Process and Compressed Memory is a Windows 10 feature responsible for memory compression (also referred to as RAM compression and memory compression). This feature basically utilizes data compression to reduce the size or number of paging request to and from the auxiliary storage. In short, this feature is designed to take less amount of disk space and memory but in this case the System and Compressed Memory process start using 100% Disk and Memory, causing the affected PC to become slow.

In Windows 10, a compressions store is added to the concept of Memory Manager, which is an in-memory collection of compressed pages. So whenever the memory starts to fill up, the System and Compressed Memory process will compress the unused pages instead of writing them to the disk. The benefit of this is the amount of memory used per process is reduced, which allows Windows 10 to maintain more programs or apps in physical memory.
The problem appears to be incorrect Virtual Memory settings. Someone changed the paging file size from automatic to a particular value, virus or malware, Google Chrome or Skype, corrupt system files etc. So without wasting any time let’s see how to actually Fix 100% Disk Usage by System and Compressed Memory with the help of below-listed troubleshooting guide.
[SOLVED] 100% Disk Usage by System and Compressed Memory
Gakktu úr skugga um að búa til endurheimtarpunkt, bara ef eitthvað fer úrskeiðis.
Aðferð 1: Gerðu við skemmdar kerfisskrár
1. Opnaðu Command Prompt. Notandinn getur framkvæmt þetta skref með því að leita að 'cmd' Og ýttu síðan á Enter.

2. Sláðu nú inn eftirfarandi í cmd og ýttu á enter:
Sfc /scannow sfc /scannow /offbootdir=c: /offwindir=c:windows (Ef að ofan mistekst þá skaltu prófa þetta)
![SFC scan now command prompt | [SOLVED] 100% Disk Usage by System and Compressed Memory](https://lbsite.org/wp-content/uploads/2023/01/SFC-scan-now-command-prompt.png)
3. Bíddu eftir að ferlinu hér að ofan lýkur og þegar því er lokið skaltu endurræsa tölvuna þína.
4. Opnaðu aftur cmd og sláðu inn eftirfarandi skipun og ýttu á enter eftir hverja og eina:
Dism /Online /Cleanup-Image /CheckHealth Dism /Online /Cleanup-Image /ScanHealth Dism /Online /Cleanup-Image /RestoreHealth

5. Láttu DISM skipunina keyra og bíddu eftir að henni ljúki.
6. Ef ofangreind skipun virkar ekki, reyndu þá eftirfarandi:
Dism /Mynd:C:offline /Cleanup-Image /RestoreHealth /Source:c:testmountwindows Dism /Online /Cleanup-Image /RestoreHealth /Source:c:testmountwindows /LimitAccess
Athugaðu: Skiptu um C:RepairSourceWindows fyrir viðgerðaruppsprettu (Windows uppsetningar- eða endurheimtardiskur).
7. Endurræstu tölvuna þína til að vista breytingar og sjá hvort þú getir það Fix 100% Disk Usage by System and Compressed Memory Issue.
Method 2: Set Correct Paging File Size
1. Ýttu á Windows Key + R og sláðu síðan inn sysdm.cpl og ýttu á Enter til að opna System Properties.

2. Skiptu yfir í Háþróaður flipi og smelltu síðan á Stillingar undir Afköst.

3. Again switch to the Advanced tab and click Change under Virtual Memory.

4. Checkmark “Stjórna sjálfkrafa skráarstærð fyrir alla diska."
![Checkmark Automatically manage paging file size for all drives | [SOLVED] 100% Disk Usage by System and Compressed Memory](https://lbsite.org/wp-content/uploads/2023/02/Checkmark-Automatically-manage-paging-file-size-for-all-drives.png)
5. Click OK, then click Apply followed by OK.
6. Select Yes to Restart your PC to save changes.
Aðferð 3: Slökktu á hraðræsingu
1. Ýttu á Windows takkann + R sláðu síðan inn control og ýttu á Enter til að opna Stjórnborð.

2. Smelltu á Vélbúnaður og hljóð smelltu síðan á Power Options.

3. Síðan skaltu velja úr vinstri glugganum "Veldu hvað máttur hnappar gera."

4. Smelltu núna á "Breyttu stillingum sem eru ekki tiltækar."

5. Taktu hakið úr “Kveiktu á hraðri gangsetningu“Og smelltu á Vista breytingar.
![Uncheck Turn on fast startup | [SOLVED] 100% Disk Usage by System and Compressed Memory](https://lbsite.org/wp-content/uploads/2023/01/Uncheck-Turn-on-fast-startup.png)
6. Restart your PC and see if you’re able to Fix 100% Disk Usage by System and Compressed Memory Issue.
Method 4: Disable Superfetch Service
1. Ýttu á Windows Key + R og sláðu síðan inn services.msc og ýttu á Enter.

2. Finndu Ofsöfnun service from the list then right-click on it and select Eiginleikar.

3. Under Service status, if the service is running, click on Hættu.
4. Nú, frá Gangsetning type drop-down select Óvirk.

5. Smelltu á Apply og síðan á Lagi.
6. Endurræstu tölvuna þína til að vista breytingar.
If the above method doesn’t disable Superfetch services then you can follow disable Superfetch using Registry:
1. Ýttu á Windows Key + R og sláðu síðan inn ríkisstjóratíð og ýttu á Enter til að opna Registry Editor.

2. Farðu í eftirfarandi skrásetningarlykil:
HKEY_LOCAL_MACHINESYSTEMCurrentControlSetControlSession ManagerMinnisstjórnunPrefetchParameters
3. Make sure you have selected PrefetchParameters þá tvísmelltu á í hægri glugganum Virkja Superfetch lykill og change it’s value to 0 in the Value data field.

4. Click OK and close the Registry Editor.
5. Endurræstu tölvuna þína til að vista breytingar og athugaðu hvort þú getir það Fix 100% Disk Usage by System and Compressed Memory Issue.
Method 5: Adjust your PC for Best Performance
1. Ýttu á Windows Key + R og sláðu síðan inn sysdm.cpl og ýttu á Enter til að opna System Properties.
2. Skiptu yfir í Ítarlegri flipann og smelltu svo á Stillingar undir Frammistaða.
3. Under Visual Effects checkmark “Stilltu fyrir bestu frammistöðu".

4. Smelltu á Apply og síðan á Lagi.
5. Reboot your PC and see if you’re able to Fix 100% Disk Usage by System and Compressed Memory Issue.
Method 6: Kill the Speech Runtime Executable Process
1. Ýttu á Ctrl + Shift + Esc til að ræsa Task Manager.
2. Í Aðferð flipi, finna Speech Runtime Executable.
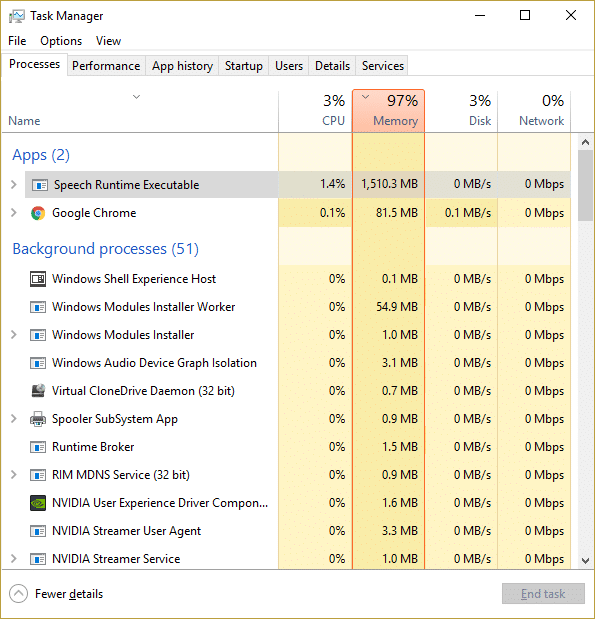
3. Hægrismelltu á það og veldu Lokaverkefni.
Aðferð 7: Keyrðu CCleaner og Malwarebytes
1. Hlaða niður og setja upp CCleaner & Malwarebytes.
2. Keyra Malwarebytes og láttu það skanna kerfið þitt fyrir skaðlegum skrám. Ef spilliforrit finnst mun það sjálfkrafa fjarlægja þá.

3. Keyrðu nú CCleaner og veldu Sérsniðið hreint.
4. Undir Custom Clean, veldu Windows flipi og merktu við sjálfgefna stillingar og smelltu Greindu.
![Select Custom Clean then checkmark default in Windows tab | [SOLVED] 100% Disk Usage by System and Compressed Memory](https://lbsite.org/wp-content/uploads/2023/01/Select-Custom-Clean-then-checkmark-default-in-Windows-tab.png)
5. Þegar greiningu er lokið skaltu ganga úr skugga um að þú sért viss um að fjarlægja skrárnar sem á að eyða.

6. Að lokum, smelltu á Keyra Cleaner hnappinn og láttu CCleaner ganga sinn gang.
7. Til að þrífa kerfið þitt enn frekar, veldu Registry flipann, og tryggðu að eftirfarandi sé athugað:

8. Smelltu á Leitaðu að vandamálum hnappinn og leyfðu CCleaner að skanna, smelltu síðan á Lagfærðu valin vandamál hnappinn.
![Once scan for issues is completed click on Fix selected Issues | [SOLVED] 100% Disk Usage by System and Compressed Memory](https://lbsite.org/wp-content/uploads/2023/01/Once-scan-for-issues-is-completed-click-on-Fix-selected-Issues.png)
9. Þegar CCleaner spyr “Viltu breytingar á öryggisafriti á skránni?" veldu Já.
10. Þegar öryggisafritinu er lokið skaltu smella á Lagfærðu öll valin vandamál hnappinn.
11. Endurræstu tölvuna þína til að vista breytingar.
Method 8: Change configuration of Google Chrome and Skype
Fyrir Google Chrome: Navigate to the following under Chrome: Settings > Show Advanced Settings > Privacy > Use a prediction service to load pages more quickly. Disable the toggle next to “Use a prediction service to load pages.”

Change configuration For Skype
1. Make sure you have exited Skype, if not end task from Task Manager for Skype.
2. Press Windows Key + R then type the following and click OK:
C:Program Files (x86)SkypePhone
3. Hægri smelltu á skype.exe og velja Eiginleikar.

4. Skiptu yfir í Öryggisflipi og smelltu Breyta.

5. Veldu ALLIR UMSÓKNARPAKKAR under Group or user names then checkmark Write undir Leyfa.

6. Click Apply, followed by OK and see if you’re able to Fix 100% Disk Usage by System and Compressed Memory Issue.
Method 9: Set Correct Permission for System and Compressed Memory Process
1. Ýttu á Windows Key + R og sláðu síðan inn Taskschd.msc and hit Enter to open Task Scheduler.

2. Farðu á eftirfarandi slóð:
Task Scheduler Library > Microsoft > Windows > MemoryDiagnostic
![Double click on ProcessMemoryDiagnostic Events | [SOLVED] 100% Disk Usage by System and Compressed Memory](https://lbsite.org/wp-content/uploads/2023/02/Double-click-on-ProcessMemoryDiagnostic-Events.png)
3. Tvísmelltu á ProcessMemoryDiagnostic Events og smelltu síðan á Breyta notanda eða hópi under Security Options.

4. smellur Ítarlegri og smelltu síðan á Find Now.

5. Veldu þinn Stjórnandi reikningur from the list then click OK.

6. Aftur smelltu á OK to add your administrator account.
7. Checkmark Hlaupa með hæstu forréttindi og smelltu síðan á OK.

8. Follow the same steps for RunFullMemoryDiagnostic and close everything.
9. Endurræstu tölvuna þína til að vista breytingar.
Method 10: Disable System and Compressed Memory Process
1. Ýttu á Windows Key + R og sláðu síðan inn Taskschd.msc og ýttu á Enter til að opna Verkefnaáætlun.
2. Farðu á eftirfarandi slóð:
Task Scheduler Library > Microsoft > Windows > MemoryDiagnostic
3. Hægri smelltu á RunFullMemoryDiagnostic og velja Slökkva.
![Right-click on RunFullMemoryDiagnostic and select Disable | [SOLVED] 100% Disk Usage by System and Compressed Memory](https://lbsite.org/wp-content/uploads/2023/02/Right-click-on-RunFullMemoryDiagnostic-and-select-Disable.png)
4. Close Task Scheduler and restart your PC.
Mælt með:
Það er það sem þú hefur með góðum árangri Fix 100% Disk Usage by System and Compressed Memory en ef þú hefur enn einhverjar spurningar varðandi þessa færslu skaltu ekki hika við að spyrja þær í athugasemdahlutanum.

