When you buy a new computer or connect a new hard drive to your computer, it usually comes with a single partition. However, it is always a good idea to have at least three partitions on your hard drive for a variety of reasons. The more partitions you have, the larger the capacity of your hard drive. Partizioni of a hard drive are referred to as Unità in Windows and typically have a letter associated with it as an indicator. Hard Drive Partitions can be created, shrunk, or resized, among other things. We bring to you a perfect guide that will teach you how to partition hard disk drive in Windows 11. So, continue reading!

Come partizionare il disco rigido in Windows 11
Why Create Partitions on the Hard Drive?
Creazione punteggi on a hard drive can be beneficial in a variety of ways.
- It is always best to keep the operating system and system files on a separate drive or partition. If you need to reset your computer, if you have your operating system on a separate drive, you can save all other data by simply formatting the drive where the operating system is installed.
- Aside from the above, installing apps and games on the same drive as your operating system will eventually slow down your computer. Hence, keeping the two separate would be ideal.
- Creating partitions with labels also aids in file organization.
Thus, we recommend you divide hard disk drive into several partitions.
How Many Disk Partitions Should be Made?
The number of partitions you should create on your hard drive is solely determined by the size of the hard drive you have installed on your computer. In general, it is recommended that you create tre partizioni sul tuo disco rigido.
- Uno per il Windows sistema operativo
- The second one for your programmi such as software and games etc.
- The last partition for your file personali such as documents, media, and so on.
Nota: If you have a small hard drive, such as 128GB o 256GB, you should not create any additional partitions. This is because it is recommended that your operating system be installed on a drive with a minimum capacity of 120-150GB.
On the other hand, if you’re working with a 500GB to 2TB hard drive, you can create as many hard drive partitions as you need.
To utilize space on your Windows PC, you can choose to use an external drive to store most of your data instead. Read our list of Best External Hard Drive for PC Gaming here.
How to Create & Modify Hard Disk Drive Partitions
The process of creating partitions on a hard drive is both, systematic and straightforward. It makes use of the built-in Disk Management tool. If your computer has two partitions, the File Explorer window will show two drives indicated by a letter and so on.
Step 1: Shrink Partition Drive to Create Unallocated Space
To successfully create a new drive or partition, you must first shrink an existing one to free up unallocated space. Your Hard Drive’s unallocated space cannot be used. To create partitions, they must be assigned as a new drive.
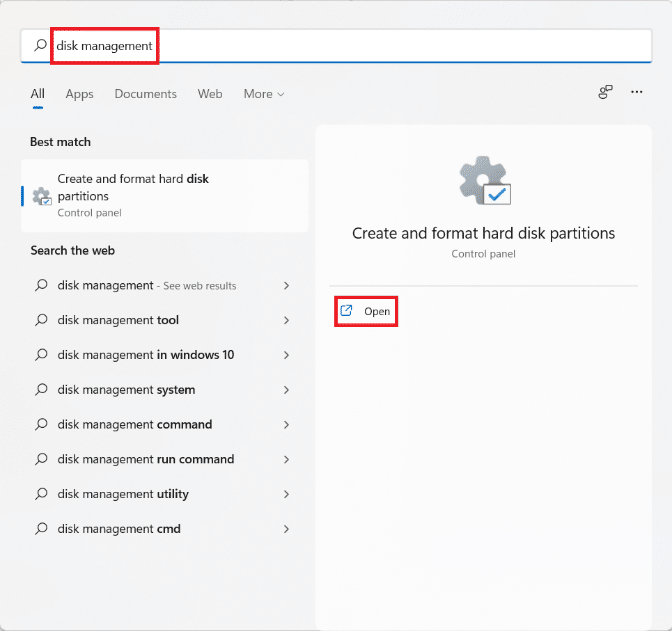
1. Clicca sul Icona di ricerca e tipo Gestione disco.
2. Quindi fare clic su Apri per Crea e formatta le partizioni del disco rigido, come mostrato.
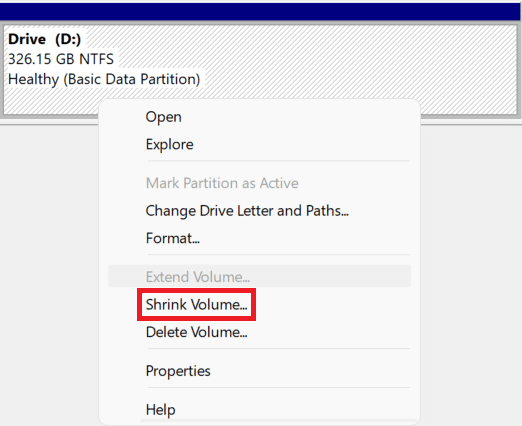
3. Nel Gestione disco window, you will find information regarding existing disk partitions and drives installed on your PC named Disk 1, Disk 2, and so on. Click on the box representing the DRIVE you want to shrink.
Nota: The selected drive will have linee diagonali highlighting the selection.
4. Fare clic con il tasto destro del mouse su Selected drive (per esempio Guidare (D:)) and select Riduci volume… from the context menu, as illustrated below.
5. Nel Riduci D: finestra di dialogo, inserire il Taglia you want to separate from the existing drive in Megabytes (MB) e fare clic su Strizzacervelli.
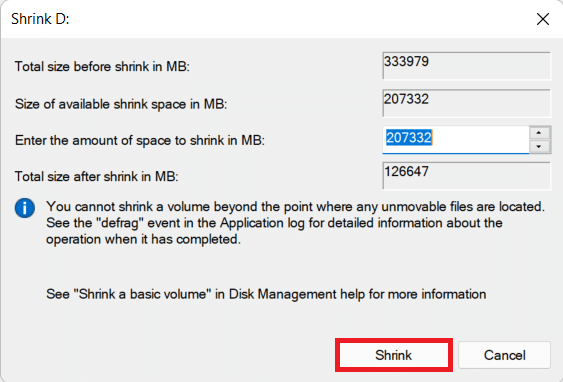
6. After shrinking, you will see a newly created space on the disk labeled as Non allocata della Taglia you chose in Step 5.
Leggi anche: Correzione: il nuovo disco rigido non viene visualizzato in Gestione disco
Step 2: Create New Drive Partition From Unallocated Space
Here’s how to partition hard disk drive in Windows 11 by creating a new drive partition using unallocated space:
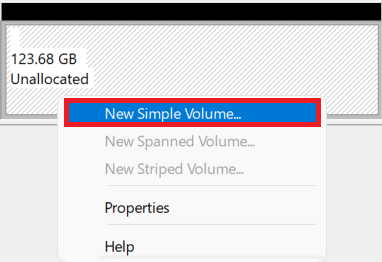
1. Right-click on the box labeled Non allocata.
Nota: The selected drive will have linee diagonali highlighting the selection.
2. Fare clic su Nuovo volume semplice ... dal menu contestuale, come mostrato.
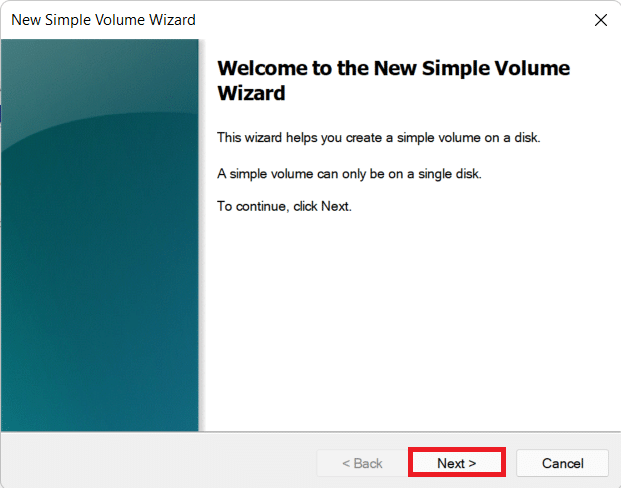
3. Nel New Simple Volume Wizard, clicca su Avanti.
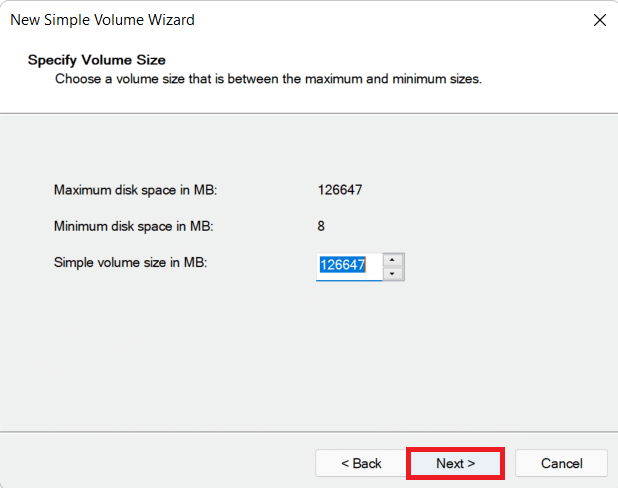
4. Nel Dimensione del volume semplice window, enter the desired volume Taglia in MBe fare clic su Avanti.
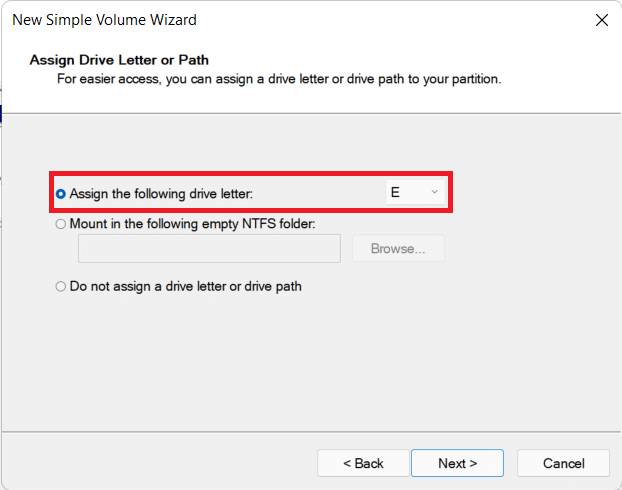
5. Sul Assegna lettera o percorso di unità screen, choose a Lettera da Assign the following drive lettera drop-down menu. Then, click Avanti, come mostrato.
6A. Now, you can format the partition by selecting Formatta questo volume con le impostazioni GMT opzioni.
- File System
- Dimensioni unità di allocazione
- Etichetta di volume
6B. If you do not want to format partition, then select Non formattare questo volume opzione.
7. Infine, fai clic su Fine, come raffigurato.
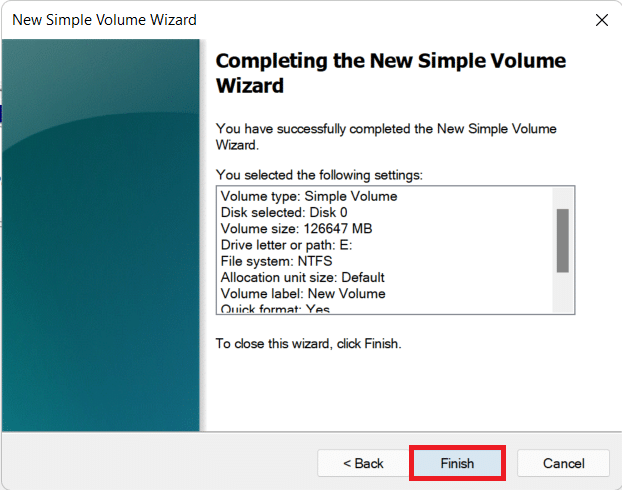
You can see the newly added partition indicated by the assigned letter and space as chosen.
Leggi anche: 3 Ways to Check if a Disk Uses MBR or GPT Partition in Windows 10
How to Delete Drive to Increase the Size of Another Drive
In case, you feel system performance has slowed down or that you do not require any additional partition, you can choose to delete the partition as well. Here’s how to modify disk partition in Windows 11:
1. Clicca sul Icona di ricerca e tipo Gestione disco.
2. Quindi, selezionare Apri opzione per Crea e formatta le partizioni del disco rigido, come mostrato.

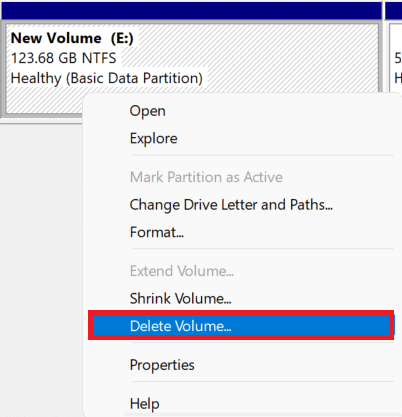
3. Seleziona il DRIVE vuoi cancellare.
Note:: Make sure you have prepared a backup dei dati for the drive you want to delete on a different drive.
4. Right-click on the selected drive and select Elimina volume... dal menu di scelta rapida.
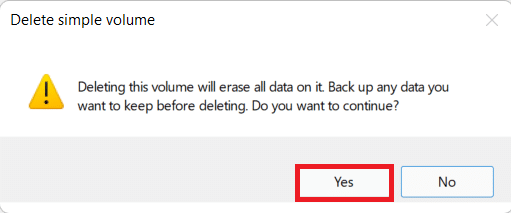
5. Fare clic su Sì nel Delete simple volume confirmation prompt, as depicted.
6. Vedrai spazio non allocato with the size of the drive you deleted.
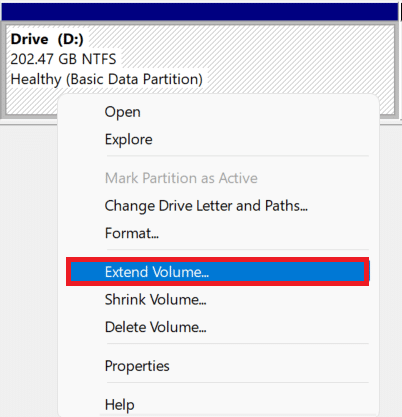
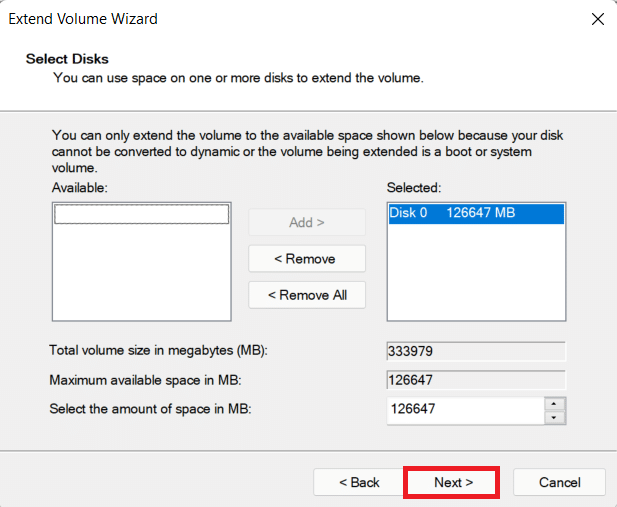
7. Fare clic con il tasto destro del mouse su DRIVE you want to expand in size and select Extend Volume ... come illustrato di seguito.
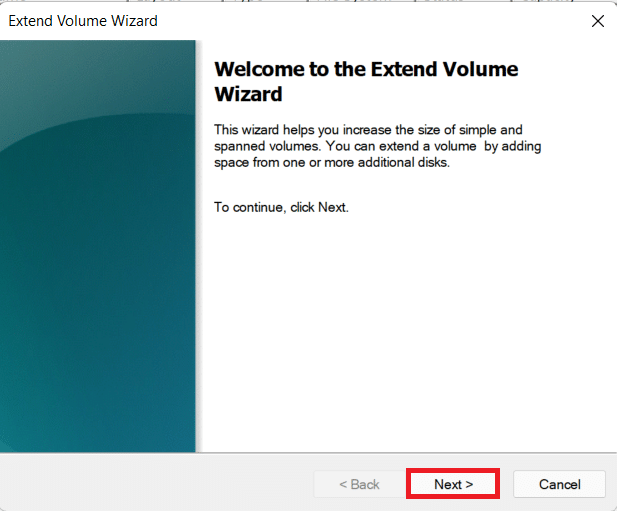
8. Fare clic su Avanti nel Estensione guidata volume.
9. Ora, clicca su Avanti nella schermata successiva.
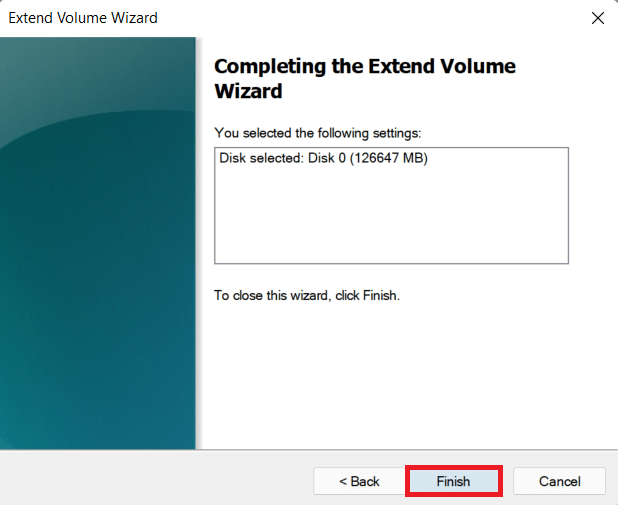
10. Infine, fai clic su Fine.
Consigliato:
We hope you found this article interesting and helpful about how to partition hard disk in Windows 11. You can send your suggestions and queries in the comment section below. We would love to gear from you!

![[SOLVED] 0xc000000e: The selected entry could not be loaded](https://lbsite.org/wp-content/uploads/2023/01/Fix-Boot-Error-0xc000000e-The-selected-entry-could-not-be-loaded.jpg "[SOLVED] 0xc000000e: The selected entry could not be loaded")