If the wireless icon or network icon is missing from Windows Taskbar, then it’s possible that the network service might not be running or some 3rd party application is conflicting with system tray notifications which can easily be resolved by restarting Windows Explorer and starting network services. In addition to above causes sometimes its also possible that the issue is caused by incorrect Windows settings.
![]()
By default, the WiFi icon or Wireless icon always appears in the Taskbar in Windows 10. The network status is automatically refreshed when your PC is either connected or disconnected from a network. So without wasting any time let’s see how to Fix WiFi Icon Missing From Taskbar In Windows 10 with the help o the below-listed guide.
תקן סמל WiFi חסר בשורת המשימות ב-Windows 10
Make sure to create a restore point, just in case something goes wrong.
Method 1: Restore missing wireless icon
1. From the taskbar, click on the small “חץ המורה למעלה” which shows system tray notifications and check if WiFi icon is hidden there.
![]()
2. Sometimes the Wifi icon is accidentally dragged to this area and to fix this issue drag the icon back to its original place.
3. הפעל מחדש את המחשב כדי לשמור שינויים.
Method 2: Enable WiFi icon from Settings
1. Press Windows Key + I open Settings then click on התאמה אישית.

2. מהתפריט השמאלי, בחר שורת המשימות.
3. Scroll down to the bottom then under Notification area click on “הפעלה או כיבוי של סמלי מערכת."
![]()
4. ודא את toggle for Network or WiFi is enabled, if not click on it to enable it.
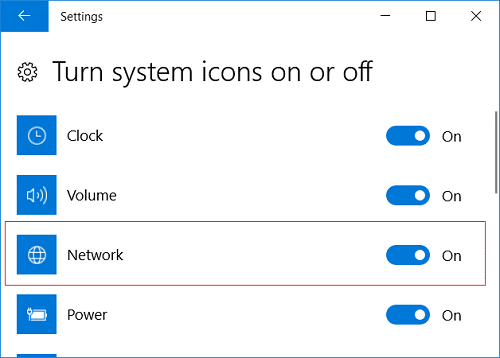
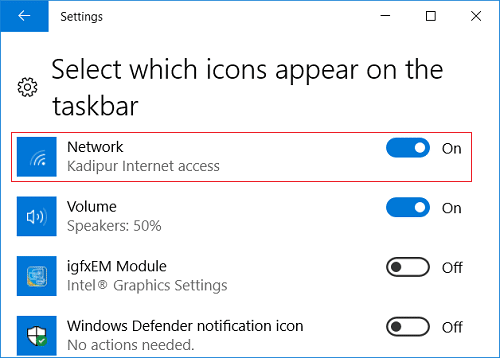
5. Press back arrow then under the same heading click on “בחר אילו סמלים יופיעו בשורת המשימות."
![]()
6. וודאו Network or Wireless is set to enable.
7. Restart your PC to save changes and see if you’re able to Fix WiFi Icon Missing From Taskbar In Windows 10.
שיטה 3: הפעל מחדש את סייר Windows
1. ללחוץ Ctrl + Shift + Esc מפתחות יחד כדי להפעיל את מנהל המשימות.
2. מצא explorer.exe ברשימה ולאחר מכן לחץ לחיצה ימנית עליו ו בחר סיים משימה.

3. Now, this will close the Explorer and to run it again, לחץ על קובץ > הפעל משימה חדשה.

4. סוּג explorer.exe ולחץ על OK כדי להפעיל מחדש את הסייר.

5. Exit Task Manager, and this should Fix WiFi Icon Missing From Taskbar In Windows 10.
Method 4: Restart Network Services
1. הקש על מקש Windows + R ואז הקלד services.msc ולחץ על Enter.

2. Find the below-listed services then make sure they are running by right-clicking on each of them and selecting הַתחָלָה:
שיחת הליך מרחוק
חיבורי רשת
Plug and Play
מנהל חיבורי גישה מרחוק
טלפוניה
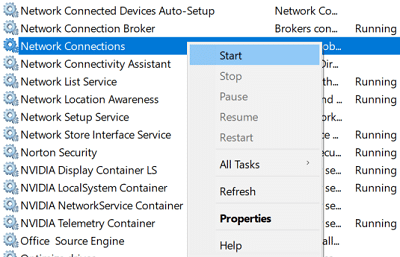
3. Once you have started all the services, again check if the WiFi icon is back or not.
Method 5: Enable Network icon in Group Policy Editor
1. הקש על מקש Windows + R ואז הקלד gpedit.msc ולחץ על Enter.

2. Now, under Group Policy Editor, navigate to the following path:
תצורת משתמש> תבניות ניהול> תפריט התחלה ושורת המשימות
3. Make sure to select Start Menu and Taskbar in the right window pane double-click on Remove the networking icon.
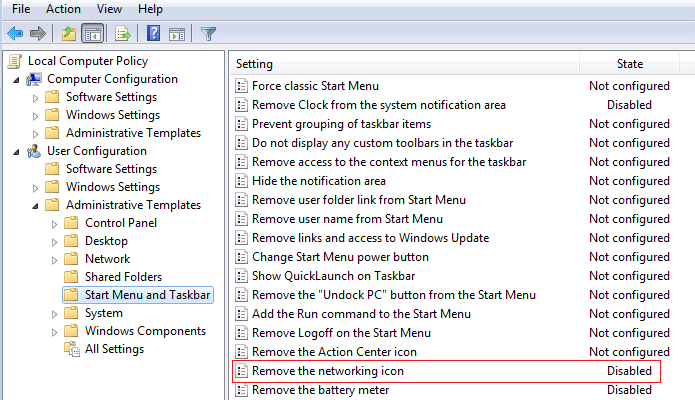
4. Once the Properties window opens, select לנכים ולאחר מכן לחץ על החל ולאחר מכן על אישור.
![]()
5. Restart Windows Explorer and again check if you’re able to Fix WiFi Icon Missing From Taskbar In Windows 10.
שיטה 6: תיקון הרישום
1. הקש על מקש Windows + R ואז הקלד regedit ולחץ על Enter כדי לפתוח את עורך הרישום.

2. נווט אל מפתח הרישום הבא:
HKEY_LOCAL_MACHINESYSTEMCurrentControlSetControlNetwork
3. Now under this key, locate the Config key לאחר מכן לחץ לחיצה ימנית עליו ובחר מחק.
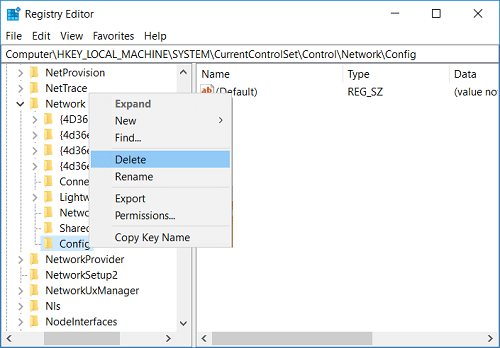
4. If you don’t find the above key, then no worries continue.
5. הפעל מחדש את המחשב כדי לשמור שינויים.
Method 7: Run Network Adapter Troubleshooter
1. Right-click on the network icon and select לפתור בעיות.
![]()
2. פעל לפי ההוראות שעל המסך.
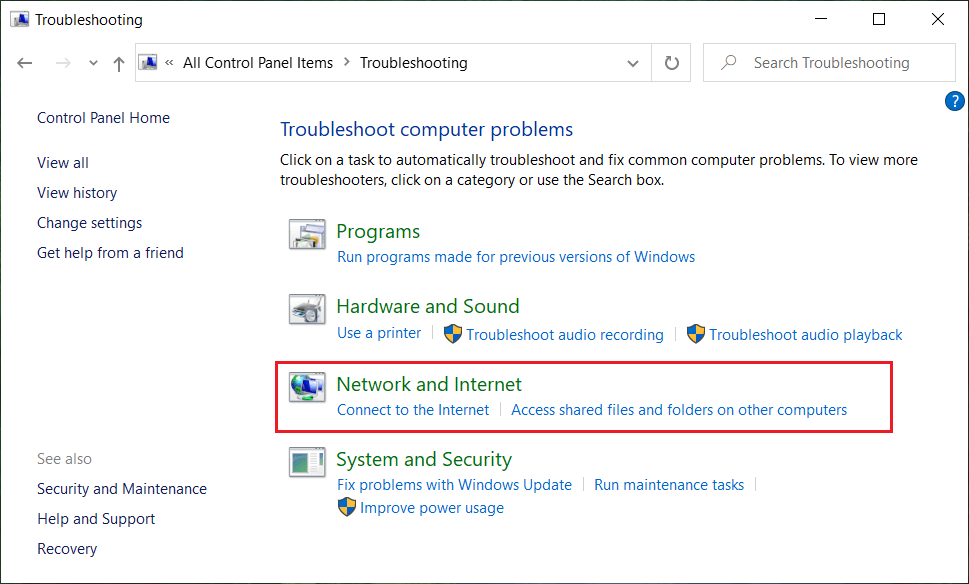
3. Open control panel and search פתרון בעיות in the Search Bar on the top right side and click on פתרון תקלות.

4. כעת, בחר "רשת ואינטרנט."
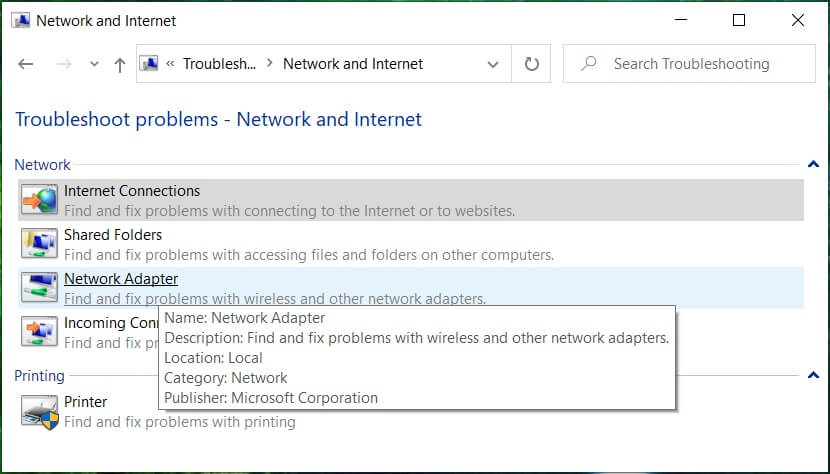
5. In the next screen, click on the מתאם רשת.
6. Follow the on-screen instruction to Fix WiFi Icon Missing From Taskbar In Windows 10.
Method 8: Reinstall Network Adapter
1. הקש על מקש Windows + R ואז הקלד devmgmt.msc ולחץ על Enter כדי לפתוח את מנהל ההתקנים.

2. Expand Network Adapters then right-click on your wireless adapter and select הסר את ההתקנה.

3. Reboot your PC to save changes and again open Device Manager.
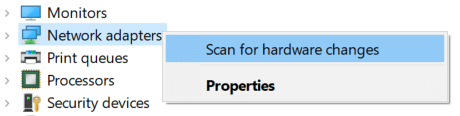
4. Now right-click on מתאמי רשת ובחר סרוק לאיתור שינויים בחומרה.
5. If the issue is resolved by now, you don’t need to continue but if the problem still exists, then continue.
6. לחץ באמצעות לחצן העכבר הימני על ה- wireless adapter under Network Adapters ובחר עדכון מנהל התקן.

7. בחר "עיין במחשב שלי עבור תוכנת מנהל התקן."

8. לחץ שוב על “תן לי לבחור מתוך רשימה של מנהלי התקנים זמינים במחשב שלי."

9. Select the latest available driver from the list and click Next.
10. הפעל מחדש את המחשב כדי לשמור שינויים.
מומלץ:
זהו זה יש לך בהצלחה תקן סמל WiFi חסר בשורת המשימות ב-Windows 10 אבל אם עדיין יש לך שאלות בנוגע לפוסט הזה, אל תהסס לשאול אותם בקטע של התגובה.

