Fix The Service Couldn’t Be Started Windows Defender Error 0x80070422: Windows Defender is a malware protection software which is inbuilt into Windows 10. Now it is used widely by Windows users because it’s reliable, but in some cases, users also installed 3rd party Antivirus software such as Norton, Quick Heal etc which is not recommend because they corrupt the files of Windows Defender. Once you completely uninstall 3rd party antivirus you won’t be able to use Windows Defender properly because files required by it have already been corrupted and can no longer be used.
“The service couldn’t be started.
The service cannot be started, either because it is disabled or because it has no enabled devices associated with it.”
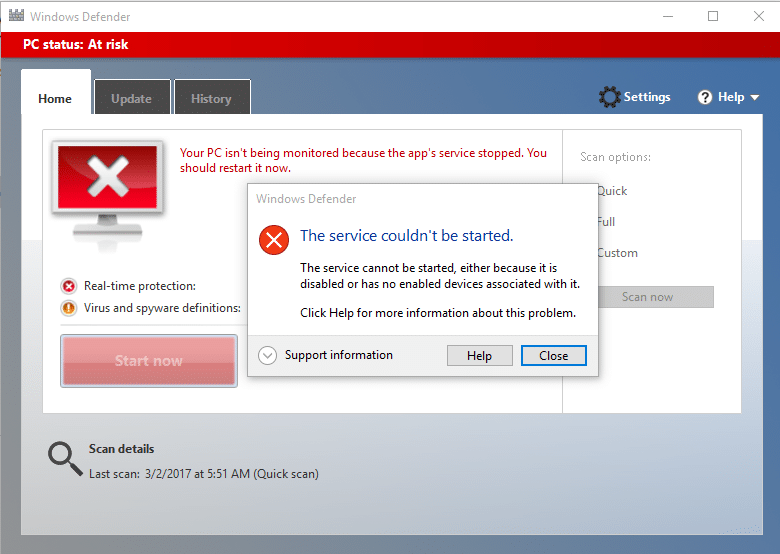
Windows Defender is turned off when you use a 3rd party Antivirus and once you uninstall the Antivirus software you won’t be able to turn ON Windows Defender. If you try to enable Windows Defender you will face the error “The Service Couldn’t Be Started” with error code 0x80070422. So without wasting any time let’s see how to actually Fix The Service Couldn’t Be Started Windows Defender Error 0x80070422 with the help of below-listed troubleshooting guide.
Fix The Service Couldn’t Be Started Windows Defender Error 0x80070422
何か問題が発生した場合に備えて、必ず復元ポイントを作成してください。
方法 1: SFC と CHKDSK を実行する
1.Windowsキー+ Xを押してからクリックします コマンドプロンプト(管理者)

2.次に、cmd に次のように入力して、Enter キーを押します。
Sfc /scannow sfc /scannow /offbootdir=c: /offwindir=c:windows (上記が失敗した場合は、これを試してください)

3.上記のプロセスが終了するのを待ち、完了したら PC を再起動します。
4.次に、ここからCHKDSKを実行します チェックディスクユーティリティ(CHKDSK)を使用してファイルシステムエラーを修正します。
5.上記のプロセスを完了させ、PC を再起動して変更を保存します。
Method 2: Temporarily Disable 3rd party Antivirus
1. を右クリックします。 ウイルス対策プログラムのアイコン システムトレイから選択し、 無効にする。

2.次に、期間を選択します。 ウイルス対策は無効のままになります。

注: 15 分や 30 分など、可能な限り短い時間を選択してください。
3.Once done, again try to run Windows Defender and check if the error resolves or not.
4.Windows キー + X を押して選択します。 コントロールパネル。

5.次に、 をクリックします。 システムとセキュリティ。
6.次に、をクリックします Windowsファイアウォール。

7.左側のウィンドウ ペインで、[Windows ファイアウォールをオンまたはオフにする] をクリックします。

8.「Windows ファイアウォールをオフにする」を選択し、PC を再起動します。 Again try to open Windows Defender and see if you’re able to Fix The Service Couldn’t Be Started Windows Defender Error 0x80070422.
上記の方法が機能しない場合は、まったく同じ手順に従ってファイアウォールを再度有効にしてください。
方法 3: Windows が最新であることを確認する
1.Windows キー + I を押して選択します。 更新とセキュリティ。

2.次に、もう一度クリックします アップデートの確認 保留中のアップデートがあれば必ずインストールしてください。

3.アップデートがインストールされたら、PCを再起動して、できるかどうかを確認します。 Fix The Service Couldn’t Be Started Windows Defender Error 0x80070422.
Method 4: Make sure Windows Defender service is set to Automatic
注: If Windows Defender service is grayed out in Services Manager then この投稿をフォローしてください.
1.Windows キー + R を押してから、次のように入力します。 services.mscと Enterキーを押します。

2.Find the following services in the Services window:
Windows Defenderウイルス対策ネットワーク検査サービス
Windows Defenderアンチウイルスサービス
Windows Defender Security Center Service
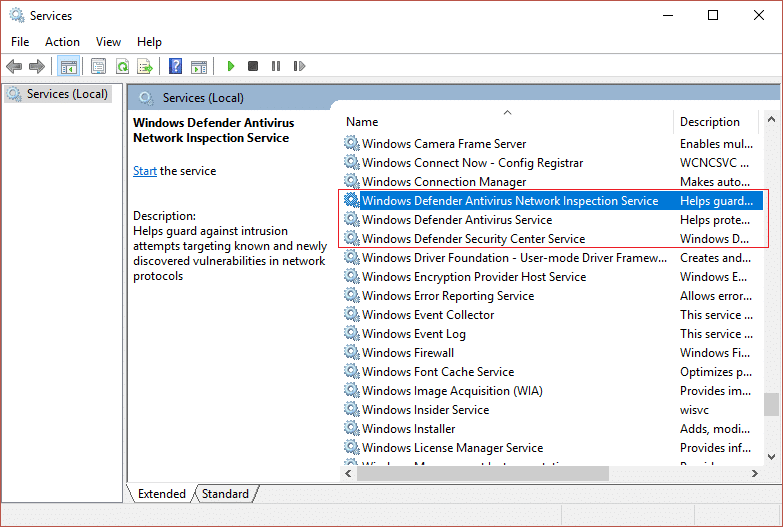
3.Double-click on each of them and make sure their Startup type is set to オートマチック and click Start if the services are not already running.
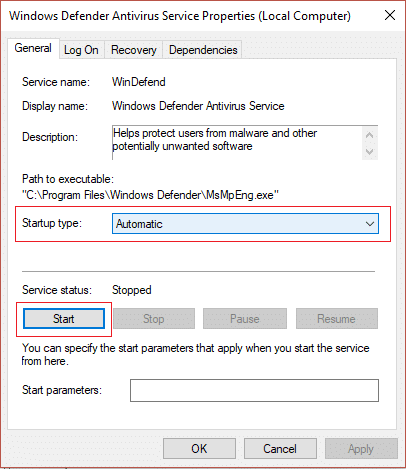
4.[適用]、[OK] の順にクリックします。
5. PC を再起動して変更を保存し、保存できるかどうかを確認します。 Fix The Service Couldn’t Be Started Windows Defender Error 0x80070422.
Method 5: Enable Windows Defender through Registry Editor
1.Windows キー + R を押してから、次のように入力します。 regeditを Enterキーを押します。

2.次のレジストリ キーに移動します。
HKEY_LOCAL_MACHINESYSTEMCurrentControlSetServicesWinDefend
3.右クリックしてください WinDefend をクリックして 許可。
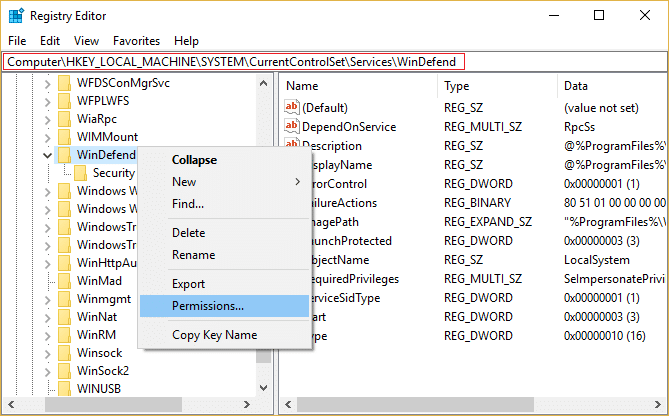
4.Follow this guide in order to take full control or ownership of the above registry key.
5.After that make sure you have selected WinDefend then in the right window double-click on Start DWORD.
6.Change the value to 2 in the value data field and click OK.
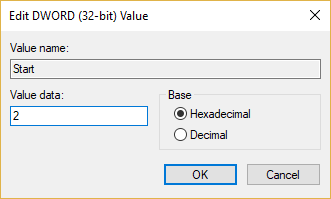
7.レジストリエディタを閉じ、PCを再起動します。
8.Again try to enable Windows Defender and this time it should work.
方法 6: CCleaner と Malwarebytes を実行する
1.ダウンロードしてインストールします CCleanerは & Malwarebytes。
2.マルウェアバイトを実行する システムをスキャンして有害なファイルがないか調べます。
3.マルウェアが見つかった場合は、自動的に削除されます。
4.実行してください CCleanerは また、[Windows] タブの [クリーナー] セクションで、クリーンアップする次の選択項目にチェックを入れることをお勧めします。

5.適切なポイントがチェックされていることを確認したら、単に ランクリーナー、 そして CCleaner をそのまま実行させます。
6.システムをさらにクリーンアップするには、「レジストリ」タブを選択し、以下がチェックされていることを確認します。

7. [問題のスキャン] を選択し、CCleaner のスキャンを許可して、[問題のスキャン] をクリックします。 選択された問題を修正。
8.CCleaner が「レジストリへの変更をバックアップしますか?”はいを選択します。
9.バックアップが完了したら、「選択した問題をすべて解決」を選択します。
10.PC を再起動して変更を保存し、保存できるかどうかを確認します。 Fix The Service Couldn’t Be Started Windows Defender Error 0x80070422.
Method 7: Refresh or Reset your PC
1.Press Windows Key + I to open Settings then select 更新とセキュリティ。
2.From left-hand menu select 回復 クリックして "始める” under Reset this PC.

3.次のオプションを選択します。 ファイルを保管する.

4.Follow the instructions on the screen to complete the process.
5.This will take some time and your computer will restart.
方法 8: Windows 10 の修復インストール
何も解決しない場合でも、この方法で PC のすべての問題を確実に修復できるため、この方法は最後の手段です。修復 インプレース アップグレードのみを使用してインストールし、システム上に存在するユーザー データを削除せずにシステムの問題を修復します。したがって、この記事に従って、Windows 10を簡単に修復インストールする方法を確認してください。
あなたにおすすめ:
それだけです、あなたは成功しました Fix The Service Couldn’t Be Started Windows Defender Error 0x80070422 ただし、このガイドに関してまだご質問がある場合は、コメントセクションでお気軽にお問い合わせください。

