If you are facing this error, then chances are you may have installed new hardware or software which is causing the issue. Sometimes installing the latest Windows updates seems to cause this issue but you can’t be sure until you troubleshoot the issue. Now as far as software problems are concerned, these might be the possible reasons as to
why you are facing this error:
- Corrupted BCD information
- System File is damaged.
- Loose or faulty SATA/IDE Cable
- Conflicting 3rd party software
- Virus utawa malware
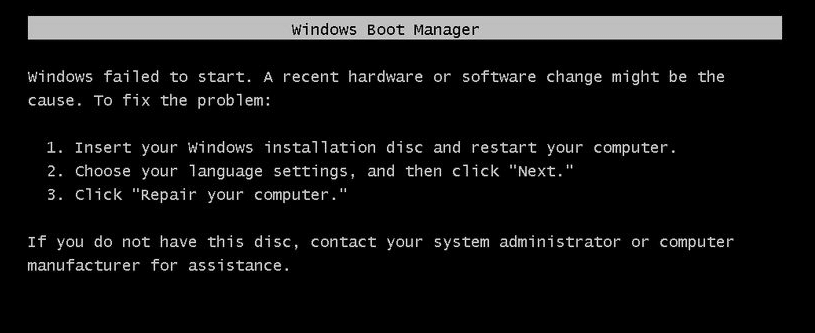
The error which you will get after a reboot will be:
error: Windows failed to start. A recent hardware or software change might have caused the issue after you install Windows Updates
The main problem is that you won’t boot into Windows and you will be stuck at this error message screen. In short, you will be inside a reboot loop as every time you restart your PC you will again face the same error message until you fix the issue. So without wasting any time let’s see how actually to Fix “Windows failed to start. A recent hardware or software change might be the cause” with the below-listed troubleshooting steps.
Fix Windows failed to start. A recent hardware or software change might be the cause.
Method 1: Run Startup/Automatic Repair
1. Lebokake ing Windows 10 instalasi bootable DVD utawa Recovery Disc lan restart PC sampeyan.
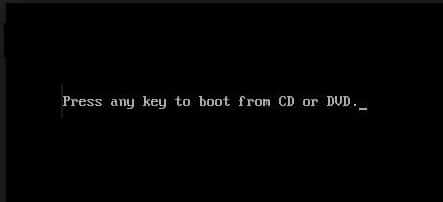
2. Nalika dijaluk Pencet sembarang tombol kanggo boot saka CD utawa DVD, pencet sembarang tombol Kanggo terus.
3. Pilih preferensi basa, banjur klik Sabanjure. Klik Repair komputer sampeyan ing sisih kiwa ngisor.

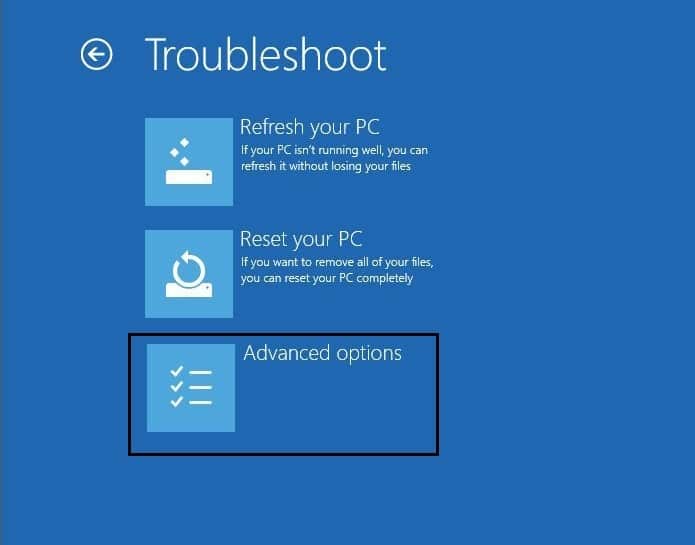
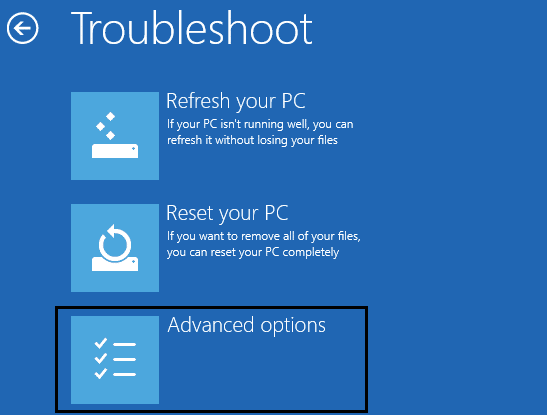
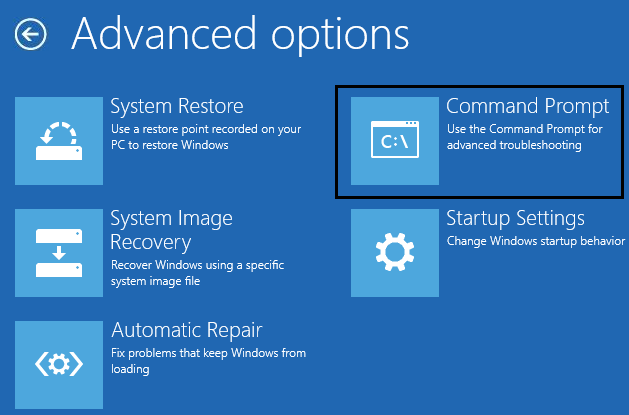
4. Nalika milih layar pilihan, klik Troubleshoot.

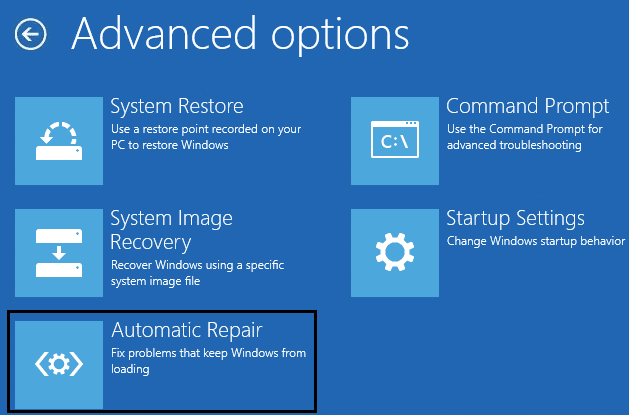
5. Ing layar Troubleshoot, klik ing Pilihan majeng.
6. Ing layar Pilihan Lanjut, klik Repair otomatis utawa Startup Repair.
7. Wait till the Windows Automatic/Startup Repairs complete.
8. Wiwiti maneh lan sampeyan wis sukses Ndandani Windows failed to start. A recent hardware or software change might be the cause, if not, continue.
Uga Waca: Cara ndandani Repair Otomatis ora bisa ndandani PC.
Method 2: Boot into Last Known Good Configuration
Before going any further let’s discuss how to Enable Legacy Advanced Boot Menu so that you can easily get Boot Options:
1. Restart your Windows 10.
2. As the system restarts enter into BIOS setup and configure your PC to boot from CD/DVD.
3. Lebokake DVD instalasi bootable Windows 10 lan miwiti maneh PC.
4. Nalika dijaluk Pencet sembarang tombol kanggo boot saka CD utawa DVD, pencet sembarang tombol kanggo nerusake.
5. Pilih preferensi basa, banjur klik Sabanjure. Klik Repair komputer sampeyan ing sisih kiwa ngisor.
6. Nalika milih layar pilihan, klik troubleshoot.
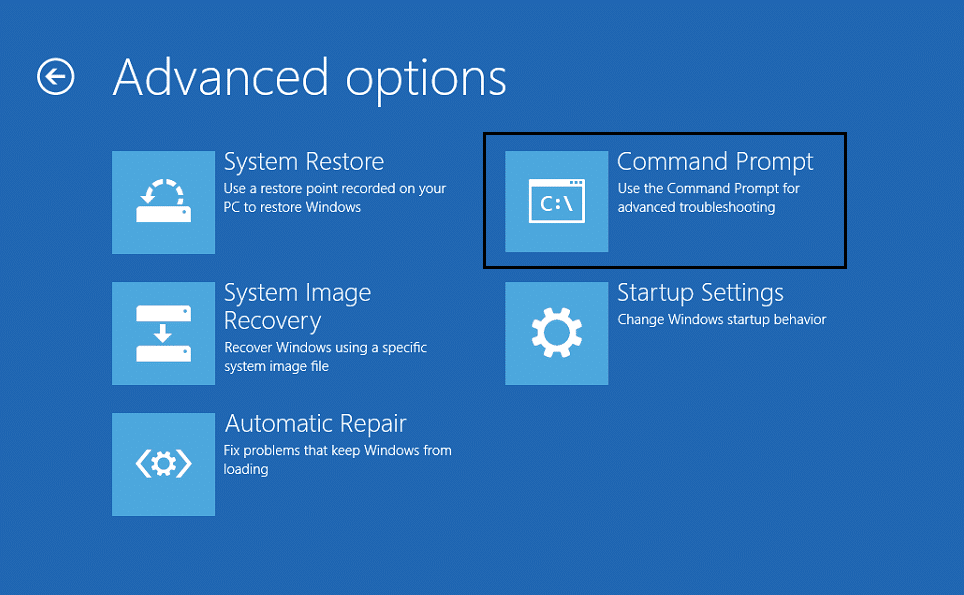
7. Ing layar Troubleshoot, klik ing Pilihan majeng.
8. Ing layar Pilihan Lanjut, klik Prompt Command.
9. When the Command Prompt(CMD) open type C: lan tekan enter.
10. Saiki ketik printah ing ngisor iki:
BCDEDIT /SET {DEFAULT} BOOTMENUPOLICY LEGACY
11. And hit enter to Enable Legacy Advanced Boot Menu.

12. Close Command Prompt and back on the Choose an option screen, click Continue to restart Windows 10.
13. Finally, don’t forget to eject your Windows 10 installation DVD to get Boot options.
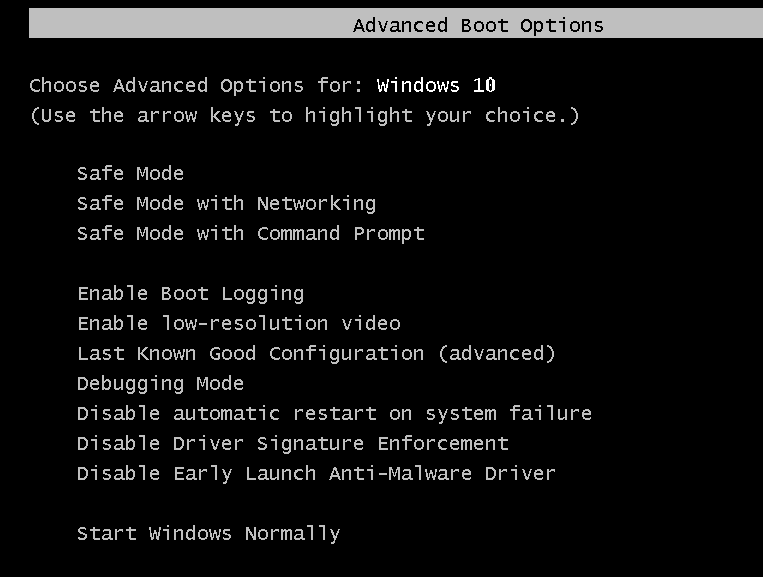
14. On the Boot Options screen, choose “Last Known Good Configuration (Advanced)."
Cara 3: Nindakake Mulihake Sistem
1. Put in the Windows installation media or Recovery Drive/System Repair Disc and select your lpreferensi anguage, banjur klik Sabanjure
2. klik Repair komputer sampeyan ing sisih ngisor.
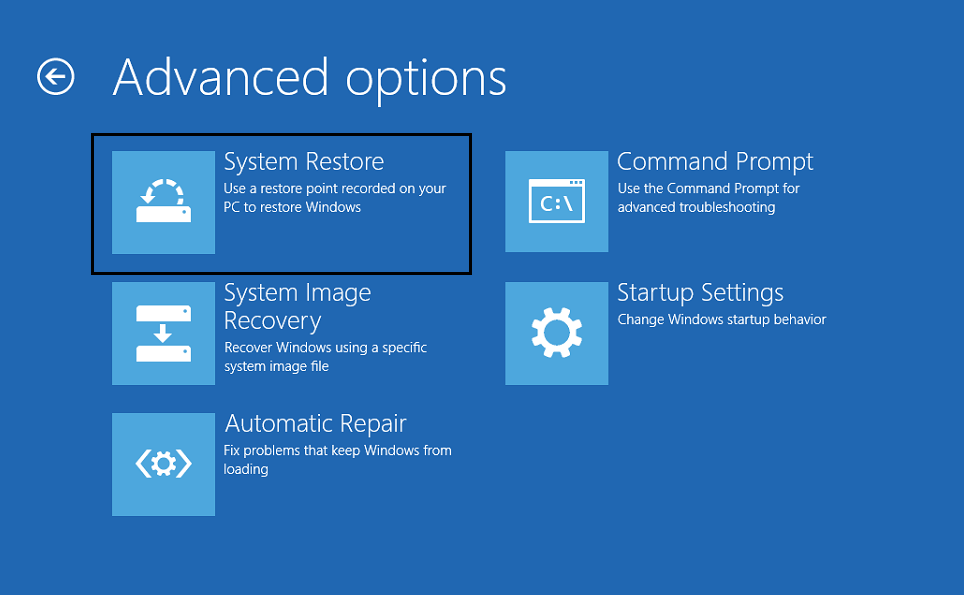
3. Saiki, pilih troubleshoot banjur Pilihan Lanjut.
4. Finally, click on “Sistem Restore” and follow on-screen instructions to complete the restore.
5. Restart your PC to save changes and see if you can fix Windows failed to start. A recent hardware or software change might be the cause error.
Cara 4: Jalanake SFC lan CHKDSK
1. Again go to command prompt using the method 1, click on command prompt in the Advanced options screen.
2. Ketik printah ing ngisor iki ing cmd lan tekan enter sawise saben:
sfc /scannow /offbootdir=c: /offwindir=c:windows
chkdsk C: /f /r /x
Note: Make sure you use the drive letter where Windows is currently installed. Also in the above command C: is the drive on which we want to check disk, /f stands for a flag which chkdsk the permission to fix any errors associated with the drive, /r let chkdsk search for bad sectors and perform recovery and /x instructs the check disk to dismount the drive before beginning the process.

3. Exit the command prompt and restart your PC.
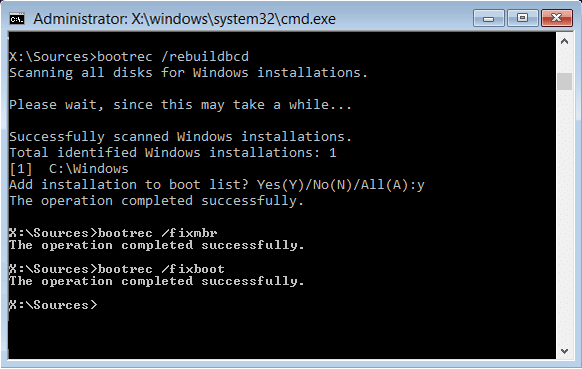
Method 5: Rebuild BCD configuration
1. Using above method open command prompt using Windows installation disk.
2. Now type the following commands one by one and hit enter after each one:
bootrec.exe /FixMbr
bootrec.exe /FixBoot
bootrec.exe /RebuildBcd
3. If the above command fails, then enter the following commands in cmd:
bcdedit /ekspor C:BCD_Backup c: cd boot attrib bcd -s -h -r ren c:bootbcd bcd.old bootrec /RebuildBcd
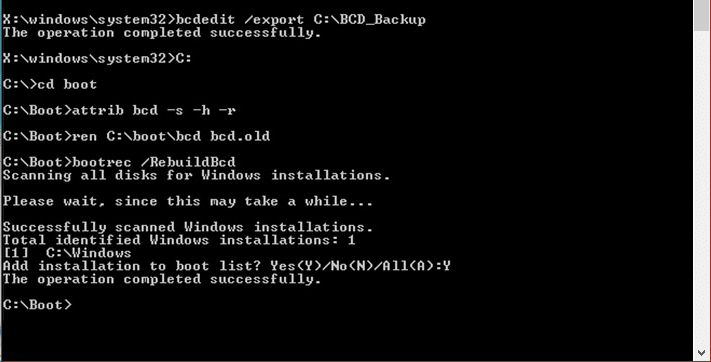
4. Finally, exit the cmd and restart your Windows.
5. This method seems to Fix Windows failed to start. A recent hardware or software change might cause the error, but if it doesn’t work for you, then continue.
Method 6: Set Correct Boot Order
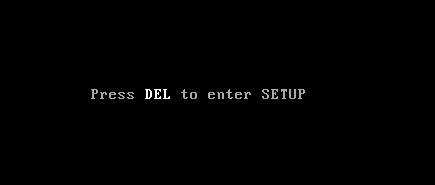
1. When your computer starts (Before the boot screen or the error screen), repeatedly press Delete or F1 or F2 key (Depending upon your computer’s manufacturer) to ketik setelan BIOS.
2. Once you are in BIOS setup, select the Boot tab from the list of options.
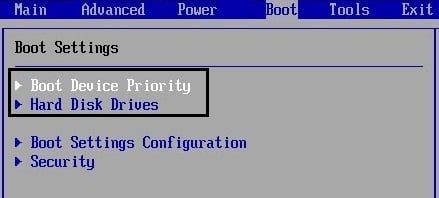
3. Now make sure that the computer Hard disk utawa SSD is set as a top priority in the Boot order. If not, use up or down arrow keys to set hard disk at the top, which means the computer will first boot from it rather than any other source.
4. Finally, press F10 to save this change and exit.
Recommended:
Iku sampeyan wis sukses Fix Windows failed to start. A recent hardware or software change might be the cause, but if you still have any questions regarding this post, please ask them in the comment’s section.

