If you are trying to rename user profile folder or to change some registry specific data for the current user, then you might want to find the Security Identifier (SID) for that user account to determine which key under HKEY_USERS in Registry belong to that particular user account.

A security identifier (SID) is a unique value of variable length used to identify a trustee. Each account has a unique SID issued by an authority, such as a Windows domain controller, and stored in a secure database. Each time a user logs on, the system retrieves the SID for that user from the database and places it in the access token. The system uses the SID in the access token to identify the user in all subsequent Windows security interactions. When a SID has been used as the unique identifier for a user or group, it cannot ever be used again to identify another user or group.
There are many other reasons you need to know the Security Identifier (SID) of a User, but there are various methods to find the SID in Windows 10. So without wasting any time, let’s see How to Find Security Identifier (SID) of User in Windows 10 with the help of the below-listed tutorial.
Find Security Identifier (SID) of User in Windows 10
დარწმუნდით, რომ შექმენით აღდგენის წერტილი, თუ რამე არასწორედ მოხდება.
Method 1: Find Security Identifier (SID) of Current User
1. გახსენით Command Prompt. მომხმარებელს შეუძლია შეასრულოს ეს ნაბიჯი ძიებით "სმდ" შემდეგ დააჭირეთ Enter- ს.

2. ჩაწერეთ შემდეგი ბრძანება cmd-ში და დააჭირეთ Enter:
whoami /user
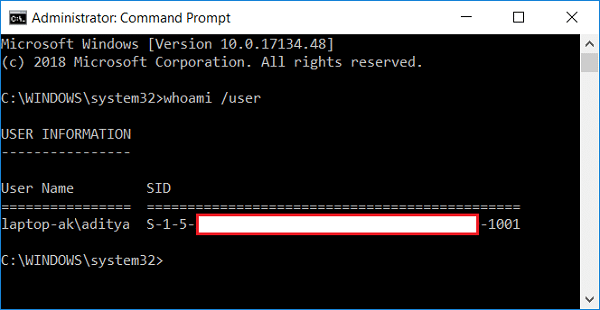
3. ეს იქნება show the SID of the current user successfully.
Method 2: Find Security Identifier (SID) of User in Windows 10
1. გახსენით Command Prompt. მომხმარებელს შეუძლია შეასრულოს ეს ნაბიჯი ძიებით "სმდ" შემდეგ დააჭირეთ Enter- ს.
2. ჩაწერეთ შემდეგი ბრძანება cmd-ში და დააჭირეთ Enter:
wmic useraccount where name=’%username%’ get domain,name,sid
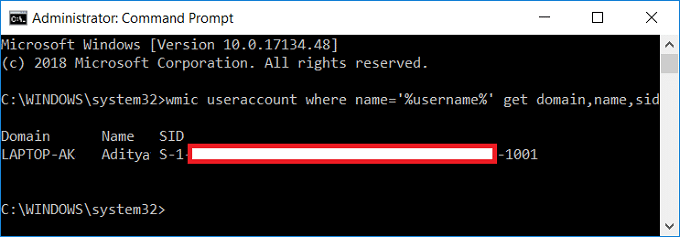
3. ეს იქნება successfully show the SID of the current user.
Method 3: Find Security Identifier (SID) of All Users
1. გახსენით Command Prompt. მომხმარებელს შეუძლია შეასრულოს ეს ნაბიჯი ძიებით "სმდ" შემდეგ დააჭირეთ Enter- ს.
2. ჩაწერეთ შემდეგი ბრძანება cmd-ში და დააჭირეთ Enter:
wmic useraccount get domain, name,sid
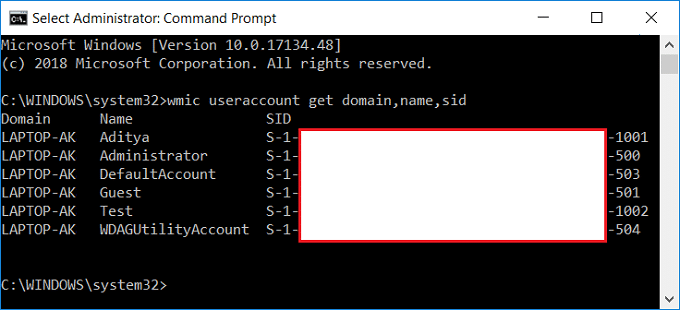
3. ეს იქნება successfully show the SID of all user accounts present on the system.
Method 4: Find Security Identifier (SID) of Specific User
1. გახსენით Command Prompt. მომხმარებელს შეუძლია შეასრულოს ეს ნაბიჯი ძიებით "სმდ" შემდეგ დააჭირეთ Enter- ს.
2. ჩაწერეთ შემდეგი ბრძანება cmd-ში და დააჭირეთ Enter:
wmic useraccount where name=”Username” get sid
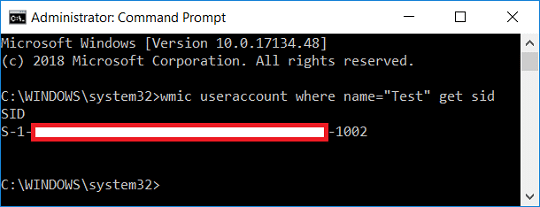
შენიშვნა: Replace username with the account’s actual username for which you are trying to find the SID.
3. That’s it, you were able to find the SID of the specific user account ვინდოუს 10-ზე.
Method 5: Find User Name for specific Security Identifier (SID)
1. გახსენით Command Prompt. მომხმარებელს შეუძლია შეასრულოს ეს ნაბიჯი ძიებით "სმდ" შემდეგ დააჭირეთ Enter- ს.
2. ჩაწერეთ შემდეგი ბრძანება cmd-ში და დააჭირეთ Enter:
wmic useraccount where sid=”SID” get domain,name
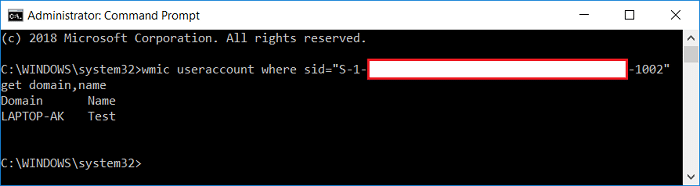
ჩანაცვლება: SID with the actual SID for which you are trying to find the username
3. This will successfully show the username of that particular SID.
Method 6: Find SID of Users using Registry Editor
1. დააჭირეთ Windows Key + R და შემდეგ აკრიფეთ regedit და დააჭირეთ Enter-ს რეესტრის რედაქტორის გასახსნელად.

2. გადადით შემდეგ რეესტრის გასაღებზე:
HKEY_LOCAL_MACHINESOFTWAREMicrosoftsoftWindows NTCurrentVersionProfileList
3. Now under ProfileList, you will find different SID’s and for finding the particular user for these SID’s you need to select each one of them then in the right window pane double-click on ProfileImagePath.
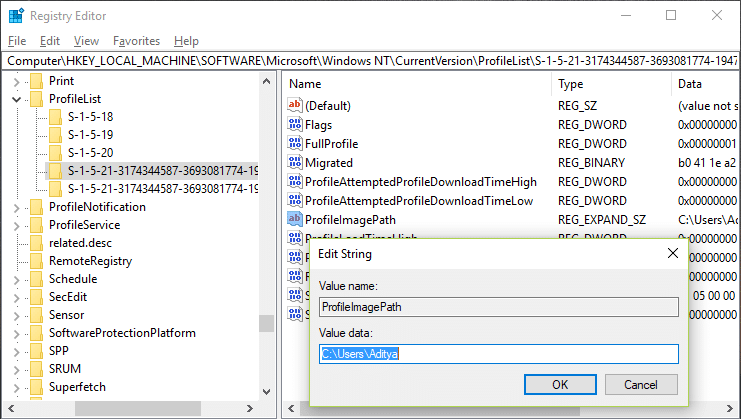
4. Under the value field of ProfileImagePath you will see the username of the particular account and this way you can find the SID’s of different users in Registry Editor.
რეკომენდებული:
ეს არის ის, რაც თქვენ წარმატებით გაქვთ Find Security Identifier (SID) of User in Windows 10 მაგრამ თუ ჯერ კიდევ გაქვთ რაიმე შეკითხვები ამ გაკვეთილთან დაკავშირებით, მოგერიდებათ დაუსვათ ისინი კომენტარების განყოფილებაში.


 of User in Windows 10)