Fix Background Intelligent Transfer Service won’t start: For Windows Update to function Background Intelligent Transfer Service (BITS) is very important as it basically acts as a download manager for Windows Update. BITS transfers files between client and server in the background and also provide progress information when needed. Now if you are having issues in downloading updates then it will be most probably caused because of BITS. Either the configuration of BITS is corrupted or BITS is not able to start.
If you will go to services window you will find out that Background Intelligent Transfer Service (BITS) won’t start. These are the type of errors which you will face while trying to start BITS:
Background intelligent transfer service did not start properly
Background intelligent transfer service will not start
Background intelligent transfer service has stopped working
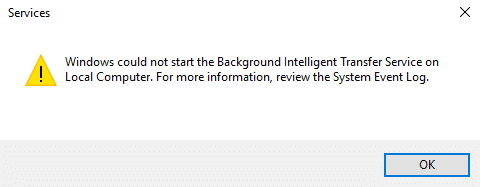
Windows could not start the Background Intelligent Transfer service on the local computer. For more information review the system event log. If this is a non-Microsoft service contact the service vendor and refer to service-specific error code -2147024894. (0x80070002)
Now if you are facing a similar issue with BITS or with Windows update then this post is for you. Without wasting any time let’s see how to actually Fix Background Intelligent Transfer Service won’t start issue with the below-listed troubleshooting guide.
Fix Background Intelligent Transfer Service won’t start
დარწმუნდით, რომ შექმენით აღდგენის წერტილი, თუ რამე არასწორედ მოხდება.
Method 1: Start BITS from Services
1.Press Windows Keys + R then type services.msc და დააჭირეთ Enter.

2.Now find BITS and then double click on it.
3.Make sure the Startup type is set to ავტომატური and the service is running, if not then click on დაწყება ღილაკი.

4. დააწკაპუნეთ Apply-ზე და შემდეგ OK.
5.Reboot your PC and again try to update Windows.
Method 2: Enable dependent Services
1.Press Windows Keys + R then type services.msc და დააჭირეთ Enter.
2.Now find the below-listed services and double click on each of them to change their properties:
Terminal მომსახურება
დისტანციური პროცედურის ზარი (RPC)
System Event Notification
Windows Management Instrumentation Driver Extensions
COM+ Event System
DCOM სერვერის პროცესის ამუშავება
![]()
3.Make sure their Startup type is set to ავტომატური and the above services are running, if not then click on დაწყება ღილაკი.
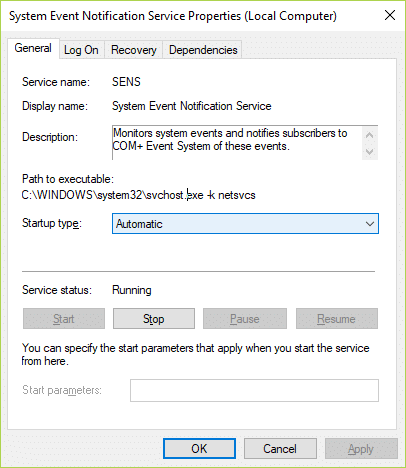
4. დააწკაპუნეთ Apply-ზე და შემდეგ OK.
5. გადატვირთეთ კომპიუტერი, რომ შეინახოთ ცვლილებები და ნახოთ, შეძლებთ თუ არა Fix Background Intelligent Transfer Service won’t start.
მეთოდი 3: გაუშვით სისტემის ფაილის შემოწმება
1. დააჭირეთ Windows Key + X და შემდეგ დააწკაპუნეთ ბრძანების ხაზი (ადმინისტრატორი).

2. ახლა ჩაწერეთ შემდეგი cmd-ში და დააჭირეთ Enter:
Sfc /scannow sfc /scannow /offbootdir=c: /offwindir=c:windows (თუ ზემოთ ვერ მოხერხდა, სცადეთ ეს)

3. დაელოდეთ ზემოაღნიშნული პროცესის დასრულებას და დასრულების შემდეგ გადატვირთეთ კომპიუტერი.
Method 4: Run Windows Update Troubleshooter
1. Windows საძიებო ზოლში ჩაწერეთ „პრობლემების მოგვარება“ და დააწკაპუნეთ Დიაგნოსტიკა.

2.შემდეგი, მარცხენა ფანჯრის ფანჯრიდან აირჩიეთ Ყველას ნახვა.
3.შემდეგ კომპიუტერის პრობლემების მოგვარების სიიდან აირჩიეთ Ვინდოუსის განახლება.

4.Follow on-screen instructions and let the Windows Update Troubleshoot run.

5.Restart your PC and see if you are able to Fix Background Intelligent Transfer Service won’t start.
Method 5: Run DISM Tool
1. დააჭირეთ Windows Key + X და აირჩიეთ Command Prompt (Admin).
2. აკრიფეთ შემდეგი ბრძანება cmd-ში და თითოეულის შემდეგ დააჭირეთ Enter:
ა) Dism /Online /Cleanup-Image /CheckHealth ბ) Dism /ონლაინ /Cleanup-Image /ScanHealth გ) Dism /ონლაინ /Cleanup-Image /RestoreHealth

3.გაუშვით DISM ბრძანება და დაელოდეთ მის დასრულებას.
4. თუ ზემოაღნიშნული ბრძანება არ მუშაობს, მაშინ სცადეთ შემდეგი:
Dism /Image:C:offline /Cleanup-Image /RestoreHealth /Source:c:testmountwindows Dism /ონლაინ /Cleanup-Image /RestoreHealth /წყარო:c:testmountwindows /LimitAccess
შენიშვნა: შეცვალეთ C:RepairSourceWindows თქვენი სარემონტო წყაროს მდებარეობით (Windows Installation ან Recovery Disc).
5. გადატვირთეთ კომპიუტერი, რომ შეინახოთ ცვლილებები და ნახოთ, შეძლებთ თუ არა Fix Background Intelligent Transfer Service won’t start, თუ არა, მაშინ გააგრძელეთ შემდეგი მეთოდი.
Method 6: Reset the Download Queue
1. პრესა Windows Key + R then type the following and hit Enter:
%ALLUSERSPROFILE%Application DataMicrosoftNetworkDownloader
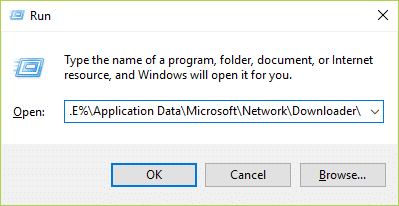
2.Now look for qmgr0.dat and qmgr1.dat, if found make sure to delete these files.
3. დააჭირეთ Windows Key + X და შემდეგ აირჩიეთ ბრძანების მოთხოვნა (Admin).
4. ჩაწერეთ შემდეგი ბრძანება cmd-ში და დააჭირეთ Enter:
წმინდა დაწყება ბიტი
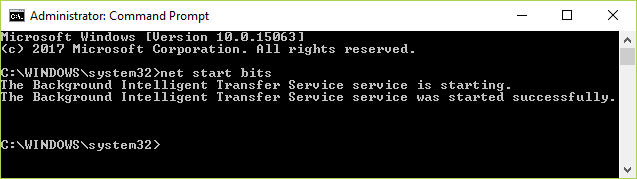
5.Again try to update window and see if it works.
მეთოდი 7: რეესტრის შესწორება
1. დააჭირეთ Windows Key + R და შემდეგ ჩაწერეთ regedit და დააჭირეთ Enter- ს გასახსნელად რეესტრის რედაქტორი.

2. გადადით შემდეგ რეესტრის გასაღებზე:
HKEY_LOCAL_MACHINESYSTEMCurrentControlSetControlBackupRestoreFilesNotToBackup
3.If the above key exists then continues, if not then right-click on სარეზერვო აღდგენა და აირჩიეთ ახალი > გასაღები.
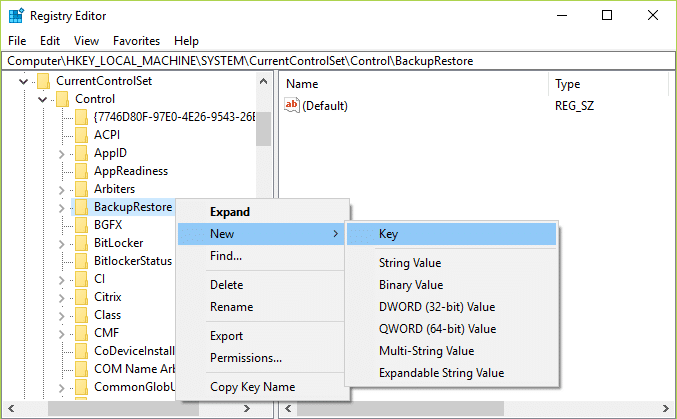
4.Type FilesNotToBackup and then hit Enter.
5.Exit Registry Editor and press Windows Key + R then type services.msc და დააჭირეთ Enter.
6.Find ნაკბენები and double-click on it. Then in the გენერალური ჩანართი, დააკლიკეთ დაიწყე
Შენთვის რეკომენდირებული:
ეს არის ის, რაც თქვენ წარმატებით გაქვთ Fix Background Intelligent Transfer Service won’t start მაგრამ თუ თქვენ ჯერ კიდევ გაქვთ რაიმე შეკითხვა ამ სახელმძღვანელოსთან დაკავშირებით, მოგერიდებათ ჰკითხოთ მათ კომენტარების განყოფილებაში.

