Millions of corporate offices and domestic industries use Epson scanners for their documentation processes. These Epson scanners are available as standalone or integrated models with a printer. Amidst many scanners in the world, Epson printers are known for their robustness and feature in scanning documents. Although these scanners have many advantages, few users complain Epson scan cannot communicate with the scanner Windows 10 issue. If you are also facing the same problem, we will help you fix the Epson scanner communication error with the help of effective troubleshooting hacks. So, continue reading to resolve Epson scanner cannot communicate issue.
How to Fix Epson Scanner Cannot Communicate in Windows 10
In this section, we have gathered a list of reasons why Epson scan cannot communicate with the scanner issue on your Windows 10 PC. Analyze them deeply to pick the correct troubleshooting method accordingly.
- The scanning software is not running with administrative privileges. Hence, a proper connection is not established.
- The network adapter is not effectively communicating with the scanner.
- Few other background tasks are interfering with the scanner.
- Few essential background services are not running on PC.
- There are corrupt or broken files on your computer.
- Presence of malware or viruses.
- You are using an outdated version of the Windows operating system.
- The proxy connection is preventing the scanning operations.
- The scanner drivers are not compatible.
- The overprotective antivirus or firewall program is interfering with the functions.
Here are some effective troubleshooting methods to help you fix the Epson scanner communication error on your Windows 10 PC.
მეთოდი 1: პრობლემების მოგვარების ძირითადი მეთოდები
Following are a few basic methods that you can follow;
1A. ფონის ამოცანების დახურვა
Several users have confirmed that the Epson scanner communication error can be resolved by closing all the background tasks running on your PC. To implement the task, follow our guide on How to End Task in Windows 10 and proceed as instructed.
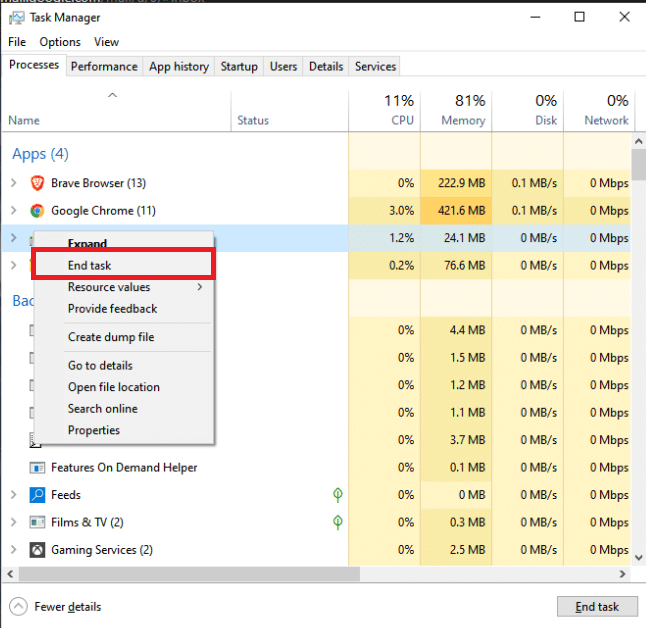
Once you have closed all the background processes, check if you could use the Epson scanner without any issues.
1B. Switch to Short USB Cables
Although many tech professionals suggest that devices can be connected through very long USB cables, this may lead to signal loss between the scanner and the network. If you have located the scanner in another corner of the room, try relocating it and connecting it using a short USB cable. Try this temporarily and check if this works or not. If it resolves the Epson scan cannot communicate with the scanner Windows 10 issue, the culprit is the long USB cables.
1C. Disable Proxy Server
Sometimes, with inappropriate network configurations on your Windows 10 computer, you will face communication errors of Epson scanners. If you have installed any VPN service or use proxy servers on your PC, read our guide on How to Disable VPN and Proxy on Windows 10 guide and implement the steps as instructed in the article.
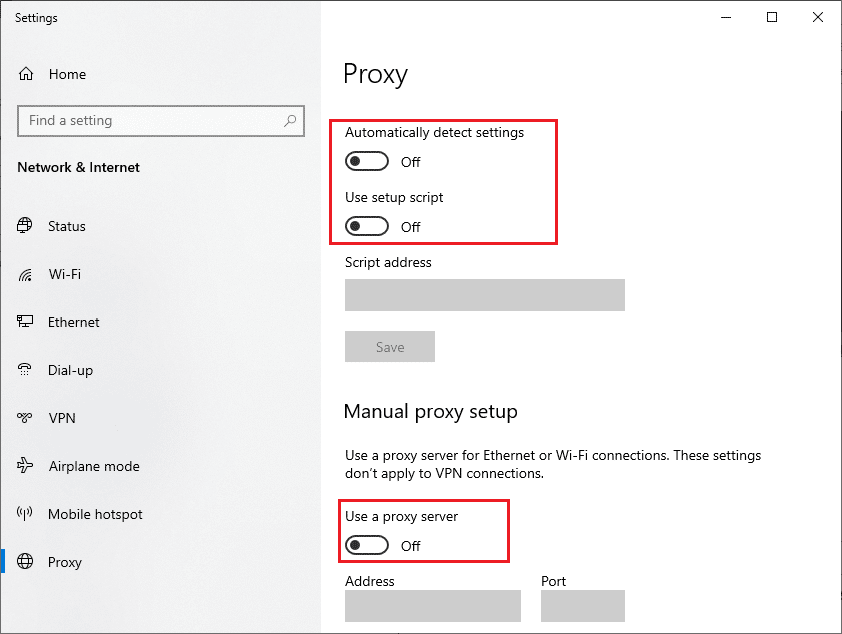
After disabling the VPN client and proxy servers, check if you have fixed the communication error of Epson scanners. Still, if you face the same problem, try connecting to a მობილური ცხელი წერტილი.
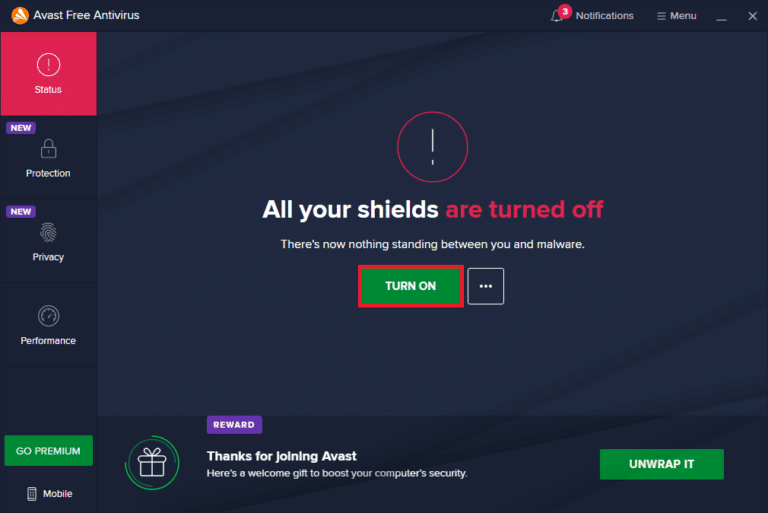
1D. Disable Antivirus Temporarily (If Applicable)
Your antivirus program may mistakenly prevent any updated features of Windows apps like Epson. Several Windows users identified many compatibility issues. They are difficult to tolerate and rectify. You are advised to temporarily disable any inbuilt or third-party antivirus software to resolve the communication error of Epson scanners. Read our guide on How to Disable Antivirus Temporarily on Windows 10 and follow the instructions to disable your Antivirus program temporarily on your PC.
ასევე წაიკითხე: როგორ წაშალოთ McAfee LiveSafe Windows 10-ში
1E. Update Windows
You can also eradicate communication errors of Epson scanners in your computer by updating your operating system. Always ensure if you have updated your Windows Operating System and if any updates are pending in action, use our guide on How to Download and Install Windows 10 Latest Update.
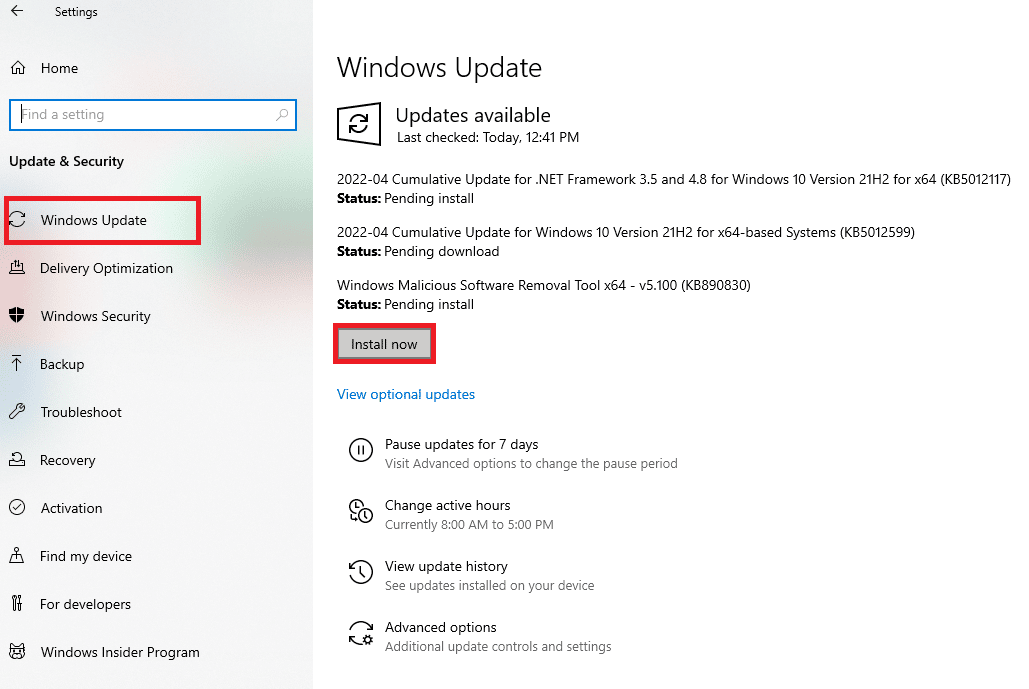
After updating your Windows operating system, check whether you can connect to your scanner.
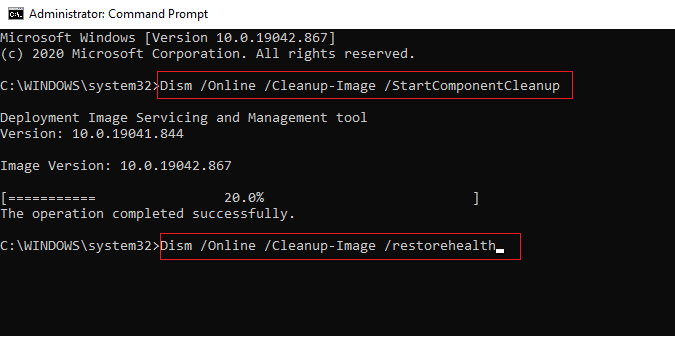
1F. Repair System Files
If corrupt system files are in your Windows Operating system, your PC may face many Internet connectivity issues. If you are experiencing communication errors with Epson scanners very recently, there are some chances that your computer files have become corrupt or damaged. Windows 10 PC has inbuilt repair tools like SFC (System File Checker) and DISM (Deployment Image Servicing and Management) that will help you fix all the corrupt files. Read our guide on How to Repair System Files on Windows 10 and follow the steps as instructed to repair all your corrupt files.
1G. Run Malware Scan
The presence of viruses causes conflicts and errors like communication errors of Epson scanners. So, install reliable antivirus software on your computer and run a complete scan. If you are confused about running a malware scan, our guide on How do I Run a Virus Scan on my Computer? will help you do so.
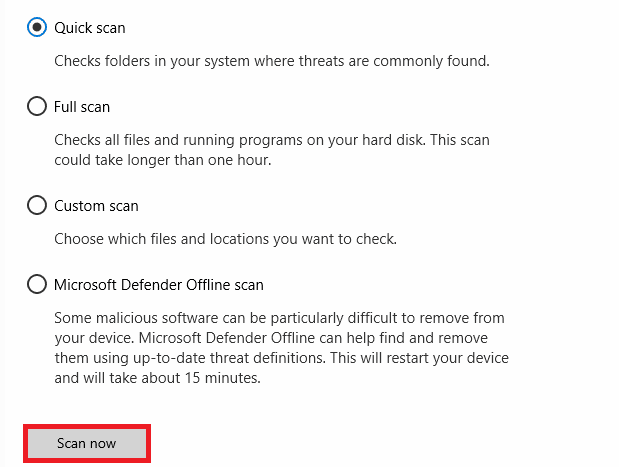
Also, if you want to remove malware from your computer, check our guide on How to Remove Malware from your PC in Windows 10.
Method 2: Run Scanner Software with Admin Privileges
You must first try to run the scanning application with admin rights. Several apps and programs that require input from any external source will require admin rights. Hence, follow the below-mentioned steps to do the same.
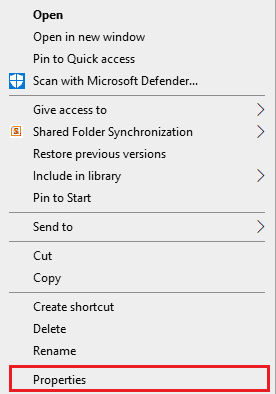
1. მარჯვენა ღილაკით დააჭირეთ ღილაკს ეპსონის სკანირება მალსახმობი on the desktop and select განცხადებები.
2. შემდეგ გადართეთ თავსებადობა ჩანართი და შეამოწმეთ ყუთი განახორციელეთ ეს პროგრამა, როგორც ადმინისტრატორი.
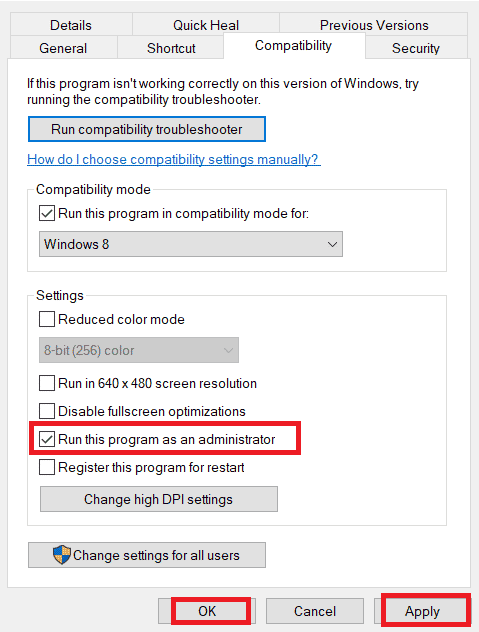
3. ბოლოს დააწკაპუნეთ მიმართვა> კარგი ცვლილებების შენახვა.
ასევე წაიკითხე: როგორ მოვძებნოთ ადმინისტრატორის პაროლი Windows 10-ში
მეთოდი 3: გაუშვით ქსელის პრობლემების გადაჭრა
To fix various internet connectivity issues, you can use the inbuilt tool provided in Windows 10 PC whenever needed. You can analyze and diagnose common network-related issues using the Windows network troubleshooter tool. It is a systematic process that, when implemented step by step, will help you fix the Epson scanner that cannot communicate issue. Follow our guide on How to Troubleshoot Network Connectivity Problems on Windows 10 to fix all network-related issues using a Network Adapter troubleshooter.

You can use the steps mentioned in the guide to diagnose Wi-Fi connections, Ethernet, and all network adapters on your Windows 10 PC. Finally, check if you have fixed the communication error of Epson scanners.
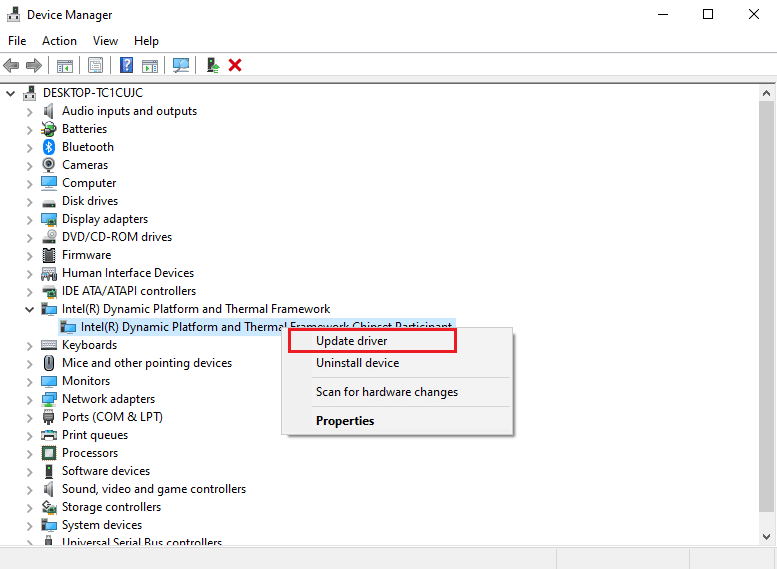
Method 4: Update Scanner Drivers
Device drivers establish a connecting link between your computer’s hardware and operating system. Also, faulty or corrupt drivers lead to a communication error in Epson scanners. Many users have reported that updating WLAN drivers have helped them fix the issue. You are advised to update scanner drivers to improve the reliability of your network adapters, fix compatibility issues, and resolve communication error. Follow our guide on How to Update Device Drivers on Windows 10 to do so. Make sure you expand Image devices ნაჩვენებია ქვემოთ.
ასევე წაიკითხე: Fix Set User Settings to Driver Failed in Windows 10
Method 5: Roll Back Scanner Drivers
When you roll back your drivers, all the current versions of the hardware device will be uninstalled, and previously installed drivers will be installed on your PC. This feature will be very helpful when any new driver update does not work well with your computer. Follow the steps as instructed in our guide on How to Rollback Drivers on Windows 10 to fix the Epson scanner communication error.
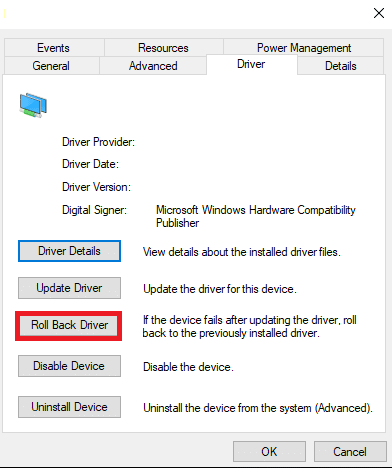
After your Windows 10 computer has installed the previous version of drivers, check if you have fixed the communication error of Epson scanners.
Method 6: Reinstall Scanner Drivers
Incompatible drivers must be reinstalled to fix the Epson scanner cannot communicate problem. You are advised to reinstall device drivers only if you cannot attain any fix by updating them. Steps to reinstall drivers are very easy, and you can do so by using a third-party application or manually. Follow our guide on How to Uninstall and Reinstall Drivers on Windows 10 to reinstall drivers on your Windows 10 computer. Make sure you expand Image devices ნაჩვენებია ქვემოთ.
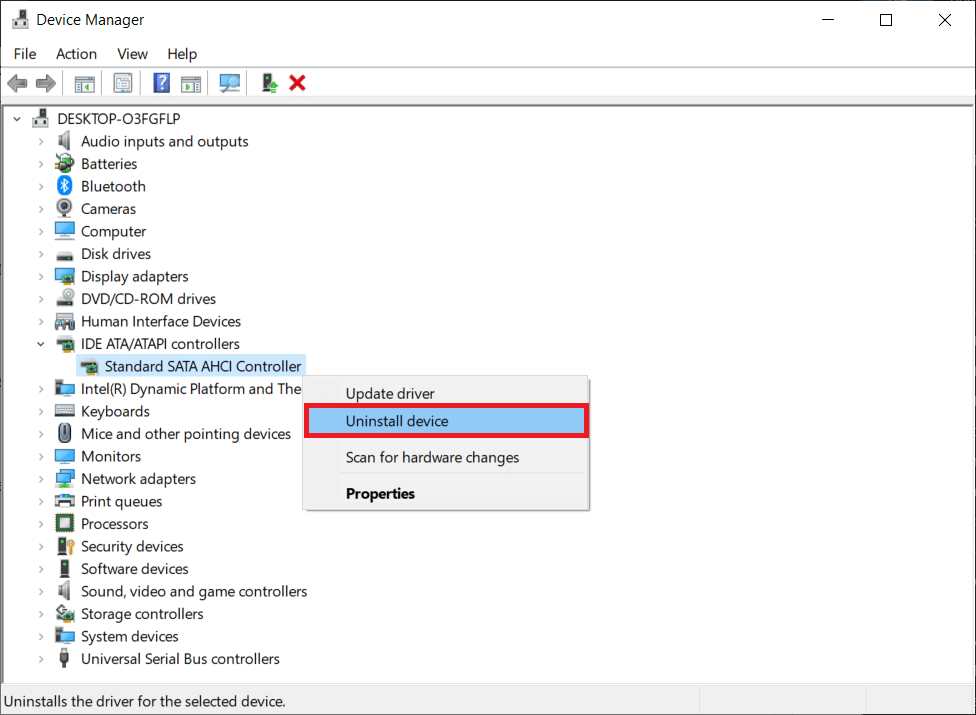
After reinstalling scanner drivers, check if you have fixed the communication error of Epson scanners.
ასევე წაიკითხე: Windows 10-ში Bluetooth დრაივერის შეცდომის გამოსწორება
Method 7: Restart Shell Hardware Detection Service
The Shell Hardware Detection service detects whether any other hardware is connected to your system or not and detects all the scanners, storage devices, and printers connected to your device. It provides notifications for AutoPlay hardware events. If this service is stopped for any reason, you will face an Epson scanner cannot communicate error. Follow the below-mentioned steps to restart this service:
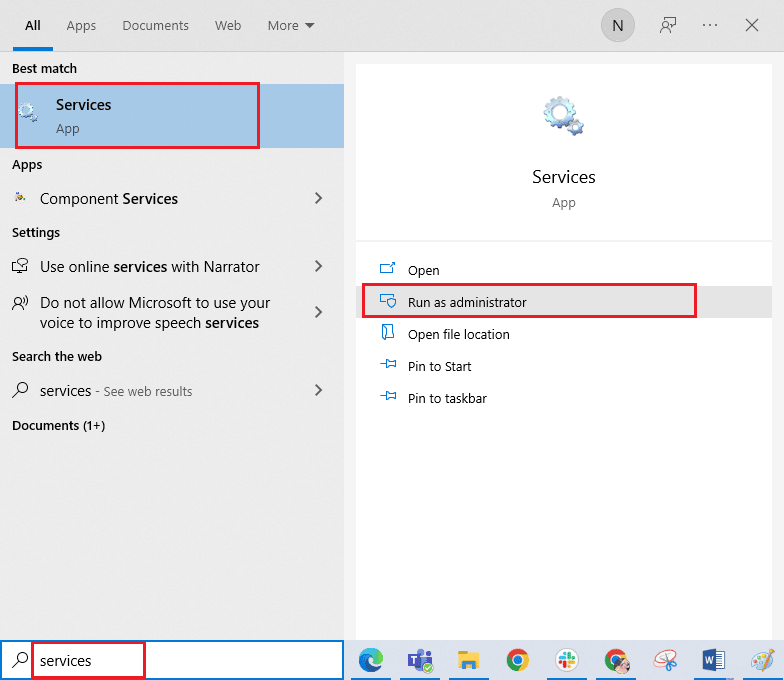
1. ტიპი მომსახურება საძიებო მენიუში და დააწკაპუნეთ ადმინისტრატორის სახელით გაშვება.
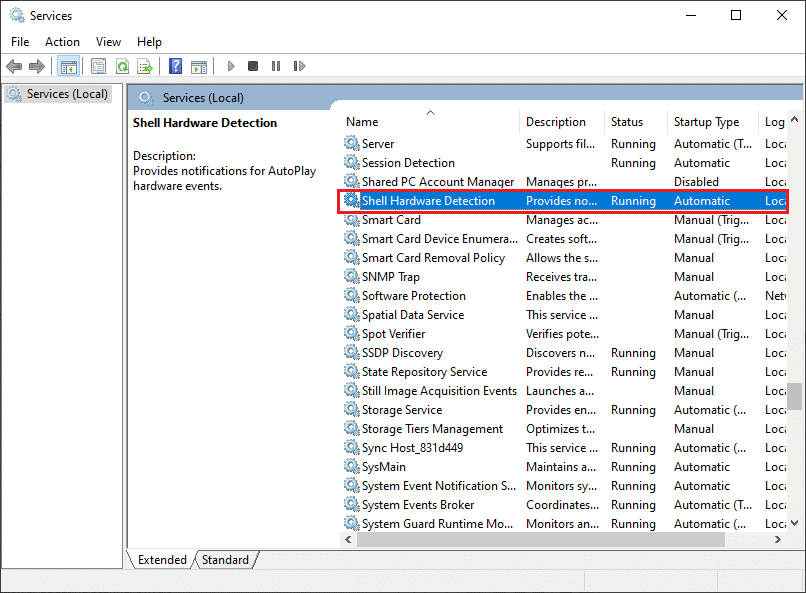
2. ახლა გადაახვიეთ ქვემოთ და ორჯერ დააწკაპუნეთ მასზე Shell Hardware Detection მომსახურება.
3. In the new pop-up window, select the გაშვების ტიპი to ავტომატური.
შენიშვნა: თუ მომსახურების სტატუსი is შეჩერებულია, დააკლიკეთ დასაწყისი ღილაკი თუ მომსახურების სტატუსი is სირბილი, დააკლიკეთ გაჩერება და დაიწყე ისევ.
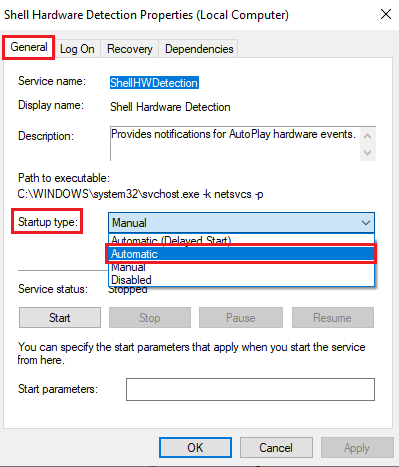
4. დაწკაპეთ მიმართვა> კარგი ცვლილებების შენახვა.
5. Unplug your scanner and wait for a while. Re-plug it back.
6. გაიმეორეთ იგივე ნაბიჯები Windows Image Acquisition Service and check if this works or not.
Method 8: Fix Wireless Connection
In several cases, the Epson scan program on your PC fails to establish the connection between the LAN addresses automatically. This happens more often when you use a wireless network. Even though you can find the addresses within the app, this does not always work. Hence, manually add the address as instructed below.
1. ტიპი Epson სკანირების პარამეტრები in the search menu. Now, click on ღიაა.
2. In the Scan Settings, select დამატება ვარიანტი ქვეშ Network Scanner Address.
შენიშვნა: Ensure you select the correct scanner with the help of the აირჩიეთ სკანერი drop-down menu at the top.
3. Now, a screen to enter the address will pop up. Follow the below-mentioned steps to find the correct address.
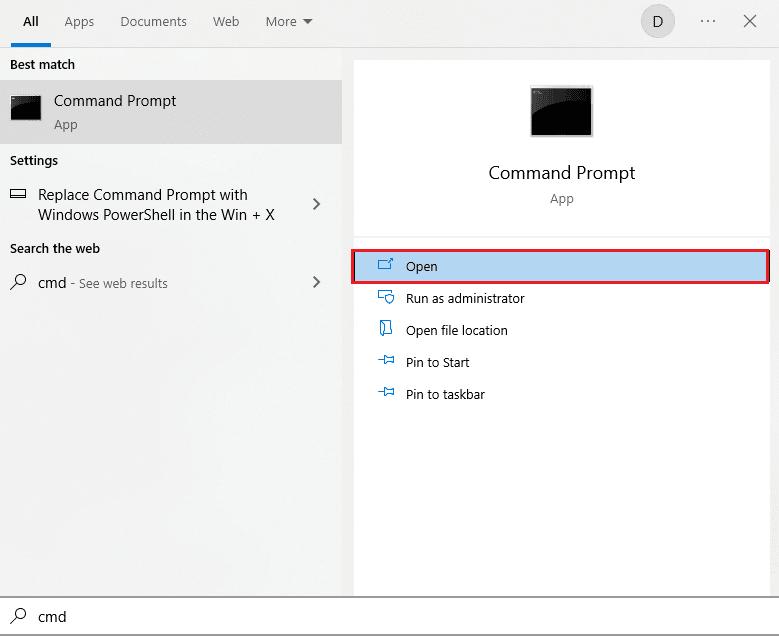
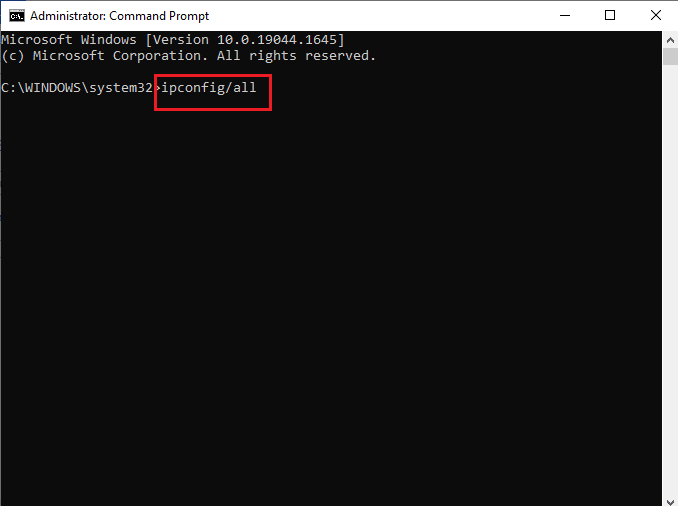
4. ტიპი cmd in the search bar and click on ღიაა.
5. შემდეგ აკრიფეთ ipconfig / ყველა ბრძანება და დააჭირეთ შეიყვანეთ გასაღები.
6. Now, note down the Default Gateway detail from the window.
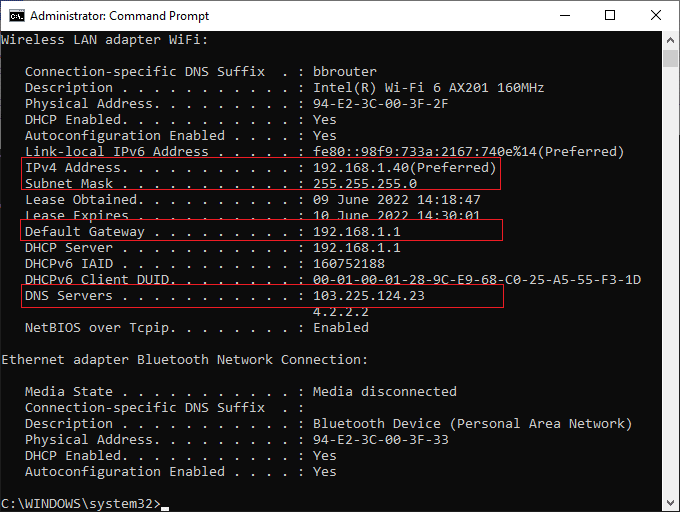
7. Copy this მისამართი (here, 192.168.1.1) and type it in your browser to access your router.
8. Note down the list of devices connected to the network. On the same screen, you can find the IP address of your scanner. Note down its value.
9. შემდეგ, გადადით დამატება window of the Scan settings window and type the IP address of your scanner under შეიყვანეთ მისამართი მენიუში.
10. დაწკაპეთ OK ცვლილებების შენახვა.
შენიშვნა: ასევე შეგიძლიათ დააჭიროთ ღილაკს ტესტი to ensure the connection is successful.
ასევე წაიკითხე: შეასწორეთ თქვენი კომპიუტერი, როგორც ჩანს, სწორად არის კონფიგურირებული, მაგრამ DNS არ პასუხობს Windows 10-ში
Method 9: Turn Off Password Protected Sharing
The Password Protected sharing setting is intended to keep the sharing of files and folders safe and secure. If this setting is turned on, the users connected to your network cannot access the files on your PC unless the privacy password is typed in manually. Several reports suggest that this feature triggers an Epson scan cannot communicate with the scanner error. Hence, you have to disable this setting, reconnect the scanner, and check if this works or not.
შენიშვნა: You must always turn on the setting if things do not go smoothly.
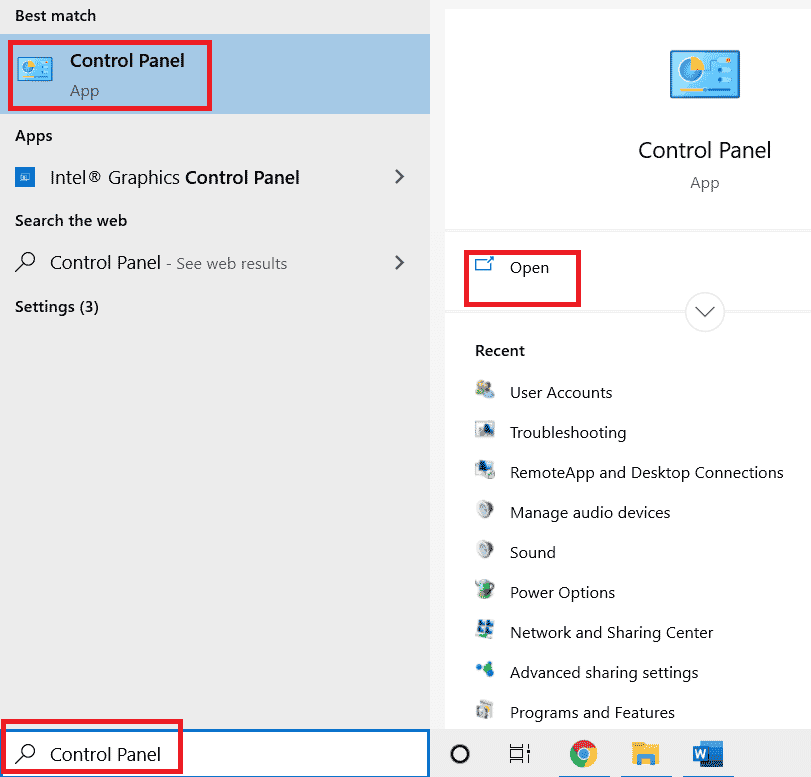
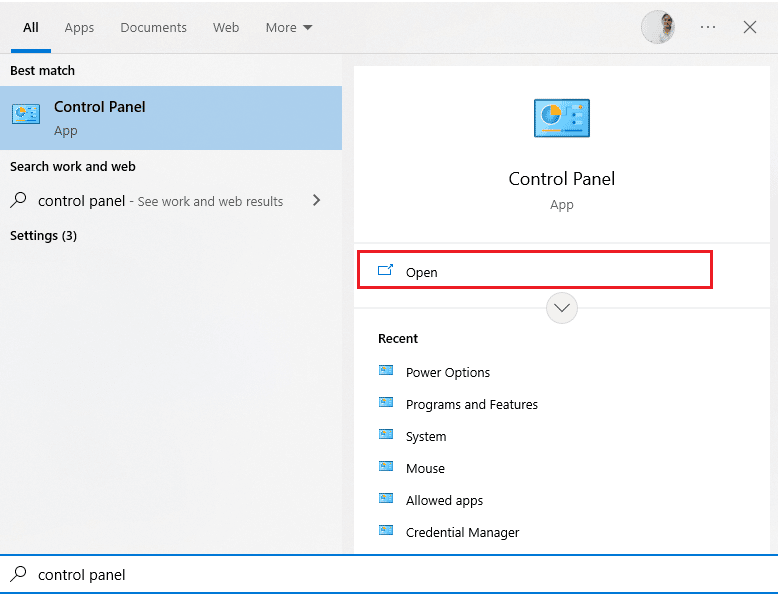
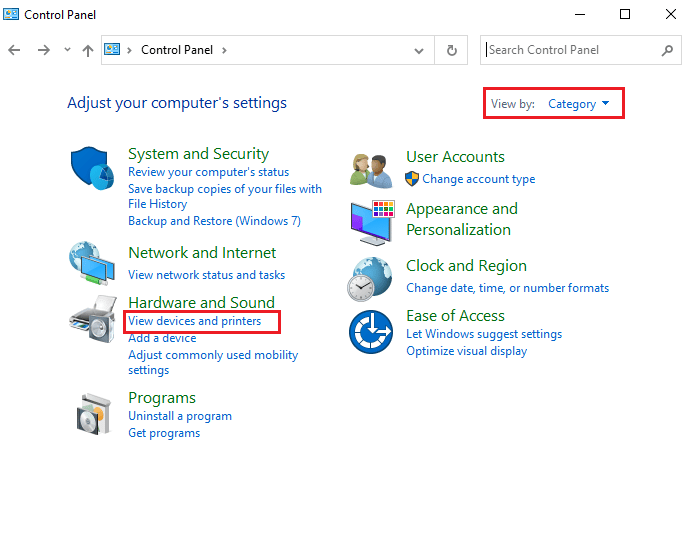
1. ტიპი პანელი in the search bar and click on ღიაა.
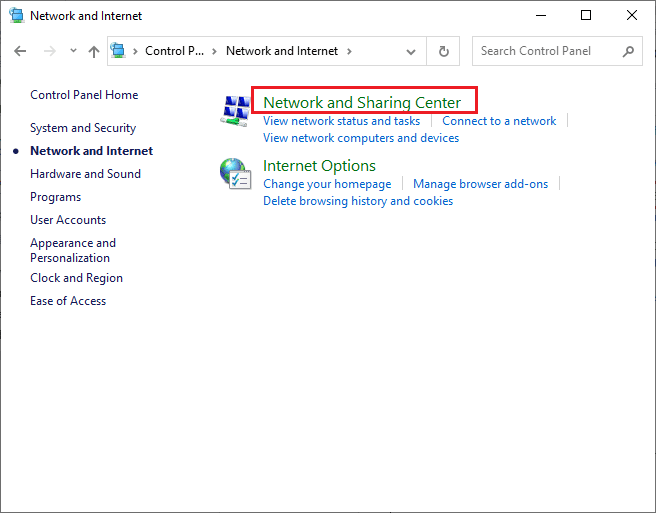
2. შემდეგ დააყენეთ ნახვა as კატეგორია და დააჭირეთ ქსელი და ინტერნეტი.
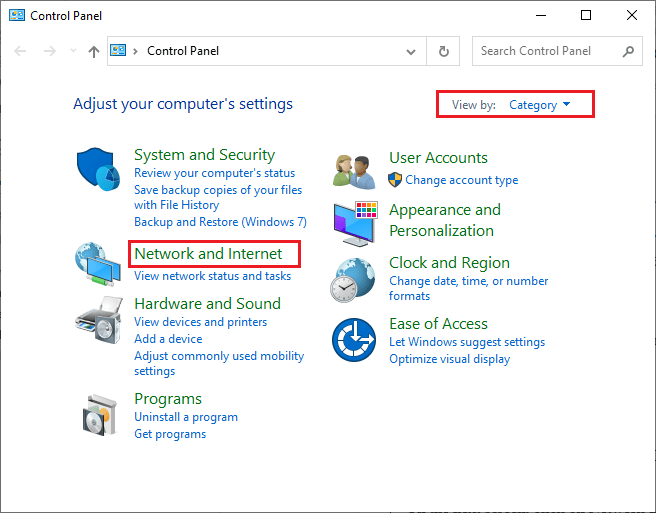
3. ახლა, დააჭირეთ ღილაკს ქსელი და გაზიარების ცენტრი როგორც გამოსახულია.
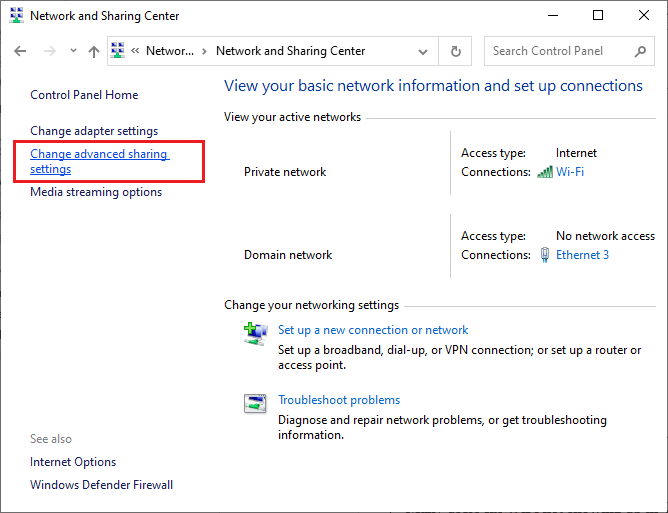
4. ახლა დააწკაპუნეთ მოწინავე გაზიარების პარამეტრების შეცვლა ბმული, როგორც ნაჩვენებია.
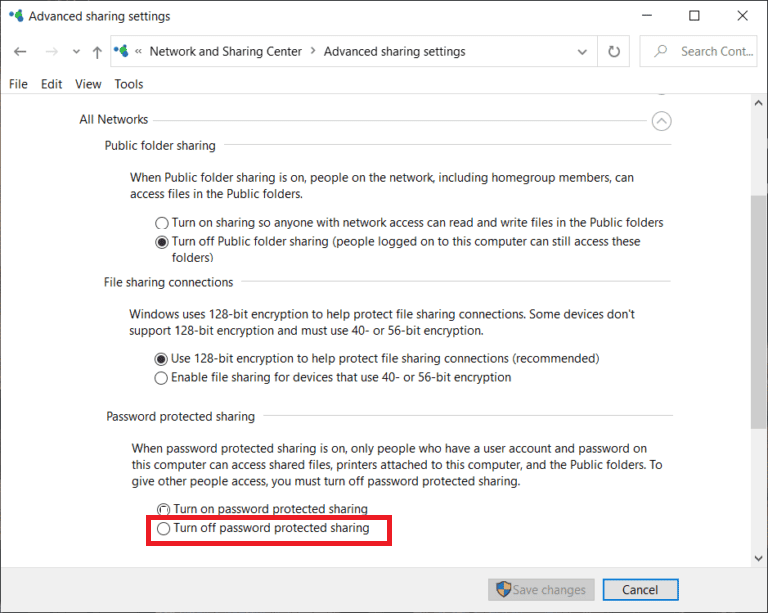
5. გაფართოება ყველა ქსელი განყოფილება და დააჭირეთ ღილაკს გამორთეთ პაროლით დაცული გაზიარება ვარიანტი.
6. ახლა, დააჭირეთ ღილაკს ცვლილებების შენახვა and unplug the scanner for a minute. დაკავშირება your scanner and check if the connection error has vanished or not.
Method 10: Change Ports from LPT1 to USB 001
An old Line Print Terminals technology was used earlier to connect your printers and scanners. Now, most printers and scanners have switched to USB. Hence, check if USB is used in your device and whether this works. This method effectively fixes the Epson scanner cannot communicate if you face the problem after upgrading to Windows 10.
1. დააჭირეთ Windows გასაღები და ტიპის პანელი. შემდეგ, დააჭირეთ ღილაკს ღიაა.
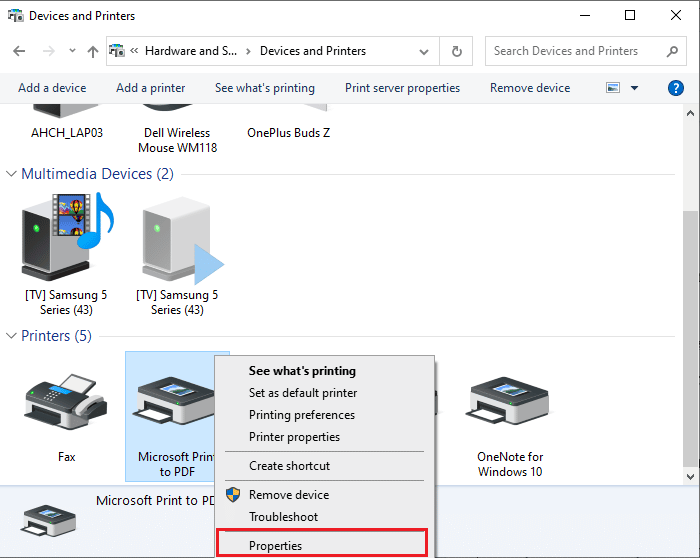
2. ახლა დააყენეთ ნახვა as კატეგორია და დააჭირეთ მოწყობილობების და პრინტერების ნახვა როგორც ნაჩვენებია.
3. ახლა, დააწკაპუნეთ მარჯვენა ღილაკით თქვენს პრინტერი და აირჩიეთ განცხადებები.
4. გადახვიდეთ პორტები tab and change the ports from LPT1 to USB 001.
5. Save the changes by clicking მიმართვა> კარგი. Then, unplug your device and connect it back after a while.
ასევე წაიკითხე: Fix Power Surge on the USB Port in Windows 10
Method 11: Modify Windows Defender Firewall Settings
You will also face an Epson scan cannot communicate with the scanner due to an over-reactive or over-protective antivirus suite on your Windows 10 computer. This prevents the connection link between the launcher and the network. So, to fix this problem, you can whitelist Epson in your Firewall settings or disable the firewall protection temporarily.
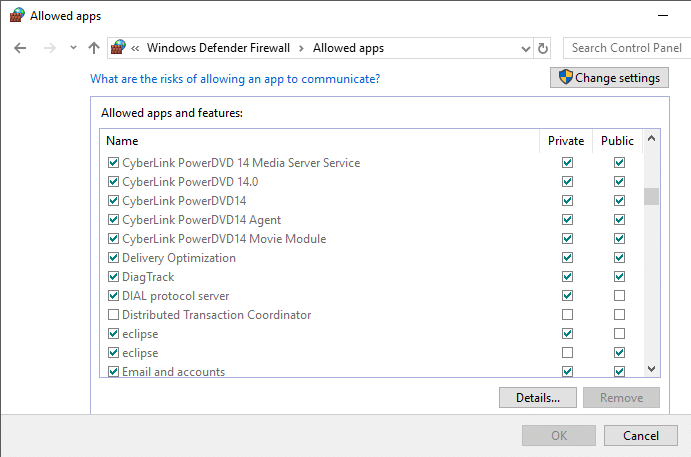
Option I: Whitelist escndv.exe
Ნების დართვა C:WINDOWStwain_32escndvescndv.exe in your Windows Defender Firewall, follow our guide on Allow or Block Apps through the Windows Firewall and implement the steps as instructed.
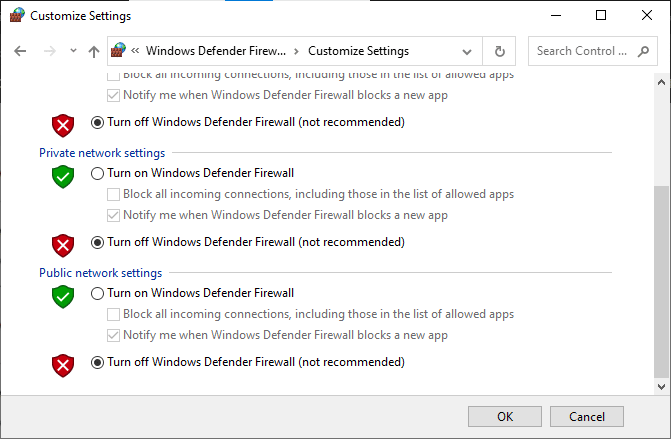
ვარიანტი II: Firewall-ის გამორთვა (არ არის რეკომენდებული)
თუ არ იცით როგორ გამორთოთ Windows Defender Firewall, ჩვენი სახელმძღვანელო, თუ როგორ გამორთოთ Windows 10 Firewall დაგეხმარებათ ამის გაკეთებაში.
ასევე წაიკითხე: როგორ შევასრულოთ Windows Defender Definition-ის განახლება
ვარიანტი III: შექმენით ახალი წესი Firewall-ში
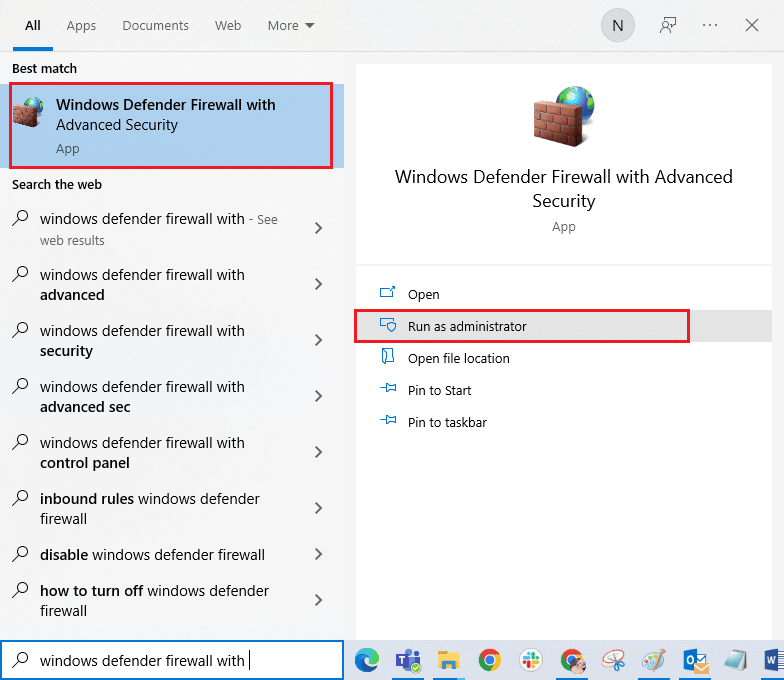
1. დააჭირეთ Windows გასაღები და ტიპის Windows Defender Firewall გაფართოებული უსაფრთხოებით. შემდეგ, დააჭირეთ ღილაკს ადმინისტრატორის სახელით გაშვება.
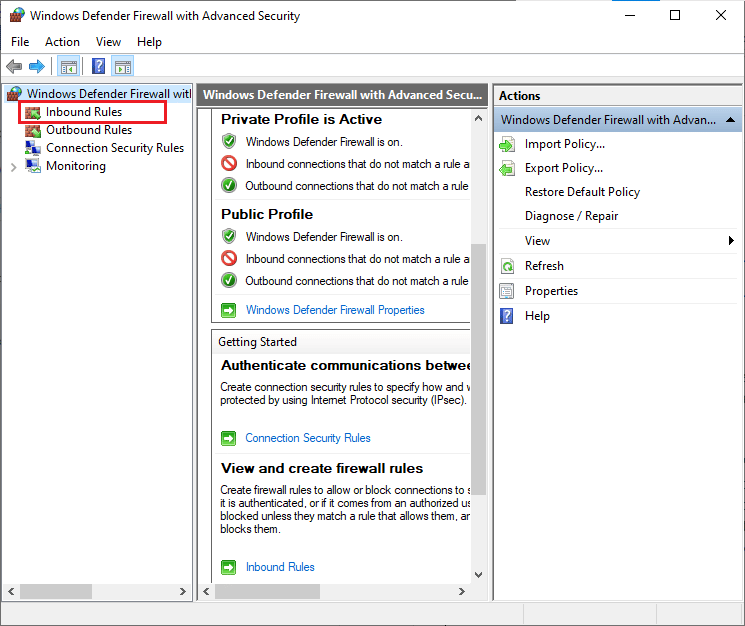
2. დაწკაპეთ შემომავალი წესები as depicted in the left pane.
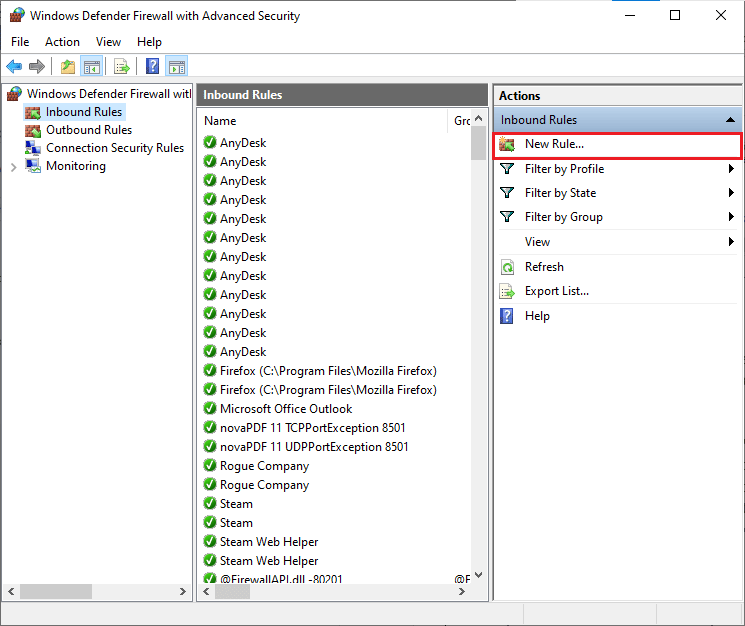
3. დაწკაპეთ ახალი წესი… as shown in the right pane.
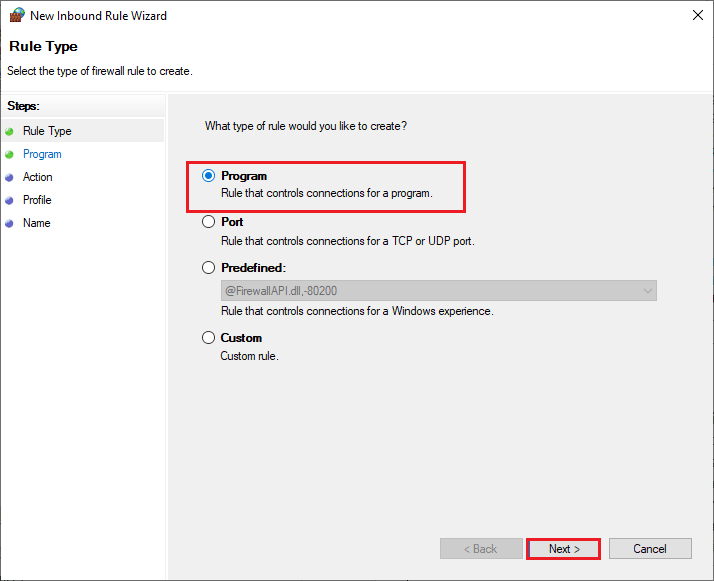
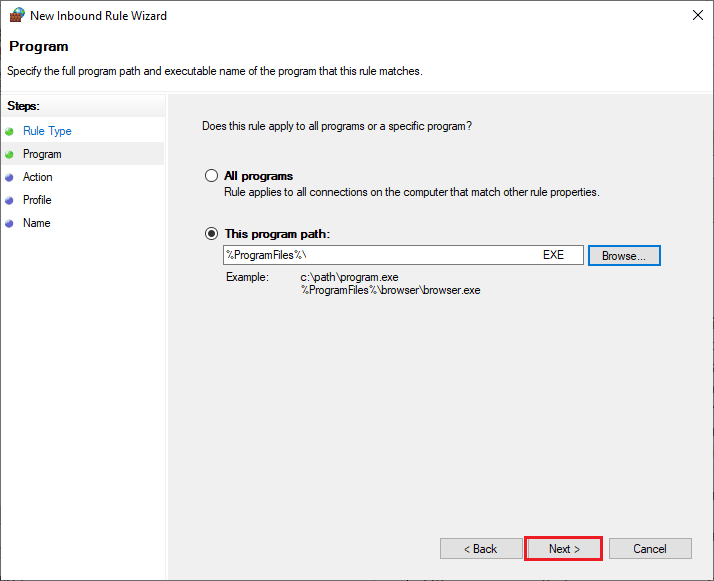
4. Ensure to select the პროგრამა ვარიანტი ქვეშ რა ტიპის წესის შექმნა გსურთ? მენიუ და დააჭირეთ შემდეგი> როგორც ნაჩვენებია.
5. შემდეგ დააწკაპუნეთ იხილე ... შესაბამისი ღილაკი ამ პროგრამის გზა: როგორც ნაჩვენებია.

6. ნავიგაცია C:WINDOWStwain_32escndvescndv.exe path and ორჯერ დააწკაპუნეთ ზე setup ფაილი. შემდეგ, დააწკაპუნეთ ღიაა ღილაკს.
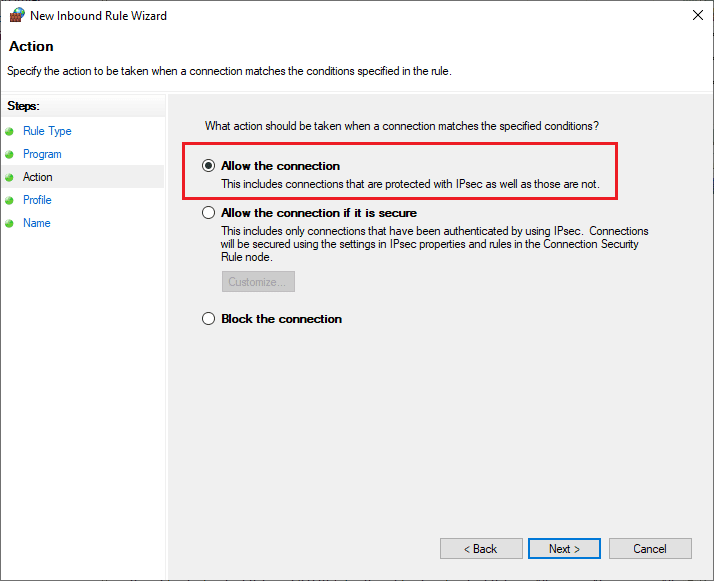
7. დაწკაპეთ შემდეგი> იმ ახალი შემომავალი წესების ოსტატი window.
8. ახლა აირჩიეთ რადიოს ღილაკი შემდეგი დაუშვით კავშირი და დააჭირეთ შემდეგი> როგორც გამოსახულია.
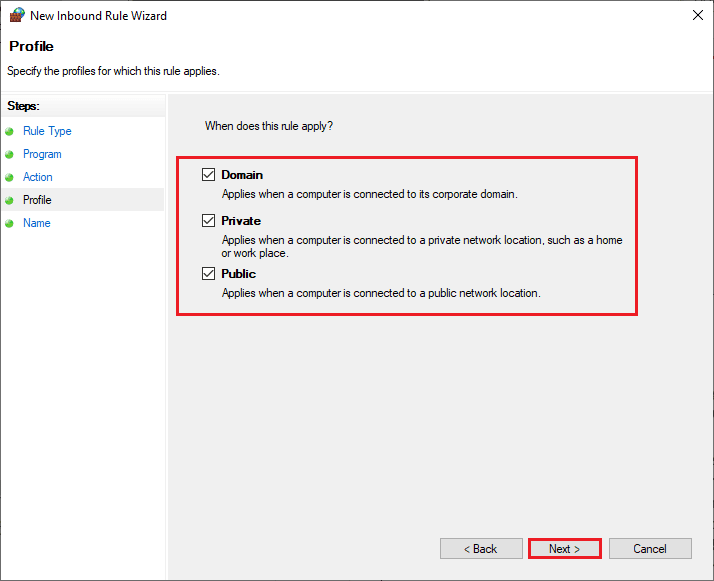
9. დარწმუნდით დომენი, პირადი და საჯარო შეირჩევა ყუთები და დააწკაპუნეთ შემდეგი>.
10. Finally, add a სახელი to your new rule and click on ფერი.
რეკომენდებული:
We hope that this guide was helpful and you would have learned how to fix Epson scanner cannot communicate in Windows 10. Let us know how this article has helped you the best. Also, if you have any queries/suggestions regarding this article, feel free to drop them in the comments section.

