Halo Infinite multiplayer beta is hitting the gaming platforms and is available for free on PC and Xbox. It is making gamers all excited to play it with their friends globally. It is a great deal to grab if you and your boys want to hit it off in the latest successor of the beloved Halo series. However, the open beta phase comes with a bumpy ride. One of the many obstructions which are haunting the dedicated fanbase of the series is Halo Infinite Customization not loading error. This is quite frustrating and players voiced their displeasure quite openly on the internet. So, we took matters into our own hands and compiled this guide on how to fix Halo Infinite Customization not loading in Windows 11.
How to Fix Halo Infinite Customization Not Loading in Windows 11
In this article, we have explained tried and tested methods to fix Halo Infinite Customization not loading error. But firstly, let us learn about the causes of this error. Well as of now, the reason behind the error is still unknown and quite frankly, it is understandable. The game is still in the open beta phase. It is not news for a game being full of bugs in these early stages. Although, culprits could be:
- Faulty or incompatible Internet Protocol Version 6 (IPv6) configuration.
- The outage from the game service providers end.
მეთოდი 1: შეასრულეთ სუფთა ჩატვირთვა
First, you should clean boot your PC to fix Halo Infinite Customization not loading on Windows 11. This will help to get rid of bugs and might fix the said error. Read our guide on How to Perform Clean boot in Windows 10 here to do so.
Method 2: Close Unnecessary Background Processes
If there are any unwanted processes running in the background which are taking up lot of memory & CPU resources, then you should close those processes, as follows:
1. დაჭერა Ctrl + Shift +Esc keys ერთად გასაშვებად პროცესების მენეჯერი (Task Manager) .
2. In პროცესები tab, you can see the applications and processes that are consuming a lot of memory resources by the მეხსიერება სვეტი.
3. მარჯვენა ღილაკით დააჭირეთ ღილაკს unwanted processes (მაგალითად Microsoft გუნდები) და დააჭირეთ ღილაკს დასასრული ამოცანა, როგორც ნაჩვენებია ქვემოთ.
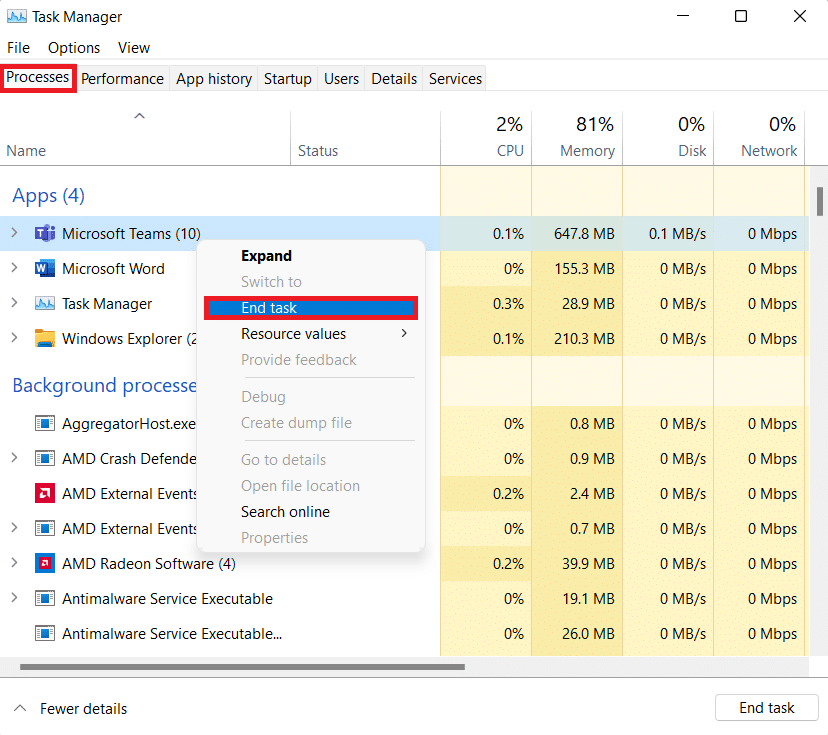
4. გაიმეორეთ the same for other tasks that are not required currently and then, launch Halo Infinite.
Method 3: Disable IPv6 Network
Here are the steps to fix Halo Infinite Customization not loading on Windows 11 by disabling the Internet Protocol Version 6 (IPv6) networking:
1. დაწკაპეთ ძიება ხატულა, ტიპი View Network Connections, და დაწკაპეთ ღიაა.
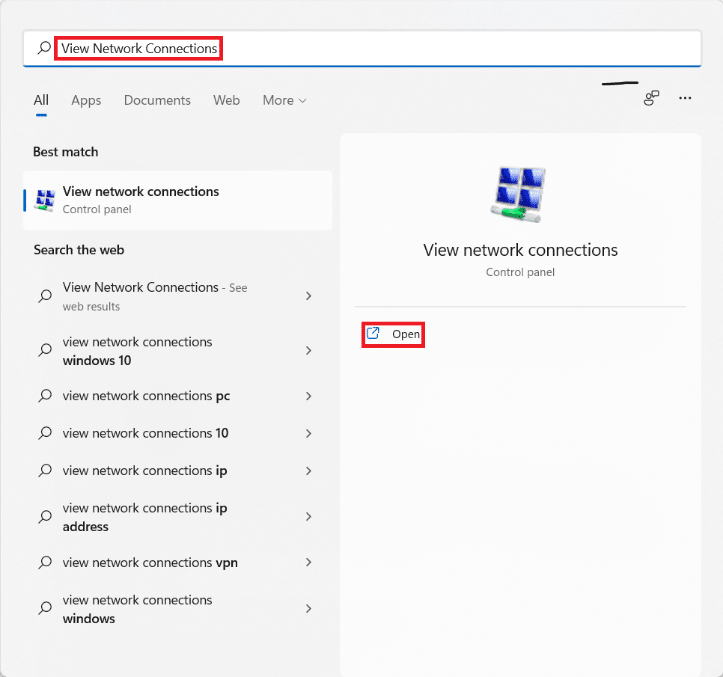
2. In ქსელის კავშირი window, right-click on the ქსელის ადაპტერი (მაგალითად Wi-Fi) you are connected to.
3. აირჩიეთ განცხადებები კონტექსტური მენიუდან, როგორც ნაჩვენებია.
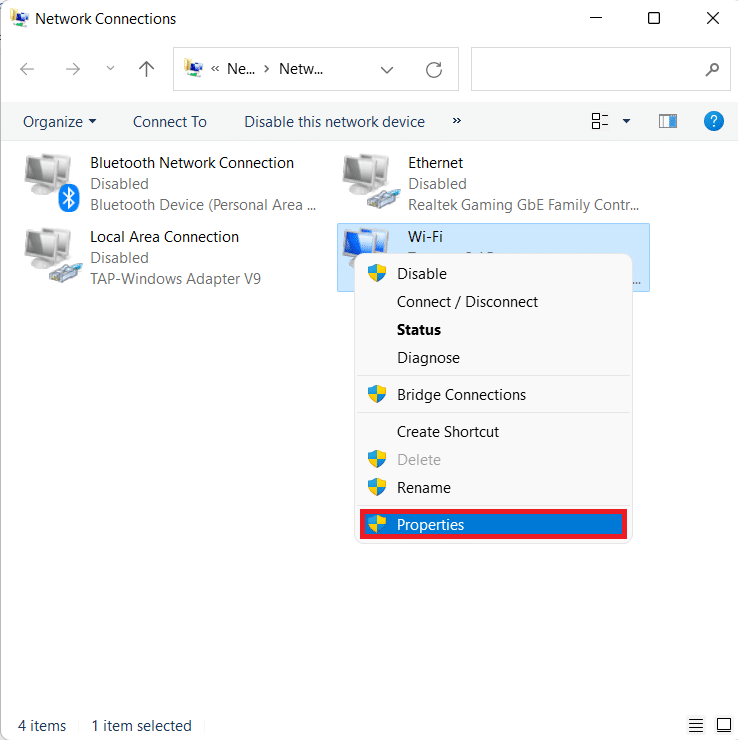
4. In Wi-Fi თვისებები window, scroll down in the ქსელში Tab.
5. აქ იპოვნეთ ინტერნეტ ოქმი ვერსია 6 (TCP / IPv6) option and uncheck it.
შენიშვნა: დარწმუნდით, რომ ინტერნეტ ოქმი ვერსია 4 (TCP / IPv4) შემოწმებულია.
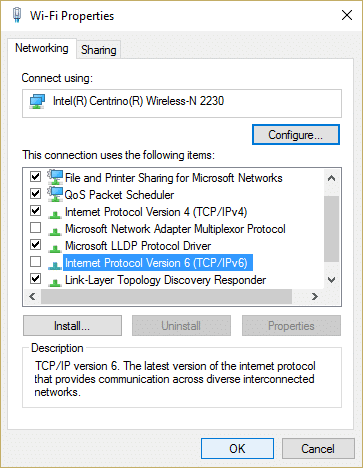
6. ბოლოს დააწკაპუნეთ OK ცვლილებების შენახვა.
Now, try restarting Halo Infinite once again to see if the error still exists.
ასევე წაიკითხე: How to View Running Processes in Windows 11
Method 4: Enable Teredo State
Another alternative to fix Halo Infinite Customization not loading issue on Windows 11 is by enabling Teredo State, as discussed below:
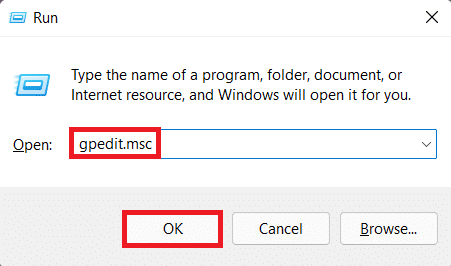
1. დაჭერა Windows + R გასაღებები ერთად გასახსნელად გასაშვებად დიალოგური ფანჯარა.
2. ტიპი gpedit.msc და დააჭირეთ OK გახსნას ადგილობრივი ჯგუფის პოლიტიკის რედაქტორი.
შენიშვნა: If you are unable to access it, read How to Enable Group Policy Editor in Windows 11 Home Edition here.
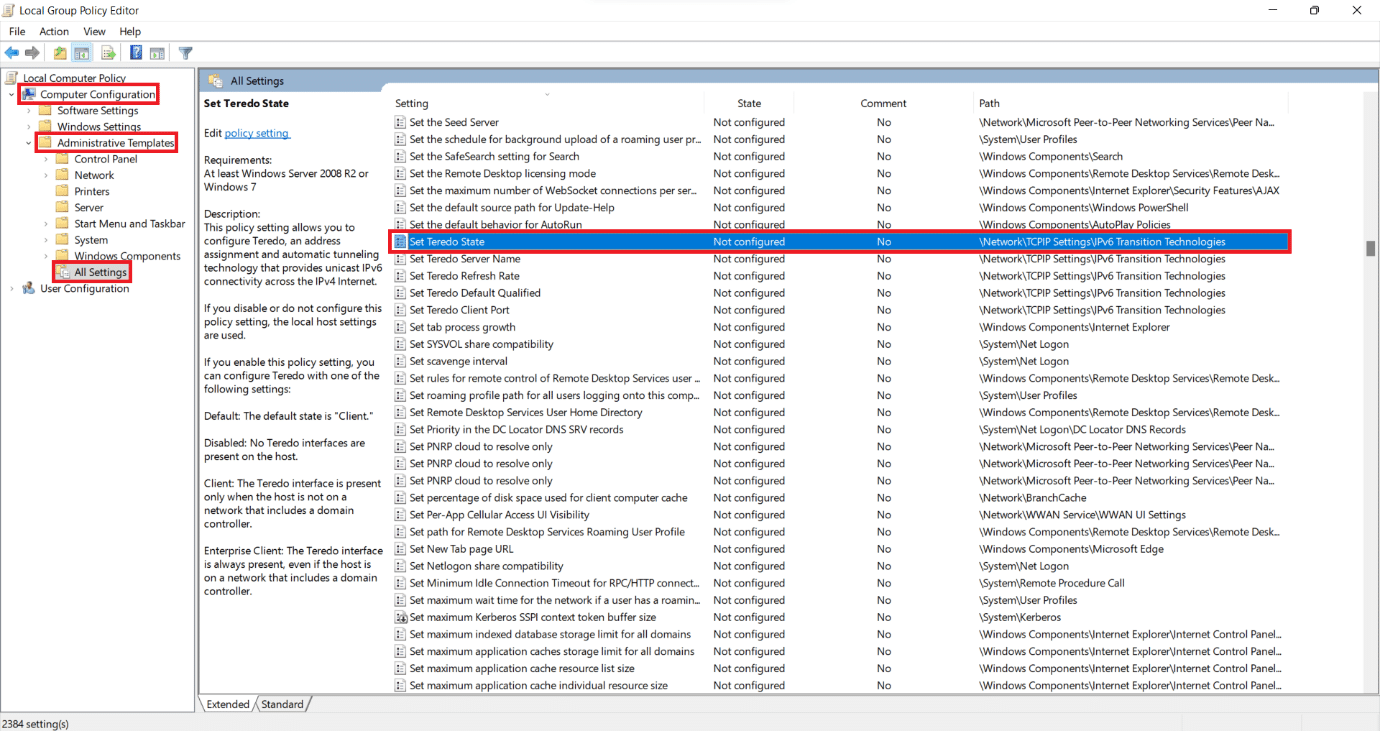
3. ნავიგაცია Computer Configuration > Administrative Templates > All Settings მარცხენა სარკმელზე.
4. Then, locate and double-click on Set Teredo State, shown highlighted.
5. აქ დააწკაპუნეთ ჩართულია და აირჩიეთ Enterprise კლიენტი დან Select from the following states ჩამოსაშლელი სია.
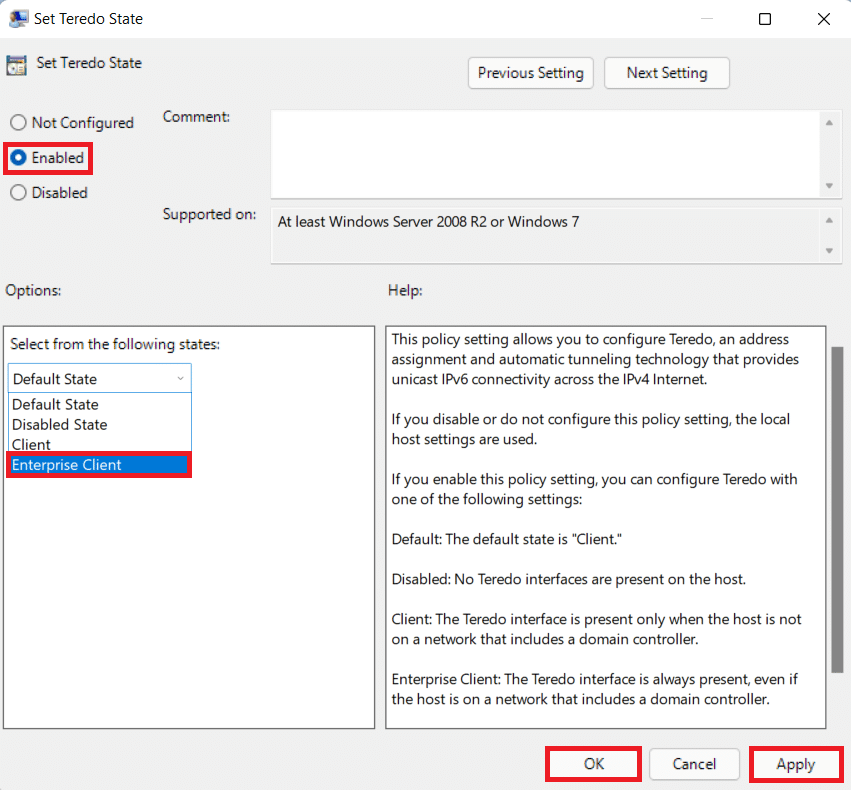
6. დაწკაპეთ მიმართვა> კარგი to save the changes and try playing the game in multiplayer mode.
Method 5: Increase Virtual RAM
You can also increase virtual RAM to fix Halo Infinite Customization not loading in Windows 11, as follows:
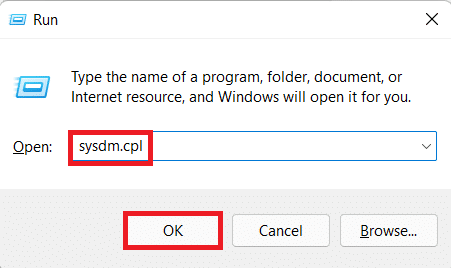
1. ღია გასაშვებად dialog box , type sysdm.cpl და დააჭირეთ OK.
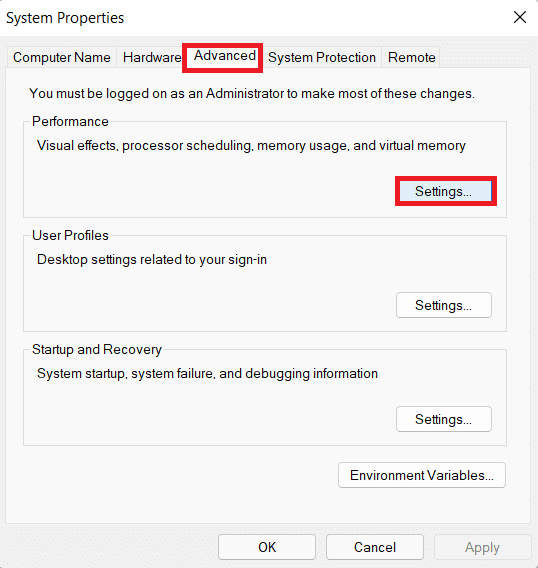
2. წასვლა მოწინავე ჩანართში სისტემის თვისებები window.
3. დაწკაპეთ პარამეტრები ღილაკს ქვეშ Performance section, as shown.
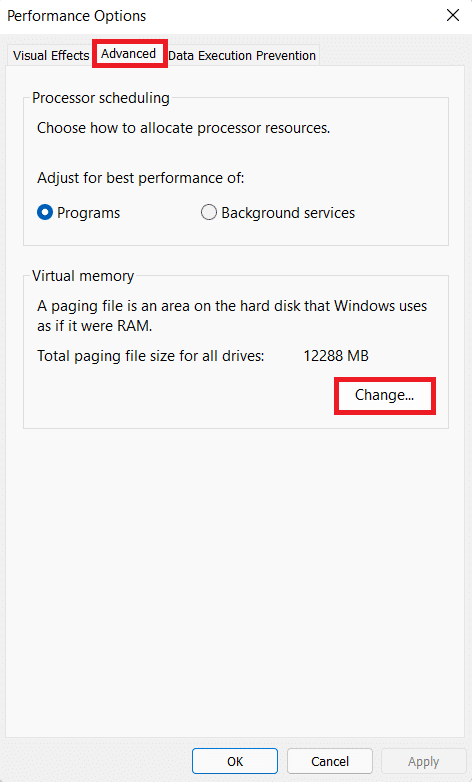
4. In შესრულების პარამეტრები ფანჯარაში, გადადით მოწინავე Tab.
5. დაწკაპეთ შეცვლა ღილაკს ქვეშ ვირტუალური მეხსიერება section, as shown.
6. მოხსენით ველი ავტომატური მართვა პეიჯინგის ფაილის ზომა ყველა დისკები.
7. Select the primary drive from the list viz C: და დააჭირეთ პეიჯინგის ფაილი არ არის.
8. შემდეგ, დააჭირეთ ღილაკს უცნობია > OK, როგორც ნაჩვენებია ქვემოთ.
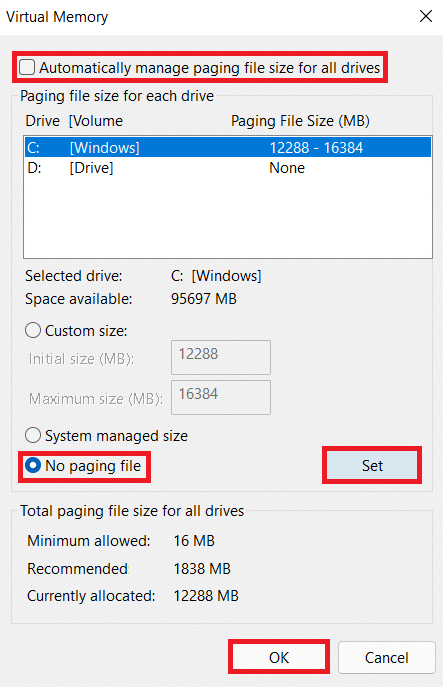
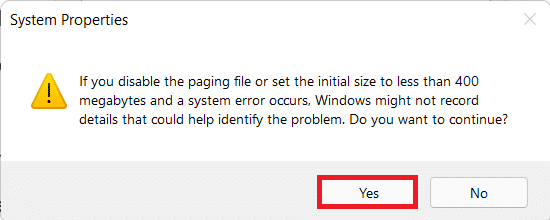
9. აირჩიეთ დიახ იმ სისტემის თვისებები confirmation prompt that appears.
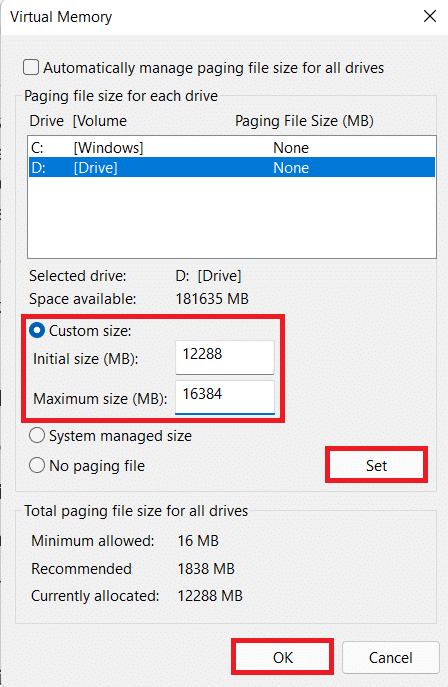
10. დაწკაპეთ non-primary volume in the list of drives and select საბაჟო ზომა.
11. შეიყვანეთ paging size ორივე საწყისი მდე მაქსიმალური ზომა in MegaBytes (MB).
შენიშვნა: The paging size is ideally twice the size of your physical memory (RAM).
12. დაწკაპეთ უცნობია and confirm any prompt that appears.
13. ბოლოს დააწკაპუნეთ OK და განაახლეთ კომპიუტერი.
ასევე წაიკითხე: How to Enable or Disable Quick Access in Windows 11
Method 6: Disable Game Overlays
Another method to fix Halo Infinite Customization not loading in Windows 11 is to disable the game overlays. This will reduce the high memory usage and resolve lags & glitches as well. We have explained the process for Discord app, NVIDIA GeForce and Xbox Game Bar in Windows 11.
Option 1: Disable Discord Overlay
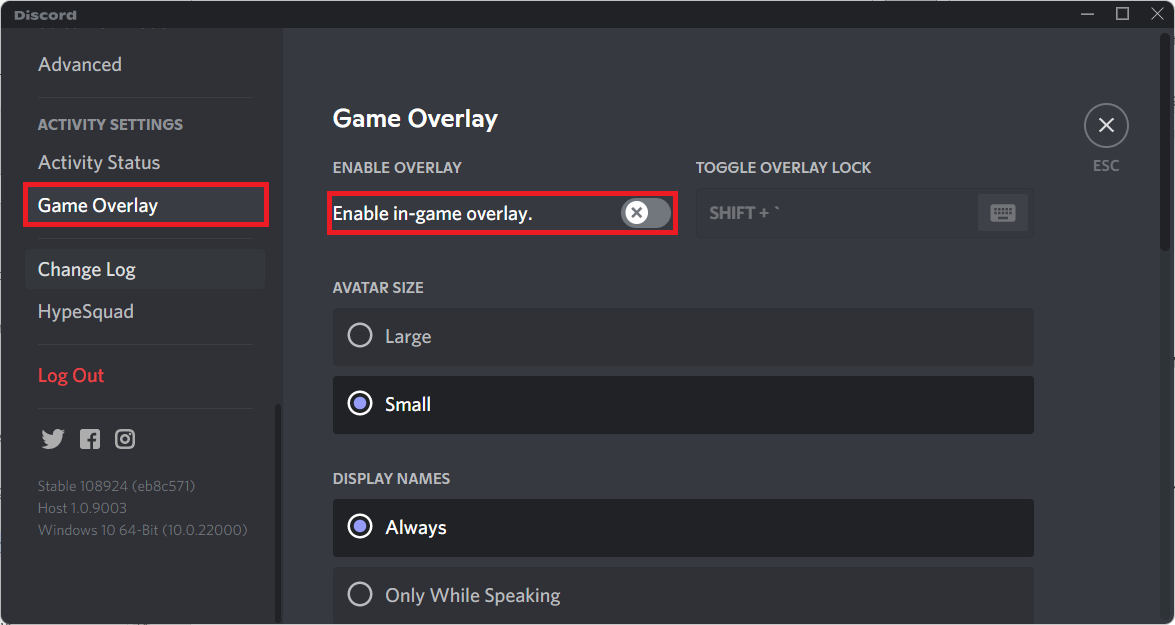
1. ღია Discord PC Client და დააკლიკეთ პარამეტრები ხატულა next to your Discord მომხმარებლის სახელი.
![]()
2. Scroll down the left navigation pane and click on თამაშის გადაფარვა ქვეშ ACTIVITY SETTINGS სექცია.
3. გადართვა Off გადართვა ამისთვის ჩართეთ თამაშში გადაფარვა to disable it, as shown.
ასევე წაიკითხე: How to Delete Discord
Option 2: Disable NVIDIA GeForce Experience Overlay
1. გახსნა GeForce გამოცდილება აპლიკაცია და დააწკაპუნეთ Setting icon as highlighted below.
![]()
2. In ზოგადი tab, Switch Off გადართვა ამისთვის თამაშში გადაფარვა გამორთვა.
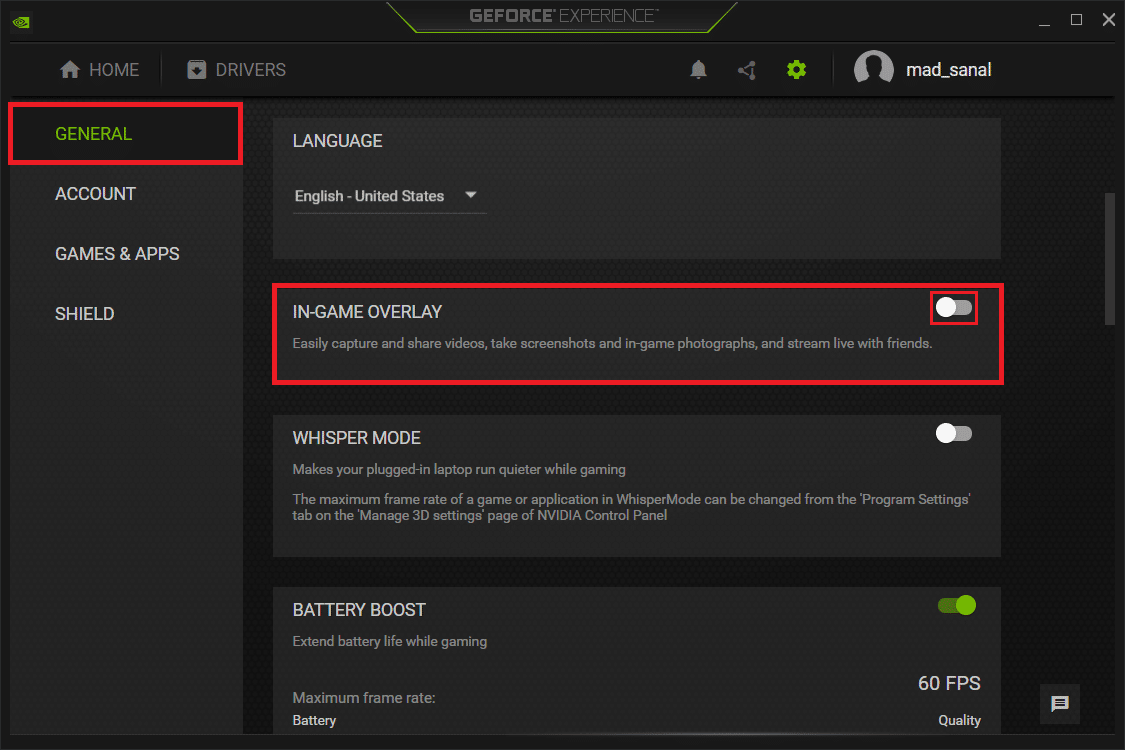
3. გადატვირთეთ კომპიუტერი to let the changes take effect.
ასევე წაიკითხე: What is NVIDIA Virtual Audio Device Wave Extensible?
Option 3: Disable Xbox Game Bar Overlay
1. დაჭერა Windows + I კლავიშები ერთად გასახსნელად პარამეტრები.
2. დაწკაპეთ Gaming settings in the left pane and Xbox თამაშის ზოლი მარჯვენა სარკმელში.
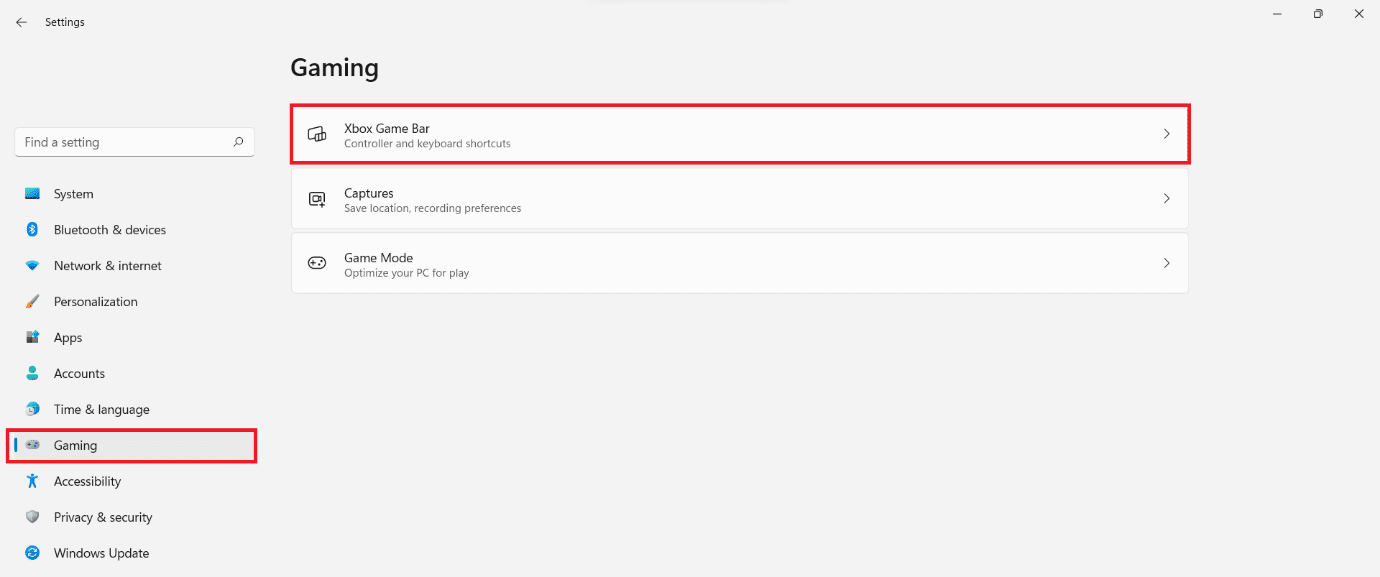
3. გადართვა Off the toggle to turn off the Xbox თამაშის ზოლი.

Method 7: Verify Integrity of Game Files (For Steam Users)
Now, if you use Steam then, you can verify integrity of game files to fix Halo Infinite Customization not loading error in Windows 11.
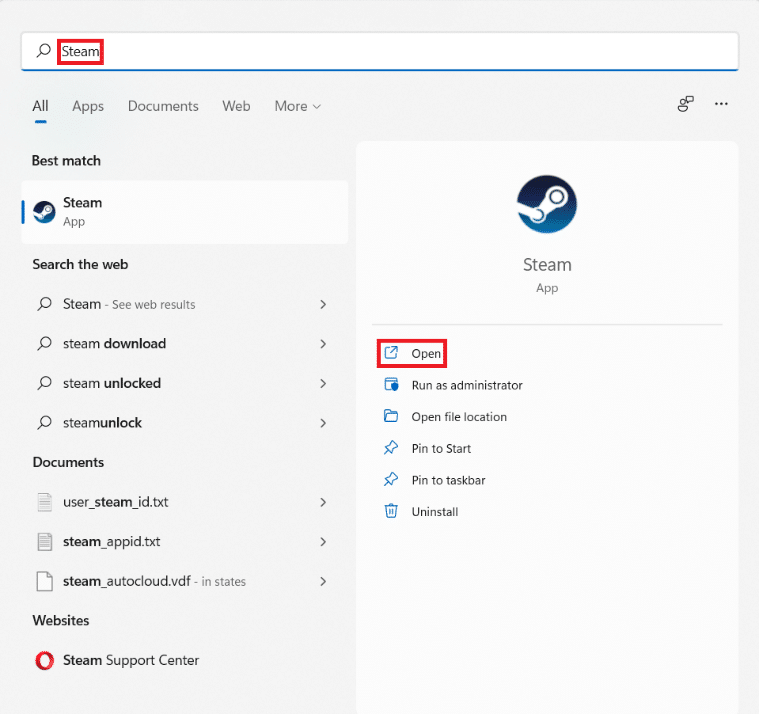
1. დაწკაპეთ ძიება ხატულა და ტიპის ორთქლის, შემდეგ დააჭირეთ ღიაა.
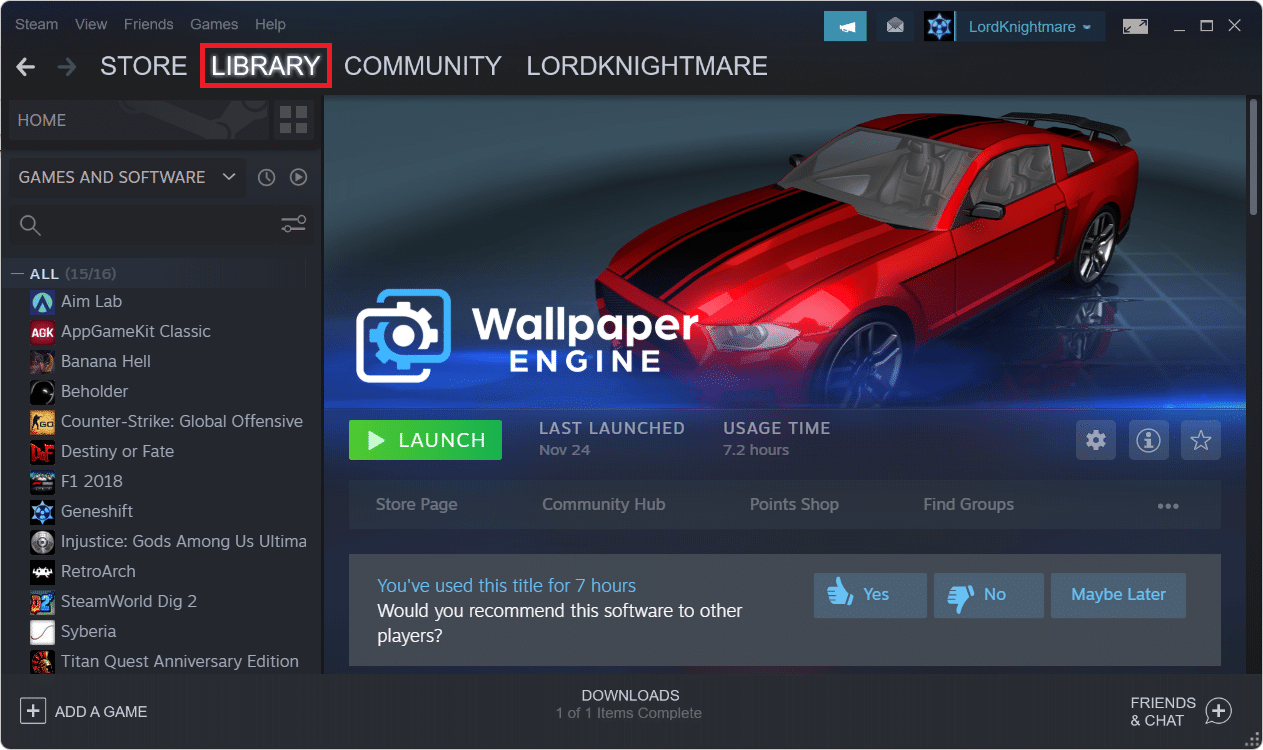
2. In Steam PC client, დააკლიკეთ ბიბლიოთეკა ჩანართი, როგორც ნაჩვენებია.
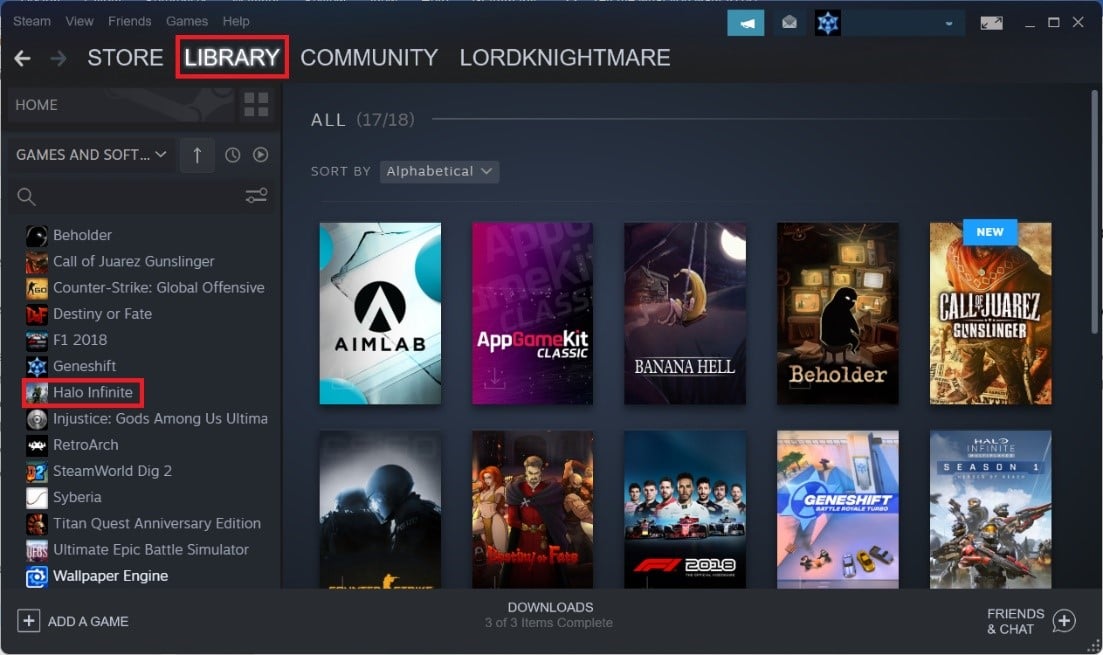
3. ძიება Halo Infinite in the left pane and right-click on it to open the context menu. Click on განცხადებები.
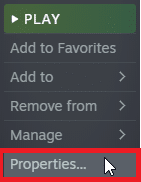
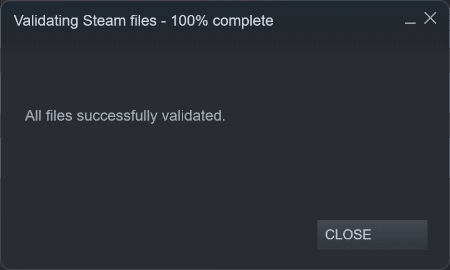
4. In განცხადებები ფანჯარა, დააჭირეთ ლოკალური ფაილები in the left pane and click on Verify Integrity of game files… shown highlighted.
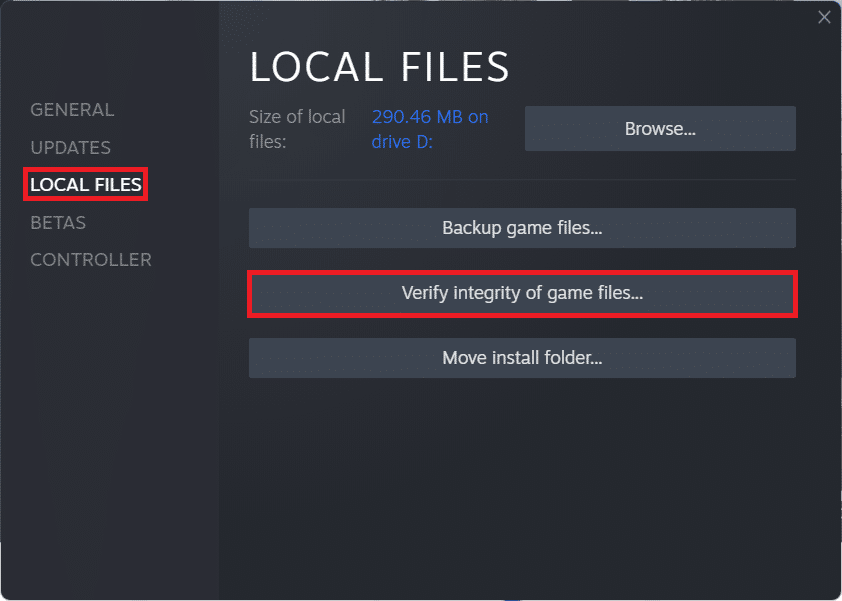
5. Steam will find discrepancies and if found, they will be replaced & rectified.
ასევე წაიკითხე: How to Change Steam Profile Picture
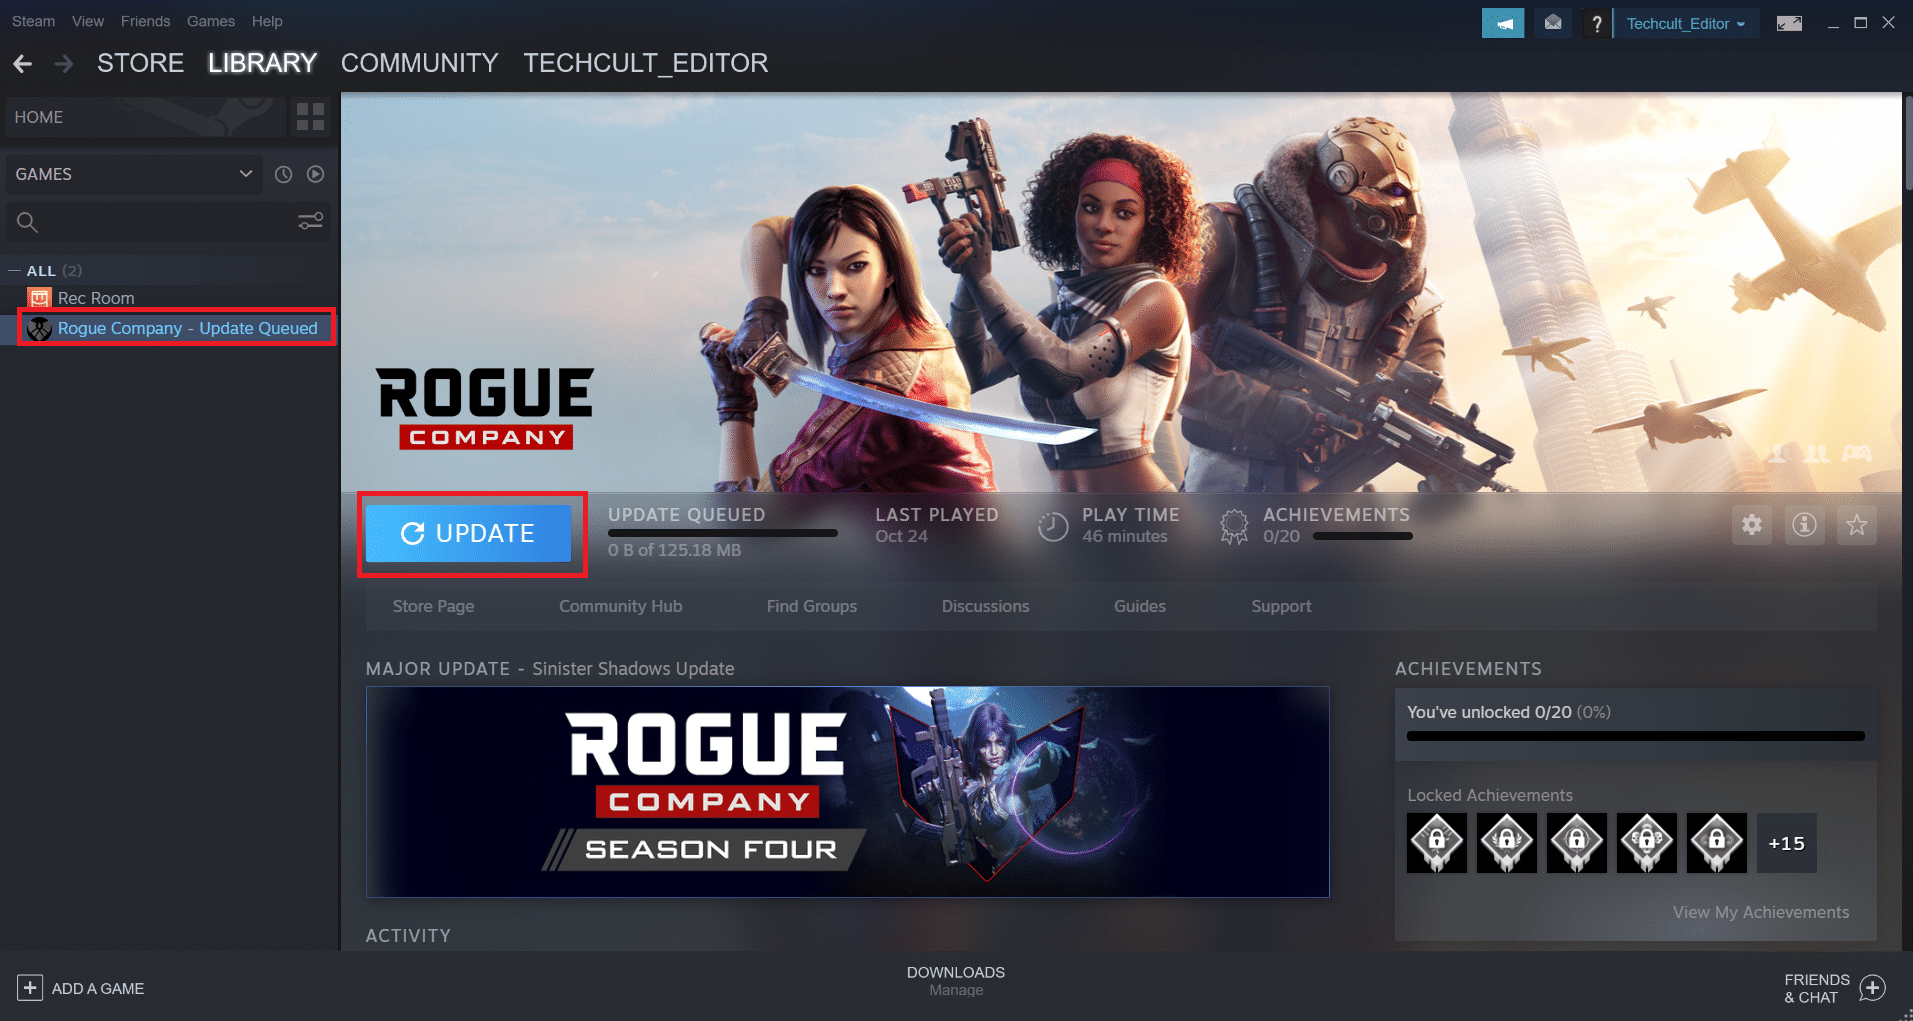
Method 8: Update Halo Infinite (For Steam Users)
Often, there may be bugs in the game, so you should update your game to fix Halo Infinite Customization not loading in Windows 11 problem.
1. დაიწყეთ ორთქლის client and switch to the ბიბლიოთეკა tab as shown in მეთოდი 7.
2. შემდეგ, დააჭირეთ ღილაკს Halo Infinite მარცხენა სარკმელზე.
3. If there is any update available, you will see the განახლების option on the game page itself. Click on it.
შენიშვნა: We have shown Update option for Rogue company for illustration purposes only.
Method 9: Use Xbox App Instead of Steam
Many of us use Steam as our primary client since it serves as a hub for the most popular PC games. Halo Infinite multiplayer is also accessible on Steam, though it may not be as bug-free as the Xbox app. As a result, we recommend downloading Halo Infinite multiplayer beta through the Xbox ოთახი ნაცვლად.
ასევე წაიკითხე: Fix Xbox One Headset Not Working
მეთოდი 10: Windows-ის განახლება
If none of the above methods work, then update your Windows OS to fix Halo Infinite Customization not loading on Windows 11 issue.
1. დაჭერა Windows + I კლავიშები ერთად გასახსნელად პარამეტრები აპლიკაცია.
2. აქ დააწკაპუნეთ Windows Update მარცხენა სარკმელზე.
3. შემდეგ, დააჭირეთ ღილაკს შეამოწმოთ განახლებები.
4. If there is any update available, click on ჩამოტვირთეთ და დააინსტალირეთ ღილაკი ნაჩვენებია მონიშნული.
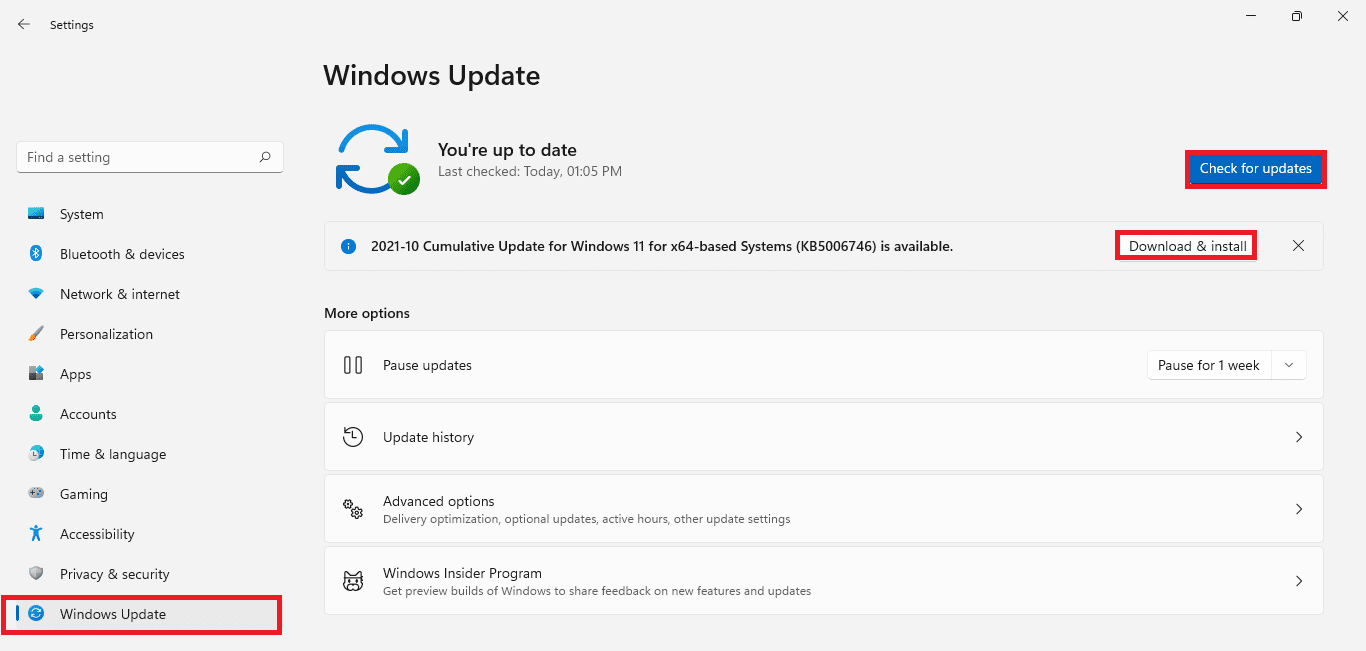
5. დაელოდე Windows to download and install the updates. Finally, გადატვირთვა თქვენი კომპიუტერი.
Pro Tip: System Requirements for Halo Infinite
მინიმალური სისტემური მოთხოვნები
| მოითხოვს 64- ის პროცესორი და ოპერაციული სისტემა | |
| ოპერაციული სისტემები | Windows 10 RS5 x64 |
| პროცესორი | AMD Ryzen 5 1600 ან Intel i5-4440 |
| მეხსიერება | 8 GB RAM |
| გრაფიკა | AMD RX 570 ან NVIDIA GTX 1050 Ti |
| DirectX | ვერსია 12 |
| შენახვის ადგილი | X GB GB ხელმისაწვდომი სივრცე |
რეკომენდებული სისტემის მოთხოვნები
| მოითხოვს 64- ის პროცესორი და ოპერაციული სისტემა | |
| ოპერაციული სისტემები | Windows 10 19H2 x64 |
| პროცესორი | AMD Ryzen 7 3700X ან Intel i7-9700k |
| მეხსიერება | 16 GB RAM |
| გრაფიკა | Radeon RX 5700 XT or NVIDIA RTX 2070 |
| DirectX | ვერსია 12 |
| შენახვის ადგილი | X GB GB ხელმისაწვდომი სივრცე |
რეკომენდებული:
We hope the article proved to be useful on how to fix Halo Infinite Customization not loading in Windows 11. We welcome all your suggestions and queries so please write to us in the comment box down below. We would also love to hear from you about the next topic that you want us to explore next.

