Fix The Service Couldn’t Be Started Windows Defender Error 0x80070422: Windows Defender is a malware protection software which is inbuilt into Windows 10. Now it is used widely by Windows users because it’s reliable, but in some cases, users also installed 3rd party Antivirus software such as Norton, Quick Heal etc which is not recommend because they corrupt the files of Windows Defender. Once you completely uninstall 3rd party antivirus you won’t be able to use Windows Defender properly because files required by it have already been corrupted and can no longer be used.
“The service couldn’t be started.
The service cannot be started, either because it is disabled or because it has no enabled devices associated with it.”
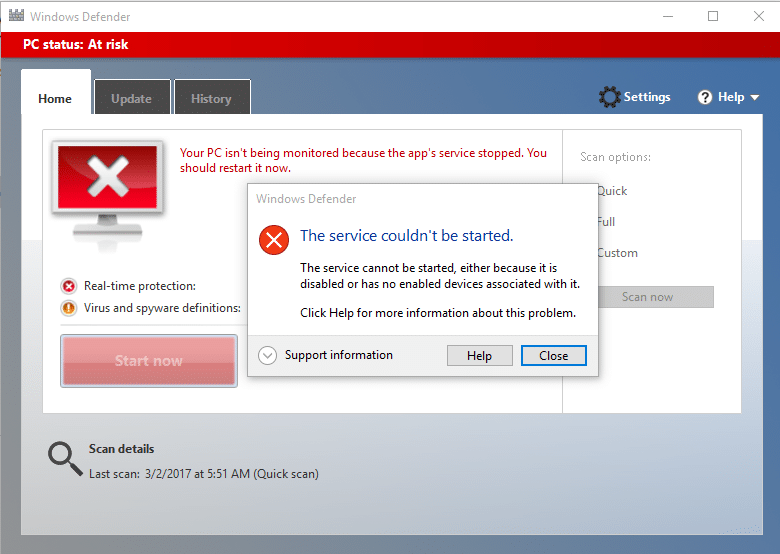
Windows Defender is turned off when you use a 3rd party Antivirus and once you uninstall the Antivirus software you won’t be able to turn ON Windows Defender. If you try to enable Windows Defender you will face the error “The Service Couldn’t Be Started” with error code 0x80070422. So without wasting any time let’s see how to actually Fix The Service Couldn’t Be Started Windows Defender Error 0x80070422 with the help of below-listed troubleshooting guide.
Fix The Service Couldn’t Be Started Windows Defender Error 0x80070422
დარწმუნდით, რომ შექმენით აღდგენის წერტილი, თუ რამე არასწორედ მოხდება.
მეთოდი 1: გაუშვით SFC და CHKDSK
1. დააჭირეთ Windows Key + X და შემდეგ დააწკაპუნეთ ბრძანების მოთხოვნა (Admin).

2. ახლა ჩაწერეთ შემდეგი cmd-ში და დააჭირეთ Enter:
Sfc /scannow sfc /scannow /offbootdir=c: /offwindir=c:windows (თუ ზემოთ ვერ მოხერხდა, სცადეთ ეს)

3. დაელოდეთ ზემოაღნიშნული პროცესის დასრულებას და დასრულების შემდეგ გადატვირთეთ კომპიუტერი.
4. შემდეგი, გაუშვით CHKDSK აქედან შეასწორეთ ფაილური სისტემის შეცდომები Check Disk Utility-ით (CHKDSK).
5. დაასრულეთ ზემოაღნიშნული პროცესი და ხელახლა გადატვირთეთ კომპიუტერი ცვლილებების შესანახად.
Method 2: Temporarily Disable 3rd party Antivirus
1. დააწკაპუნეთ მაუსის მარჯვენა ღილაკით ანტივირუსული პროგრამის ხატულა სისტემის უჯრიდან და აირჩიეთ გამორთვა.

2.შემდეგი, აირჩიეთ დრო, რომლისთვისაც ანტივირუსი გამორთული დარჩება.

შენიშვნა: აირჩიეთ ყველაზე მცირე დრო, მაგალითად 15 წუთი ან 30 წუთი.
3.Once done, again try to run Windows Defender and check if the error resolves or not.
4. დააჭირეთ Windows Key + X და შემდეგ აირჩიეთ Მართვის პანელი.

5. შემდეგი, დააწკაპუნეთ Სისტემა და უსაფრთხოება.
6. შემდეგ დააწკაპუნეთ Windows Firewall.

7. ახლა მარცხენა ფანჯრის ფანჯრიდან დააწკაპუნეთ Windows Firewall-ის ჩართვა ან გამორთვა.

8.აირჩიეთ გამორთეთ Windows Firewall და გადატვირთეთ კომპიუტერი. Again try to open Windows Defender and see if you’re able to Fix The Service Couldn’t Be Started Windows Defender Error 0x80070422.
თუ ზემოთ მოყვანილი მეთოდი არ მუშაობს, დარწმუნდით, რომ მიჰყევით ზუსტად იგივე ნაბიჯებს თქვენი Firewall-ის ხელახლა ჩართვისთვის.
მეთოდი 3: დარწმუნდით, რომ Windows განახლებულია
1. დააჭირეთ Windows Key + I და შემდეგ აირჩიეთ განახლება და უსაფრთხოება.

2. შემდეგი, კვლავ დააწკაპუნეთ შეამოწმოთ განახლებები და დარწმუნდით, რომ დააინსტალირეთ ნებისმიერი მომლოდინე განახლება.

3. განახლებების დაინსტალირების შემდეგ გადატვირთეთ კომპიუტერი და ნახეთ, შეძლებთ თუ არა Fix The Service Couldn’t Be Started Windows Defender Error 0x80070422.
Method 4: Make sure Windows Defender service is set to Automatic
შენიშვნა: If Windows Defender service is grayed out in Services Manager then follow this post.
1. დააჭირეთ Windows Key + R და შემდეგ ჩაწერეთ services.msc და დააჭირეთ Enter.

2.Find the following services in the Services window:
Windows Defender Antivirus Network Inspection Service
Windows Defender Antivirus Service
Windows Defender Security Center Service
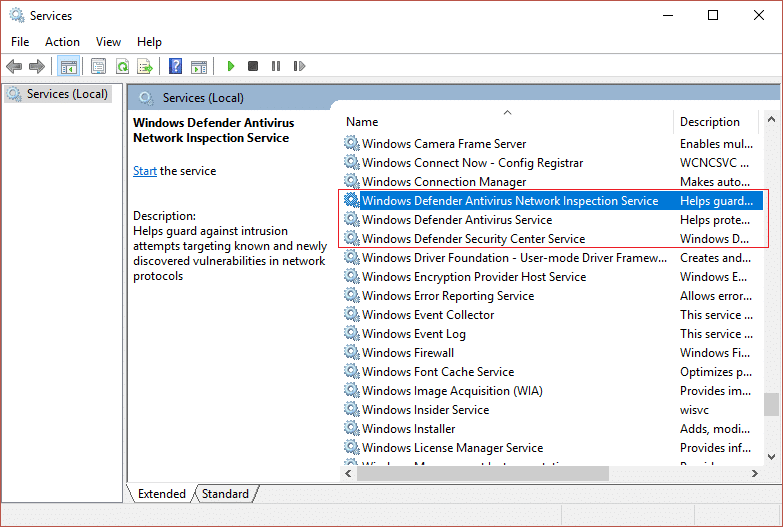
3.Double-click on each of them and make sure their Startup type is set to ავტომატური and click Start if the services are not already running.
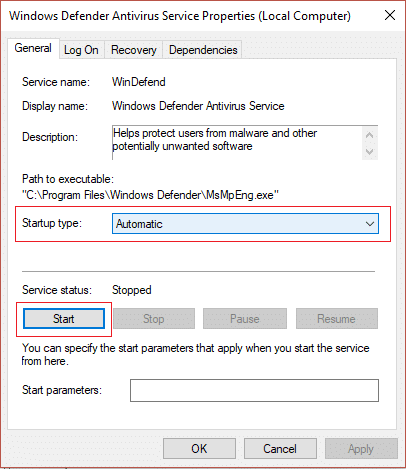
4. დააწკაპუნეთ Apply-ზე და შემდეგ OK.
5. გადატვირთეთ კომპიუტერი, რომ შეინახოთ ცვლილებები და ნახოთ, შეძლებთ თუ არა Fix The Service Couldn’t Be Started Windows Defender Error 0x80070422.
Method 5: Enable Windows Defender through Registry Editor
1. დააჭირეთ Windows Key + R და შემდეგ ჩაწერეთ regedit და დააჭირეთ Enter.

2. გადადით შემდეგ რეესტრის გასაღებზე:
HKEY_LOCAL_MACHINESYSTEM მიმდინარე კონტროლი მოწყობილობების სერვისები Win Defend
3.ახლა დააწკაპუნეთ მაუსის მარჯვენა ღილაკით WinDefend და აირჩიეთ ნებართვები.
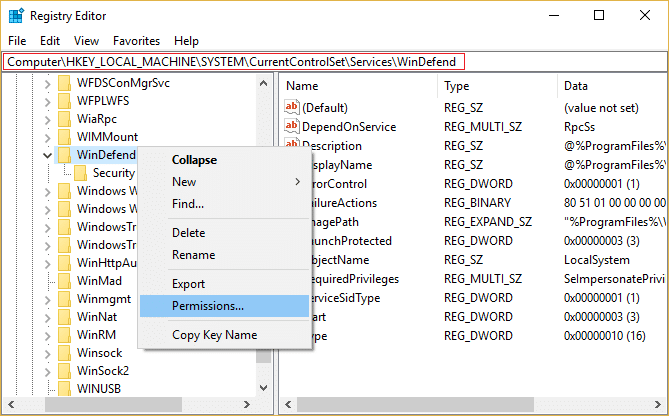
4.Follow this guide in order to take full control or ownership of the above registry key.
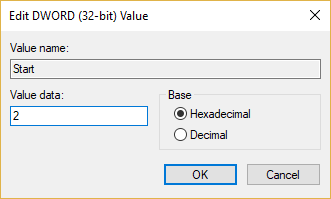
5.After that make sure you have selected WinDefend then in the right window double-click on Start DWORD.
6.Change the value to 2 in the value data field and click OK.
7. დახურეთ რეესტრის რედაქტორი და გადატვირთეთ კომპიუტერი.
8.Again try to enable Windows Defender and this time it should work.
მეთოდი 6: გაუშვით CCleaner და Malwarebytes
1.ჩამოტვირთეთ და დააინსტალირეთ CCleaner & მავნე პროგრამები.
2.გაუშვით Malwarebytes და მიეცით საშუალება დაასკანიროს თქვენი სისტემა მავნე ფაილებისთვის.
3. თუ მავნე პროგრამა იქნა ნაპოვნი, ის ავტომატურად წაშლის მათ.
4. ახლა გაიქეცი CCleaner და "Cleaner" განყოფილებაში, Windows ჩანართში, ჩვენ გირჩევთ შეამოწმოთ შემდეგი არჩევანი გასასუფთავებლად:

5. მას შემდეგ რაც დარწმუნდებით, რომ სათანადო ქულები შემოწმებულია, უბრალოდ დააწკაპუნეთ გაუშვით სუფთა, და მიეცით საშუალება CCleaner-ს გაუშვას თავისი კურსი.
6. სისტემის შემდგომი გასასუფთავებლად აირჩიეთ რეესტრის ჩანართი და დარწმუნდით, რომ შეამოწმეთ შემდეგი:

7. აირჩიეთ Scan for Issue და მიეცით CCleaner-ს სკანირების საშუალება, შემდეგ დააწკაპუნეთ შერჩეული საკითხების დაფიქსირება.
8. როდესაც CCleaner ითხოვს "გსურთ სარეზერვო ცვლილებები რეესტრში?” აირჩიეთ დიახ.
9. როგორც კი თქვენი სარეზერვო ასლის შექმნა დასრულდება, აირჩიეთ Fix All Selected Issues.
10. გადატვირთეთ კომპიუტერი, რომ შეინახოთ ცვლილებები და ნახოთ, შეძლებთ თუ არა Fix The Service Couldn’t Be Started Windows Defender Error 0x80070422.
Method 7: Refresh or Reset your PC
1. დააჭირეთ Windows Key + I გასახსნელად Settings და აირჩიეთ განახლება და უსაფრთხოება.
2.From left-hand menu select აღდგენა და დააჭირეთ ღილაკს ”მიიღეთ დაიწყო” under Reset this PC.

3. აირჩიეთ ვარიანტი შეინახეთ ჩემი ფაილი.

4.Follow the instructions on the screen to complete the process.
5.This will take some time and your computer will restart.
მეთოდი 8: შეკეთება დააინსტალირეთ Windows 10
This method is the last resort because if nothing works out then this method will surely repair all problems with your PC. Repair Install just using an in-place upgrade to repair issues with the system without deleting user data present on the system. So follow this article to see How to Repair Install Windows 10 Easily.
Შენთვის რეკომენდირებული:
ეს არის ის, თქვენ წარმატებით Fix The Service Couldn’t Be Started Windows Defender Error 0x80070422 მაგრამ თუ ჯერ კიდევ გაქვთ რაიმე შეკითხვები ამ სახელმძღვანელოსთან დაკავშირებით, მოგერიდებათ დაუსვათ ისინი კომენტარების განყოფილებაში.

