თუ თქვენ ეძებთ გზას Block Internet Access or connectivity on Windows 10 PC then don’t look any further as today in this article we will see how you can disable internet access on your PC. There can many n numbers of reasons as to why you want to block internet access for example, on home PC, a child or family member might mistakenly install some malware or virus from the internet, sometimes you want to save your internet bandwidth, organizations disable internet so that employees can focus more on the work etc. This article will list all the possible methods using which you can easily block internet connection and you can also block internet access for programs or applications.

Windows 10 რჩევა: როგორ დავბლოკოთ ინტერნეტი
დარწმუნდით, რომ შექმენით აღდგენის წერტილი, თუ რამე არასწორედ მოხდება.
მეთოდი 1: გამორთეთ ინტერნეტ კავშირი
You can block internet connection from any specific network through network connection settings. Follow these steps to disable the internet for any specific network.
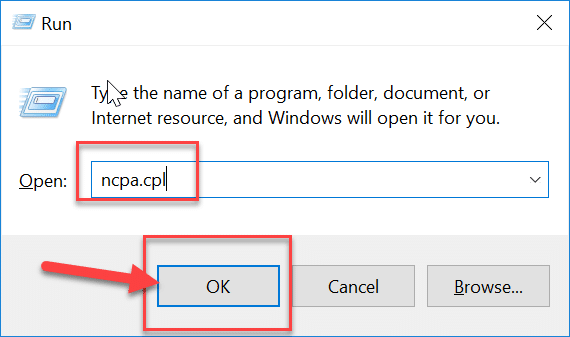
1. დააჭირეთ Windows Key + R და შემდეგ ჩაწერეთ ncpa.cpl და დააჭირეთ Enter- ს გასახსნელად ქსელთან კავშირი window.
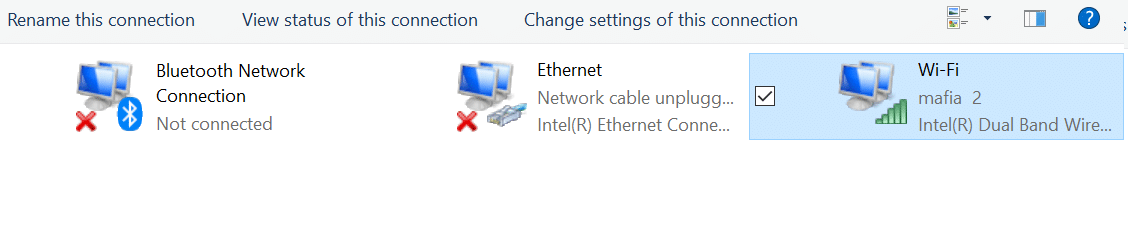
2.This will open the network connection window where you can see your Wi-Fi, Ethernet network etc. Now, choose the network which you want to disable.
3.Now, right-click on that particular network და აირჩიეთ გამორთე პარამეტრებიდან.
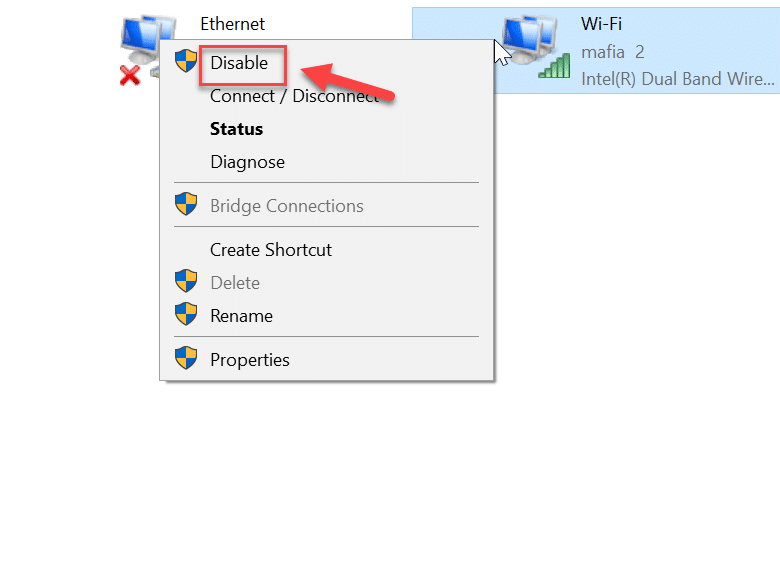
This will disable the internet for that respective network connection. If you want to “ჩართვა” this network connection, follow these similar steps and this time choose “ჩართვა".
Method 2: Block Internet Access Using System Host File
A website can be easily blocked through the system host file. It is one of the easiest methods to block any websites, so just follow these steps:
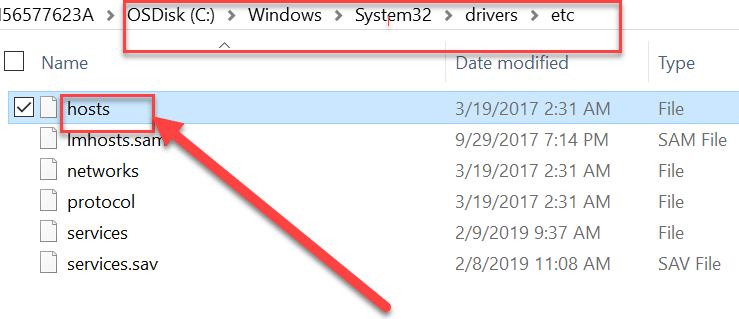
1.Navigate to the following path from the File Explorer:
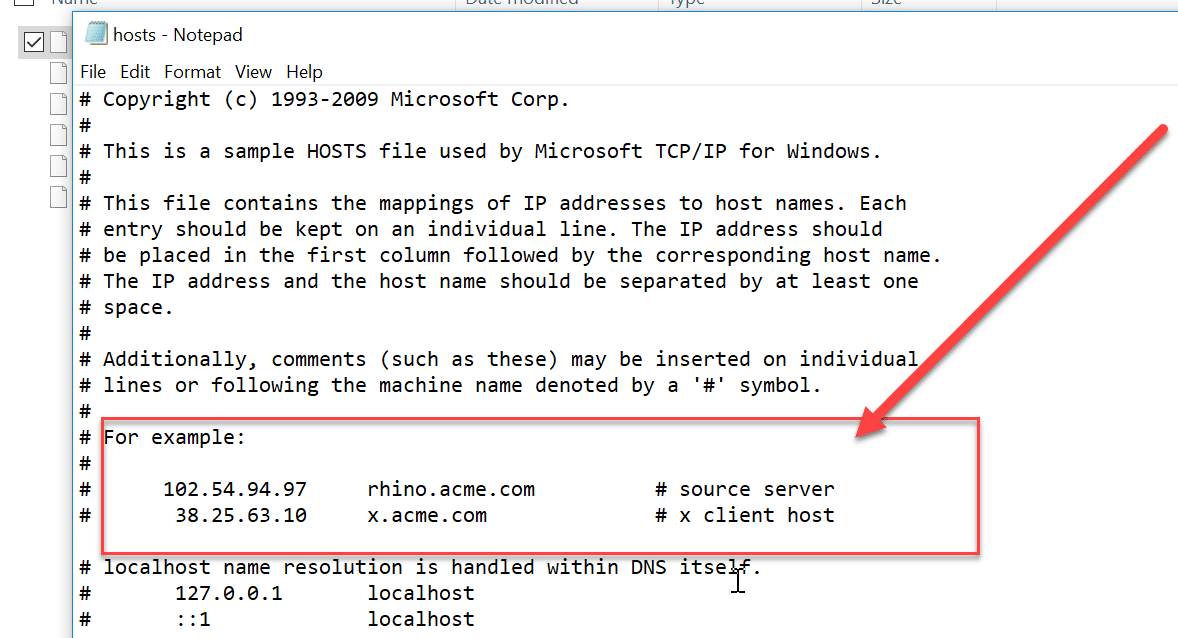
C:/Windows/System32/drivers/etc/hosts
2.Double-click on the მასპინძლებს ფაილი then from the list of programs select ჩასაწერი და დაწკაპეთ OK.
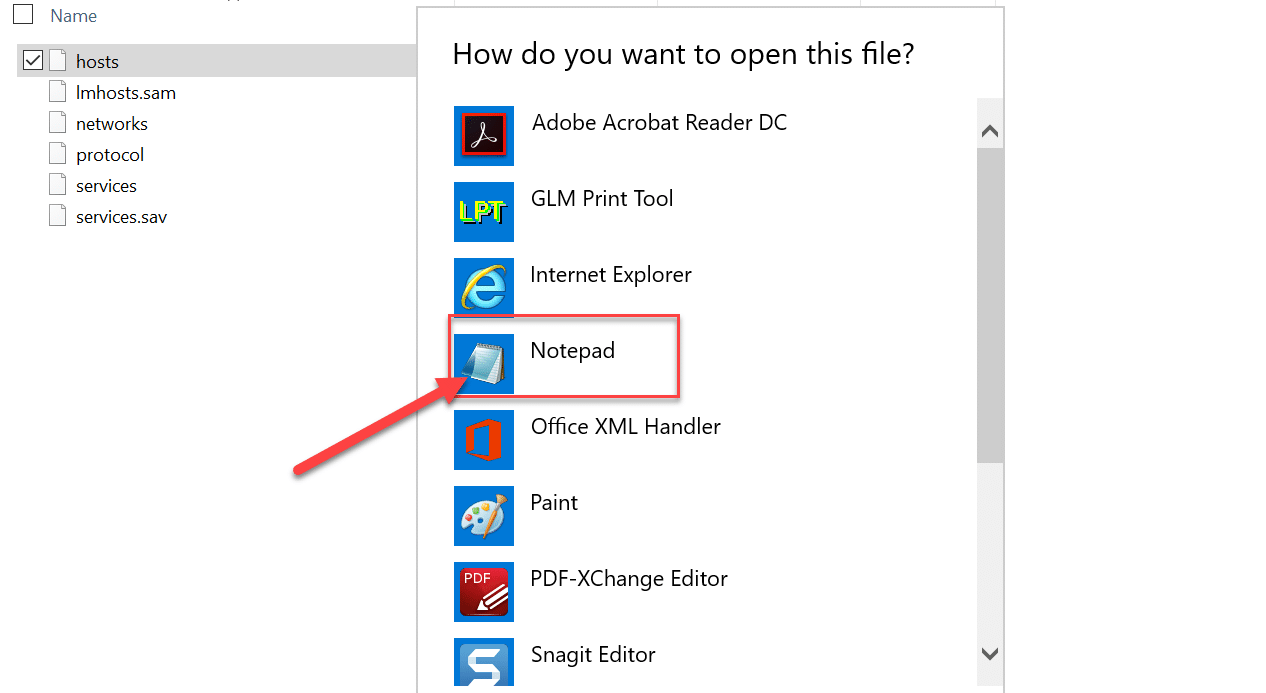
3.This will open the hots file in notepad. Now type the website name and the IP address which you want to be blocked.
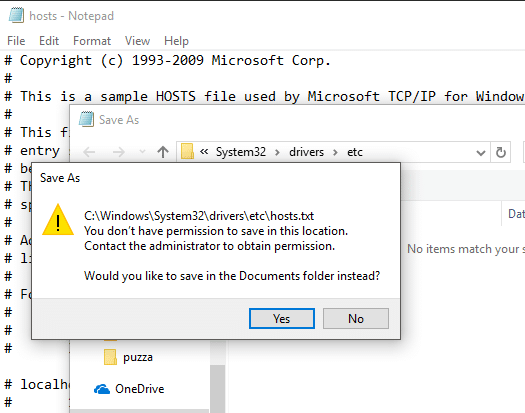
4.Press Ctrl + S to save the changes. If you’re unable to save then you need to follow this guide to fix the issue: Want to Edit the Hosts File in Windows 10? Here is how to do it!
საშუალებას 3: Block Internet Access Using მშობელთა კონტროლის გამოყენება
You can block any website with a parental control feature. This feature helps you define which websites should be allowed, and which websites should be restricted on your system. You can also put data limit (bandwidth) on the internet. This feature can be implement by following these steps:
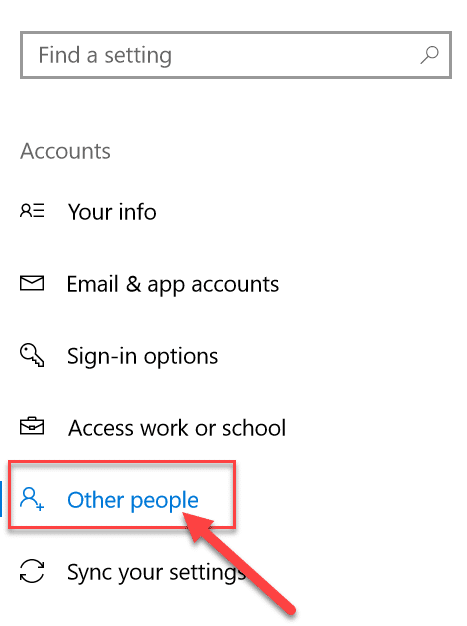
1. გასახსნელად დააჭირეთ Windows Key + I პარამეტრები შემდეგ დააჭირეთ აკონt icon to open account related settings.
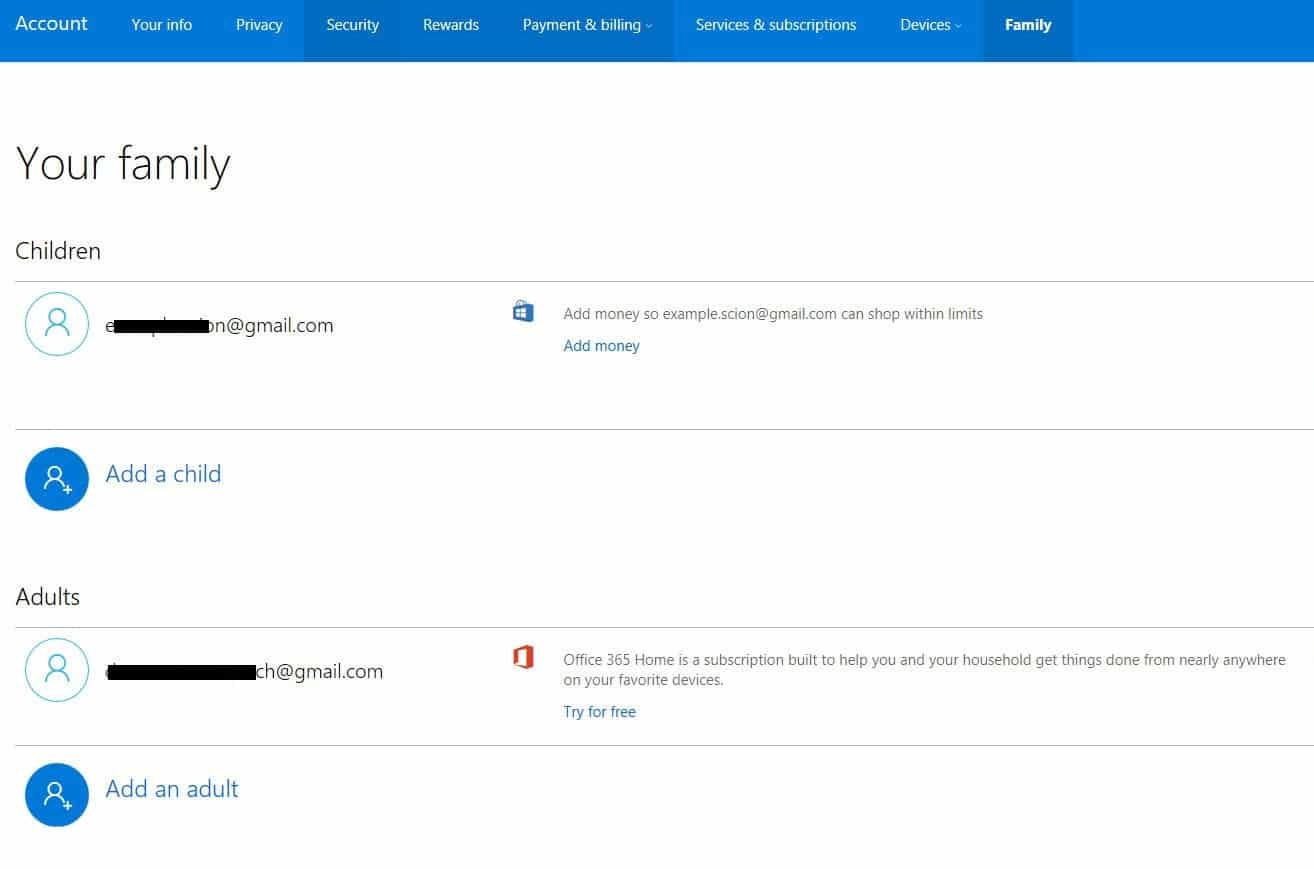
2.Now from the left-hand side menu select “Სხვა ხალხი"ვარიანტი.
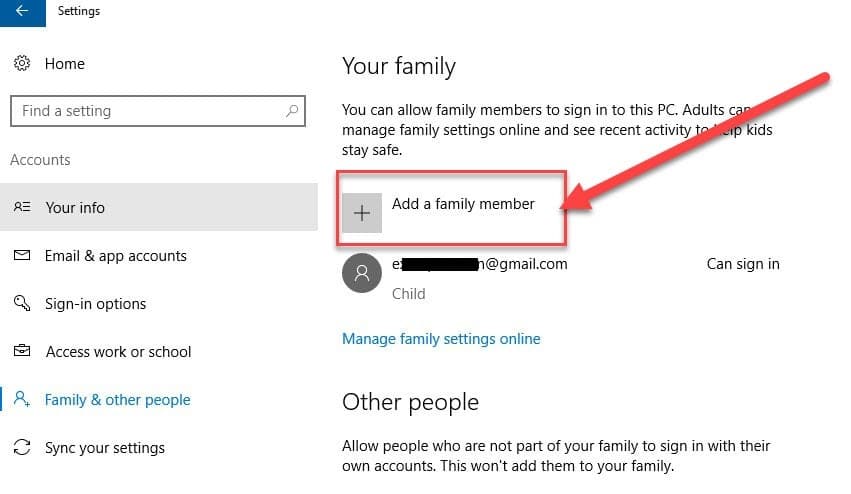
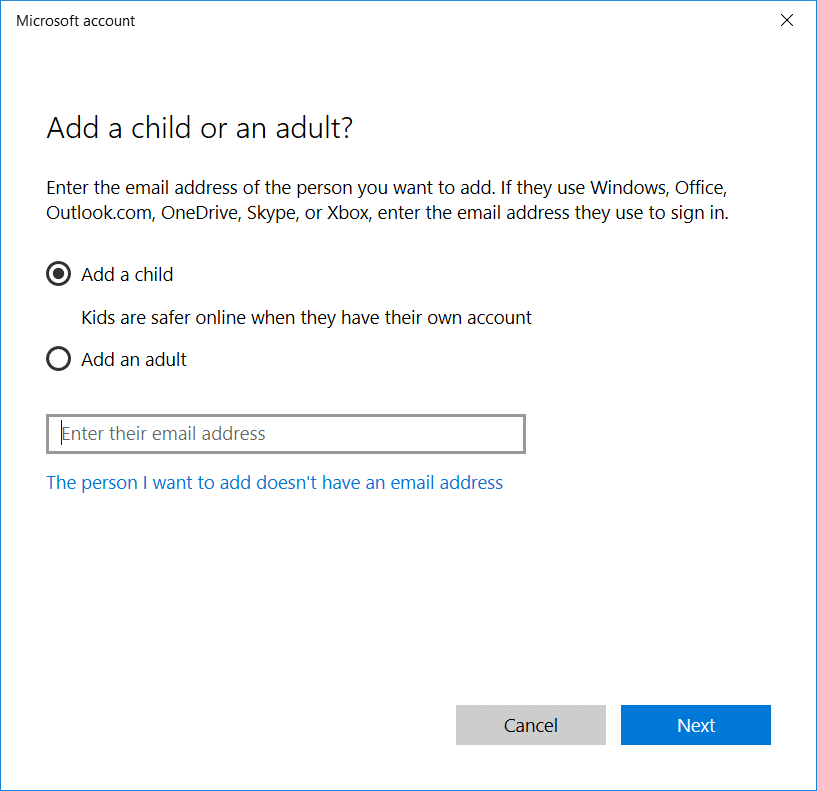
3.Now, you need to ოჯახის წევრის დამატება როგორც ბავშვი ან როგორც ან ზრდასრული under the option “ოჯახის წევრის დამატება".
 '
'
4.Now click on “Manage Family Setting online” to change the parental setting for the accounts.
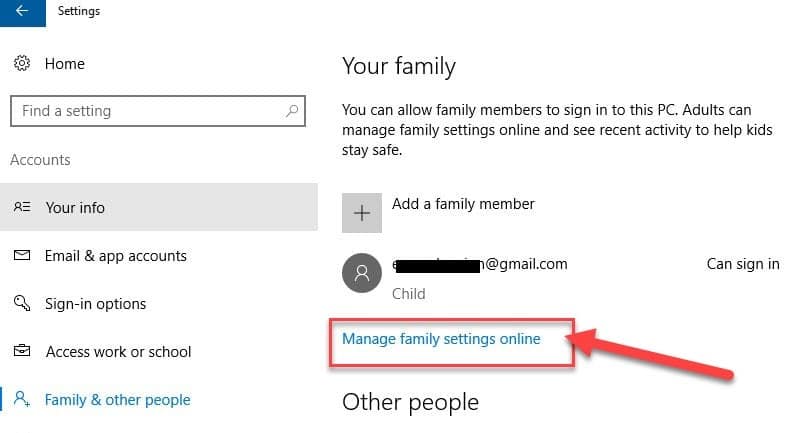
5.This will open a web page of Microsoft parental control. Here, all the adult and child account would be visible, which you have created for your Windows 10 PC.
6.Next, click on the recent activity option at the top-right corner of the screen.
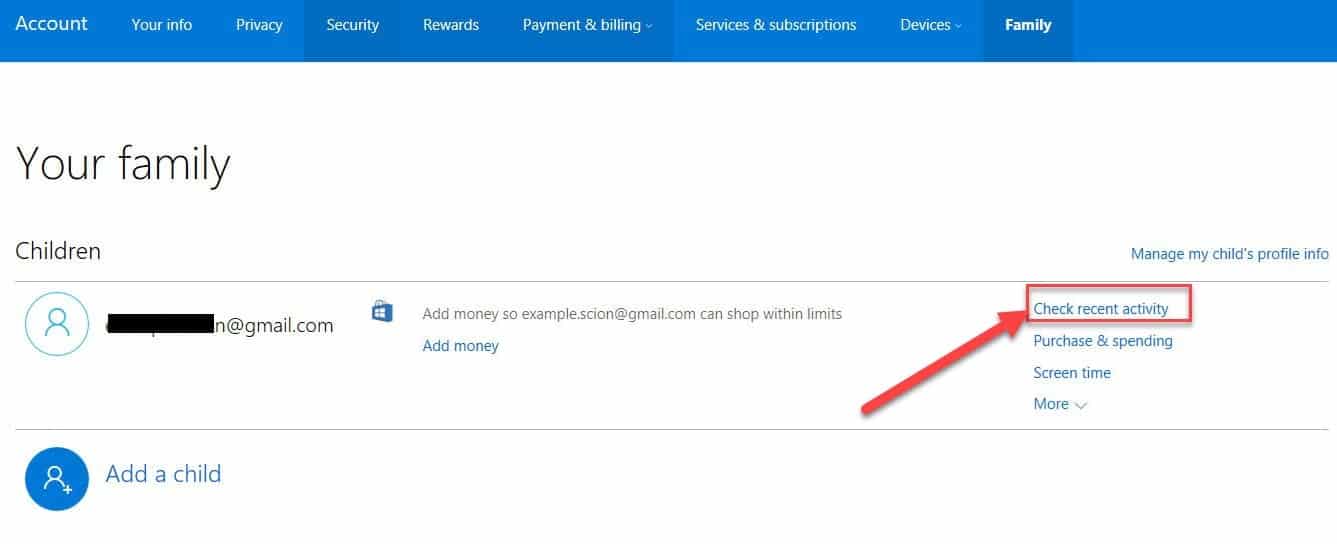
7.This will open a screen where you can apply different restriction related to the internet and games under “შინაარსის შეზღუდვა"Tab.
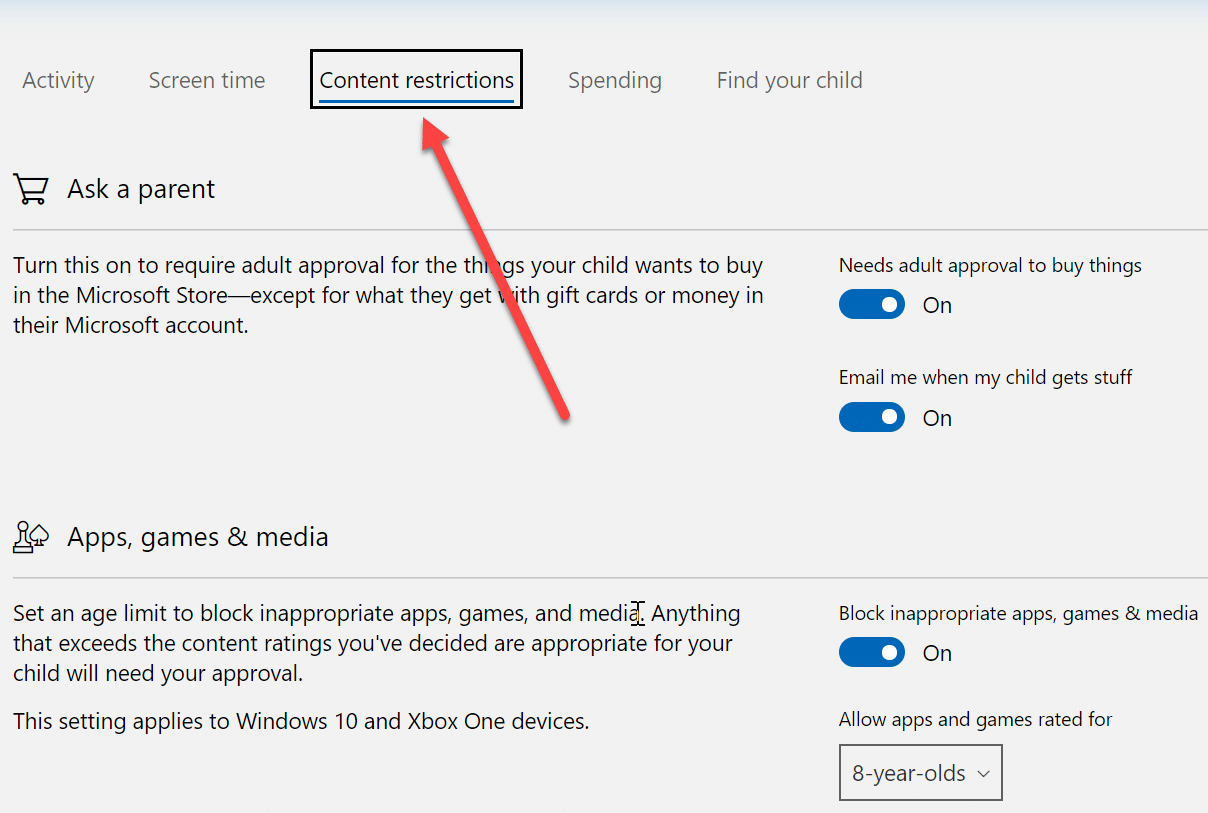
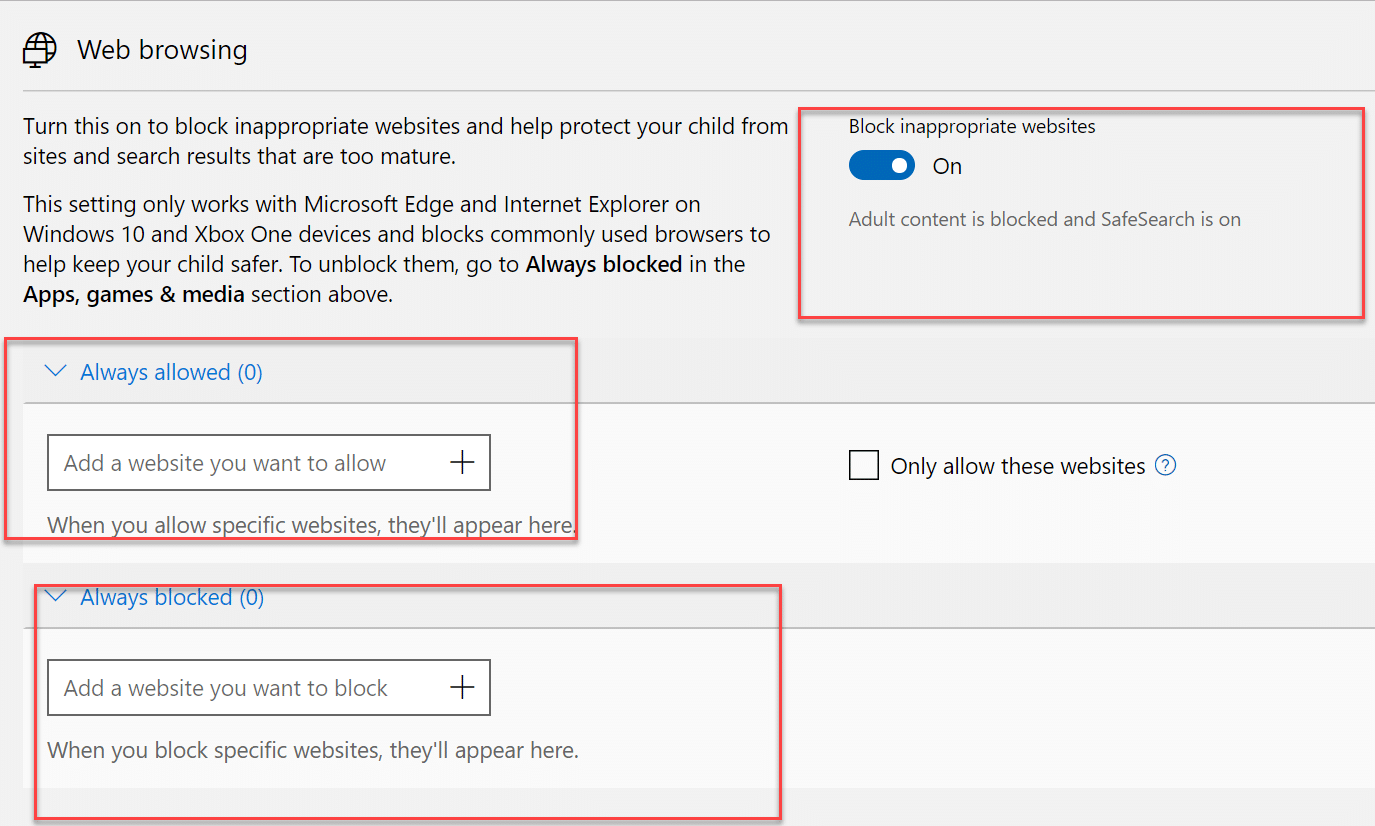
8.Now you can restrict the websites ასევე enable safe search. You can also specify which websites are allowed and which ones are blocked.
Method 4: Disable Internet Access Using Proxy Server
You can block all the websites by using the proxy server option in internet explorer. You can change the proxy server through these steps:
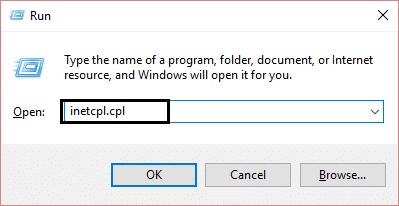
1. დააჭირეთ Windows Key + R და შემდეგ ჩაწერეთ "inetcpl.cpl” and hit Enter to open Internet Properties.
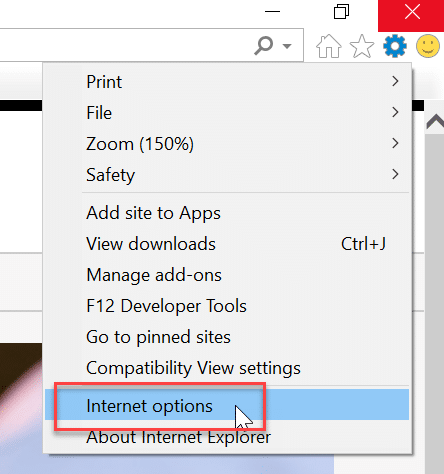
შენიშვნა: You can also open Internet Properties by using Internet Explorer, select პარამეტრები > ინტერნეტ პარამეტრები.
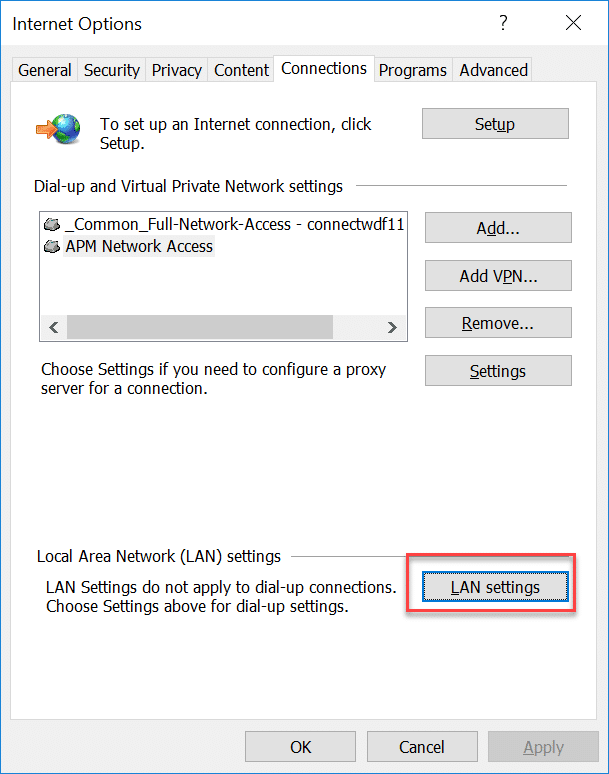
2. გადახვიდეთ კავშირიs tab and click on the “LAN პარამეტრები".
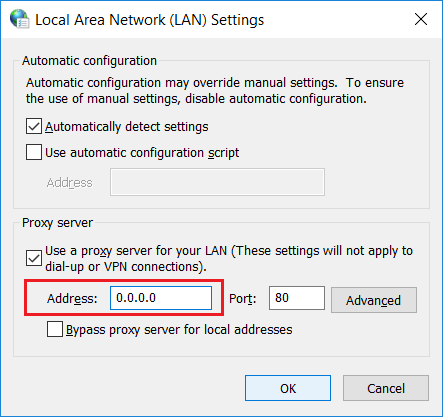
4.Make sure to checkmark “გამოიყენეთ პროქსი სერვერი თქვენი LAN- ისთვის” option then type any fake IP address (ex: 0.0.0.0) under the address field and click OK to save changes.
Disable Proxy Settings using Registry Editor
You should be careful using the registry because any mistake can result in permanent damage to your system. So it is recommended that you create a full back up of your registry before making any changes. Just follow the step below to block internet connection through the registry.
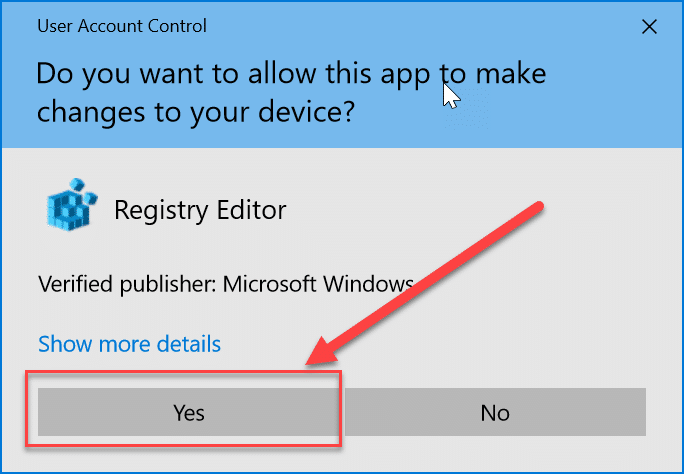
1. დააჭირეთ Windows Key + R და შემდეგ ჩაწერეთ regedit და დააჭირეთ Enter-ს რეესტრის რედაქტორის გასახსნელად.

2.When you run the above command, it will ask for permission. Click on “დიახ” to open the Registry Editor.
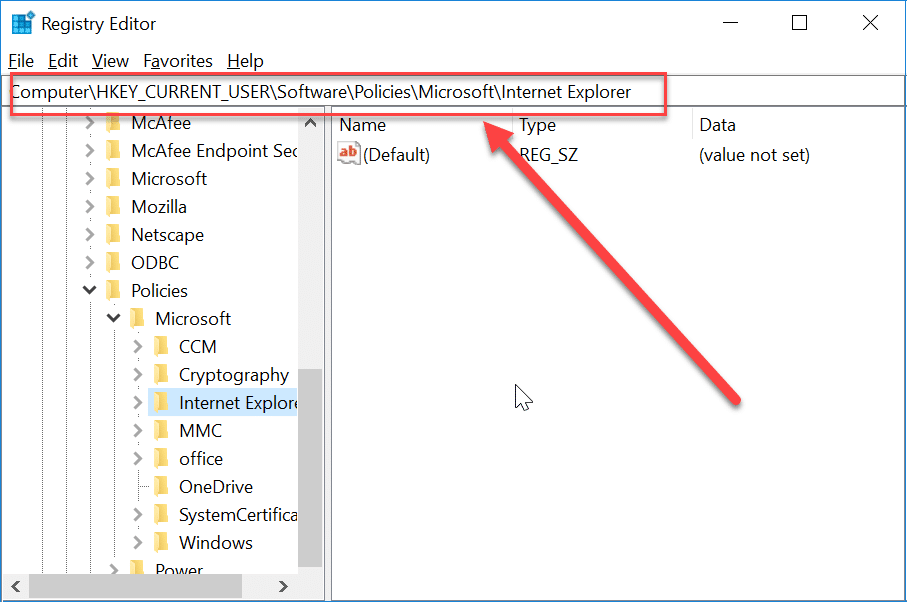
3.Now, navigate to the following location in the Registry Editor:
HKEY_CURRENT_USERSoftwarePoliciesMicrosoftInternet Explorer
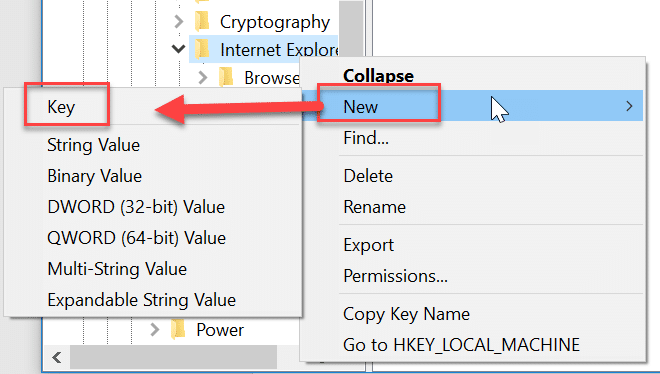
4.Now right-click on the internet Explorer და აირჩიეთ New > key. Name this new key as “შეზღუდვები” & hit Enter.
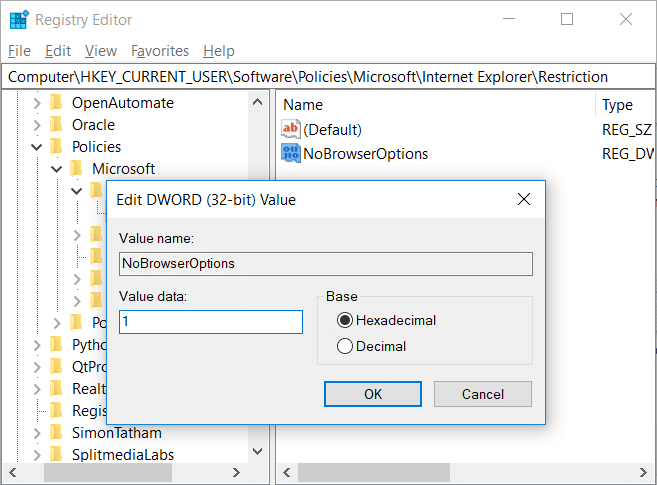
5.Then again right-click on the “შეზღუდვა” key then select New > DWORD (32-Bit) Value.
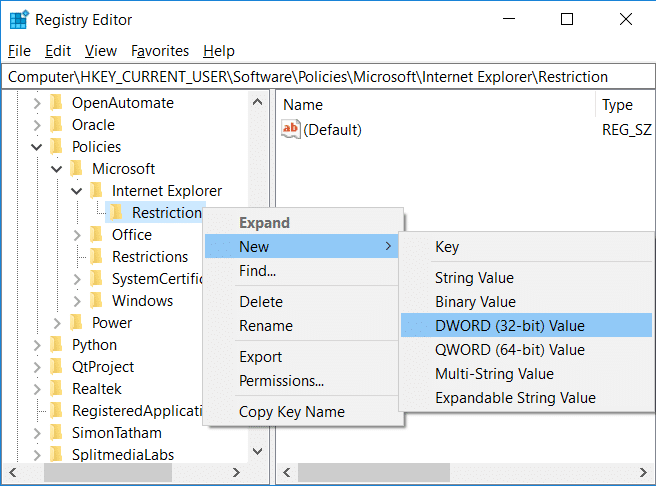
6.Name this new DWORD as “NoBrowserOptions”. Double-click on this DWORD and change the value data to ‘1’ from ‘0’.
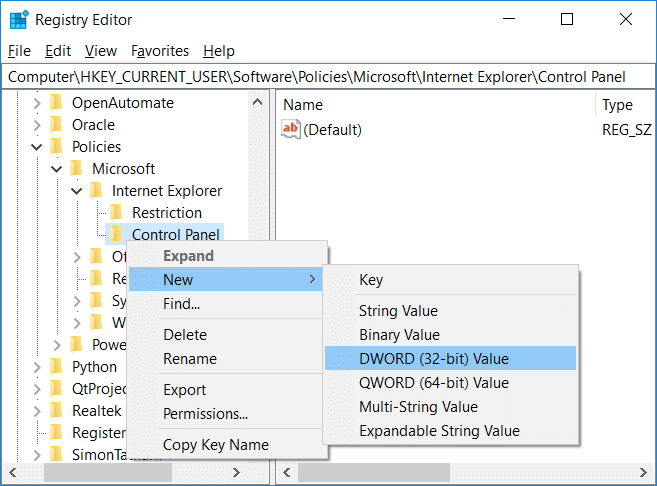
7.Again right-click on internet Explorer აირჩიეთ ახალი> გასაღები. Name this new key as “პანელი".
8. დააწკაპუნეთ მარჯვენა ღილაკით პანელი აირჩიეთ New > DWORD(32-bit) Value.
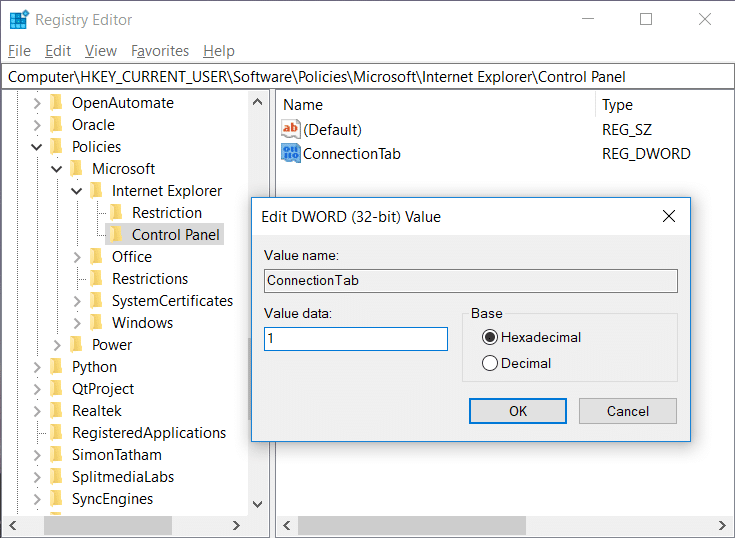
9.Name this new DWORD as “ConnectionTab” and change its value data to ‘1’.
10.Once finished, close the Registry Editor and reboot your PC to save changes.
After the PC restarts, no one will be able to change the proxy settings using Internet Explorer or Control Panel. Your proxy address will be the last address which you used in the above method. Finally, you have disabled or block Internet Access in Windows 10 but if in future you need to access the internet then just navigate to Internet Explorer registry key მარჯვენა ღილაკის on შეზღუდვა და აირჩიეთ წაშლა. Similarly, right-click on Control Panel & again select Delete.
Method 5: Disable Network Adapter
You can block the internet by disabling network adapters. Through this method, you will able to block all the internet access on your PC.
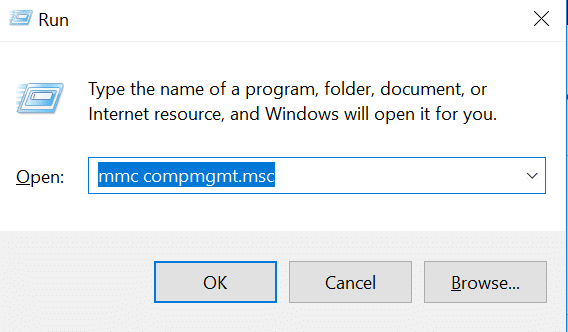
1.Press Windows Key + R then type “mmc compmgmt.msc” (without quotes) and hit Enter.
2.ეს გაიხსნება კომპიუტერის მართვა, from where click on Device Manager under the System Tools section.
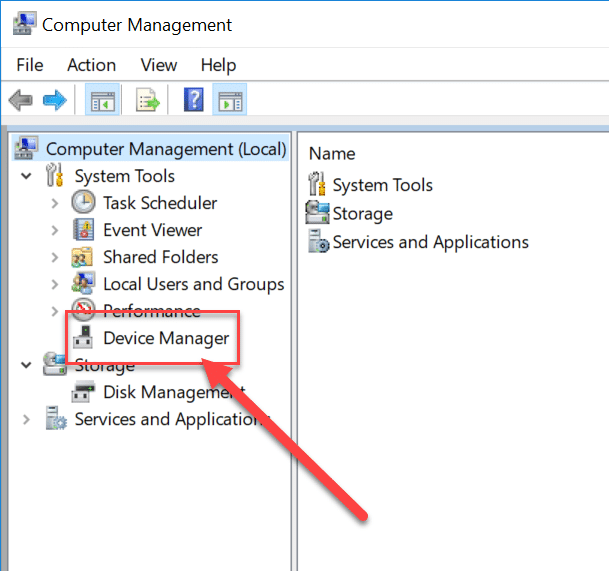
3.Once Device Manager opens, scroll down and click on “Ქსელის შეერთება” to expand it.
4.ახლა choose any device then right-click on it and select გამორთვა.
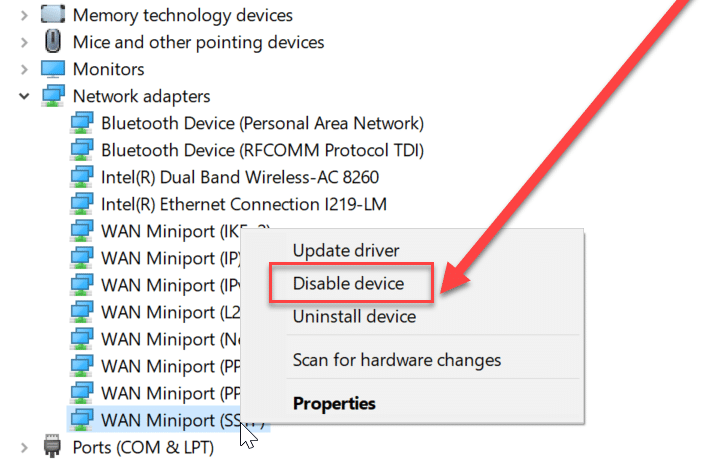
If in future you want to use that device again for the network connection then follow the above steps then right-click on that device and select Enable.
How to Block Internet Access to Programs
Method A: Use Windows Firewall
Windows firewall is basically used to prevent unauthorized access into the system. But you can also use a window firewall to block internet access for any application. You need to create a new rule for that program through the following steps.
1.მოძებნეთ პანელი using the Windows Search.
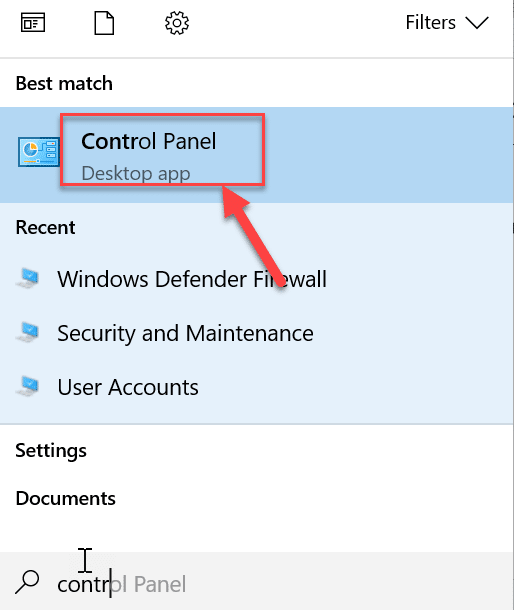
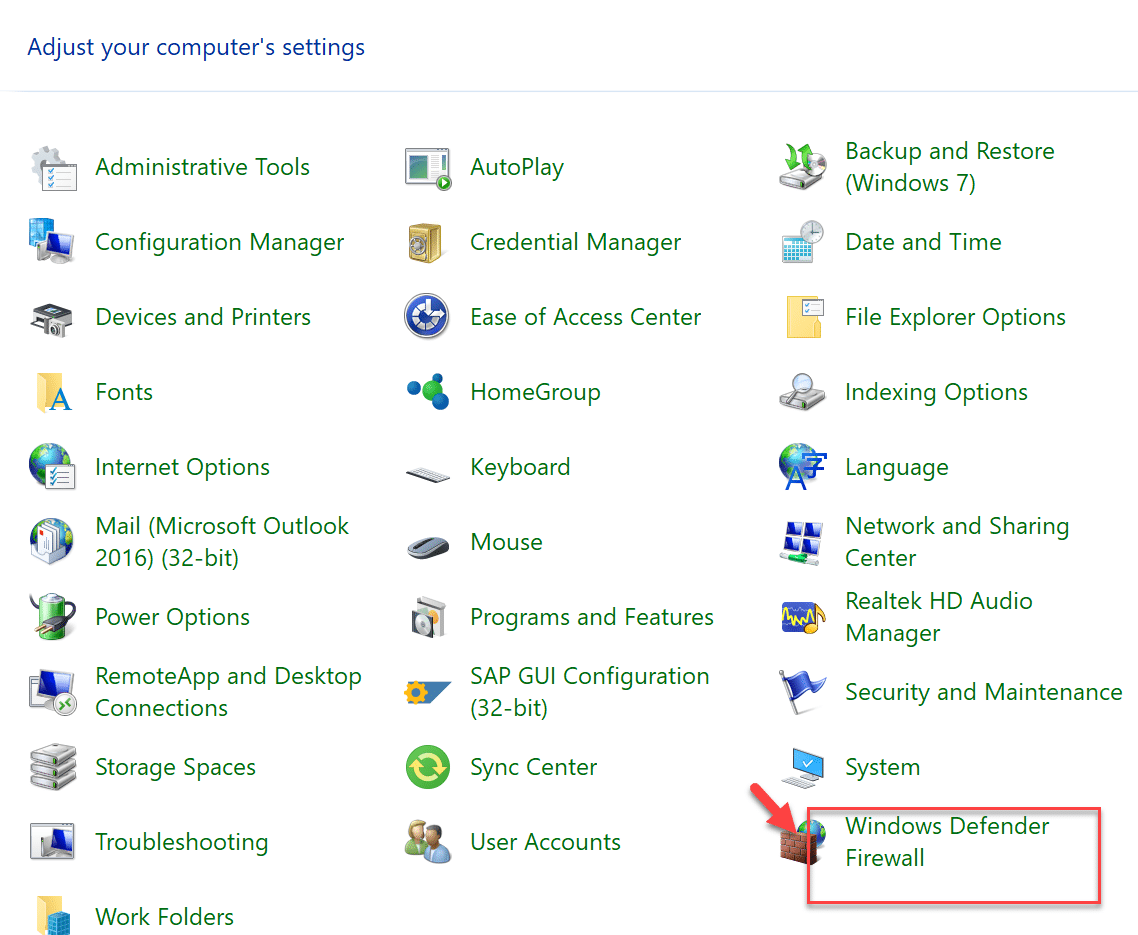
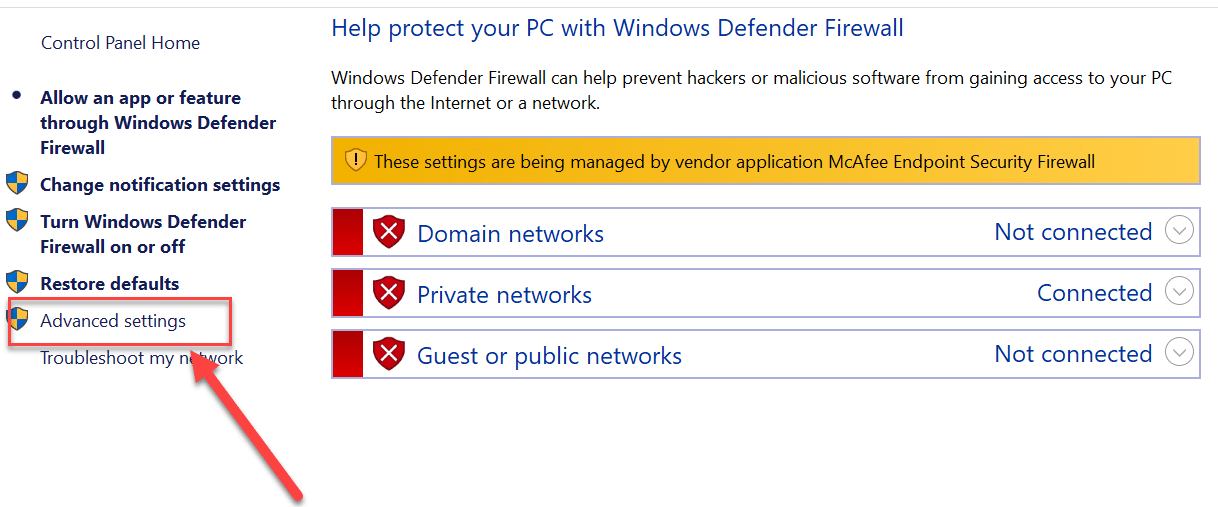
2.In the control panel, click on the “Windows დამცველის Firewall"ვარიანტი.
3.Now click on the “დამატებითი პარამეტრები” option from the left-hand side of the screen.
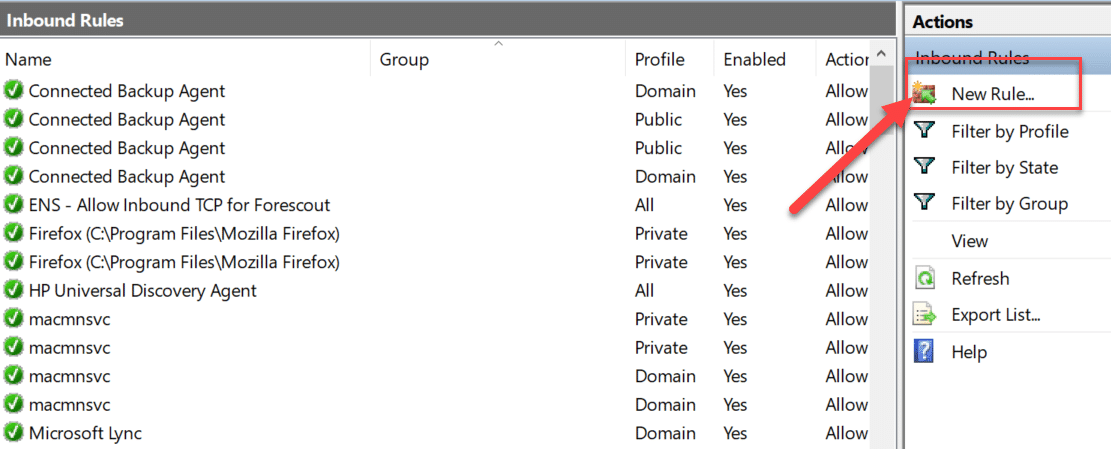
4.A firewall window with advanced settings wizard will open, click on “შემომავალი წესი” from the left-hand side of the screen.

5.Go to the Action section and click on the “ახალი წესი".
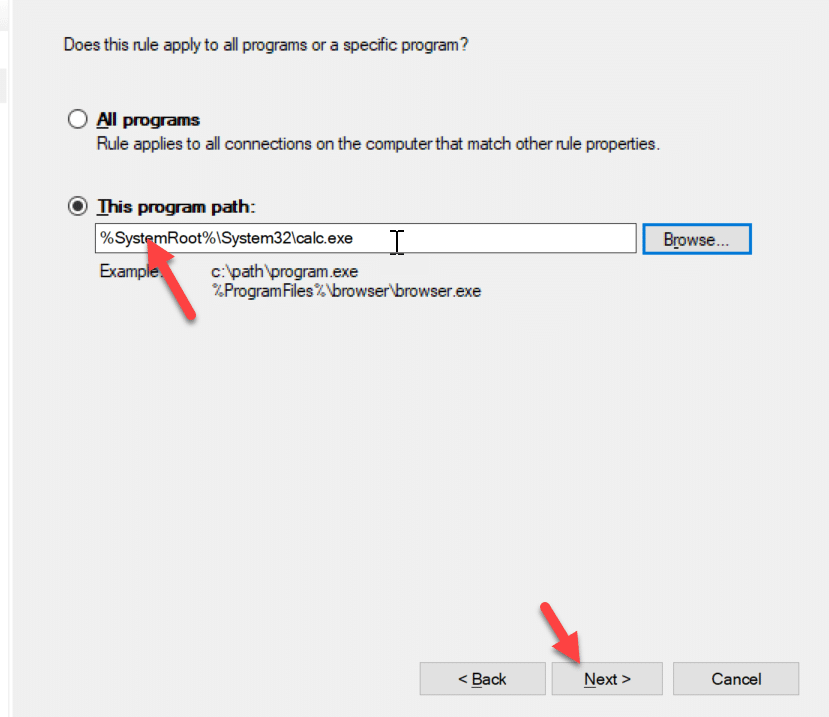
6.Follow all the steps to create the rule. On the “პროგრამა” step, browse to the application or program for which you are creating this rule.
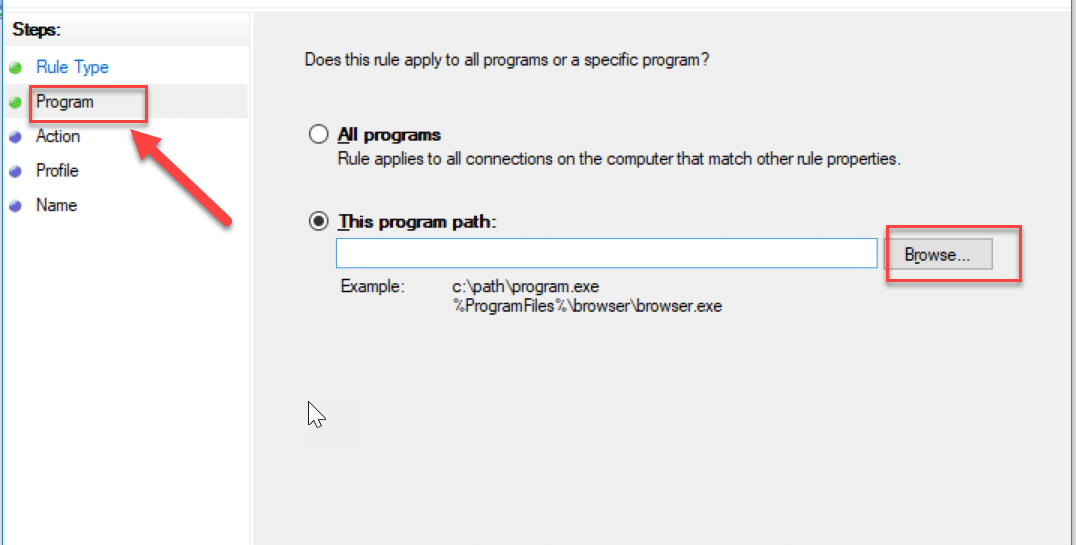
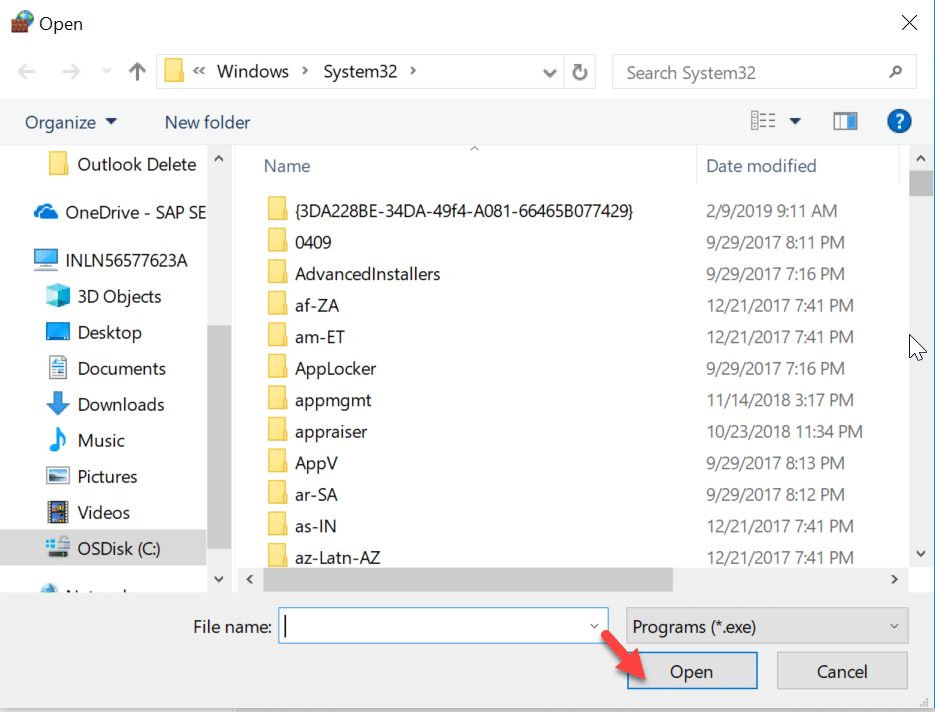
7.Once you click the browse button the “File Explorer” window will open. Choose the .exe ფაილი of the program and hit the “შემდეგი"ღილაკი.
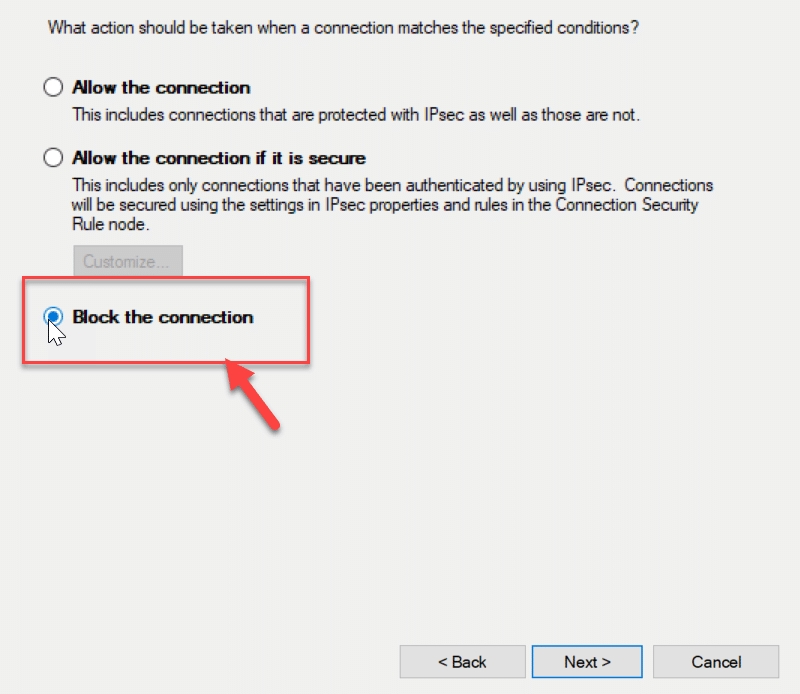
8.Now select “Block the Connection” under Action and hit the შემდეგი button. Then give the პროფაილი and again click შემდეგი.
9. ბოლოს და ბოლოს, type the name & description of this rule და დააჭირეთ "ფერი"ღილაკი.
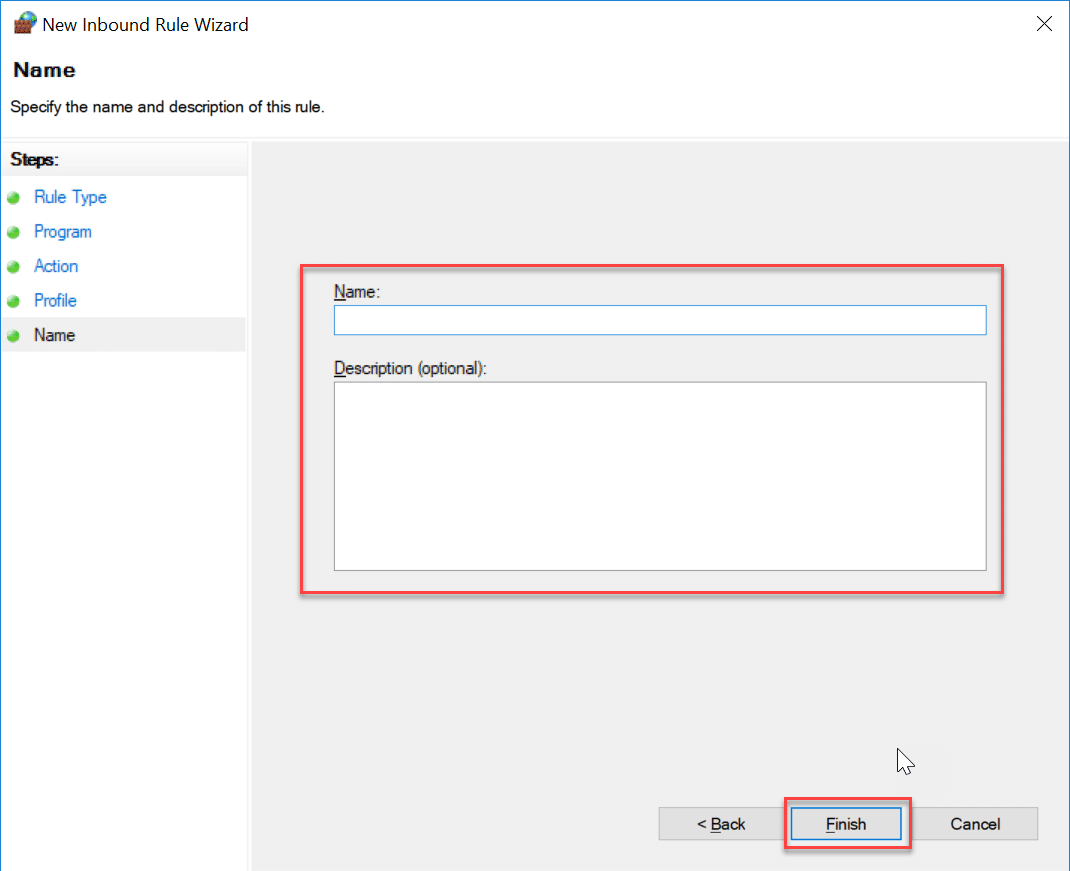
That’s it, it will block internet access for the specific program or application. You could again enable the internet access for the said program by following the same steps till the Inbound rule window opens, then delete the rule which you just created.
მეთოდი B: Block Internet Access for any Program using Internet Lock (Third Party Software)
ინტერნეტის დაბლოკვა is the third-party software which you can install to block internet access. Most of the method which we have earlier discussed require manual blocking of the internet. But through this software, you can configure the required settings related to internet connectivity. It is a freeware and has a very user-friendly interface. Following are the feature of this software:
- Can block internet connection.
- Any Websites can be blocked.
- You can also create parental rule related for the internet connection.
- Can restrict internet access to any program.
- Can be used to blacklist any website.
მეთოდი C: Block Internet Access for any Program using OneClick Firewall
OneClick firewall is the utility tool which you can install on your computer. It would be just the part of the windows firewall and this tool does not have its own interface. It would be just appeared in the context menu, whenever you right click on any program.
In the right-click context menu you will find these two options after installation:
- Block Internet Access.
- Restore Internet Access.
Now, just right-click on the programs’ s .exe file. In the menu, you need to choose the “დაბლოკოს ინტერნეტი”. This will block internet access for that program and the firewall will automatically create a rule for this program.
These are the methods which can be used to restrict internet access for the program and the computer.
რეკომენდებული:
I hope the above steps were helpful and now you can easily Change Keyboard Layout in Windows 10, მაგრამ თუ ჯერ კიდევ გაქვთ რაიმე შეკითხვები ამ გაკვეთილთან დაკავშირებით, მოგერიდებათ დაუსვათ ისინი კომენტარების განყოფილებაში.

