Fix Background Intelligent Transfer Service won’t start: For Windows Update to function Background Intelligent Transfer Service (BITS) is very important as it basically acts as a download manager for Windows Update. BITS transfers files between client and server in the background and also provide progress information when needed. Now if you are having issues in downloading updates then it will be most probably caused because of BITS. Either the configuration of BITS is corrupted or BITS is not able to start.
If you will go to services window you will find out that Background Intelligent Transfer Service (BITS) won’t start. These are the type of errors which you will face while trying to start BITS:
Background intelligent transfer service did not start properly
Background intelligent transfer service will not start
Background intelligent transfer service has stopped working
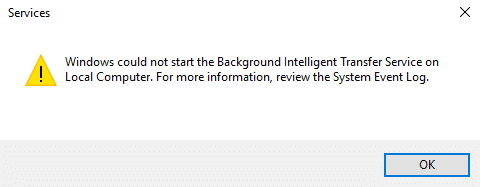
Windows could not start the Background Intelligent Transfer service on the local computer. For more information review the system event log. If this is a non-Microsoft service contact the service vendor and refer to service-specific error code -2147024894. (0x80070002)
Now if you are facing a similar issue with BITS or with Windows update then this post is for you. Without wasting any time let’s see how to actually Fix Background Intelligent Transfer Service won’t start issue with the below-listed troubleshooting guide.
Fix Background Intelligent Transfer Service won’t start
Бірдеңе дұрыс болмаса, қалпына келтіру нүктесін жасауды ұмытпаңыз.
Method 1: Start BITS from Services
1.Press Windows Keys + R then type services.msc Enter енгізіңіз.

2.Now find BITS and then double click on it.
3.Make sure the Startup type is set to автоматтық and the service is running, if not then click on Бастау түймешігі.

4.Қолдану түймесін, содан кейін OK түймесін басыңыз.
5.Reboot your PC and again try to update Windows.
Method 2: Enable dependent Services
1.Press Windows Keys + R then type services.msc Enter енгізіңіз.
2.Now find the below-listed services and double click on each of them to change their properties:
Терминалды қызметтер
Қашықтан шақыру процедурасы (RPC)
Жүйе оқиғасы туралы хабарландыру
Windows Management Instrumentation Driver Extensions
COM+ оқиға жүйесі
DCOM серверін іске қосу құралы
![]()
3.Make sure their Startup type is set to автоматтық and the above services are running, if not then click on Бастау түймешігі.
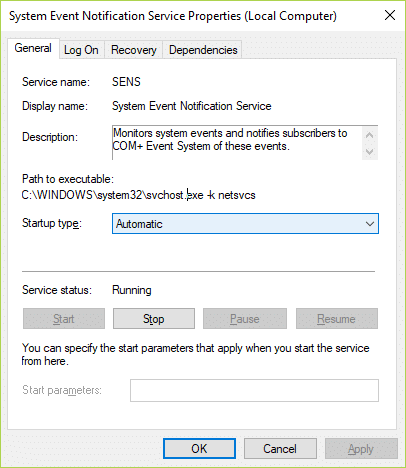
4.Қолдану түймесін, содан кейін OK түймесін басыңыз.
5.Өзгерістерді сақтау және мүмкіндігіңіз бар-жоғын білу үшін компьютерді қайта жүктеңіз Fix Background Intelligent Transfer Service won’t start.
3-әдіс: Жүйелік файл тексергішін іске қосыңыз
1. Windows пернесі + X пернелерін басыңыз, содан кейін басыңыз Пәрмен жолы (әкімші).

2. Енді cmd ішіне келесіні теріп, enter пернесін басыңыз:
Sfc /scannow sfc /scannow /offbootdir=c: /offwindir=c:windows (Егер жоғарыда орындалмаса, мынаны қолданып көріңіз)

3. Жоғарыда көрсетілген процестің аяқталуын күтіңіз және аяқталғаннан кейін компьютерді қайта іске қосыңыз.
4-әдіс: Windows жаңарту ақауларын жою құралын іске қосыңыз
1. Windows іздеу жолағына «ақауларды жою» деп теріп, түймесін басыңыз Ақаулық себебін іздеу және түзету.

2.Келесі, сол жақ терезе тақтасынан таңдаңыз Барлығын көру.
3.Одан кейін Компьютер ақауларын жою тізімінен таңдаңыз Windows жаңарту орталығы.

4.Follow on-screen instructions and let the Windows Update Troubleshoot run.

5.Restart your PC and see if you are able to Fix Background Intelligent Transfer Service won’t start.
Method 5: Run DISM Tool
1. Windows пернесі + X пернелер тіркесімін басып, Пәрмен жолы (Әкімші) тармағын таңдаңыз.
2. cmd-де келесі пәрменді теріңіз және әрқайсысынан кейін enter пернесін басыңыз:
a) Dism /Online /Cleanup-Image /CheckHealth b) Dism /Online /Cleanup-Image /ScanHealth c) Dism /Online /Cleanup-Image /RestoreHealth

3. DISM пәрменін іске қосып, оның аяқталуын күтіңіз.
4. Жоғарыдағы пәрмен жұмыс істемесе, төмендегі әрекетті орындап көріңіз:
Dism /Image:C:offline /Cleanup-Image /RestoreHealth /Дереккөз:c:testmountwindows Dism /Online /Cleanup-Image /RestoreHealth /Дереккөз:c:testmountwindows /LimitAccess
Ескерту: C:RepairSourceWindows жүйесін жөндеу көзінің орнымен ауыстырыңыз (Windows орнату немесе қалпына келтіру дискі).
5.Өзгерістерді сақтау және мүмкіндігіңіз бар-жоғын білу үшін компьютерді қайта жүктеңіз Fix Background Intelligent Transfer Service won’t start, болмаса, келесі әдіске өтіңіз.
Method 6: Reset the Download Queue
1. түймесін басыңыз Windows пернесі + R then type the following and hit Enter:
%ALLUSERSPROFILE%Application DataMicrosoftNetworkDownloader
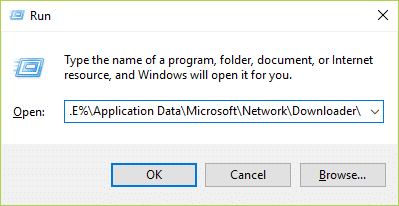
2.Now look for qmgr0.dat and qmgr1.dat, if found make sure to delete these files.
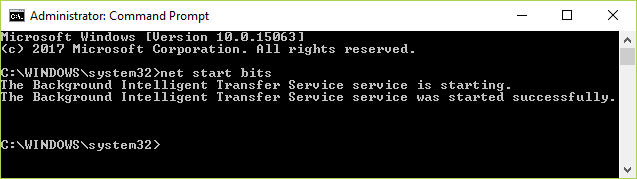
3. Windows пернесі + X пернелерін басыңыз, содан кейін таңдаңыз Командалық шақыру (әкімші).
4. cmd ішіне келесі пәрменді теріп, Enter пернесін басыңыз:
бастапқы старт биттері
5.Again try to update window and see if it works.
7-әдіс: Тіркеуді түзету
1. Windows пернесі + R пернелерін басып, теріңіз regedit және ашу үшін Enter пернесін басыңыз Тіркеуші редактор.

2.Келесі тізілім кілтіне өтіңіз:
HKEY_LOCAL_MACHINESYSTEMCurrentControlSetControlBackupRestoreFilesNotToBackup
3.If the above key exists then continues, if not then right-click on Backup Restore тармағын таңдаңыз және Жаңа > Кілт.
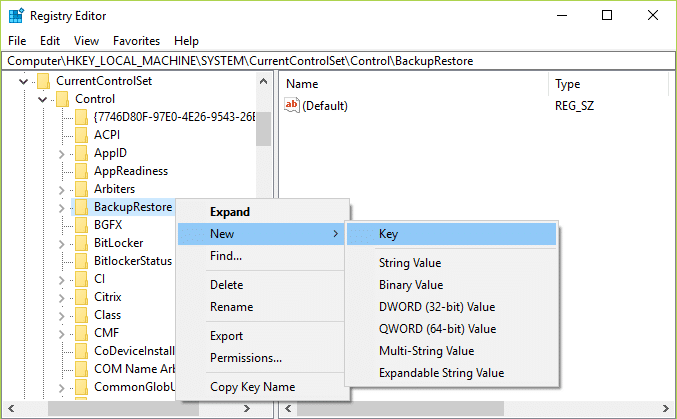
4.Type FilesNotToBackup and then hit Enter.
5.Exit Registry Editor and press Windows Key + R then type services.msc Enter енгізіңіз.
6.Табу BITS and double-click on it. Then in the Жалпы қойындысы, басыңыз бастау.
Сізге ұсынылады:
Міне, сіз сәтті болдыңыз Fix Background Intelligent Transfer Service won’t start бірақ егер сізде осы нұсқаулыққа қатысты сұрақтарыңыз болса, оларды түсініктеме бөлімінде сұрауға болады.

