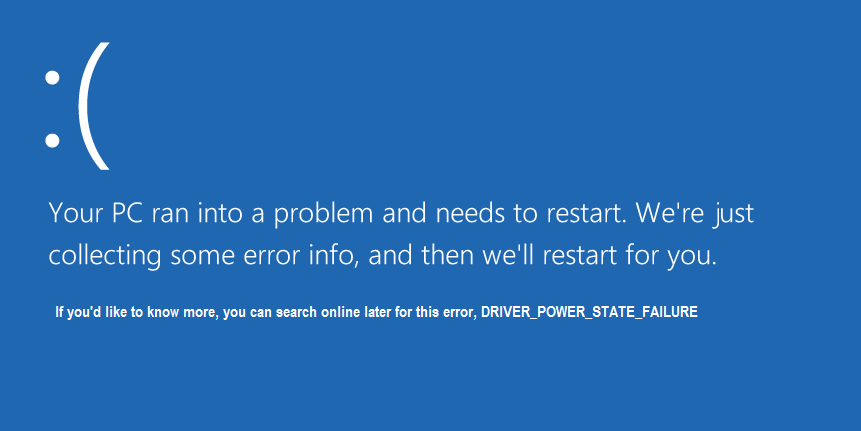
Fix Driver Power State Failure in Windows 10: Driver Power State Failure Error (0x0000009F) mostly occur due to outdated or incompatible drivers for the hardware devices of your PC. Драйвер қуатының күйі is an error which is displayed on Blue Screen of Death(BSOD), which doesn’t mean that your computer can’t be repaired, it just means that the PC has encountered something that it didn’t know what to do.
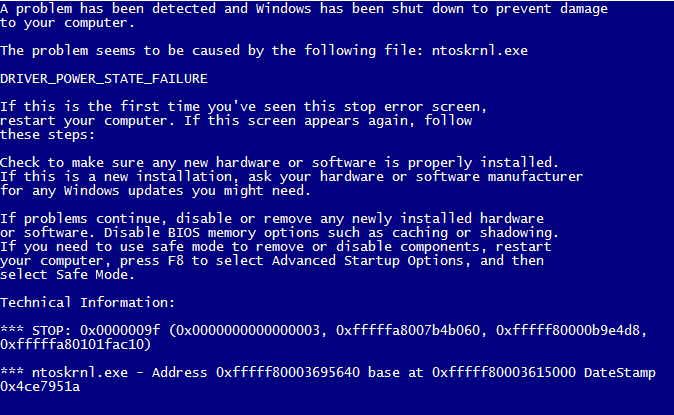
And the biggest problem you encounter is that you can’t log on to the Windows, because every time you restart your PC you will be shown Driver Power State Failure Error ( DRIVER_POWER_STATE_FAILURE Error ), hence you are stuck in an endless loop. However, this error is totally fixable if you will follow this article as shown below.
ЕСКЕРТУ: Most of the users who encounter this issue have put their computer to sleep and when they try to wake up their PC they encounter this error.
The most common driver which cause this error are antivirus software’s, so try to disable them and try to reboot your Windows. Always update your BIOS!
Windows 10 жүйесіндегі драйвер қуатының ақаулығын түзетіңіз
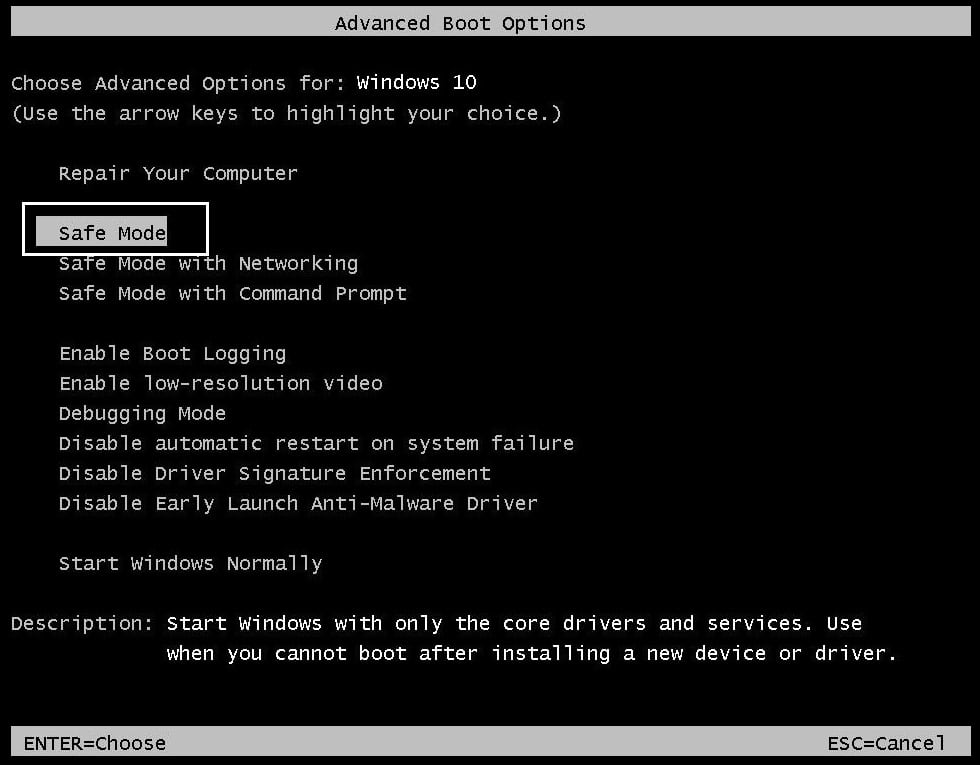
Before going any further let’s discuss how to Enable Legacy Advanced Boot Menu so that you can easily get into Safe Mode:
1. Windows 10 жүйесін қайта іске қосыңыз.
2.As the system restarts enter into BIOS setup and configure your PC to boot from CD/DVD.
3. Windows 10 жүктелетін орнату DVD дискісін салып, компьютерді қайта іске қосыңыз.
4. CD немесе DVD дискісінен жүктеу үшін кез келген пернені басыңыз сұралғанда, жалғастыру үшін кез келген пернені басыңыз.
5. Өзіңізді таңдаңыз тіл таңдаулары, Келесі түймесін басыңыз. Жөндеу түймесін басыңыз компьютеріңізді төменгі сол жақта.

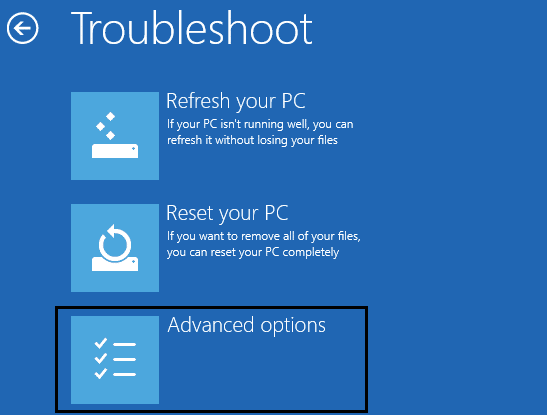
6. Опция экранын таңдауда түймесін басыңыз Ақауларды жою.

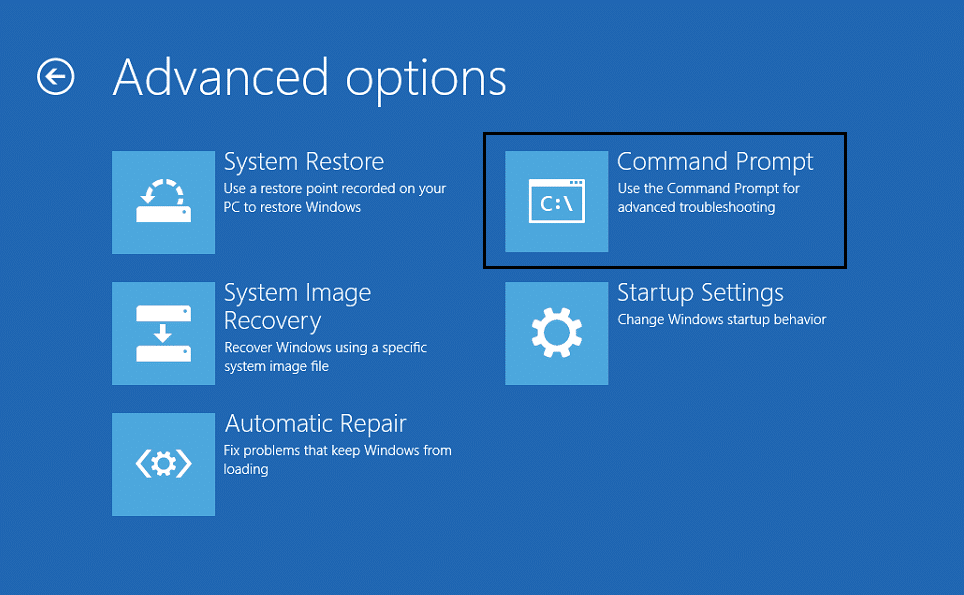
7. Ақаулықтарды жою экранында түймесін басыңыз Жетілдірілген опция.
8.On Advanced options screen, click Командалық шақыру.
9.When the Command Prompt(CMD) open type C: және кіргізіңіз.
10.Now type the following command:
BCDEDIT / SET {DEFAULT} БОТМЕНУПОЛИЯЛЫҚ СЫЙЫҚТЫҚ
11.And hit enter to Бұрынғы кеңейтілген жүктеу мәзірін қосыңыз.

12.Close Command Prompt and back on the Choose an option screen, click continue to restart Windows 10.
13.Finally, don’t forget to eject your Windows 10 installation DVD, in order to boot into қауіпсіз режим.
Method 1: Uninstall Problematic Driver
1. As the computer restarts, press F8 to display the Қосымша жүктеу параметрлері тармағын таңдаңыз және Қауіпсіз режим.
2.Hit Enter to start Windows 10 in Safe Mode.
3.Press Windows Key + R and type “devmgmt.msc” then hit enter to open Device Manager.

4.Now inside Device Manager, you must see the problematic device driver (it has a yellow mark next to it).
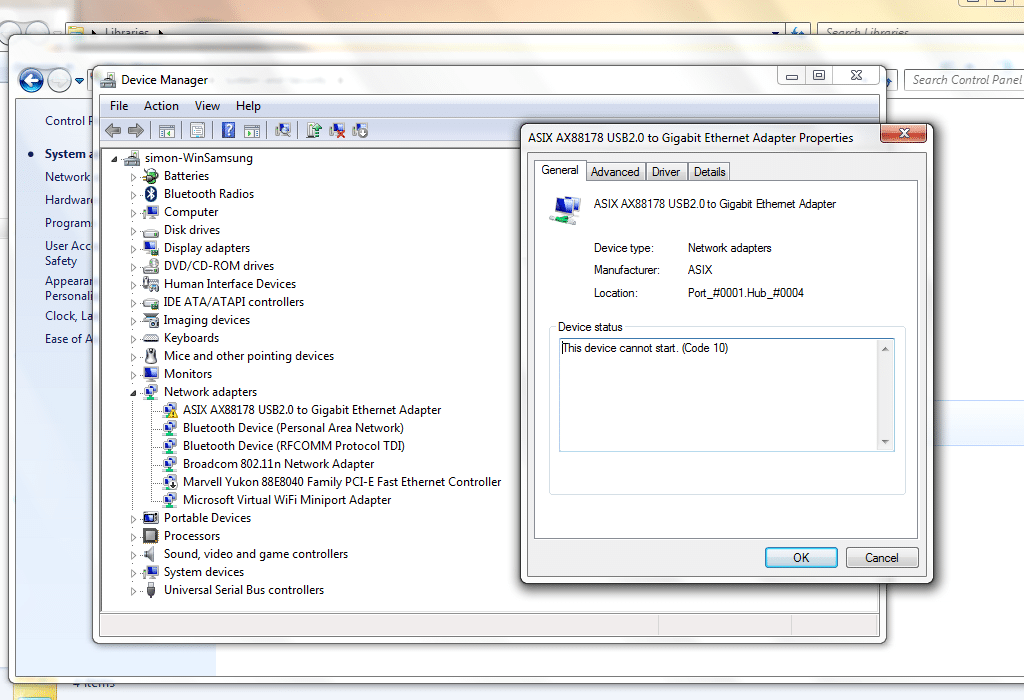
Also, see Fix This device cannot start (Code 10)
5.Once the problematic device driver is identified, right click and select Жою.
6.When asked for confirmation, click Жарайды ма.
7.Once the driver is uninstalled restart Windows 10 normally.
Method 2: Check Windows Minidump file
1.Let’s first make sure that minidumps are enabled.
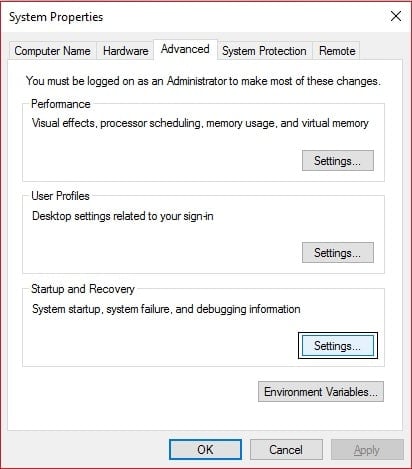
2.Press Windows Key + R and type “sysdm.cpl” then press enter.

3.Go to advanced tab and click on the Settings button in Іске қосу және қалпына келтіру.
4.Ensure that Автоматты түрде қайта қосыңыз under System failure is unchecked.
5.Under the Write Debugging Information header, select Small memory dump (256 kB) in the drop-down box.
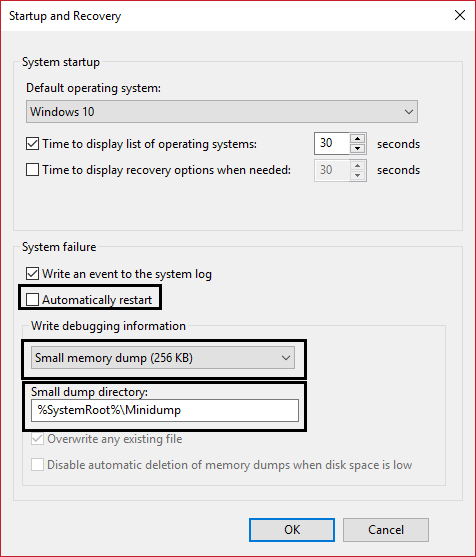
6. Бұл екеніне көз жеткізіңіз Small Dump Directory ретінде көрсетілген %systemroot%Minidump.
7.Click OK and restart your PC to apply the changes.
8.Now install this program called WhoCrashed.
9.Жүгіру WhoCrashed and click on Analyze.
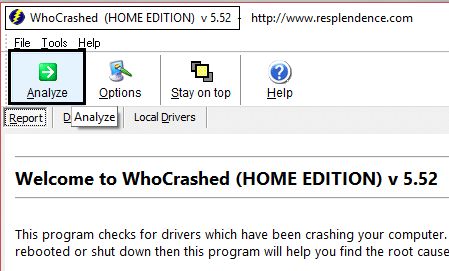
10..Scroll down to view the report and check for the problematic driver.
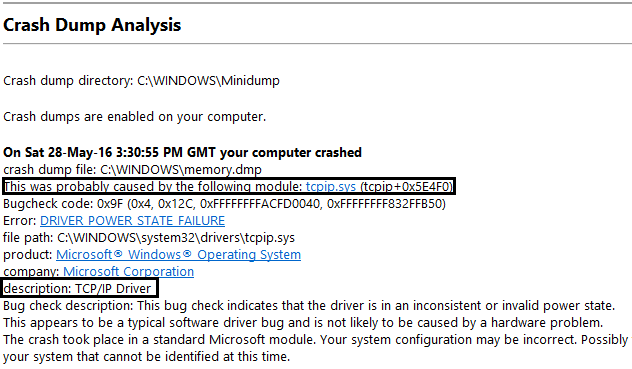
11.Finally, update the driver and Reboot to apply your changes.
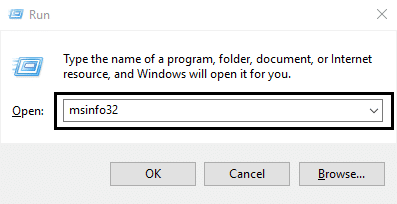
12.Now Press Windows пернесі + R және «msinfo32» содан кейін enter пернесін басыңыз.
13.Ин Жүйенің түйіндемесі make sure all your drivers are up to date.
14.Make sure your BIOS is also updated, else update it.
15.Селеу Бағдарламалық жасақтама ортасы содан кейін нұқыңыз Running Tasks.
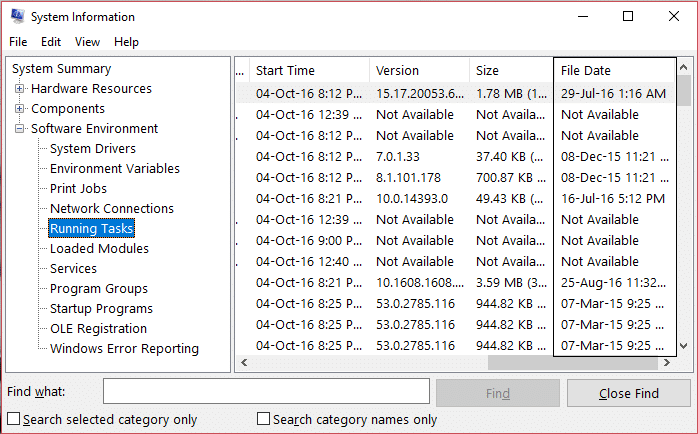
16.Again make sure the drivers have updated i.e. no drivers have file dated back to 2 years.
17.Reboot your PC and this would Windows 10 жүйесіндегі драйвер қуатының ақаулығын түзетіңіз бірақ болмаса, жалғастырыңыз.
Method 3: Run System File Check (SFC)
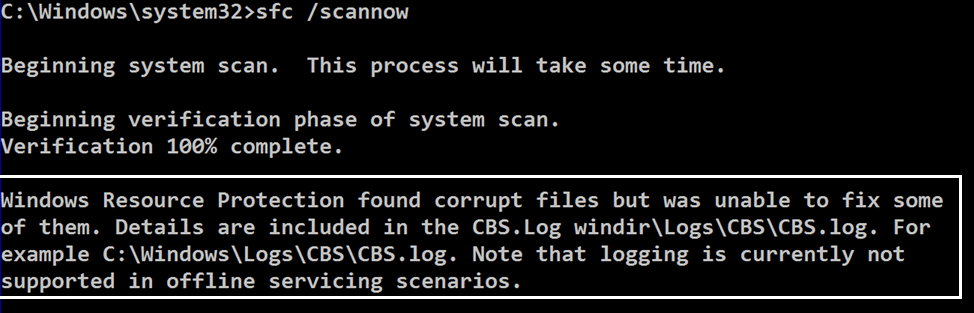
1.In the safe mode, Right click on Start and select Command Prompt(Admin) to open cmd.
2. cmd-де келесі пәрменді теріңіз: / scannow

3.Let system file check run, usually, it takes 5 to 15 minutes.
Ескерту: Sometimes you have to run SFC command 3-4 times to fix the problem.
4.After the process is finished and you receive the following message:
Windows Resource Protection бүлінген файлдарды тауып, оларды сәтті жөндеді. Мәліметтер жинаққа енгізілген
CBS.Log %WinDir%LogsCBSCBS.log.
5.Simply restart your PC and see if the problem is resolved or not.
6.If you receive the following message:
Windows Resource Protection бүлінген файлдарды тапты, бірақ олардың кейбірін жөндей алмады. Мәліметтер жинаққа енгізілген
CBS.Log %WinDir%LogsCBSCBS.log.
7.Then you have to manually repair corrupted files, to do this first view details of the SFC process.
8.At the command prompt, type the following command, and then press ENTER:
findstr /c:"[SR]" %windir%LogsCBSCBS.log >"%userprofile%Desktopsfcdetails.txt"

9. Ашыңыз Sfcdetails.txt file from your desktop.
10.The Sfcdetails.txt file uses the following format: Date/Time SFC detail
11.The following sample log file contains an entry for a file that could not be repaired:
2014-02-17 02:40:22, CSI 000001aa [SR] Cannot repair member file [l:22{11}]"autochk.exe" of Microsoft-Windows-Autochk,
Version = 6.1.7600.16385, pA = PROCESSOR_ARCHITECTURE_INTEL (0), Culture neutral, VersionScope = 1 nonSxS, PublicKeyToken
= {l:8 b:31bf3856ad364e35}, Type neutral, TypeName neutral, PublicKey neutral in the store, hash mismatch
12.Now type the following command in the cmd:
DISM.exe /Online /Cleanup-image /Scanhealth && DISM.exe /Online /Cleanup-image /Restorehealth

This will run DSIM(Deployment Image Servicing and Management) restore commands and will fix SFC errors.
13.After running DISM it is a good idea to re-run SFC /scannow to make sure all the issues were fixed.
14.If for some reason DISM command is not working try this SFCFix Tool.
15.Компьютерді қайта іске қосыңыз және мүмкіндігіңіз бар-жоғын тексеріңіз Fix Driver Power State Failure in Windows 10.
Method 4: Restore you PC to earlier time
1. Windows пернесі + R пернелерін басып, теріңіз»sysdm.cpl» содан кейін enter пернесін басыңыз.
2.Селеу Жүйені қорғау қойындысын таңдап, таңдаңыз Жүйені қалпына келтіру.
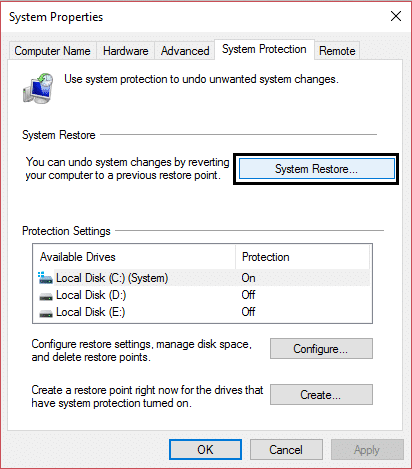
3.Келесі түймесін басып, қажеттіні таңдаңыз Жүйені қалпына келтіру нүктесі.
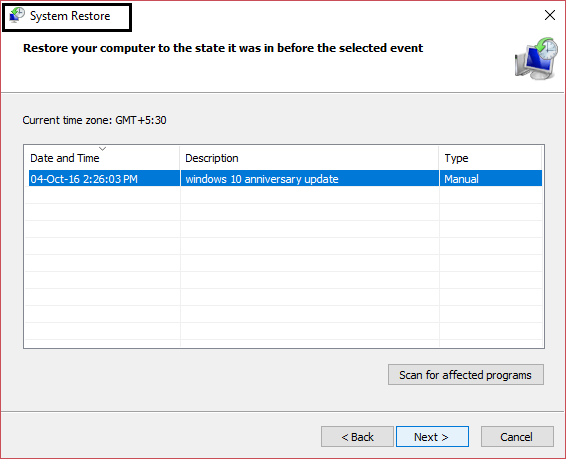
4.Follow on screen instruction to complete system restore.
5.After reboot, you must have fixed the Driver Power State Failure.
Сізге ұсынылады:
Міне, сіз сәтті болдыңыз Windows 10 жүйесіндегі драйвер қуатының ақаулығын түзетіңіз if you still have any question regarding this post feel free to ask them in comments.

