WmiPrvSE is the acronym for Windows Management Instrumentation Provider Service. Windows Management Instrumentation (WMI) is a component of the Microsoft Windows operating system that provides management information and control in an enterprise environment. Many people believe it’s a virus as sometimes WmiPrvSE.exe causes high CPU usage, but it’s not a virus or malware instead WmiPrvSE.exe is manufactured by Microsoft itself.
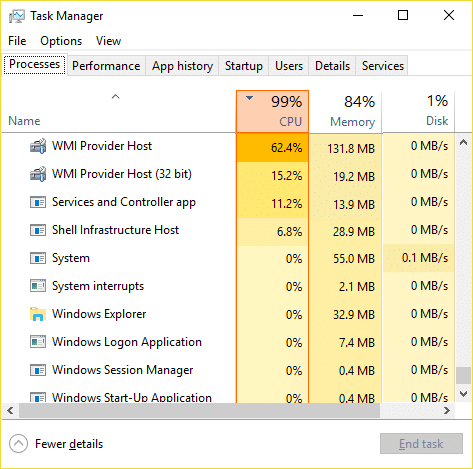
The main problem is that the Windows freezes or stuck when WmiPrvSE.exe is taking many system resources, and all the other apps or programs are left with a little or no resources at all. This will cause your PC to become sluggish, and you won’t be able to use it all, at last, you will have to reboot your PC. Even after a reboot, sometimes this issue will not be resolved, and you will again face the same problem. So without wasting any time let’s see how to actually Fix High CPU Usage by WmiPrvSE.exe with the below-listed troubleshooting guide.
Fix High CPU Usage by WmiPrvSE.exe
Бірдеңе дұрыс болмаса, қалпына келтіру нүктесін жасауды ұмытпаңыз.
Method 1: Restart Windows Management Instrumentation Service
1. Windows пернесі + R пернелерін басып, теріңіз services.msc Enter енгізіңіз.

2. Табыңыз Windows Management Instrumentation Service in the list then right-click on it and select Қайтадан қосу.
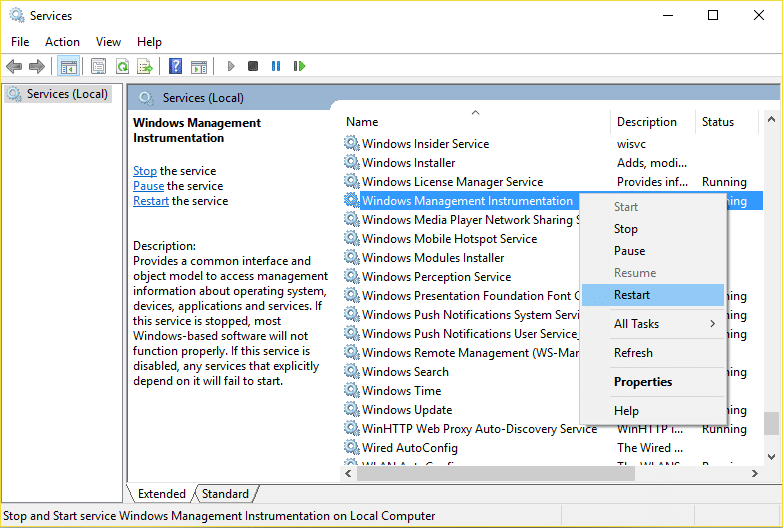
3. This will restart all the service associated with WMI services and Fix High CPU Usage by WmiPrvSE.exe.
Method 2: Restart Other Services associated with WMI
1. Press Windows Key + X then select Командалық шақыру (әкімші).

2. Type the following into cmd and hit Enter after each one:
iphlpsvc таза тоқтату
wscsvc таза тоқтату
winmgmt таза тоқтату
таза бастау winmgmt
wscsvc таза басталуы
iphlpsvc таза басталуы
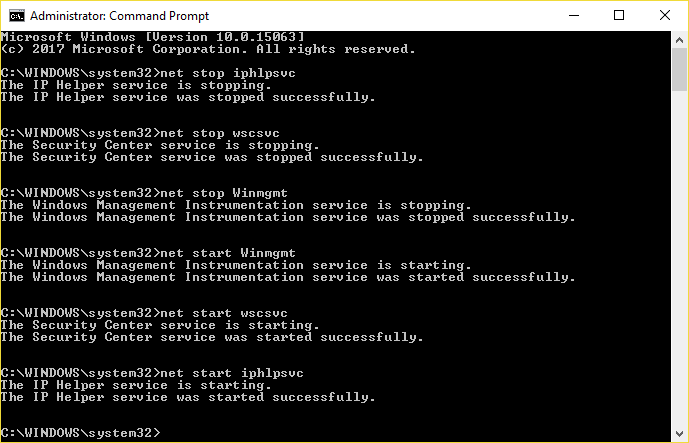
3. Өзгерістерді сақтау үшін компьютерді қайта жүктеңіз.
3-әдіс: CCleaner және Malwarebytes бағдарламаларын іске қосыңыз
1. Жүктеу және орнату CCleaner & Malwarebytes.
2. Malwarebytes іске қосыңыз және оның жүйеңізді зиянды файлдарға сканерлеуіне мүмкіндік беріңіз. Зиянды бағдарлама табылса, ол оларды автоматты түрде жояды.

3. Енді CCleaner бағдарламасын іске қосып, таңдаңыз Арнайы тазалау.
4. Таңдамалы тазалау астында опциясын таңдаңыз Windows қойындысы then make sure to checkmark defaults and click талдау.

5. Талдау аяқталғаннан кейін жойылатын файлдарды жою керек екеніне көз жеткізіңіз.

6. Соңында, батырмасын басыңыз Cleaner іске қосыңыз түймесін басып, CCleaner бағдарламасына өз бағытын іске қосуға мүмкіндік беріңіз.
7. Жүйені одан әрі тазалау үшін, Тіркеу қойындысын таңдаңыз, және мыналардың тексерілгенін тексеріңіз:

8. Басыңыз Мәселелерді іздеңіз түймесін басып, CCleaner бағдарламасына сканерлеуге рұқсат беріңіз, содан кейін түймесін басыңыз Таңдалған мәселелерді түзетіңіз түймесін басыңыз.

9. CCleaner сұрағанда «Тізілімге сақтық көшірме жасауды қалайсыз ба?« Иә таңдаңыз.
10. Сақтық көшірме жасау аяқталғаннан кейін түймесін басыңыз Барлық таңдалған мәселелерді түзетіңіз түймесін басыңыз.
11. Өзгерістерді сақтау үшін компьютерді қайта іске қосыңыз.
Method 4: Run System Maintenance Troubleshooter
1. Windows пернесі + X пернелерін басып, түймесін басыңыз Басқару панелі.

2. Search Troubleshoot and click on Ақаулық себебін іздеу және түзету.

3. Next, click on view all in the left pane.
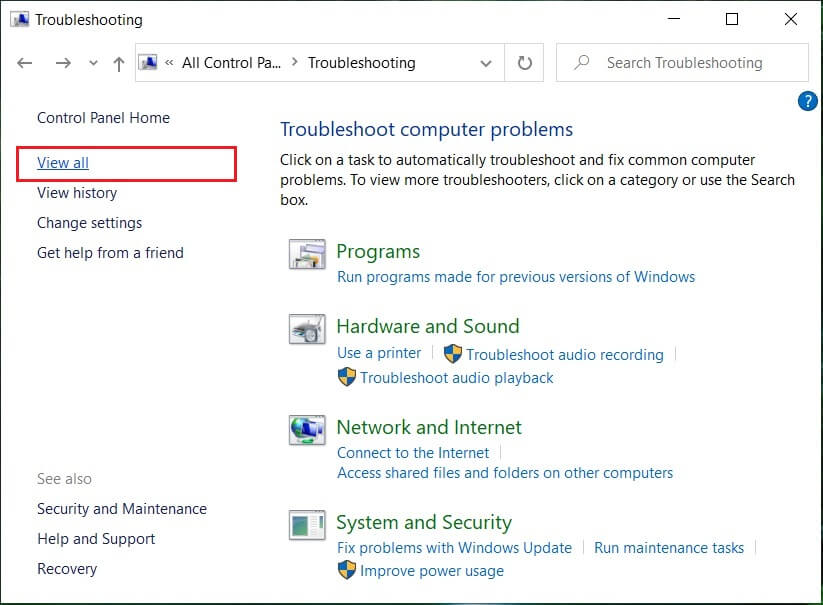
4. Click and run the Troubleshooter for System Maintenance.

5. The Troubleshooter may be able to Fix High CPU Usage by WmiPrvSE.exe.
Method 5: Locate the process manually using Event Viewer
1. Windows пернесі + R пернелерін басып, теріңіз eventvwr.msc және ашу үшін Enter пернесін басыңыз Оқиғаларды қарау құралы.

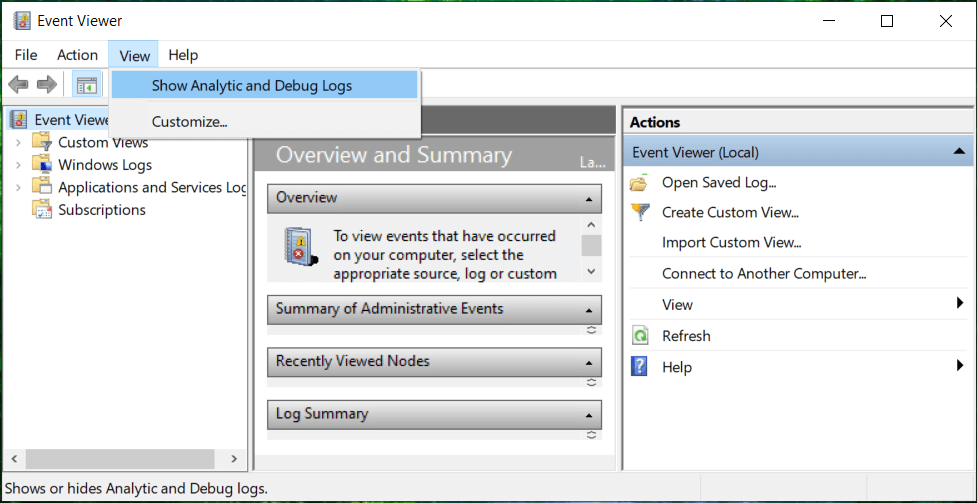
2. From the top menu, click on көрініс содан кейін таңдаңыз Show Analytic and Debug Logs option.
3. Now, from the left pane navigate to the following by double-clicking on each of them:
Applications and Services Logs > Microsoft > Windows > WMI-Activity
4. Once you are under WMI-әрекет folder (make sure you have expanded it by double-clicking on it) select Operationally.
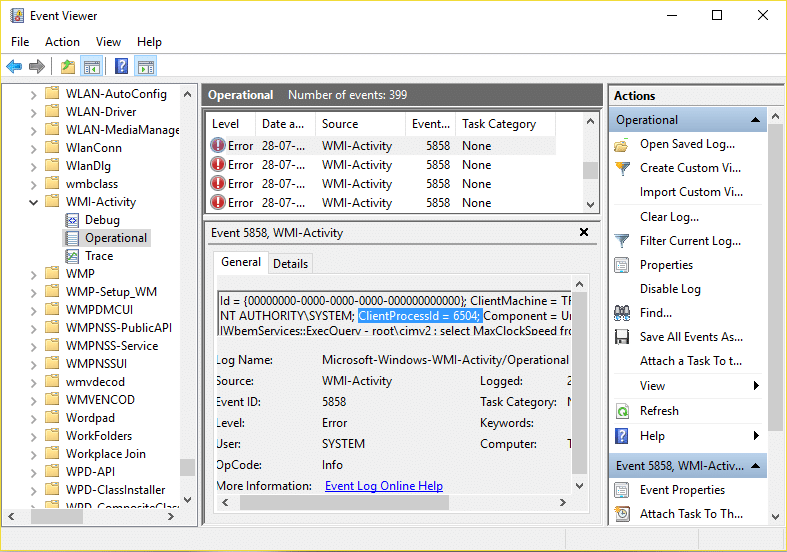
5. In the right window pane select қателік under Operational and General tab look for the ClientProcessId for that particular service.
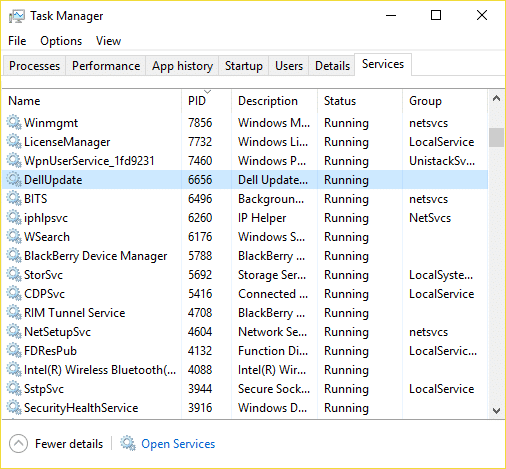
6. Now we have the Process Id of the particular service causing High CPU usage, we need to disable this particular service осы мәселені шешу үшін.
7. Басыңыз Ctrl + Shift + Esc together to open Task Manager.

8. ауысу Қызмет қойындысы және іздеңіз Process Id which you noted above.
9. The service with the corresponding Process ID is the culprit, so once you find it go to Control Panel > Uninstall a Program.
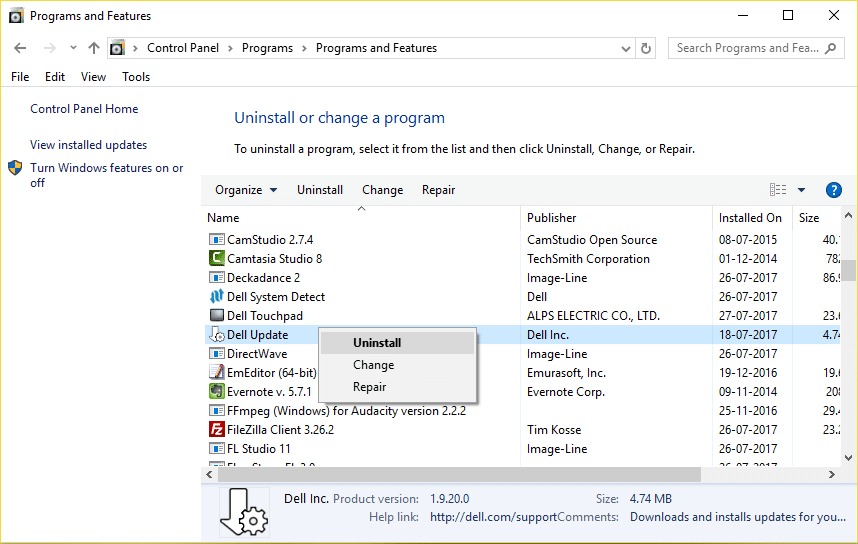
10. Uninstall the particular program or service associated with above Process ID then reboot your PC.
Ұсынылған:
Міне, сіз сәтті болдыңыз Fix High CPU Usage by WmiPrvSE.exe бірақ егер сізде осы постқа қатысты сұрақтарыңыз болса, оларды түсініктеме бөлімінде қоюға болады.

