Logitech is one of the cheap and best platforms where you can get high-quality computing accessories. Few notable products of Logitech include headphones and headsets. If you are a pro player in your games, you would definitely know about Logitech G533. The Logitech G533 microphone provides a high-quality audio effect with more than 15 hours of battery life. One of the most lovable features of this Logitech G533 headphone includes a lightweight design and incredible noise cancellation technology. Amidst all these advantages, few Windows users have complained about Logitech G533 Mic not working issue on Windows 10 PC. If you are also facing the same problem, you are at the right place! This guide will help you fix Logitech G533 microphone not working issue with effective troubleshooting hacks. So, continue reading!
How to Fix Logitech G533 Mic Not Working in Windows 10
If you are facing Logitech G533 microphone not working while enjoying your audio contents, the most probable reason would be due to improper configurations of sound settings. Although this problem affects many versions of Windows, many users are struggling with this issue in Windows 10. Here are some common reasons that contribute to the discussed issue on your computer.
- The volume may be muted or very low.
- The Audio enhancement features are enabled on PC.
- Other applications on your PC are using audio.
- Outdated audio drivers in computers.
- Damaged cables, plugs, and ports.
- Access for using a Microphone is not granted.
- Outdated Windows Operating System.
- Outdated/incompatible audio drivers.
- Presence of corrupt files on PC.
- Few essential Windows Audio services are not enabled.
Now, move ahead to the next section to fix Logitech G533 microphone issue.
In this section, you will come to know about the troubleshooting methods that will help you fix Windows 10 Logitech G533 microphone audio issues. Implement the methods as instructed in the same order to get perfect results.
Алдын ала тексерулер
Before you head towards the advanced troubleshooting methods, a few simple hacks will help you fix Logitech G533 microphone sound not working issue within clicks. Make sure your PC meets all of these preliminary checks and still if you did not attain any fix, move to the next section.
1. Қайтадан қосу компьютерге and any temporary glitches associated with the computer will be resolved.
2. Ensure you use a high-quality Logitech G533 microphone and it is set firmly with your PC.
3. Last but not least, ensure that you are not in a noisy environment with traffic sounds or crowd noises in the background.
Method 1: Basic Troubeshooting Methods
1A. Check Hardware Damage
If you have not attained any fix from the above preliminary checks, then it’s time to check if there is any external damage to the external speakers, microphone, and other audio devices contributing to the problem.
1. Check your Logitech G533 microphone for any damage or broken stage.
2. Disconnect your device from your computer and unplug all the external devices connected to it.
3. Wait for a while and компьютерді қайта жүктеңіз.
4. Содан кейін, connect your Logitech G533 microphone to your Windows 10 PC and check if this works. If not, move to the next troubleshooting method.
1B. Check Audio Output
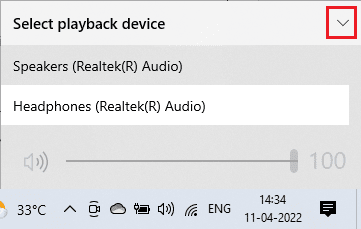
When you are using more than one audio output device, you have to confirm when the device is used up as an output device. To check the audio output in your Windows 10 PC, follow the below-mentioned steps.
1. Басыңыз Спикерлер экранның төменгі оң жақ бұрышындағы белгіше.
![]()
2. Енді, басыңыз Көрсеткі белгішесі компьютерге қосылған дыбыс құрылғыларының тізімін кеңейту үшін.
![]()
3. Then, Select playback device (you prefer) and make sure the audio is playing through the selected device.
If this method doesn’t help you to fix Logitech G533 Mic not working issue, move ahead to the next one.
1C. Check Sound Settings
In this method, you have to check if the sound settings are correct and compatible with the audio device you are using. This helps you to fix Logitech headset mic not working issue as you follow the steps instructed below.
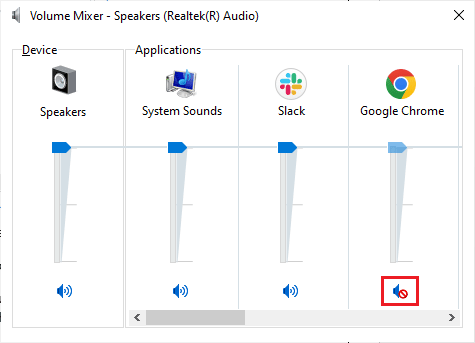
1. Тінтуірдің оң жағын басыңыз Спикерлер icon at the bottom right corner of the screen and click on Көлемді араластырғышты ашыңыз.
![]()
2. Now, a set of дыбыс деңгейін басқару элементтері will be opened up. Make sure all volume levels are not muted. If you find any red circle with a line, unmute the volume level.
3. Енді түймесін басыңыз Windows + I пернелері ашу үшін бірге Windows параметрлері.
4. Енді, басыңыз жүйе орнату.
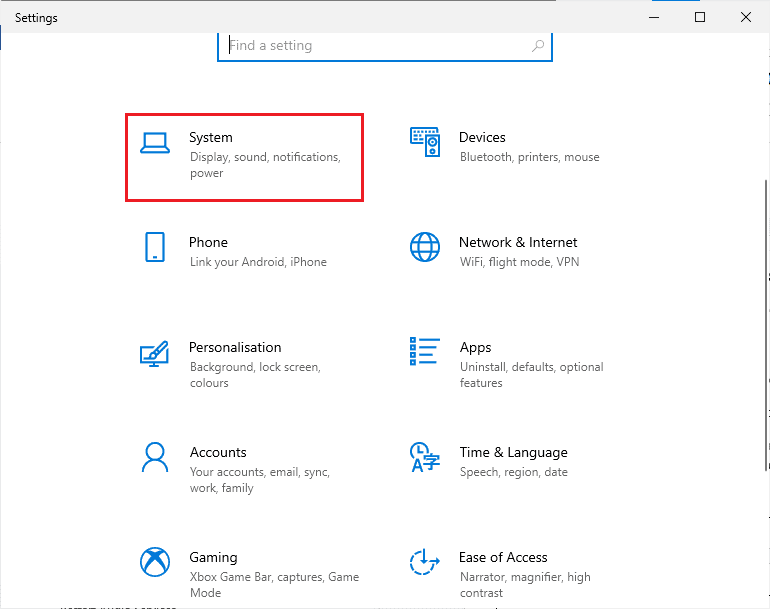
5. Содан кейін түймесін басыңыз дыбыс сол жақ тақтадан бастап нұқыңыз Құрылғының қасиеттері астында шығыс көрсетілгендей мәзір.
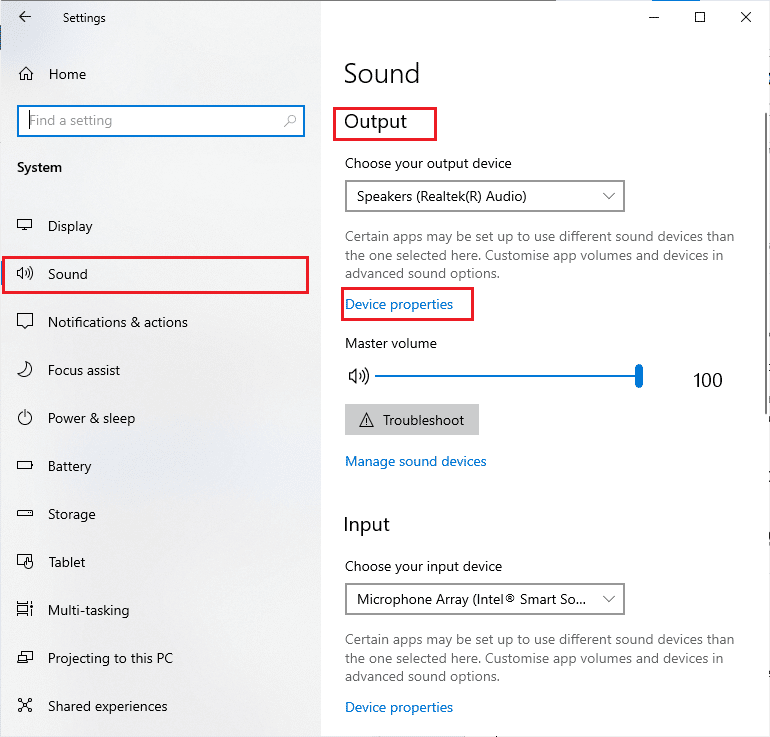
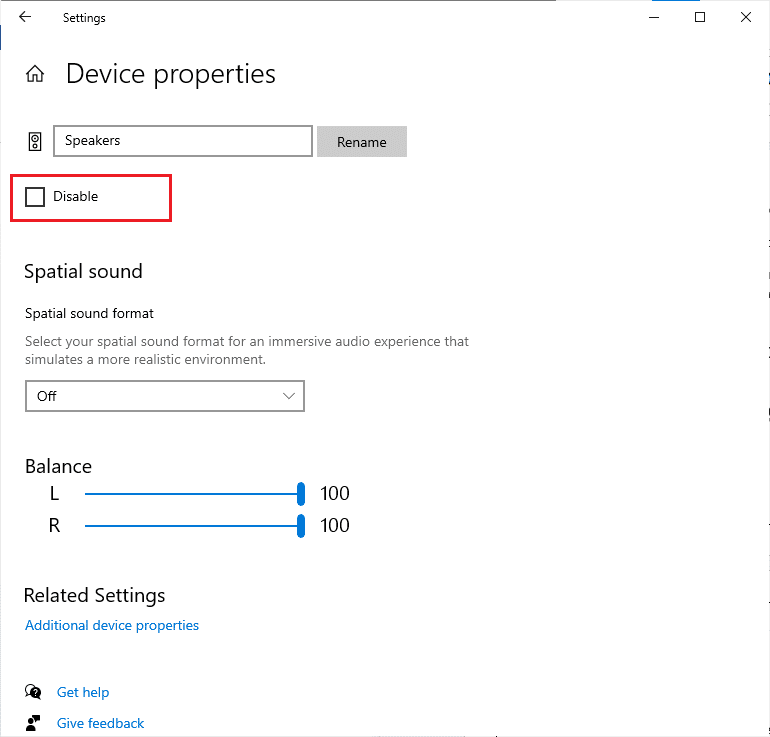
6. көз жеткізіңіз өшіру құсбелгі қойылмаған.
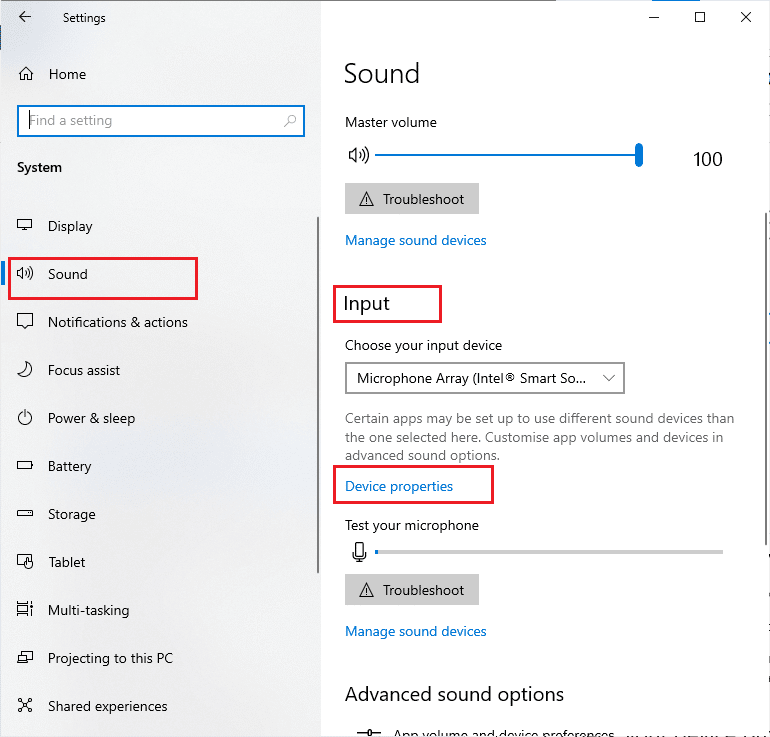
7. Repeat Steps 5-6 for input devices as depicted.
Now, check if you have fixed Windows 10 Logitech G533 microphone audio issues.
Сондай-ақ оқыңыз: Windows 10 жүйесінде Firefox-та дыбыс жоқ дегенді түзетіңіз
1D. Repair System Files
For perfect audio quality services, a few essential files and programs must be functioning on your PC. But, if they are corrupt or misconfigured, you will face Logitech headset mic not working issue. Fortunately, all these corrupt misconfigured files can be repaired by using the inbuilt utilities of your Windows 10 PC namely, Жүйелік файл тексергіші және Қолдануды басқару және басқару. Windows 10 жүйесінде жүйелік файлдарды жөндеу туралы нұсқаулықты оқып шығыңыз және барлық бүлінген файлдарды жөндеу үшін нұсқауларды орындаңыз.
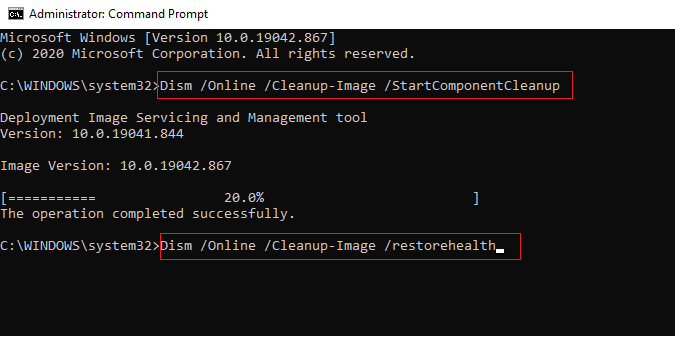
Wait for the commands to be executed and check if you have fixed Logitech G533 microphone sound not working issue.
1E. Windows жүйесін жаңарту
If there are any new Microsoft updates pending to be installed on your PC, a few bugs and problems cannot be resolved on your computer. As suggested by many users, updating Windows 10 computers will help you resolve Windows 10 audio error Logitech G533 microphone not working issue. Follow our guide How to Download and Install Windows 10 Latest Update to update your Windows 10 computer.
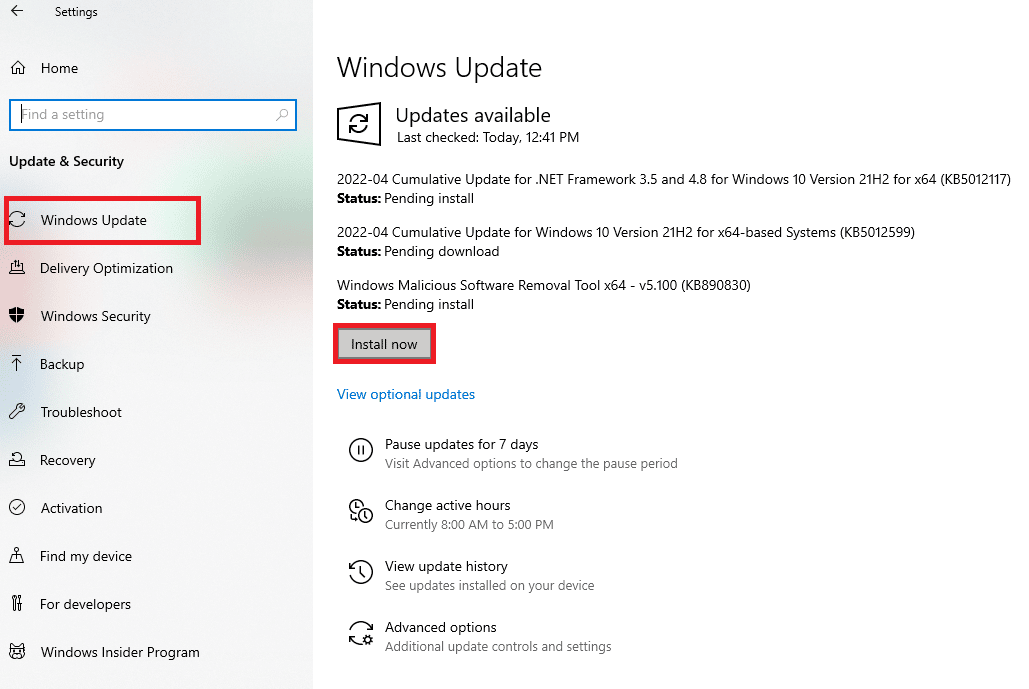
After updating your Windows Operating System, check whether you can access audio in your Windows 10 PC.
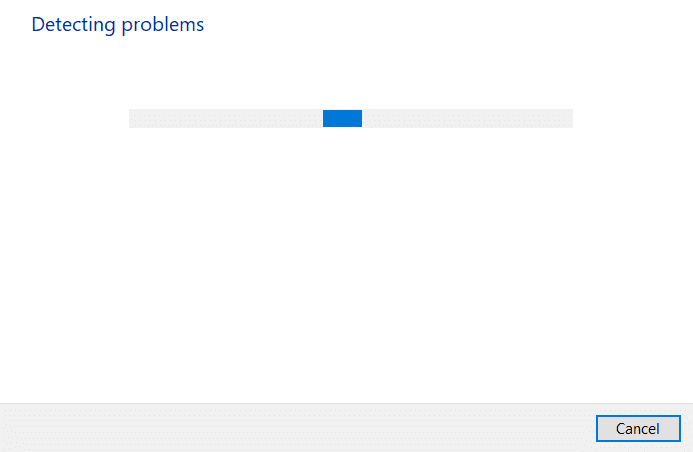
2-әдіс: Аудио ақауларын жою құралын іске қосыңыз
You must be aware of the fact that your PC contains an inbuilt troubleshooting tool to fix any issues and errors arising automatically. The audio devices plugged into your computer and the inbuilt audio devices will be scanned and altogether the problems associated with the process will be sorted out.
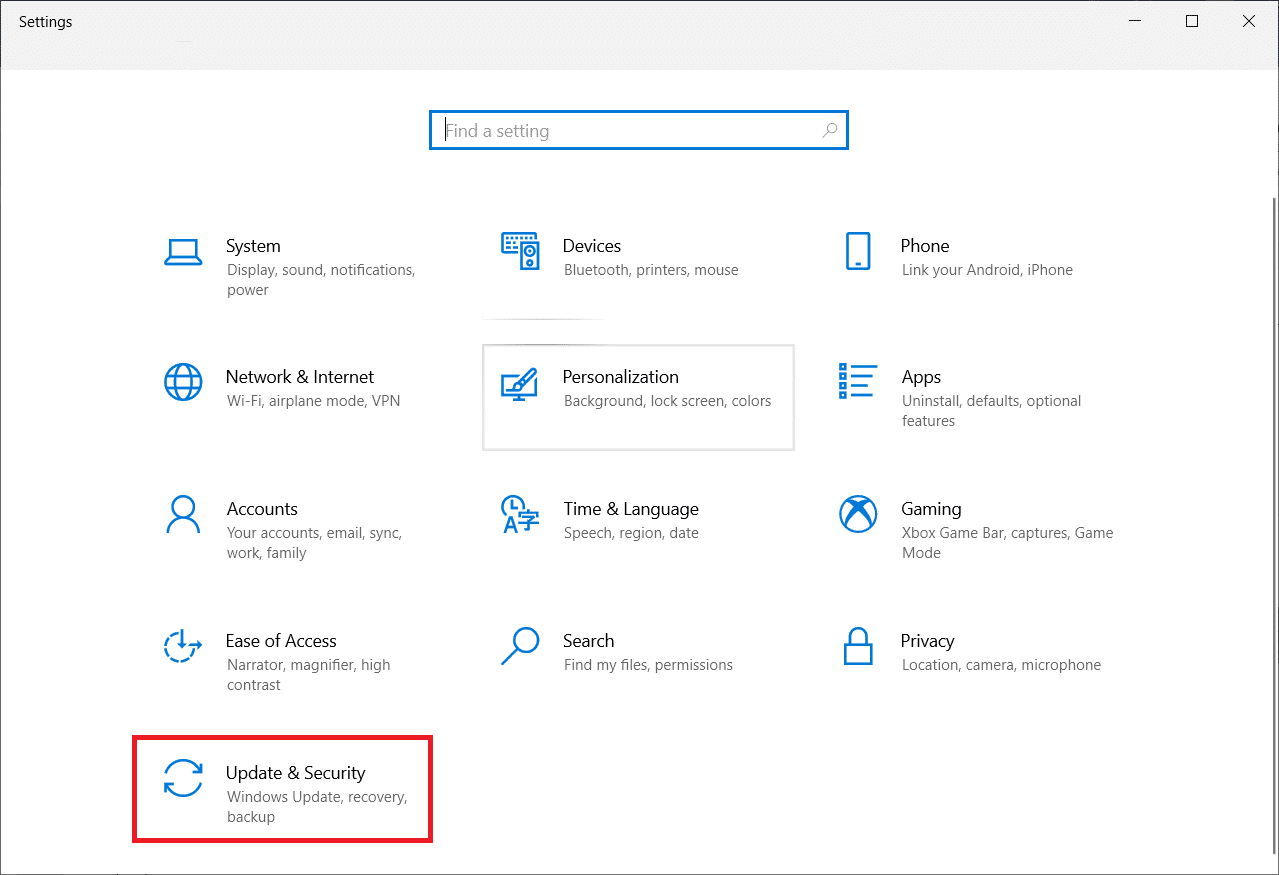
1.. Іске қосыңыз Windows параметрлері.
2. Басыңыз Жаңарту және қауіпсіздік орнату.
3. Таңдаңыз Ақауларды жою сол жақ тақтадан мәзір.
4. Содан кейін таңдаңыз Аудио ойнатылуда және басыңыз Ақаулықтарды жою құралын іске қосыңыз опция.
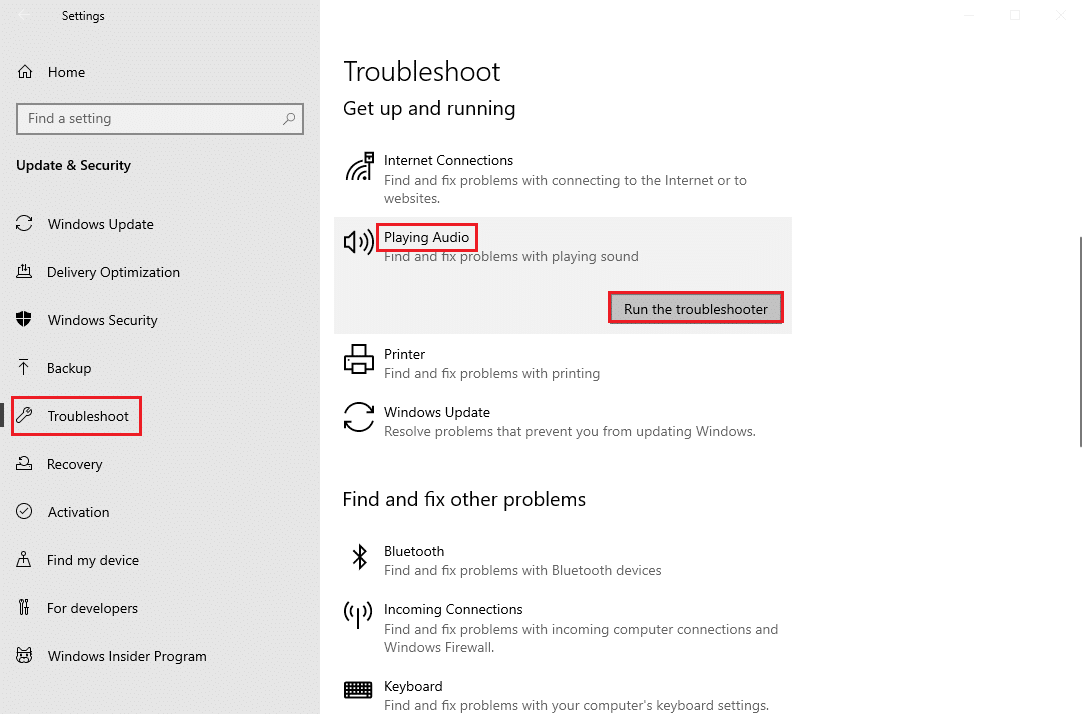
5. Wait for the troubleshooter to detect problems and follow the экрандағы нұсқаулар to apply the fix.
Сондай-ақ оқыңыз: Аудио шығыс құрылғысы орнатылмаған қатені түзетіңіз
Method 3: Close Other Programs using Audio
When the audio utility is used by other programs on your Windows 10 PC, then you may face Logitech G533 microphone audio issues. To resolve the problem, you are advised to close all other programs or applications running in the background one by one or force them to shut down by using Task Manager. To do so, follow our guide on How to End Task in Windows 10.

Method 4: Restart Windows Explorer Processes
Some users have reported that restarting Windows Explorer processes will help to resolve the Logitech G533 Mic not working issue. Follow the below-listed instructions to do the same.
1. түймесін басыңыз Ctrl + Shift + Esc пернелері ашу үшін бірге Тапсырмалар менеджері.
2. Ішінде Процестер қойындысын нұқыңыз Windows Explorer тармағын таңдаңыз және Қайтадан қосу түймесін басыңыз.
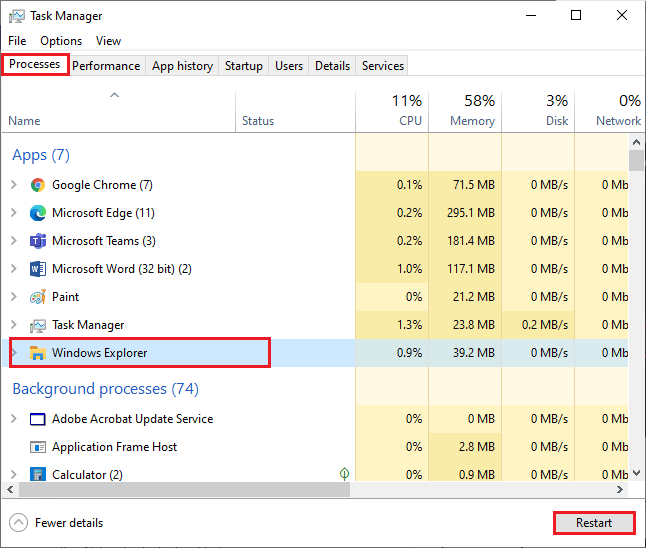
3. Now, Windows Explorer restarts and Windows 10 Logitech G533 microphone issue will be fixed now.
Method 5: Allow Audio Access for Audio Apps
There is a list of applications and programs on your computer that will have access for using audio devices. If your Logitech G533 microphone application is not on the list, you cannot hear any audio content contributing to the discussed error. Therefore, ensure the audio settings are enabled for your game on your PC by following the below-mentioned steps.
1.. Іске қосыңыз Windows параметрлері түймесін басу арқылы Windows + I пернелері бірге.
2. Енді, басыңыз Құпиялық орнату.
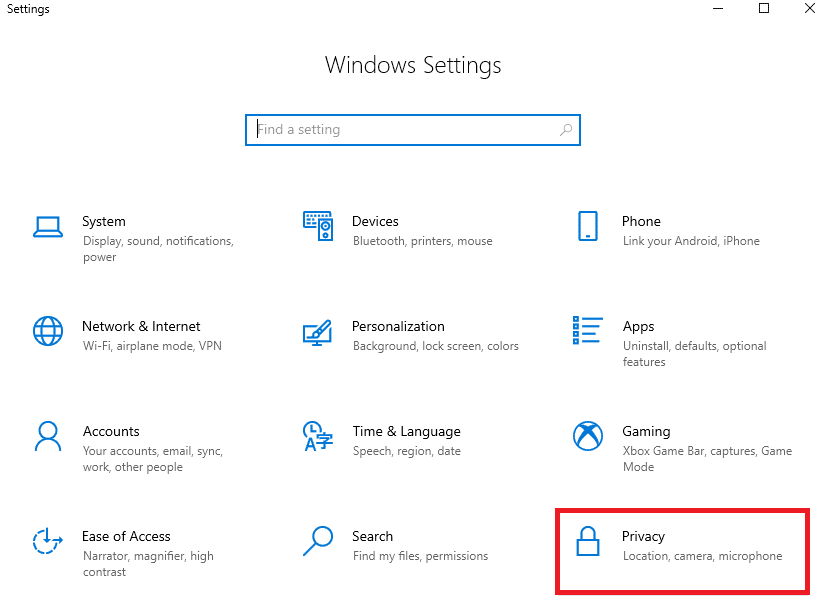
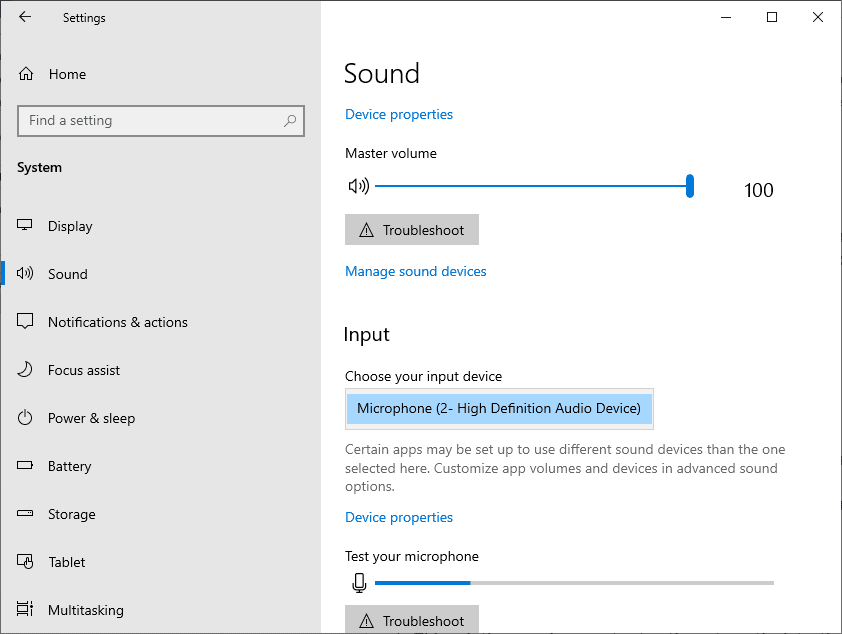
3. Here, scroll down left pane and click the Микрофон option. Ensure Қолданбаларға микрофоныңызға кіруге рұқсат беріңіз option are enabled as shown.
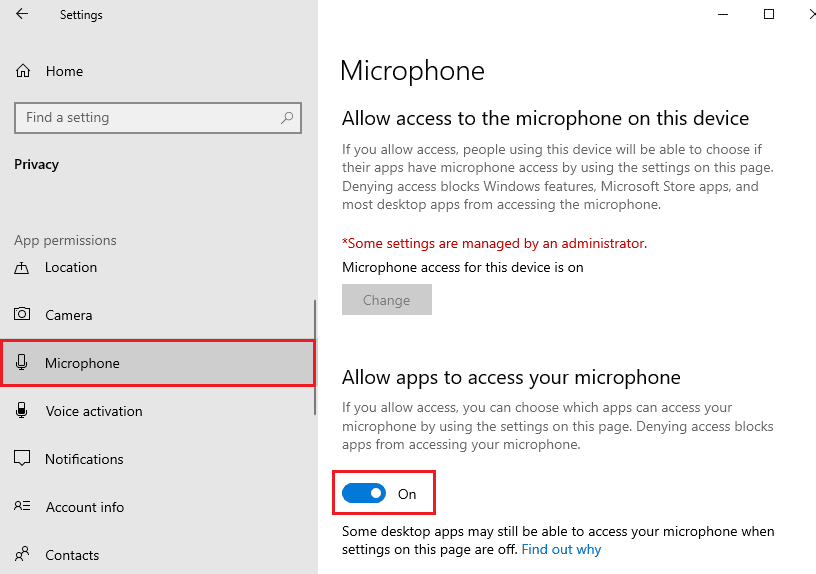
Ескерту: ұшыру Дыбыс параметрлері from the search menu and select the correct input device (Microphone (2 High-Definition Audio Device)) as default.
Then, check if you have fixed Logitech G533 microphone sound not working issue.
Сондай-ақ оқыңыз: NVIDIA Virtual Audio Device Wave Extensible дегеніміз не?
Method 6: Set Audio Device as Default Device
If you are using an audio device like Logitech G533 microphone or speakers, you must ensure whether it is set as a default device or not. Let us assume a case of connecting an external monitor (that does not have built-in speakers) to your PC. If this monitor is set as a default output device, you cannot hear any audio. You have to set your audio device as the default device as instructed below to fix Logitech G533 Mic not working issue.
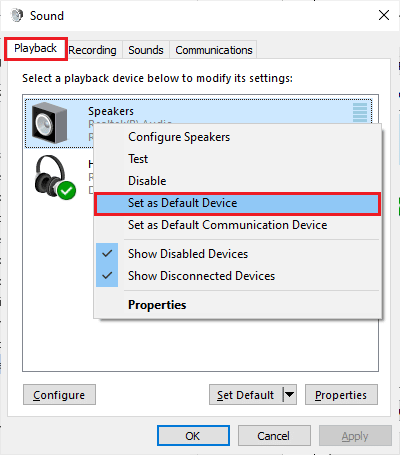
1. Тінтуірдің оң жағын басыңыз Спикерлер icon at the bottom right corner of the screen and select Дыбыстар опция.
![]()
2. Then, switch to Ойнату tab and right-click on аудио құрылғы you would like to set as the default one.
3. Енді таңдаңыз Әдепкі құрылғы ретінде орнатыңыз option as highlighted and click on Қолдану> Жарайды өзгерістерді сақтау.
Method 7: Re-enable Sound Card
You can easily resolve Logitech headset mic not working issue by restarting the sound card as instructed below.
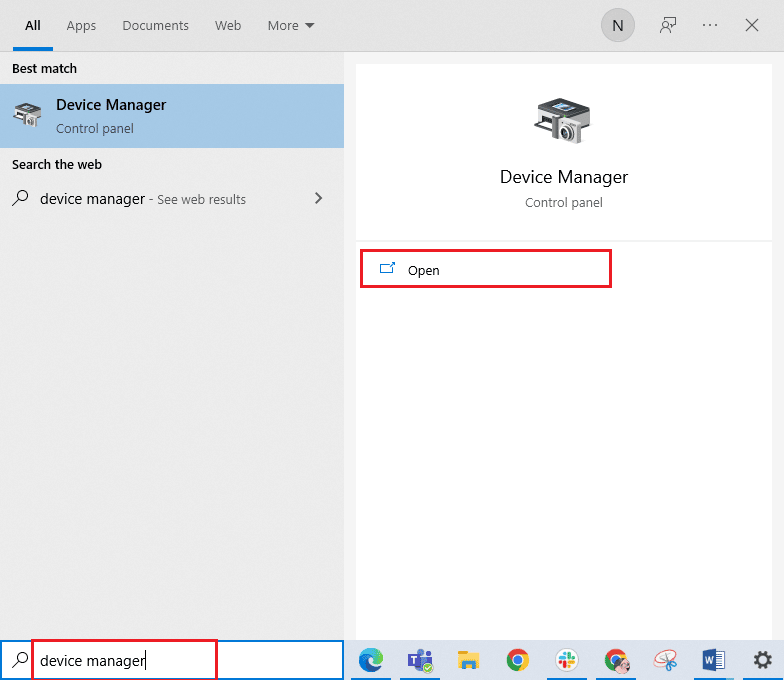
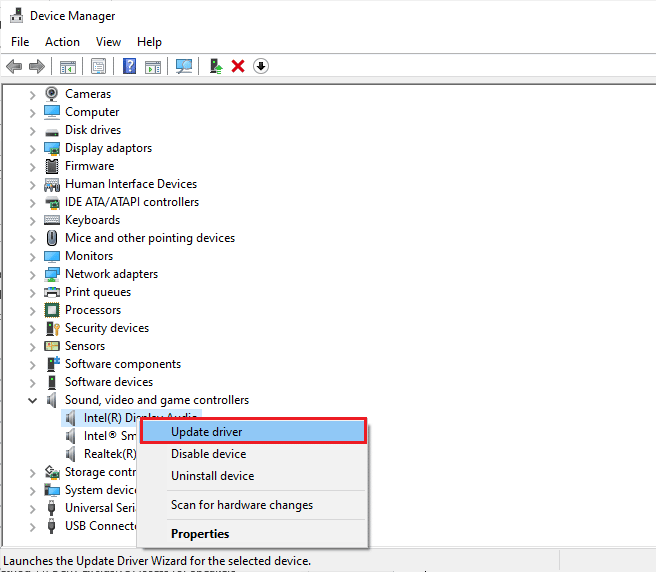
1. хит Windows кілті және түрі Құрылғы менеджері, содан кейін нұқыңыз ашық.
2. Then, expand Дыбыс, бейне және ойын контроллері оны екі рет басу арқылы.
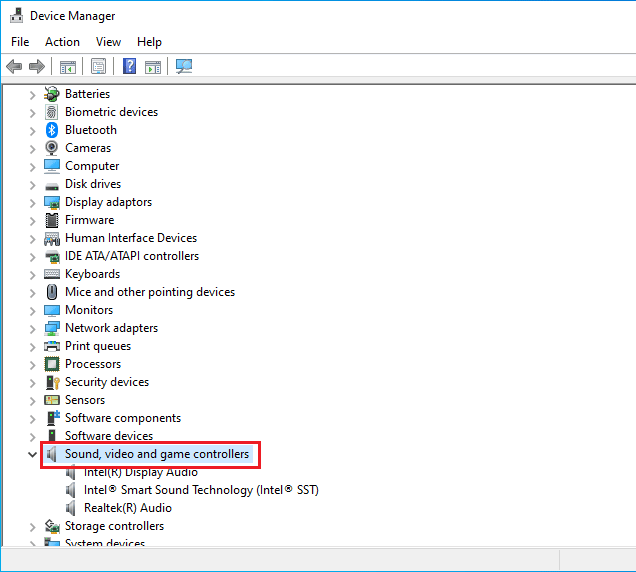
3. Одан кейін тінтуірдің оң жақ түймешігімен басыңыз дыбыстық карта таңдаңыз Құрылғыны өшіріңіз опция.
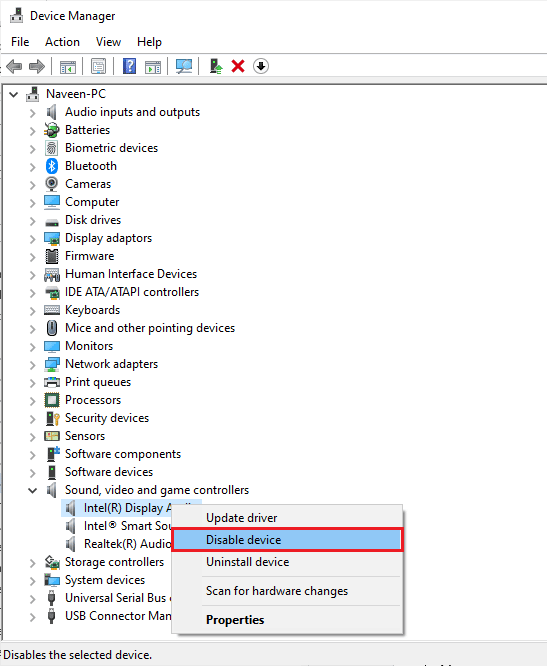
4. Енді түймесін басу арқылы сұрауды растаңыз иә және Қайта жүктеу your computer. Then, repeat Steps 1-2.

5. Одан кейін тінтуірдің оң жақ түймешігімен басыңыз дыбыстық карта таңдаңыз Құрылғыны қосыңыз опция.
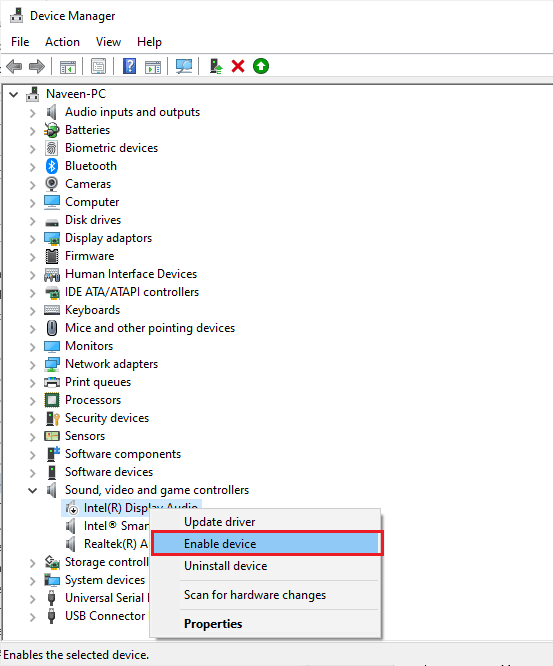
6. Now, try playing any sound in your audio application and check if the issue is resolved or not.
8-әдіс: Дыбыс жақсартуларын өшіріңіз
If you find your audio working well for other multimedia resources, but the sound seems to be of low quality or noisy in Logitech G533 Mic, you are advised to change the sample rate. A low-frequency sample rate may cause Logitech headset mic not working issue. You can select a higher frequency sample rate by following the below-mentioned steps.
1. Тінтуірдің оң жағын басыңыз Спикерлер icon at the bottom right corner of the screen and select Дыбыстар опция.
![]()
2. Then, switch to Ойнату tab and select audio device followed by Сипаттар түймесі көрсетілгендей.

3. Then, switch to озат қойындысын және астындағы ашылмалы мәзірден Әдепкі пішім, таңдағаныңызға көз жеткізіңіз ең жоғары жиілік диапазоны (24-bit, 48000 Hz).
Ескерту: Сенімді болу Enable audio enhancements option is unchecked under Signal Enhancements көрсетілгендей.
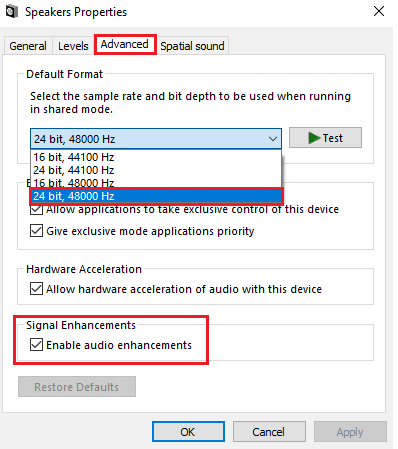
4. Басыңыз Қолдану содан соң OK өзгерістерді сақтау.
Check if you face Logitech G533 Mic not working again. If so, adjust different levels of frequency ranges by repeating these steps and confirm which range solves the problem.
Сондай-ақ оқыңыз: Windows 10 дыбысының бұзылуын түзетіңіз
9-әдіс: Аудио қызметтерін қайта іске қосыңыз
Few essential Windows audio services will help you prevent Logitech G533 Mic not working issue. If in case, if these services are turned off, you may face several conflicts. Hence, you are advised to restart a few essential audio services as instructed below steps.
1. түймесін басыңыз Windows кілті, теріңіз Қызметтер батырмасын басыңыз және Әкімші ретінде іске қосыңыз.
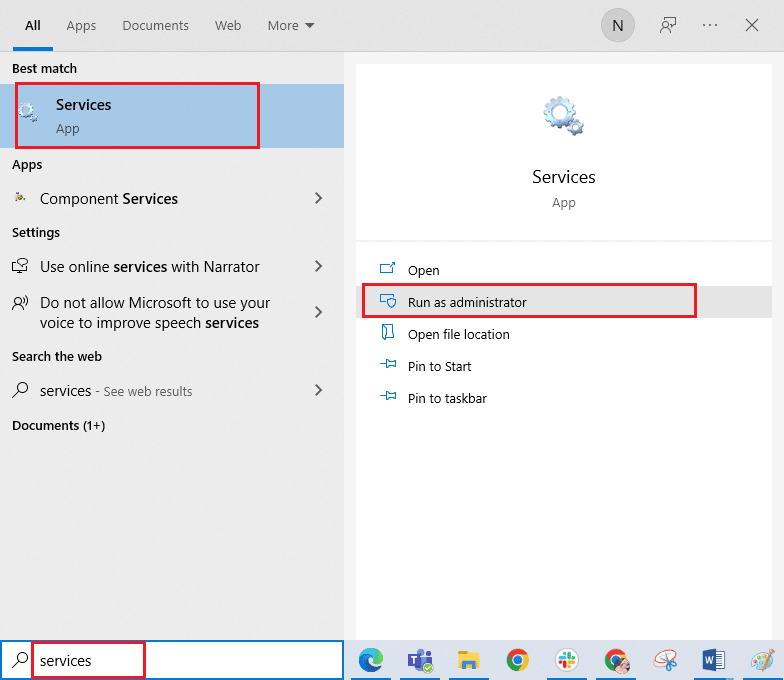
2. Енді төмен айналдырып, екі рет басыңыз Windows дыбысы қызмет.
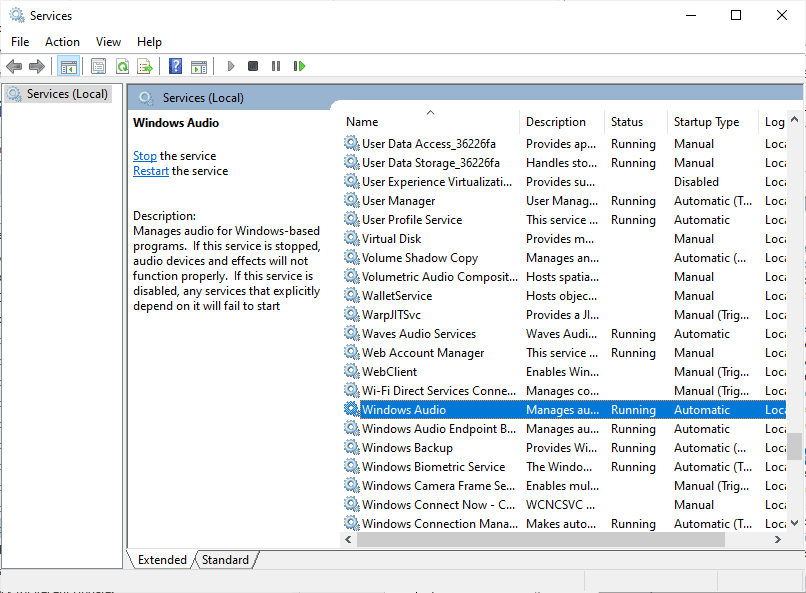
3. Now, in the new popup window, select Іске қосу түрі дейін автоматтық, суреттелгендей.
Ескерту: егер Қызмет мәртебесі is Тоқтатылды, содан кейін түймесін басыңыз бастау батырмасы. Егер Қызмет мәртебесі is Жүгіру, басыңыз Тоқта және оны қайта бастаңыз.
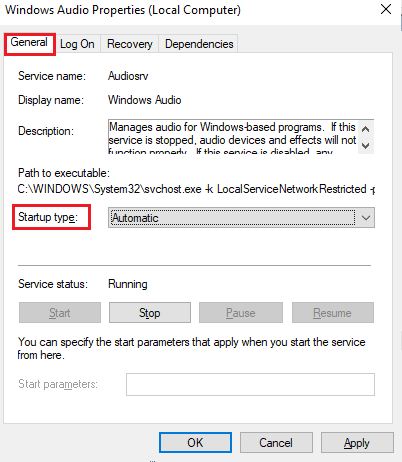
4. Басыңыз Қолдану> OK өзгерістерді сақтау.
5. Осы қадамдардың барлығын Windows жүйесінің басқа қызметтері үшін қайталаңыз Windows Audio Endpoint Builder және Қашықтан шақыру процедурасы (RPC) және мәселені шешкеніңізді тексеріңіз.
Method 10: Deny Exclusive Access for Audio Device
Still, if you are struggling with Logitech G533 microphone not working issue, then you have to ensure no other program is taking the exclusive control of your audio device. You can disable the discussed feature by following the below-mentioned steps to fix Logitech headset mic not working issue.
1.. Іске қосыңыз Дыбыстар орнату.
2. Then, select your audio device and click on Сипаттар түймесі көрсетілгендей.
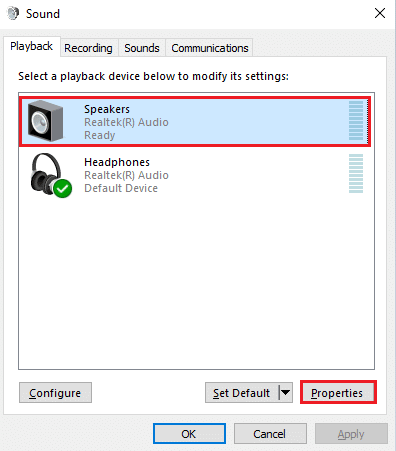
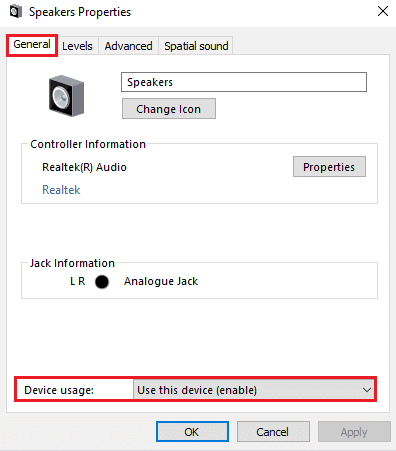
3. Ішінде жалпы tab, make sure the Құрылғыны пайдалану опциясы орнатылған Use this device (enable) as shown. Click on Қолдану> Жарайды if you have made any changes.
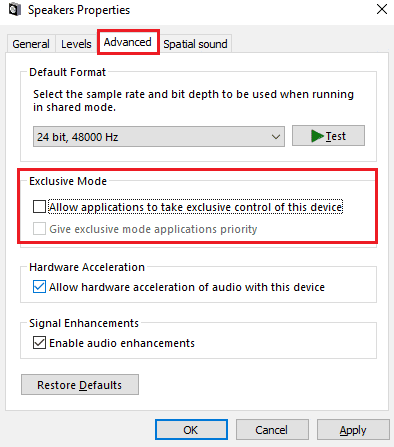
4. Now, switch to озат қойынды және астында Эксклюзивті режим menu, make sure the following options are unchecked.
- Қолданбаларға осы құрылғыны ерекше бақылауға рұқсат беру.
- Эксклюзивті режим қолданбаларына басымдық беріңіз.
Ескерту: As soon as you uncheck Қолданбаларға осы құрылғыны ерекше бақылауға рұқсат беру опция, give exclusive mode applications priority option will be automatically unchecked.
5. Соңында түймесін басыңыз Қолдану> OK to save the changes. Now, you would have fixed Logitech G533 microphone audio issues.
Сондай-ақ оқыңыз: Windows 10 жүйесінде Firefox-та дыбыс жоқ дегенді түзетіңіз
Method 11: Update or Roll Back Audio Drivers
Follow the given steps to update or roll back audio drivers to fix Logitech headset mic not working issue.
Option I: Update Audio Drivers
Outdated and incompatible audio drivers will always result in Logitech G533 Mic not working issue. Always ensure you use an updated version of audio drivers and if your computer lacks the latest drivers, you are advised to update them as instructed in our guide How to Update Realtek HD Audio Drivers in Windows 10.
Once you have updated your audio drivers to the latest version, check if you have fixed Logitech G533 microphone audio issues.
Option II: Roll Back Audio Driver Updates
Sometimes, the current version of audio drivers may cause any Logitech G533 audio conflicts and in this case, you have to restore previous versions of installed drivers. This process is called драйверлерді кері қайтару және Windows 10 жүйесінде драйверлерді қалай қайтару туралы нұсқаулықты орындау арқылы компьютер драйверлерін бұрынғы күйіне оңай қайтаруға болады.
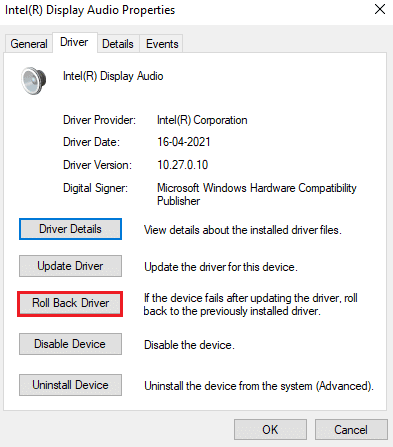
Windows 10 компьютеріңізге драйверлердің алдыңғы нұсқалары орнатылғанша күтіңіз. Аяқтағаннан кейін, мәселені шешкеніңізді тексеріңіз.
Method 12: Reinstall Audio Drivers
Incompatible drivers must be reinstalled to resolve all audio related problems. You are advised to reinstall device drivers only if you cannot attain any fix by updating them. Steps to reinstall drivers are very easy and you can do so by using a third-party application or by implementing the steps manually as instructed in our guide How to Uninstall and Reinstall Drivers on Windows 10
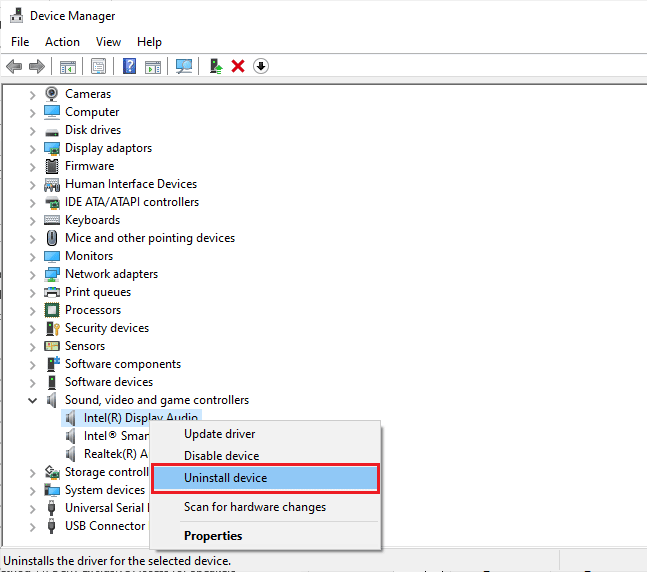
After reinstalling audio drivers, check if you can hear audio while playing them in Logitech G533 device.
Сондай-ақ оқыңыз: Windows 10 жүйесінде Firefox-та дыбыс жоқ дегенді түзетіңіз
Method 13: Reinstall Logitech Gaming Software
If none of the methods have helped you to fix Logitech headset mic not working issue, then try uninstalling the Logitech Gaming software and reinstall it again. Reinstalling this Logitech program may fix the bugs with your Logitech devices like microphone. Any common glitches associated with a software program can be resolved when you uninstall the application entirely from your computer and reinstall it. Here are few steps to implement the same.
Step I: Through Control Panel
1. хит Windows кілті, теріңіз Басқару панелі батырмасын басыңыз және ашық.
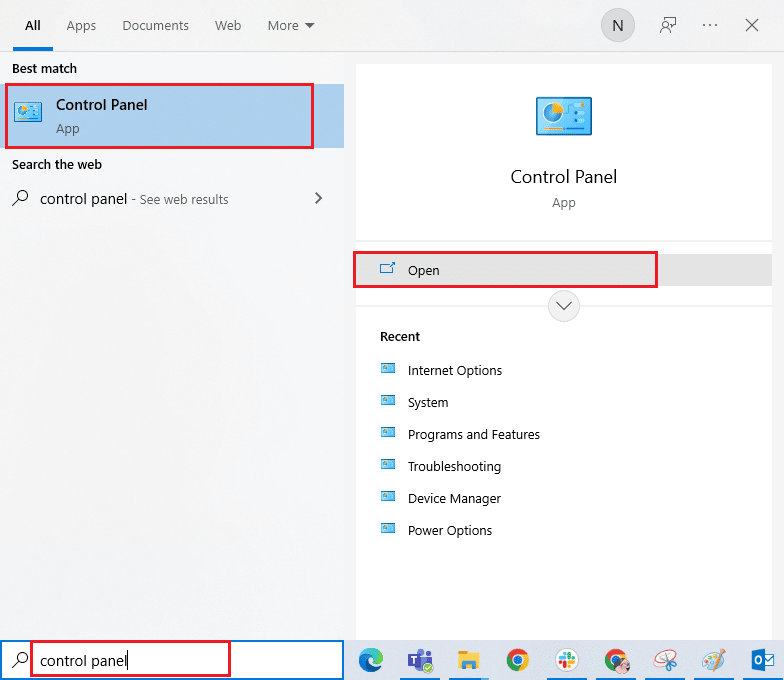
2. Орнатыңыз Көру > Санат, содан кейін нұқыңыз Бағдарламаны жою астында бағдарламалар көрсетілгендей мәзір.
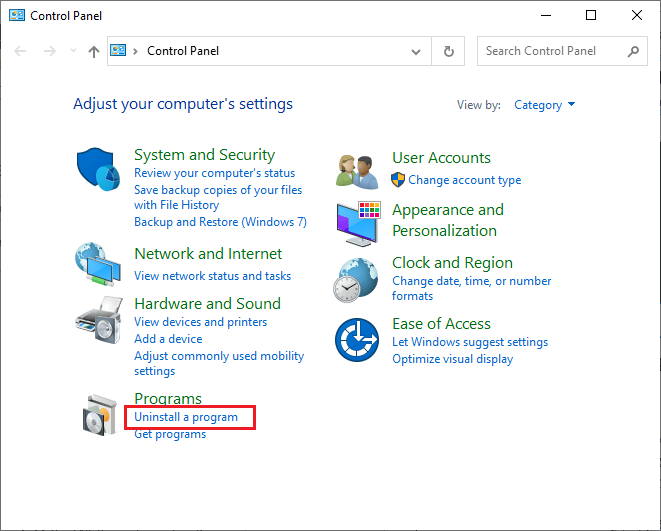
3. The Бағдарламалар мен ерекшеліктері утилита ашылады және енді іздеңіз Logitech gaming software.
4. Енді, басыңыз Logitech gaming software және нұқыңыз Жою / Өзгерту option from top bar.
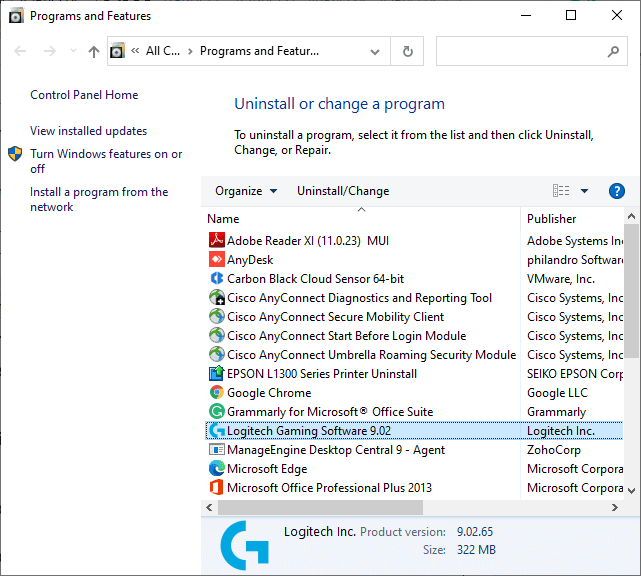
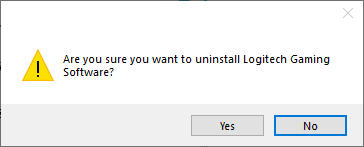
5. Енді шақыруды растаңыз Are you sure want to uninstall Logitech Gaming Software? басыңыз Иә. Refer to the pic.
6. Қайтадан қосу the computer once you complete all the steps mentioned above.
Step II: Delete Cache Files
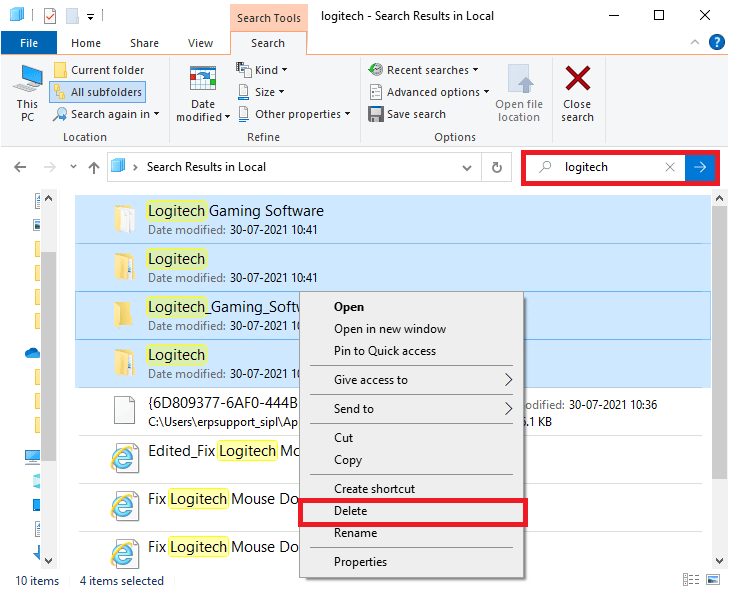
1. басыңыз Windows іздеу жолағы және түрі % appdata%
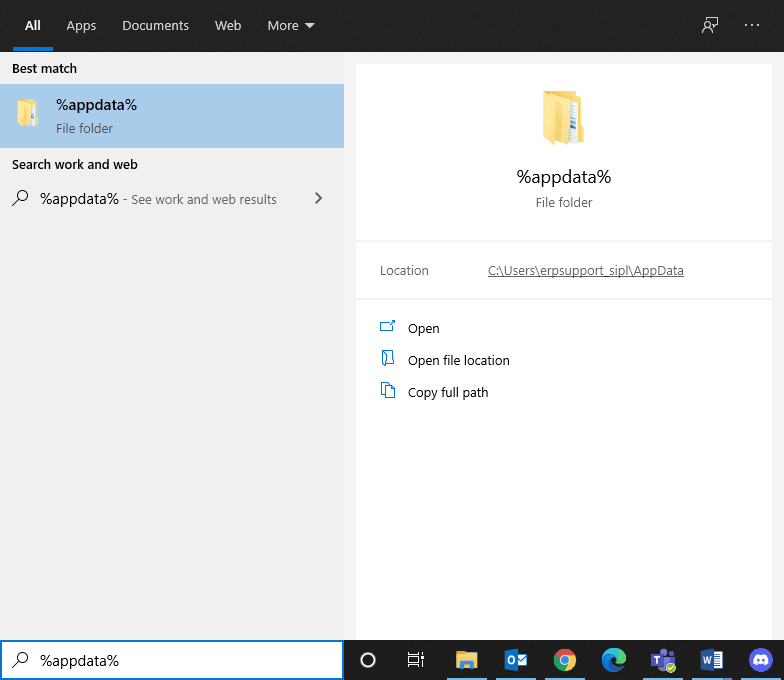
2. Таңдаңыз App Data Roaming folder and navigate to the following жолы.
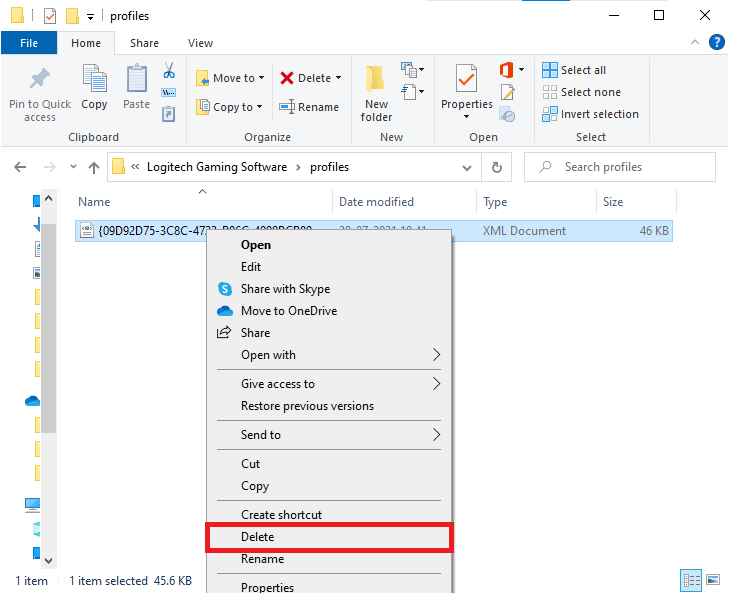
C:UsersUSERNAMEAppDataLocalLogitechLogitech Gaming Softwareprofiles
3. Now, right-click and жою ол.
4. басыңыз Windows іздеу жолағы қайта және теріңіз % LocalAppData%
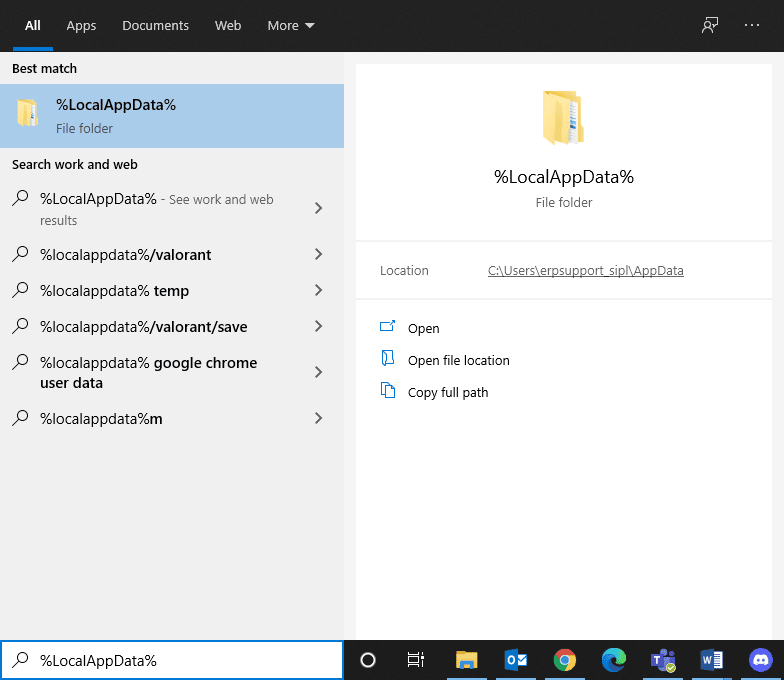
5. Табыңыз Logitech Gaming Software folder by using the search menu and жою ол.
Now, you have successfully deleted Logitech gaming software from your PC. Now, follow the below steps to reinstall the same.
Step III: Reinstall Logitech Gaming Software
1. келу official Logitech Gaming software site дейін орнату компьютеріңіздегі бағдарламалық құрал.
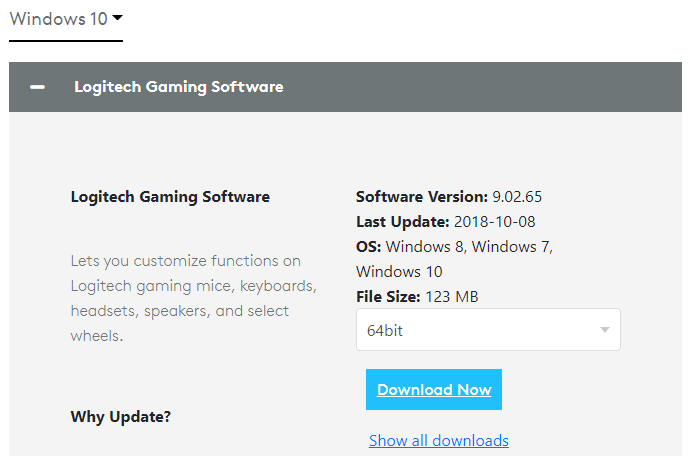
2. Бару Менің жүктеп алуларым және екі рет басыңыз LGS_9.02.65_x64_Logitech (it varies according to the version you download) to open it.
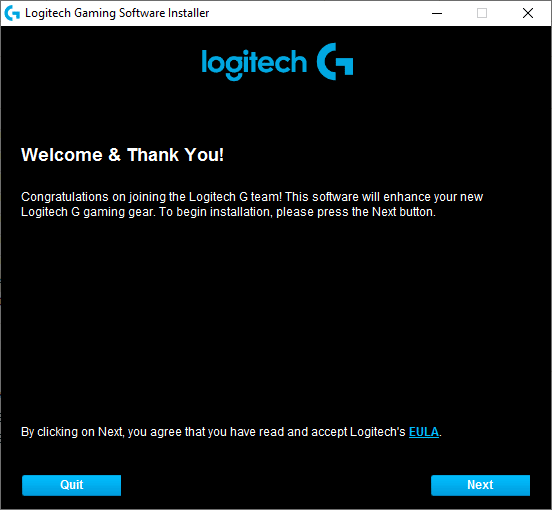
3. Мұнда түймесін басыңыз Келесі button until you see the installation process on the screen.
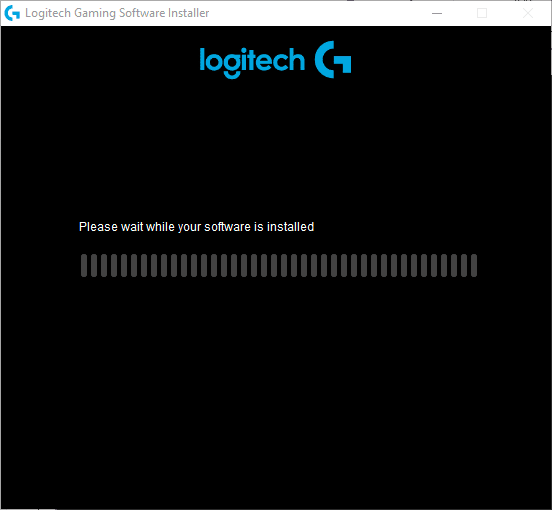
4. Now, once the software is installed, your system may undergo a restart process.
Now, you have successfully reinstalled the Logitech software program on your system. Next, check if Logitech headset mic not working is fixed on Windows PC.
Сондай-ақ оқыңыз: Windows 10 жұмыс істемейтін масштабтау дыбысын түзетіңіз
14-әдіс: Жүйені қалпына келтіруді орындаңыз
If none of the methods have helped you, then the only option left is to restore your computer to its previous version. To do so, follow our guide on How to use System Restore on Windows 10 and implement the instructions as demonstrated in the section to perform a system restore.
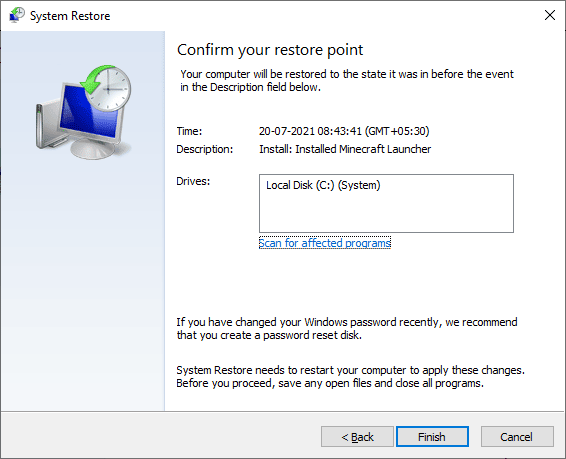
After restoring your Windows 10 PC, check if have fixed Logitech G533 microphone audio issues on your Windows 10 PC.
Ұсынылған:
Бұл нұсқаулық пайдалы болды және сіз түзете аласыз деп үміттенеміз Logitech G533 Mic not working in your device. Feel free to reach out to us with your queries and suggestions via the comments section below.

![Windows 10 жүйесінде WiFi жұмыс істемейтінін түзетіңіз [100% жұмыс істейді]](https://lbsite.org/wp-content/uploads/2023/02/Fix-WiFi-not-Working-in-Windows-10.jpg "Windows 10 жүйесінде WiFi жұмыс істемейтінін түзетіңіз [100% жұмыс істейді]")