While surfing internet in your browser, you may face Server IP address could not be found error. This is a common issue for the Google Chrome users. We bring to you a helpful guide that will fix server IP address could not be found error on Windows 10. So, continue reading!
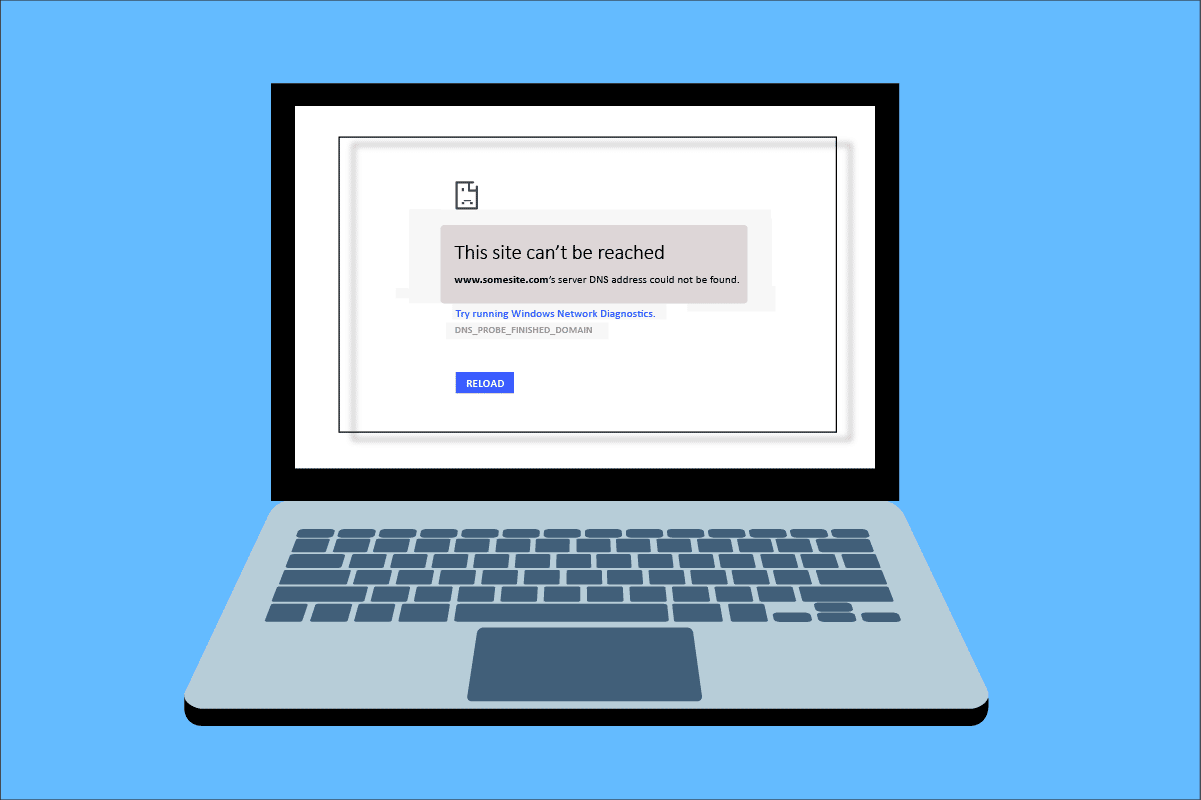
How to Fix Server IP Address Could Not be Found on Windows 10
One of the most popular web browser is Google Chrome. However if you are facing the error while browsing in the Chrome browser, then do not worry! This issue may be caused due to various reasons like;
- Тұрақсыз Интернет қосылымы
- Corrupt Browser Cache and Cookies
- Incorrect IP Address
- Corrupt DNS Cache
- Outdated Network Drivers
Here, we have listed all possible methods to fix the said issue on Windows 10.
Method 1: Troubleshoot Network Adapter
The said issue may occur due to your network error. You can run the network adapter troubleshooter to fix any errors with your network adapter. Read our guide to troubleshoot network connectivity on Windows 10.

2-әдіс: Браузер кэшін тазалау
The cache files in your web browser may get corrupt. You can try to clear the cache and cookies of your browser and try to check if the error still persists or not. Follow these steps to clear browser cache.
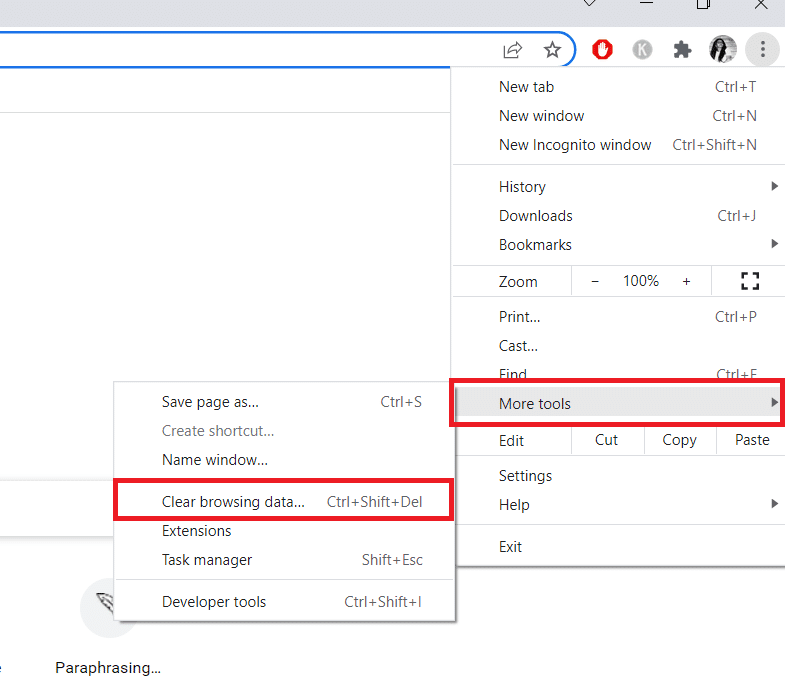
1.. Іске қосыңыз Chrome browser from Windows search bar as shown.

2. Енді түймесін басыңыз үш нүктелі белгіше жоғарғы оң жақ бұрышта.
3. Осы жерде түймесін басыңыз Қосымша құралдар опция.
4. Содан кейін түймесін басыңыз Қарауды тазалау деректер… опция.
Ескерту: Сіз теруіңізге болады chrome: // settings / clearBrowserData in the search bar to launch the browser history page directly.
5. Осы жерден таңдаңыз Уақыт диапазоны in the next window. Check the boxes marked:
- Cookie файлдары және басқа сайт деректері және
- Кэштелген суреттер мен файлдар.
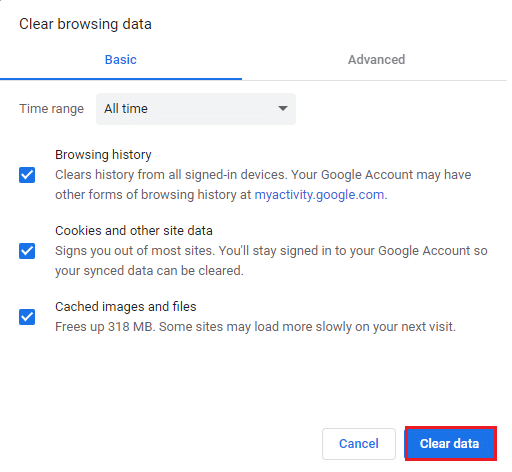
6. Соңында түймесін басыңыз Clear деректер.
Сондай-ақ оқыңыз: Fix This Plugin is Not Supported error in Chrome
Method 3: Clear DNS Cache
You can try to clear the DNS cache to fix server IP address could not be found error. Follow our guide to flush and reset the DNS cache in Windows 10.
Method 4: Release and Renew IP Address
Here are the steps to release and renew the IP address.
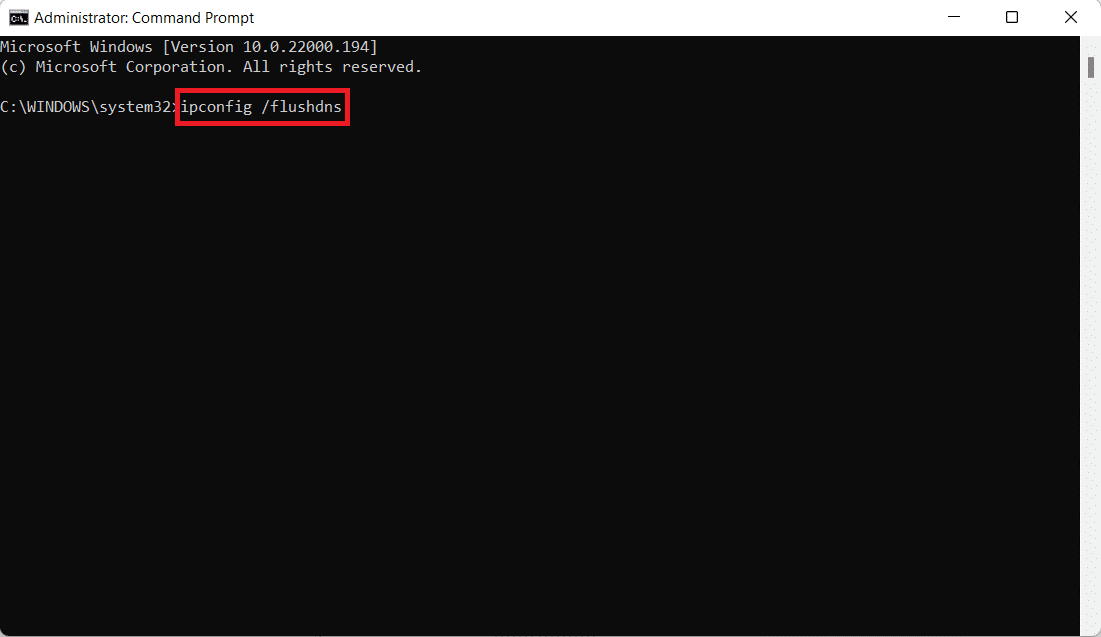
1. түймесін басыңыз Windows кілті, теріңіз Командалық шақыру, және нұқыңыз Әкімші ретінде іске қосыңыз.

2. Firstly you should flush the DNS cache as shown in 2 әдісі.
3. Once the above process is complete, type ipconfig / босату түймесін басыңыз кіру кілт.

4. Содан кейін теріңіз ipconfig / renew және хит кіру to renew your IP.

Сондай-ақ оқыңыз: Windows 10 жүйесінде WiFi желілері табылмады дегенді түзетіңіз
5-әдіс: DNS мекенжайын өзгерту
Incorrect DNS address also cause this said Chrome error. You can change your DNS address to fix the error. Follow the given steps to change DNS address.
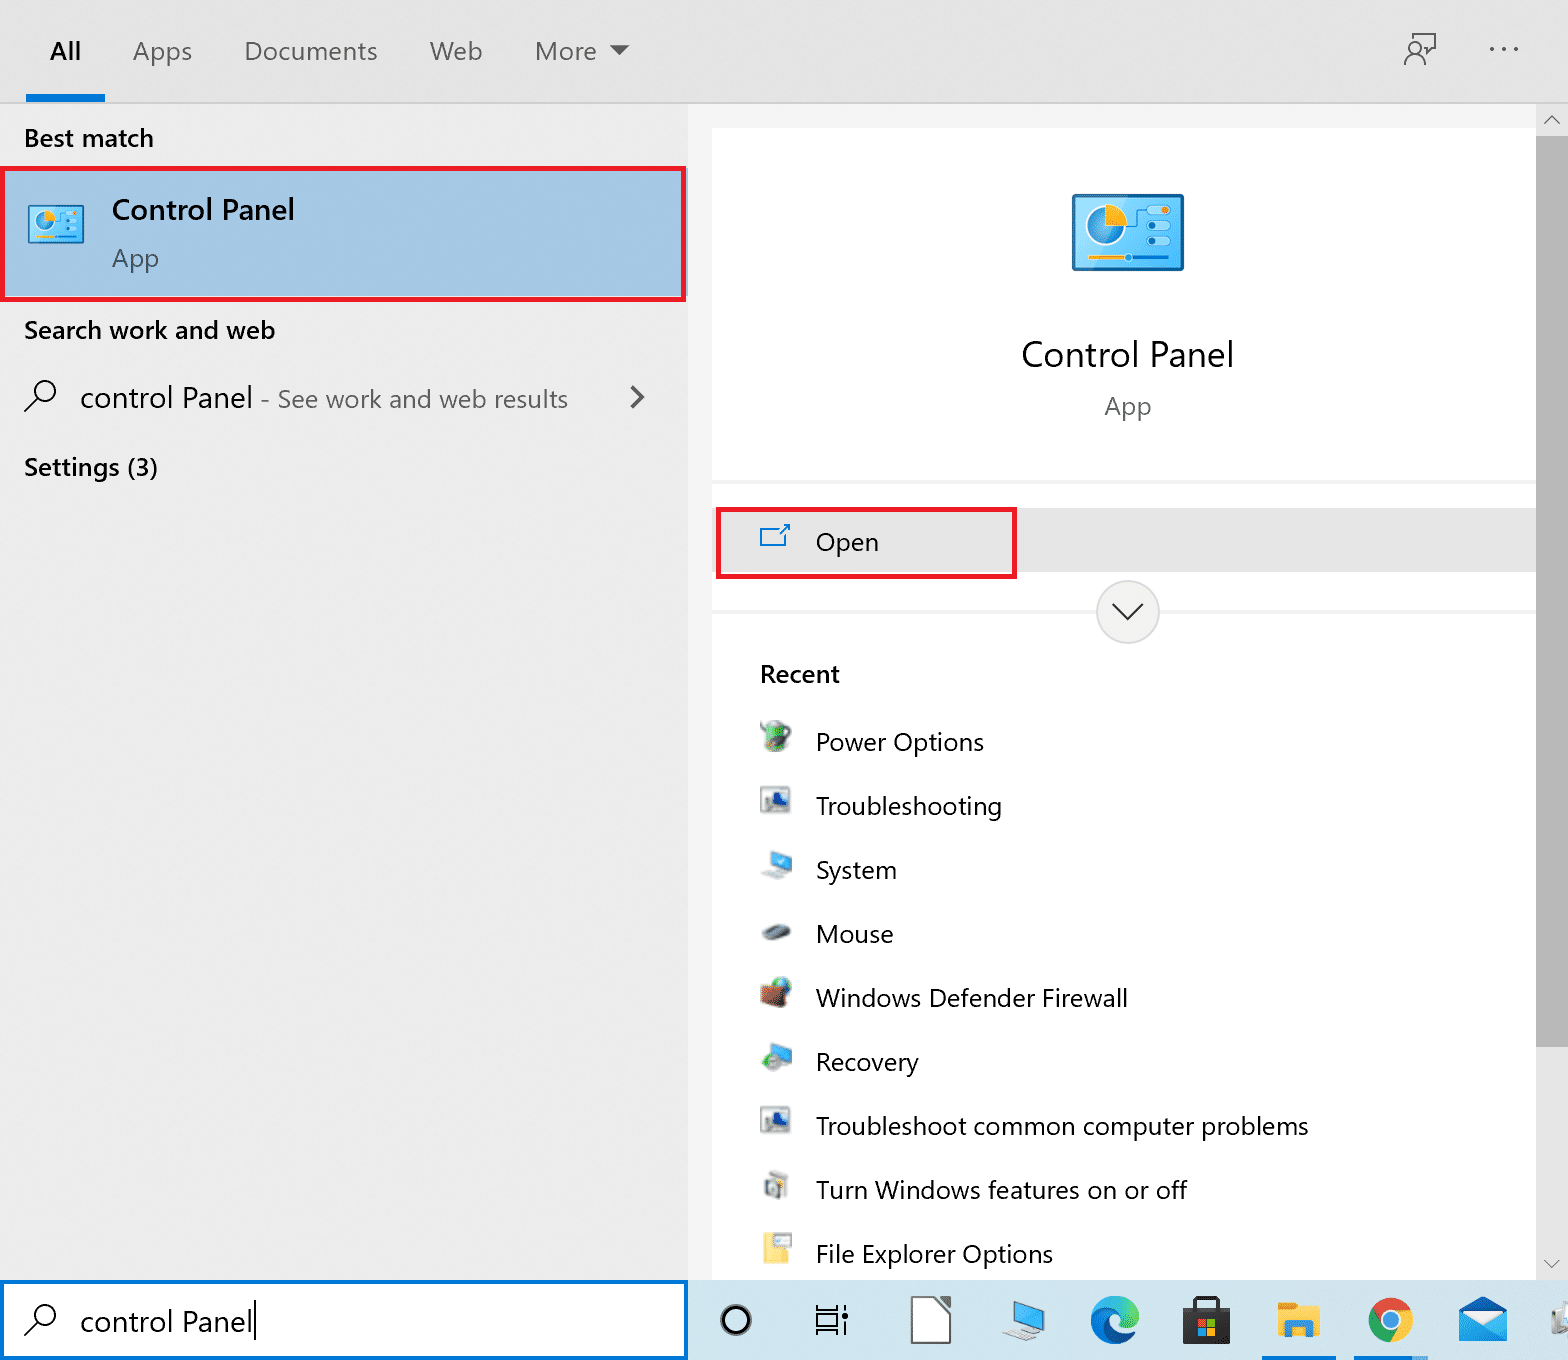
1. Түймесін басыңыз Windows кілті, теріңіз Басқару панелі батырмасын басыңыз және ашық.
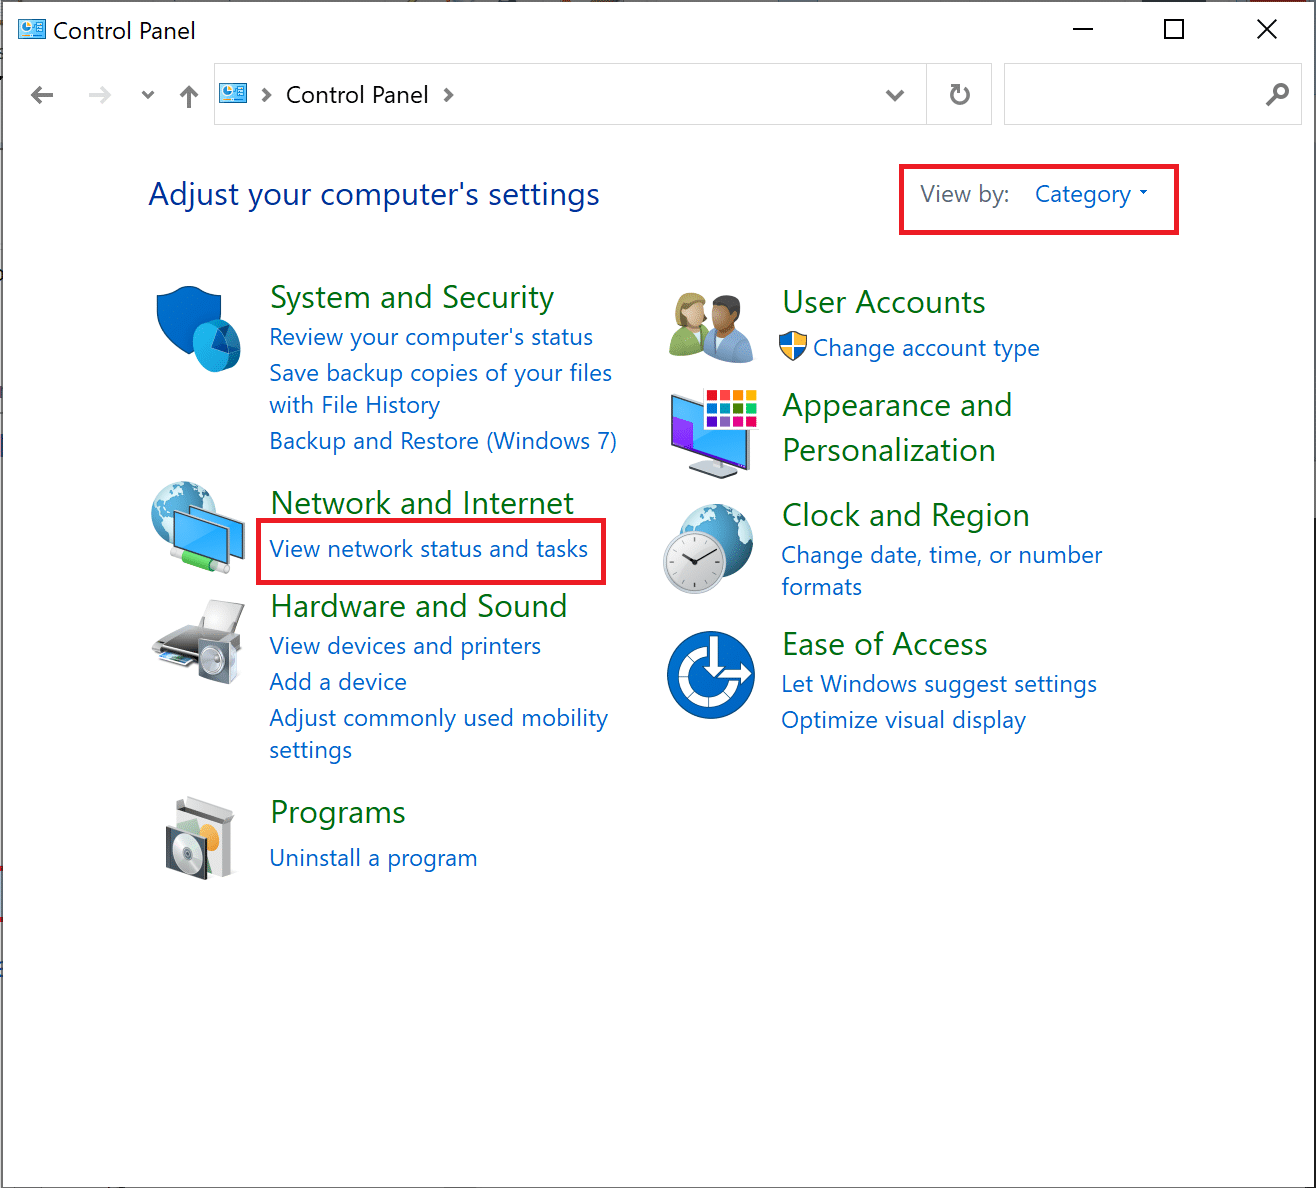
2. Орнатыңыз Көру > санат батырмасын басыңыз және Желі күйін және тапсырмаларды қарау.
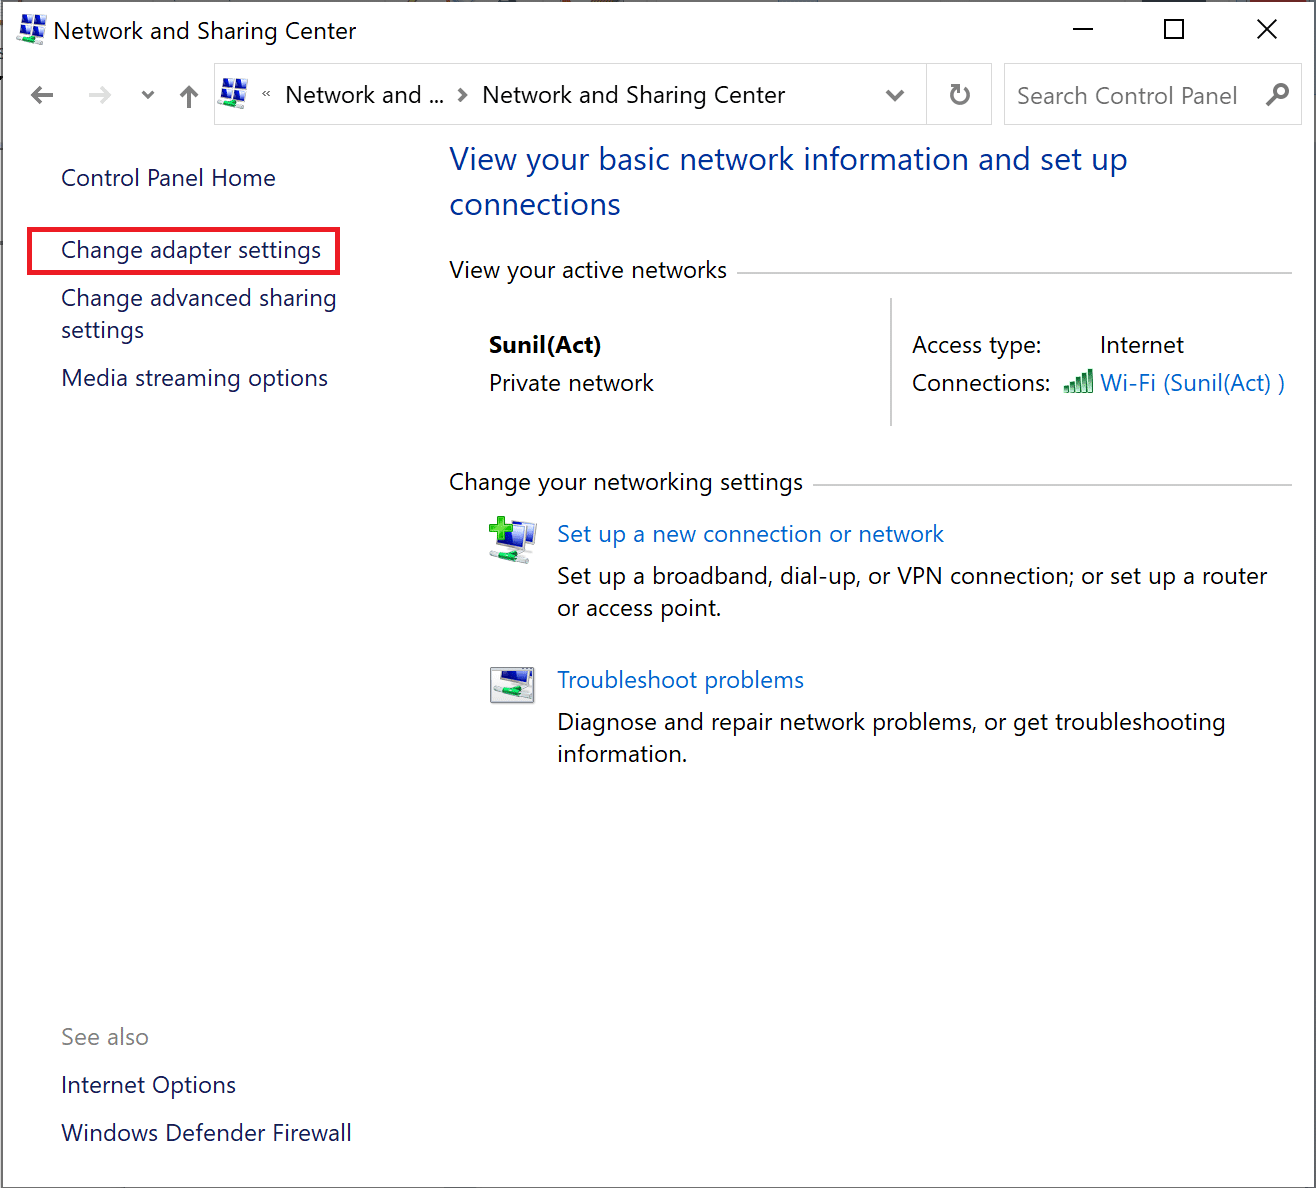
3. Енді түймесін басыңыз Адаптер параметрлерін өзгертіңіз option at the left sidebar.
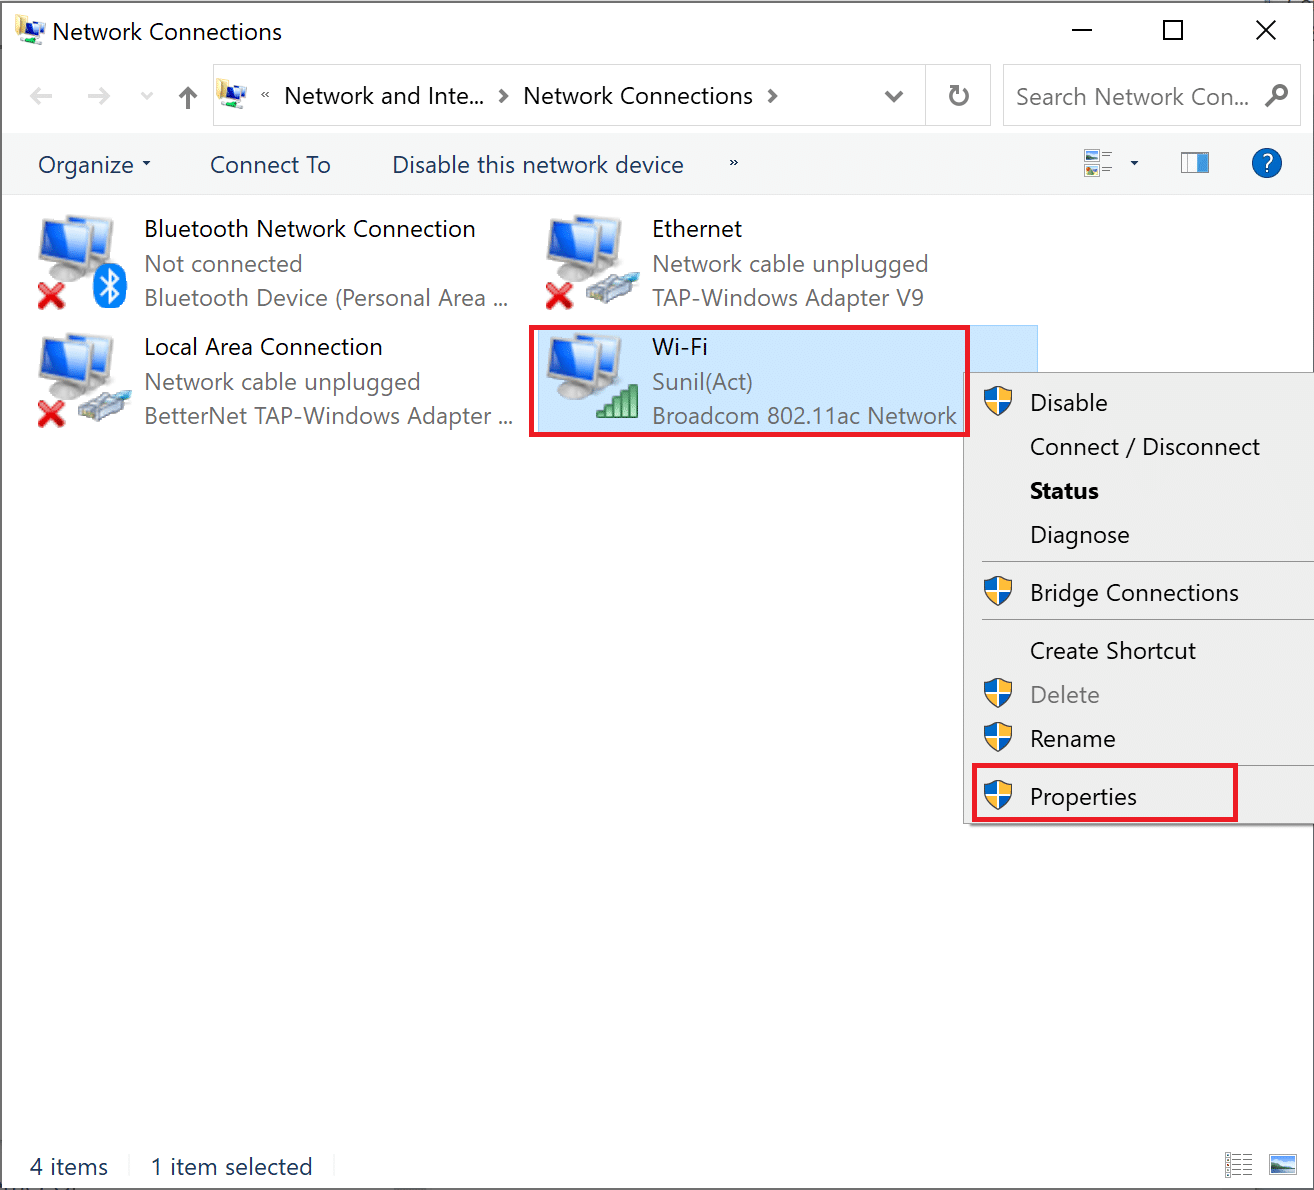
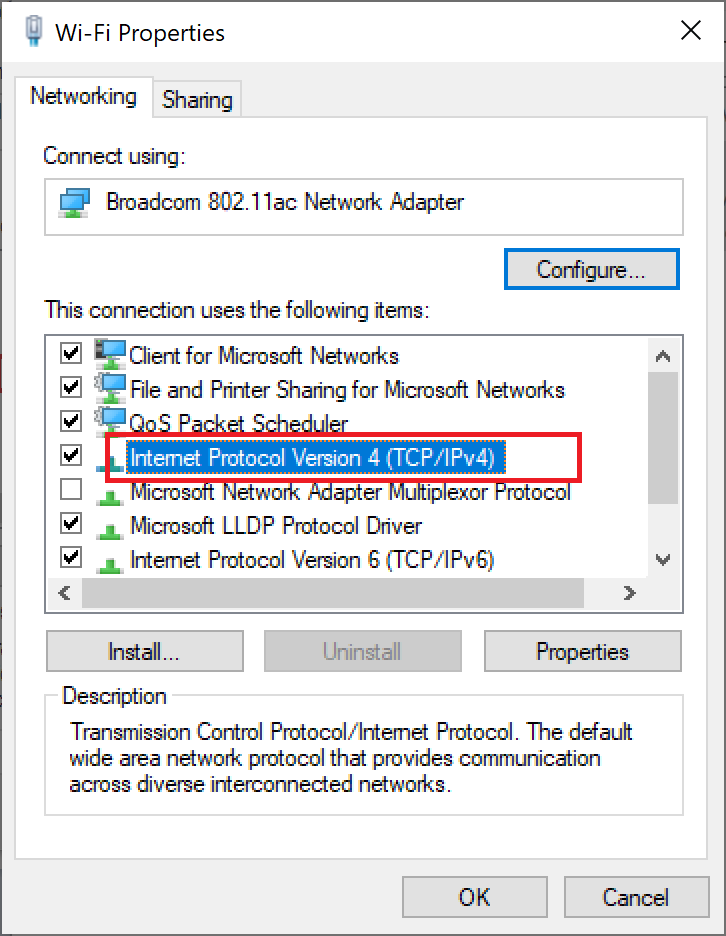
4. Next, right-click on your currently active internet connection and select Сипаттар, атап көрсетілгендей.
5. In the Properties window, double-click on Internet Protocol нұсқасы 4 (TCP / IPv4).
6. Next, check the options titled IP-мекен-жайын автоматты түрде алыңыз және Келесі DNS серверінің мекенжайларын пайдаланыңыз, атап көрсетілгендей.
6a. For the Preferred DNS server, enter the Google Public DNS address as: 8.8.8.8
6b. And, In the Баламалы DNS сервері, enter the other Google Public DNS as: 8.8.4.4
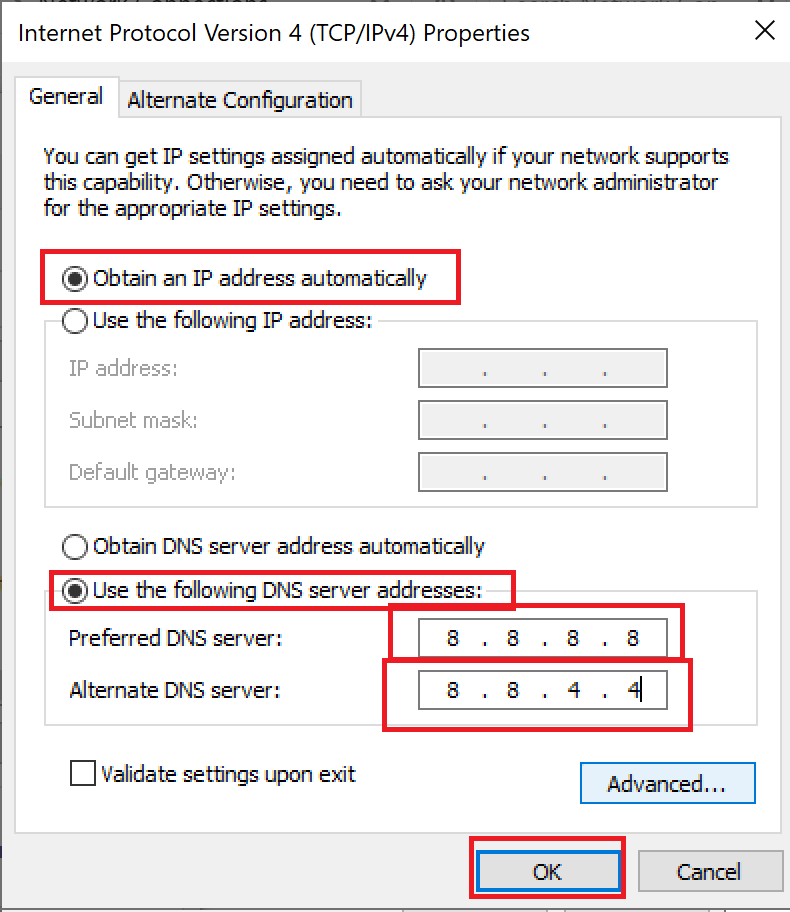
7. Соңында, басыңыз OK өзгертулерді сақтау үшін және компьютерді қайта жүктеңіз.
Method 6: Restart DNS Cache
You can follow these steps to restart DNS cache.
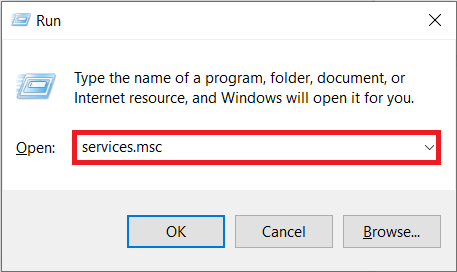
1. Түймесін басыңыз Windows + R пернелері ашу үшін бірге жүгіру тілқатысу терезесі.
2. Содан кейін теріңіз services.msc түймесін басыңыз Кілт сөзді енгізіңіз ашу Қызметтер терезе.
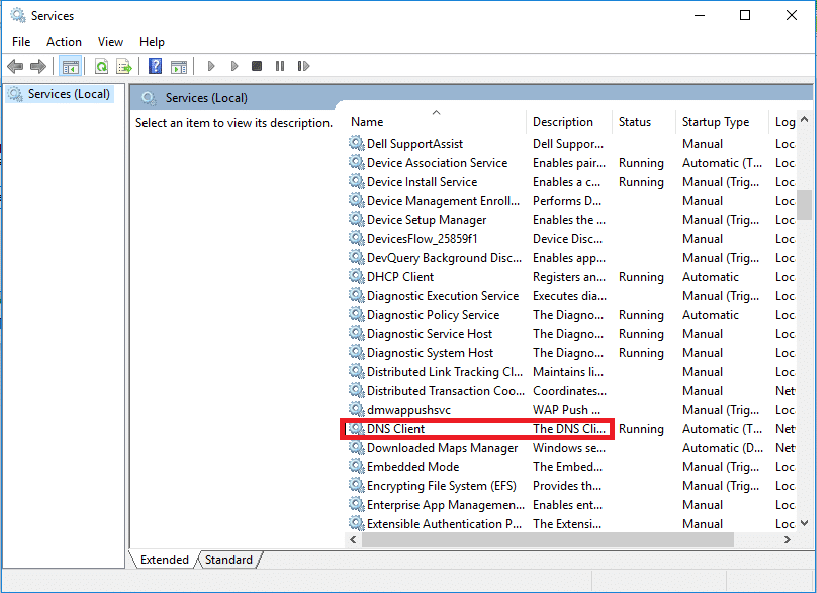
3. Right-click on DNS клиенті тармағын таңдаңыз және Қайтадан қосу.
Ескерту: If you find no restart option and unable to restart it from this method, you do not need to worry. You just need to open an elevated Command Prompt on your system.
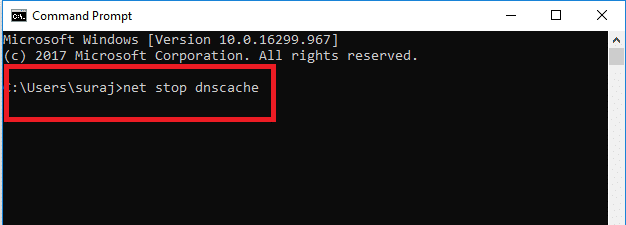
4. Келесіні теріңіз бұйрық түймесін басыңыз Кілт сөзді енгізіңіз.
dnscache таза тоқтату
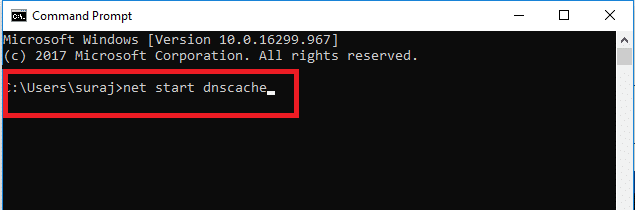
5. To start it again, type the given бұйрық және соққы беріңіз Кілт сөзді енгізіңіз.
таза бастау dnscache
Сондай-ақ оқыңыз: Windows 10 жүйесінде желі параметрлерін қалай қалпына келтіруге болады
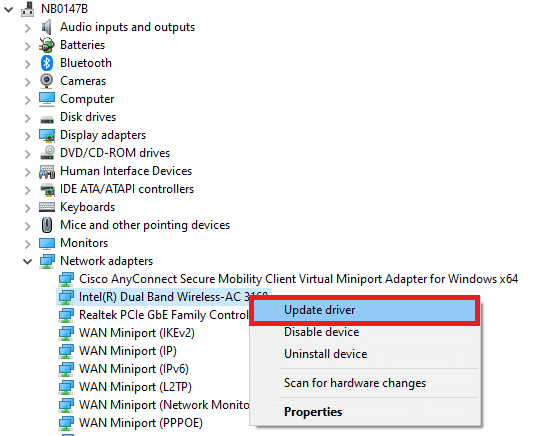
Method 7: Update Network Driver
Outdated network drive also can cause server IP address could not be found error. If you do not have the latest driver versions installed, then this may create bugs and can result in the unstable network connection. So, updating your network driver is necessary for a good network connection. Read our guide to update network drivers on Windows 10.
Method 8: Verify Proxy Settings
If you are using a proxy server, then using a particular proxy can create issues with your internet. You can change your proxy server to solve this problem. Follow the steps listed below to verify proxy settings.
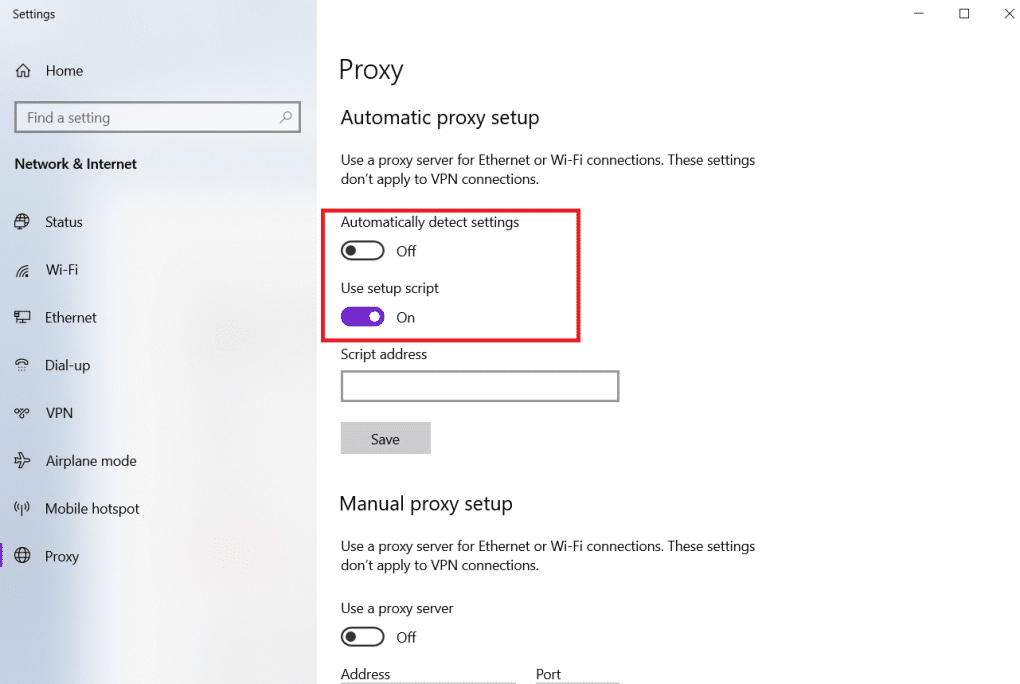
1. түймесін басыңыз Windows key және түрі прокси батырмасын басыңыз және Прокси параметрлерін өзгертіңіз іздеу нәтижелерінен.
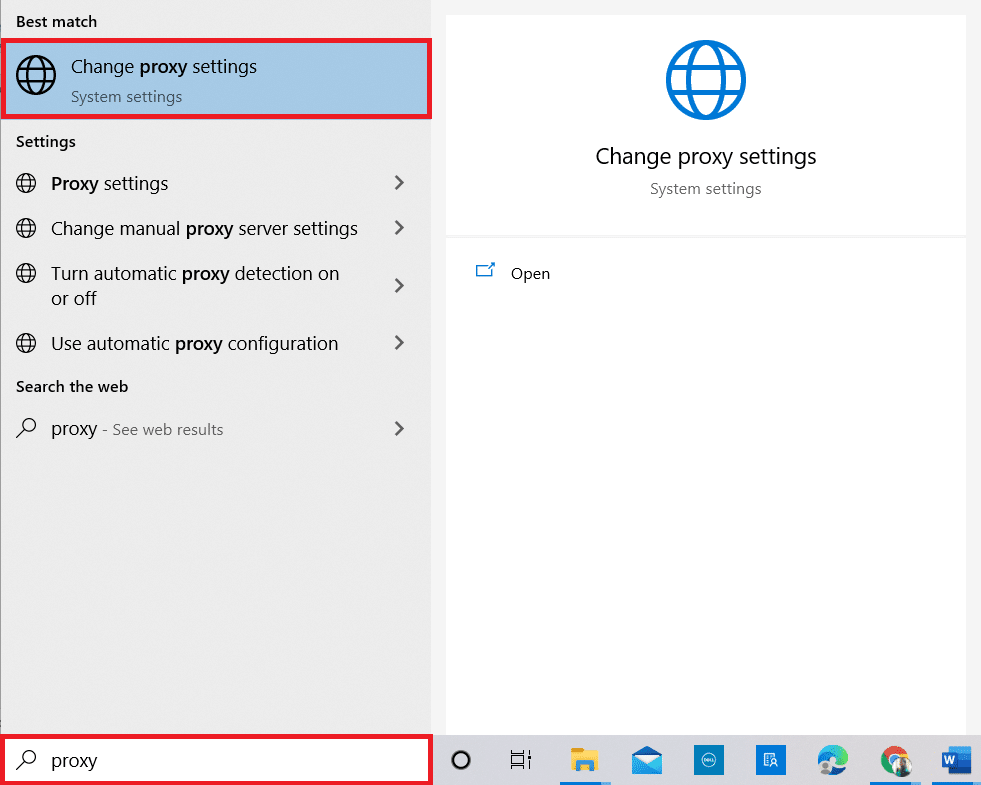
2. Here, switch on the toggle for Параметрлерді автоматты түрде анықтау.
Ұсынылған:
We hope that you learned how to fix server IP address could not be found on Windows 10. Feel free to reach out to us with your queries and suggestions via the comments section below. Let us know what you want to learn about next.

