Issues with Microsoft Outlook’s Personal Folders File format—commonly referred to as PST—have been a huge problem for years. Microsoft knows that, which is why Outlook comes with a built-in tool called Inbox Repair to help you fix corrupted PST files.
In most cases, simply running a damaged PST file through the Inbox Repair tool should be enough to patch it up. But sometimes, you must take extra action to recover lost items.

How Outlook PST File Repair Works
Outlook бағдарламасының кіріс жәшігін жөндеу құралы компьютеріңіздегі Microsoft Office орнату қалтасының тереңінде орналасқан, сондықтан оған жету үшін аздап қазу қажет. Кіріс жәшігін жөндеуді тауып, іске қосқаннан кейін, оны жөндеу үшін зақымдалған PST файлын таңдау жеткілікті.
Маңызды: Inbox Repair provides an option to create a backup of the damaged PST file. Make sure to select it since you may need a copy to retrieve missing data later on.
1. Completely exit Microsoft Outlook.
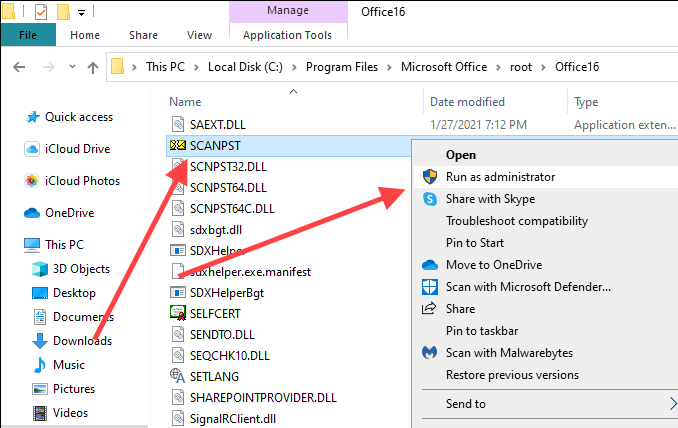
2. Open File Explorer. Depending on the version of Windows that you use, navigate through the following folders:
- Windows 64-бит: Local Disk (C:) > Program Files > Microsoft Office > root > Office16
- Windows 32-бит: Local Disk (C:) > Program Files (x86)> Microsoft Office > root > Office16
Ескерту: The folder paths above apply to Outlook 2016, Outlook 2019, and Outlook 365. If you use an older version of Outlook, you must select the Office15 (Outlook 2013), Office14 (Outlook 2010), or Office12 (Outlook 2007) folder instead.
3. Locate the file labeled SCANPST and run it as an administrator.
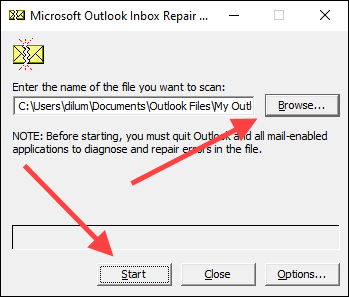
4. Қолданыңыз Browse button to select the Outlook PST file that you want to repair.
If you don’t know the location of the PST file, press Windows+S to open Windows Search. Then, search for it by name and include the .PST file extension. You will see the file location within the search results.
Alternatively, open Outlook and go to файл > Аккаунт баптаулары > Деректер файлдары to view the PST file’s location. Make sure to close the application after that.
5. Таңдаңыз бастау. The Inbox Repair tool will check the PST file for issues. That should take some time.
6. Check the radio button next to Жөндемес бұрын сканерленген файлдың сақтық көшірмесін жасаңыз тармағын таңдаңыз және жөндеу.

7. Таңдаңыз OK to finish repairing the PST file.
Open Microsoft Outlook and it should automatically start using the PST file without issues. You will find a copy of the corrupted PST file (with the .BAK extension) in the same location as the repaired original.
Recover Lost and Found Files
Sometimes, Microsoft Outlook’s Inbox Repair tool may end up repairing a severely damaged PST file. Suppose the tool fails to place any repaired items in their original folders or locations. In that case, it will lump them into a Lost and Found folder or a set of folders under the Recovered Personal Folders заттаңба.
You can recover these items by creating a new PST data file in Outlook and moving the contents from Lost and Found or Recovered Personal Folders into it.
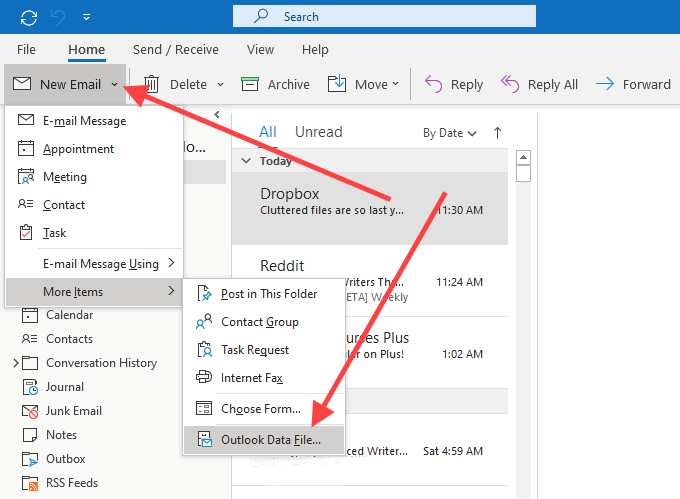
1. ашыңыз Home tab in Outlook. Then, open the menu next to Жаңа электрондық пошта, көрсетіңіз Қосымша элементтер, тармағын таңдаңыз және Outlook деректер файлы.
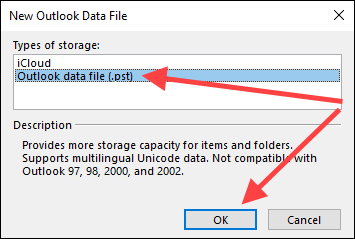
2. таңдаңыз Outlook деректер файлы параметрін таңдап, таңдаңыз OK.
3. Specify a location on your computer, enter a name for the new PST file, and select OK.
4. Таңдаңыз Көбірек icon (three dots) to the Outlook window’s lower-left corner and select Қалталар to switch the Outlook sidebar to Folder List view.

5. Drag the contents within Жоғалған және табылған or Recovered Personal Folders into the new data file.
Once you’ve done that, you can choose to remove the Lost and Found folder or the Recovered Personal Folders data file from Outlook.
Recover Additional Items from PST
Suppose you notice any missing items within the repaired data file. if you also can’t find them inside the Lost and Found folder or under Recovered Personal Folders, you can try retrieving them using the backup copy of the original. Basically, you try to import the contents within the file without duplicating any items that the Inbox Recovery tool has already recovered.
1. Copy the corrupted PST file backup to your desktop.
2. өзгертіңіз .АРТЫНДА extension at the end of the file name to .PST.

Ескерту: If you can’t see the file extension, open the файл menu in a File Explorer window and select Қалтаны және іздеу параметрлерін өзгертіңіз. Содан кейін параметріне ауысыңыз көрініс қойындысын басып, жанындағы құсбелгіні алып тастаңыз Белгілі файл түрлеріне арналған кеңейтімдерді жасыру.
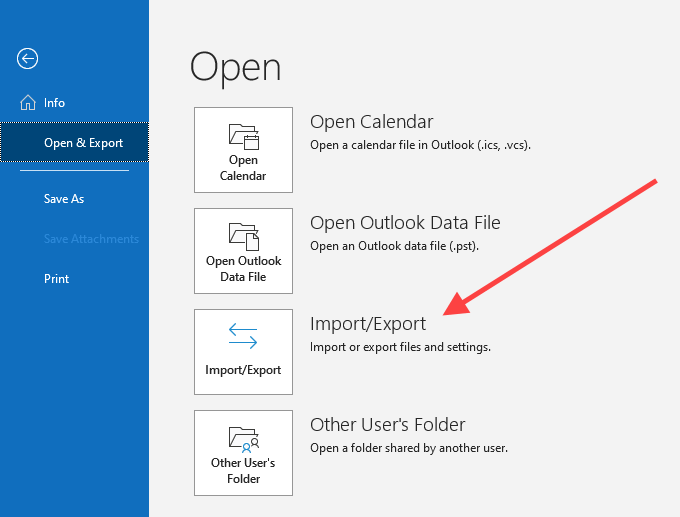
3. ашыңыз файл menu in Outlook and select Ашу және экспорттау > Импорт экспорт.
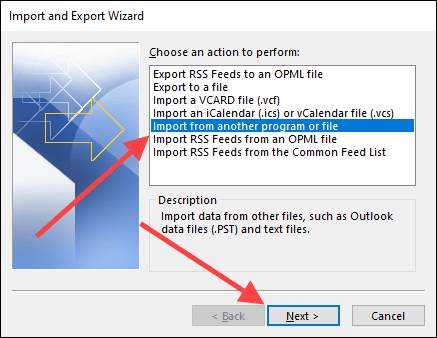
4. Таңдаңыз Басқа бағдарламадан немесе файлдан импорттау тармағын таңдаңыз және Келесі.
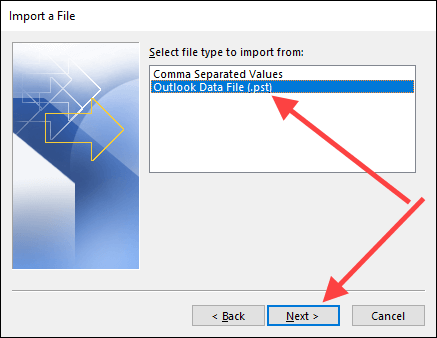
5. Таңдаңыз Outlook деректер файлы (.pst) тармағын таңдаңыз және Келесі.
6. Таңдаңыз Browse and select the backup copy of the corrupted PST file (the one that you just renamed).
7. Таңдаңыз Көшірмелерді импорттамаңыз тармағын таңдаңыз және Келесі.

8. жанындағы құсбелгіні қойыңыз Ішкі қалталарды қосыңыз. Содан кейін таңдаңыз Import folders into the same folder and pick the account or data file that you want to import the items into.
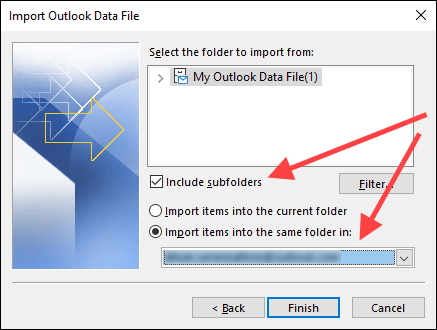
9. Таңдаңыз Аяқтау.
Once Outlook finishes importing any items, you must manually confirm if the previously missing items are now present. If not, try running the Inbox Repair tool another time.
Third-Party Outlook PST Repair and Recovery Tools
A cursory search online will reveal lots of paid third-party tools that claim to repair damaged or corrupted Outlook PST files. In almost all cases, though, the Inbox Repair tool should be more than good enough for the job.
Only use a third-party recovery program if Inbox Repair fails to retrieve your data, and do your due diligence by checking online reviews thoroughly before spending any money on them.
Before we wrap up, here’s an interesting tidbit: the Inbox Repair tool also allows you to recover deleted items from Outlook.

