All the corrupt files in your system can be analyzed and repaired by several built-in tools in Windows 10 system. One such command-line tool is 배포 이미지 서비스 및 관리 or DISM, which assists in servicing and preparing Windows images on Windows Recovery Environment, Windows Setup, and Windows PE. This tool could also help you in repairing the corrupt files even if System File Checker is not working correctly. Yet, sometimes you may receive Windows 10 DISM Error 87 due to varied reasons. This guide will help you fix DISM Error 87 in Windows 10 PC.
Windows 87에서 DISM 오류 10을 수정하는 방법
What causes DISM Error 87 in Windows 10?
Several reasons contribute to Windows 10 DISM Error 87. A few of them are discussed below.
- Command Line has an Error – Wrongly typed command line can cause the said error. For example, when you have typed an incorrect code or any incorrect spaces exist before the /베다.
- Bug in Windows 10 System – When there is an update pending in your system or if your system has a hidden bug, then you might face DISM Error 87. Installing all the new updates available can fix the issue in your system.
- Running Commands in Regular Command Prompt Window – Few commands are validated only if you have administrative privileges.
- Outdated Version of DISM – If you try to apply or use a Windows 10 image using an old version of DISM in your system, you will face DISM Error 87. In this case, use the correct wofadk.sys filter driver and try applying the Windows 10 image using an apt DISM version.
Now that you have a basic idea about what causes DISM Error 87 in Windows 10, continue reading the article to learn how to fix the said problem. A list of methods is compiled and arranged according to user convenience. So, one by one, implement these until you find a solution for your Windows 10 desktop/laptop.
Method 1: Type Commands with Correct Spelling & Spacing
The most common mistake users make is of either typing an incorrect spelling or leaving an incorrect spacing before or after the / character. To fix this error, type the command correctly.
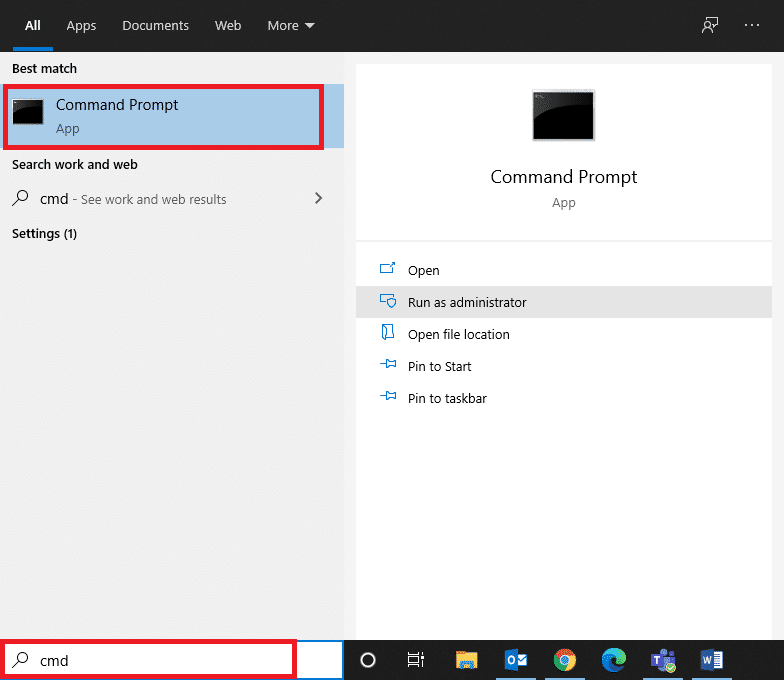
1. 쏘다 명령 프롬프트 를 통해 Windows 검색 창, 보여진 바와 같이.
2. Type the following command with spelling and spacing as mentioned:
DISM.exe / 온라인 / 정리 이미지 / Scanhealth
OR
DISM.exe / 온라인 / 정리 이미지 / 복원 건강
3. Once you hit 입력 you will see some data pertaining to the DISM tool displayed on the screen, as depicted.
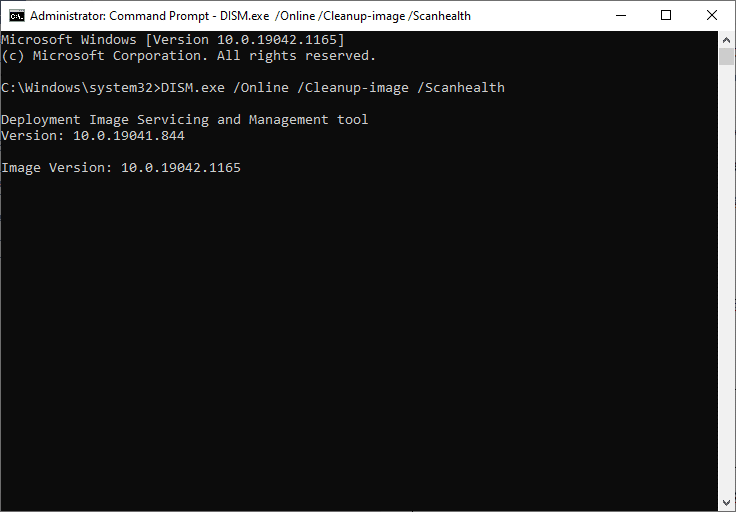
4. The said command should get executed and fetch results.
Method 2: Run Command Prompt with Administrative Privileges
Even if you type the command with correct spelling and spacing, you may encounter Windows 10 DISM Error 87 due to lack of administrative privileges. Hence, do as follows:
1. 누르세요 Windows 키와 타입 cmd를 검색 막대에.
2. 을 클릭 관리자 권한으로 실행 in the right pane to launch Command Prompt with administrative privileges.

3. 다음을 입력하십시오. 명령 as earlier and hit 엔터 버튼.
Now, your command will be executed and Windows 10 DISM Error 87 will be fixed. If not, try the next solution.
또한 읽기 : Fix DISM Error 14098 Component Store has been corrupted
Method 3: Run System File Checker and CHKDSK
Windows 10 users can automatically, scan and repair their system files by running System File Checker (SFC) and Check Disk (CHKDSK) commands. These are built-in tools that let the user delete files and fix Windows 10 DISM Error 87. Steps to run SFC and CHKDSK are given below:
1. 쏘다 관리자 권한으로 명령 프롬프트 using the steps explained in 방법 2.
2. 다음 명령을 입력합니다. SFC / scannow를 키를 누릅니다 키를 입력하십시오.
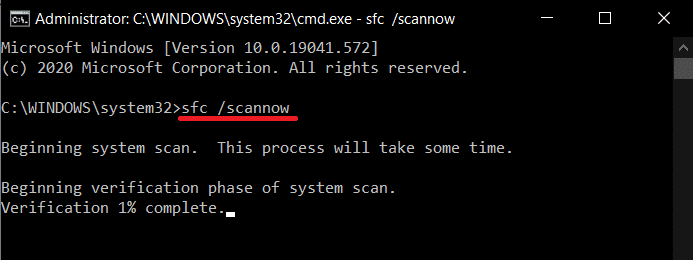
Now, System File Checker will begin its process. All the programs in your system will be scanned and will be repaired automatically.
3. 기다립니다 검증 100% 완료 statement to appear, and once done, PC를 다시 시작하십시오..
Check if Windows 10 DISM Error 87 is fixed. If not, follow the steps further.
참고 : Before executing the CHKDSK tool, make sure you do not need to recover any deleted files in your system since this tool cannot restore the recoverable data.
4. 다시 시작 Command Prompt as an administrator.
5. 유형 CHKDSK C:/r and hit 엔터 버튼, 보여진 바와 같이.
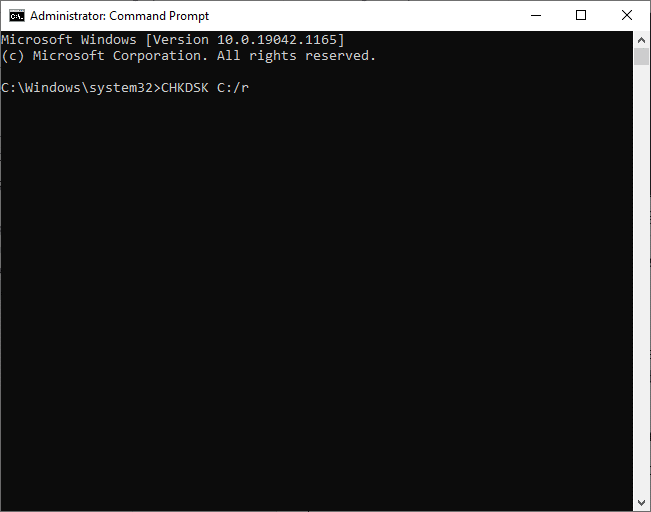
6. 마지막으로 프로세스가 성공적으로 실행될 때까지 기다리고 가까운 창.
또한 읽기 : Fix DISM Source Files Could not be Found Error
방법 4: Windows OS 업데이트
If you did not obtain any results by the above-mentioned methods, then there might be bugs in your system. Microsoft releases updates periodically, to fix the bugs in your system. Therefore, always ensure that you use your system in its updated version. Otherwise, the files in the system will not be compatible with the DISM files leading to DISM Error 87 in Windows 10 computers.
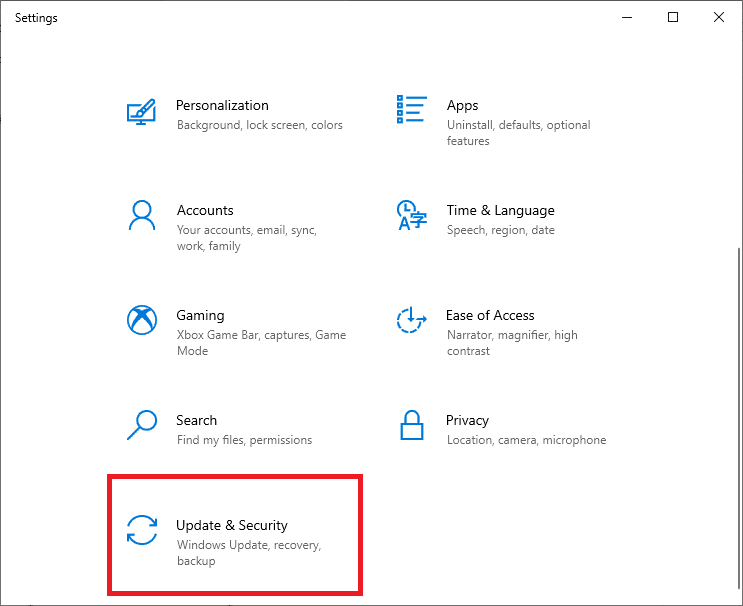
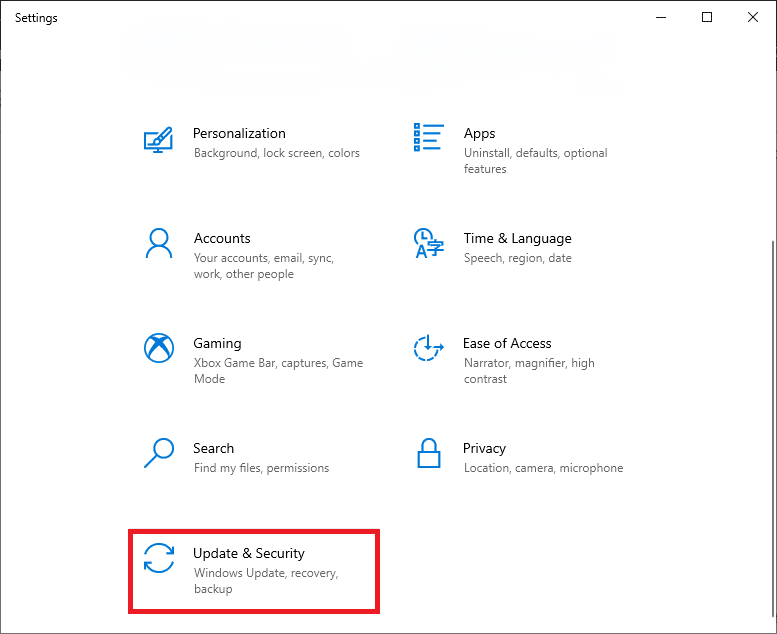
1. 누르세요 윈도우 + I 열려면 함께 키 설정 귀하의 시스템에.
2. 이제 업데이트 및 보안, 보여진 바와 같이.
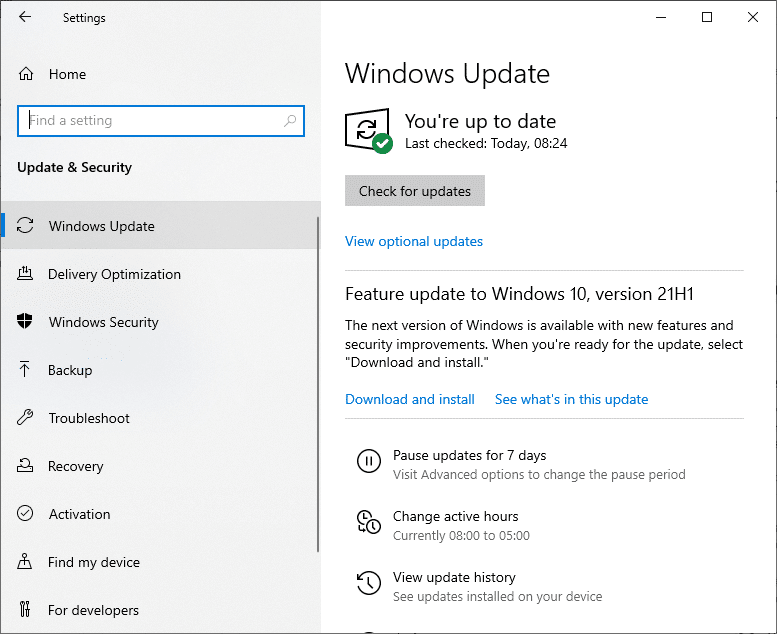
3. 다음을 클릭하십시오. 업데이트 확인 버튼을 클릭합니다.
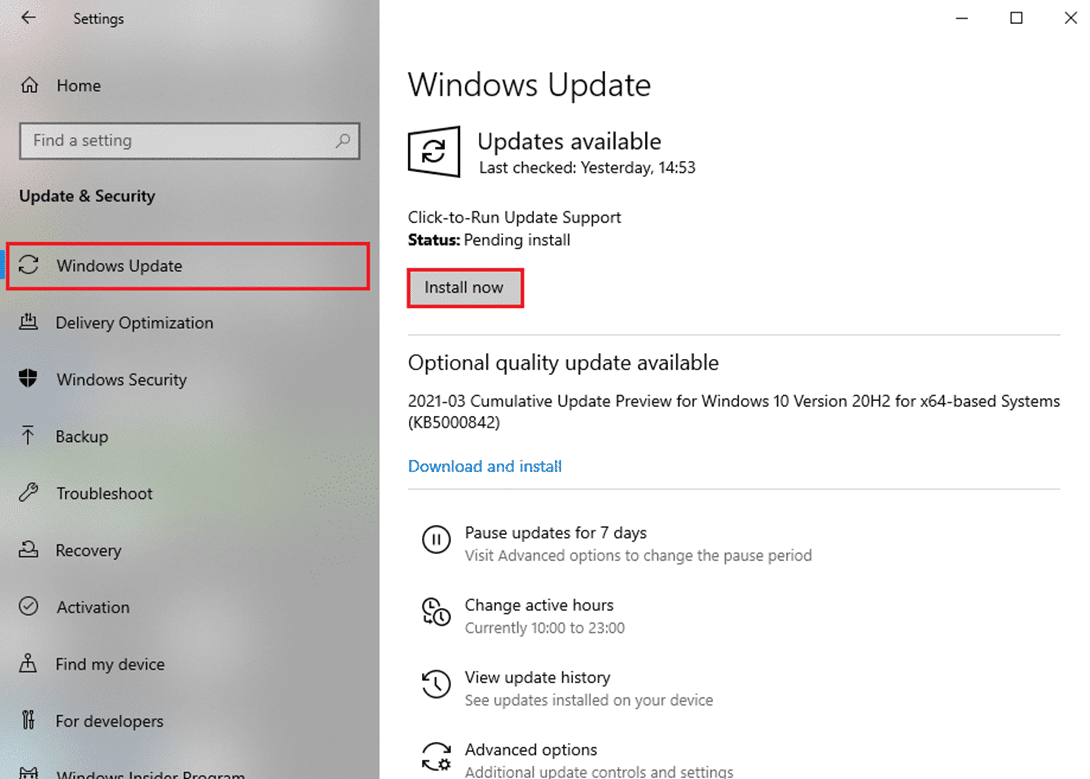
3A. 클릭 이제 설치 다운로드 및 설치 사용 가능한 업데이트.
3B. 시스템이 이미 최신 상태라면 다음과 같이 표시됩니다. 당신은 최신 정보입니다 message, as depicted.
4. 시스템을 다시 시작하십시오. 이제 문제가 해결되었는지 확인하세요.
또한 읽기 : Windows 0에서 DISM 오류 800x081f10f 수정
Method 5: Use the Correct Version of DISM
When you execute command lines on older versions of DISM on Windows 8.1 or earlier, you are bound to face Windows 10 DISM Error 87. But this problem can be fixed when you use the correct version of DISM in Windows 10 with the correct Wofadk.sys filter driver. The Operating System used by DISM is the Host deployment environment. The DISM supports the following platforms in several Windows versions, as listed below:
| 호스트 배포 환경 | 대상 이미지: Windows 11 또는 Windows 11용 WinPE | 대상 이미지: Windows 10 또는 Windows 10용 WinPE | 대상 이미지: Windows 8.1, Windows Server 2016, Windows Server 2012 R2 또는 WinPE 5.0(x86 또는 x64) |
| 윈도우 11 | 지원 | 지원 | 지원 |
| Windows 10(x86 또는 x64) | DISM의 Windows 11 버전을 사용하여 지원됨 | 지원 | 지원 |
| Windows 서버 2016(x86 또는 x64) | DISM의 Windows 11 버전을 사용하여 지원됨 | 지원 | 지원 |
| Windows 8.1(x86 또는 x64) | DISM의 Windows 11 버전을 사용하여 지원됨 | DISM의 Windows 10 버전을 사용하여 지원됨 | 지원 |
| Windows Server 2012 R2(x86 또는 x64) | DISM의 Windows 11 버전을 사용하여 지원됨 | DISM의 Windows 10 버전을 사용하여 지원됨 | 지원 |
| Windows 8(x86 또는 x64) | 지원되지 않음 | DISM의 Windows 10 버전을 사용하여 지원됨 | Windows 8.1 버전의 DISM 이상을 사용하여 지원됨 |
| Windows 서버 2012(x86 또는 x64) | DISM의 Windows 11 버전을 사용하여 지원됨 | DISM의 Windows 10 버전을 사용하여 지원됨 | Windows 8.1 버전의 DISM 이상을 사용하여 지원됨 |
| Windows 7(x86 또는 x64) | 지원되지 않음 | DISM의 Windows 10 버전을 사용하여 지원됨 | Windows 8.1 버전의 DISM 이상을 사용하여 지원됨 |
| Windows Server 2008 R2(x86 또는 x64) | DISM의 Windows 11 버전을 사용하여 지원됨 | DISM의 Windows 10 버전을 사용하여 지원됨 | Windows 8.1 버전의 DISM 이상을 사용하여 지원됨 |
| Windows Server 2008 SP2(x86 또는 x64) | 지원되지 않음 | 지원되지 않음 | Windows 8.1 버전의 DISM 이상을 사용하여 지원됨 |
| Windows 11 x64용 WinPE | 지원 | 지원됨: X64 대상 이미지만 | 지원됨: X64 대상 이미지만 |
| Windows 10 x86용 WinPE | 지원 | 지원 | 지원 |
| Windows 10 x64용 WinPE | DISM의 Windows 11 버전을 사용하여 지원됨 | 지원됨: X64 대상 이미지만 | 지원됨: X64 대상 이미지만 |
| WinPE 5.0 x86 | DISM의 Windows 11 버전을 사용하여 지원됨 | DISM의 Windows 10 버전을 사용하여 지원됨 | 지원 |
| WinPE 5.0 x64 | DISM의 Windows 11 버전을 사용하여 지원됨 | DISM의 Windows 10 버전을 사용하여 지원됨: X64 대상 이미지만 해당 | 지원됨: X64 대상 이미지만 |
| WinPE 4.0 x86 | 지원되지 않음 | DISM의 Windows 10 버전을 사용하여 지원됨 | Windows 8.1 버전의 DISM 이상을 사용하여 지원됨 |
| WinPE 4.0 x64 | 지원되지 않음 | DISM의 Windows 10 버전을 사용하여 지원됨: X64 대상 이미지만 해당 | Windows 8.1 버전의 DISM 이상을 사용하여 지원됨: X64 대상 이미지만 해당 |
| WinPE 3.0 x86 | 지원되지 않음 | DISM의 Windows 10 버전을 사용하여 지원됨 | Windows 8.1 버전의 DISM 이상을 사용하여 지원됨 |
| WinPE 3.0 x64 | 지원되지 않음 | DISM의 Windows 10 버전을 사용하여 지원됨: X64 대상 이미지만 해당 | Windows 8.1 버전의 DISM 이상을 사용하여 지원됨: X64 대상 이미지만 해당 |
Thus, when you use DISM for an image service, always ensure what version you are using and whether it is compatible with the device or not. Run DISM commands only if you are sure that you are using the correct DISM version.
Method 6: Perform Clean Installation
If none of the methods have helped you solve the issue, you can try to reinstall Windows. Here’s how to fix DISM Error 87 in Windows 10 by performing a clean installation of Windows:
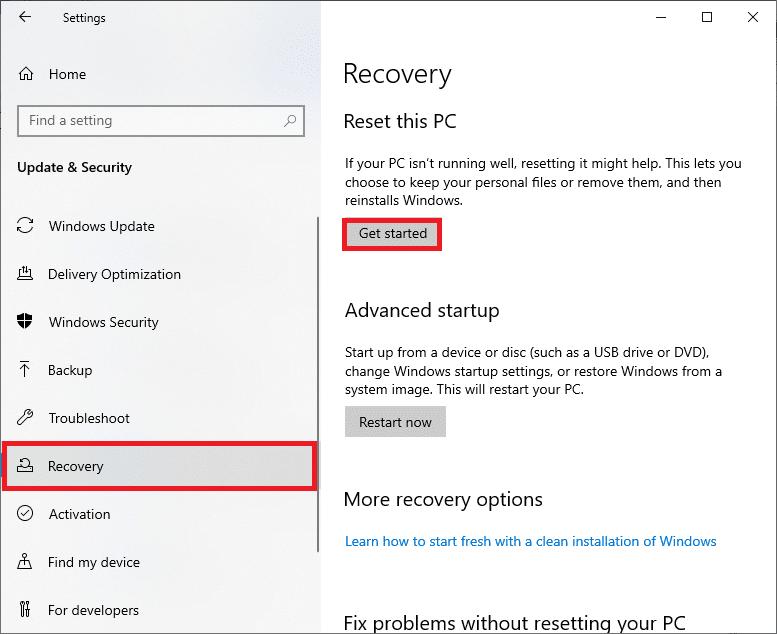
1. 로 이동 설정> 업데이트 및 보안 에서 지시한 대로 3 메소드.
2. 이제 회복 왼쪽 창에서 옵션을 클릭하고 시작하기 오른쪽 창에.
3. Here, choose an option from the 이 PC 재설정 창 :
- 내 파일 보관 option will remove apps and settings but keeps your personal files.
- XNUMXD덴탈의 모든 것을 제거하십시오. option will remove all your personal files, apps, and settings.
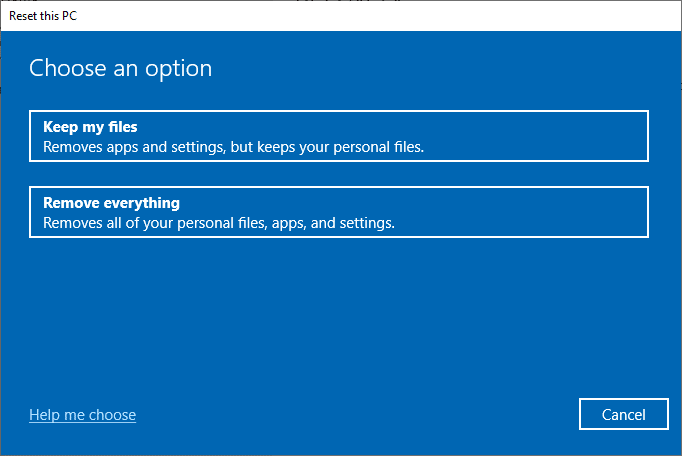
4. 마지막으로 다음을 따르십시오. 화면 지침 재설정 프로세스를 완료합니다.
추천
이 가이드가 도움이 되었기를 바랍니다. fix DISM Error 87 in Windows 10. 어떤 방법이 귀하에게 가장 적합한지 알려주세요. 또한, 이 기사와 관련하여 질문이나 제안 사항이 있는 경우 댓글 섹션에 자유롭게 남겨주세요.

