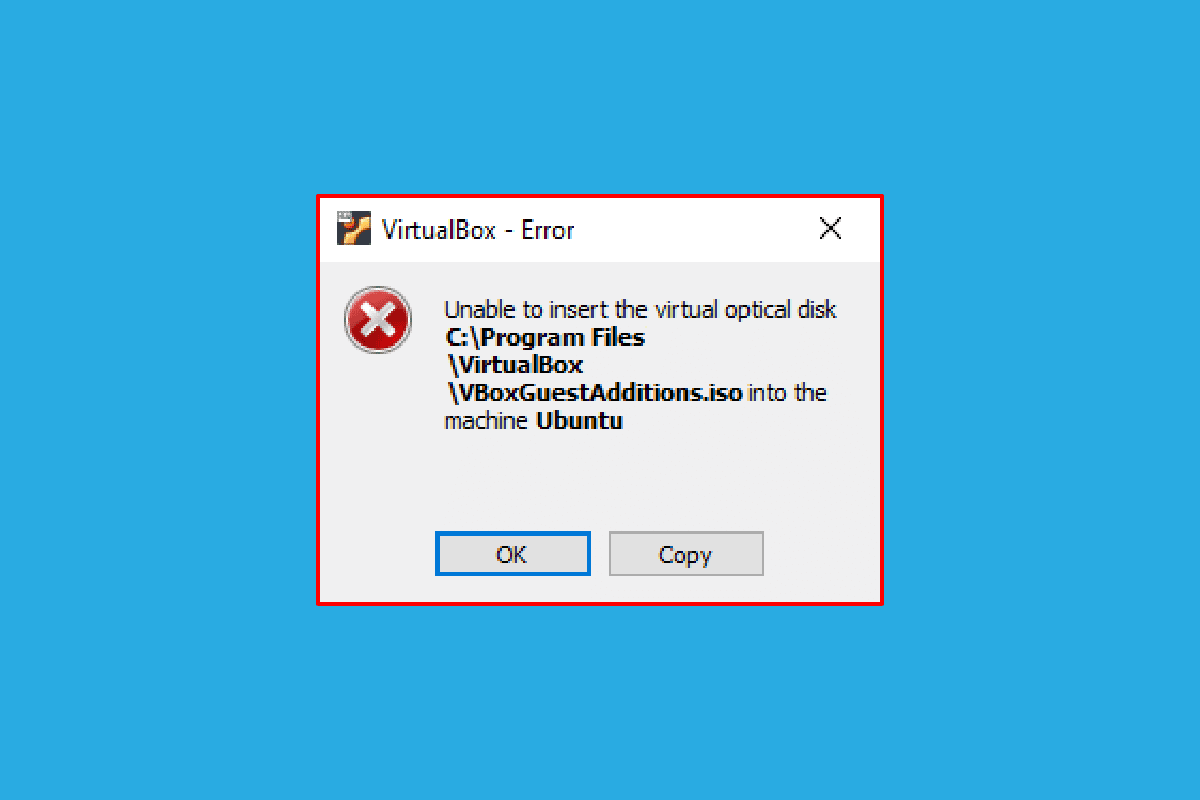
Have you ever come across the Unable to insert the virtual optical disk error? Users, who have a VirtualBox and are trying to create a virtual machine may be accustomed to this message. VirtualBox is open-source software for the x86 computing architecture used to deploy servers, desktops, and embedded operating systems as VMs or Virtual Machines. By definition, the Virtual Optical Disk file simply means that it is a .iso image containing a complete copy of the contents of a CD or DVD. The complete structure of the file along with the contents is stored in this file. The Virtualbox unable to insert virtual optical disk error message may pop up due to a few glitches in the settings. If the VirtualBox is not properly set up on your PC, you may see this error. The article aims to provide methods to clear this issue on various platforms.
How to Fix Virtualbox Unable to Insert Virtual Optical Disk
The method to install 버추얼 on a Linux PC is discussed in this section.
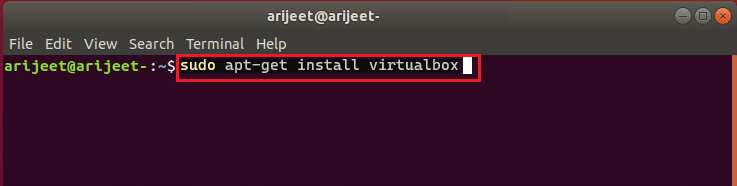
1. 열려있는 단말기 from the menu, type the following command and press the 엔터 버튼 key to install VirtualBox.
sudo apt-get install virtualbox
2. Enter login password of your PC in the field and press the Enter 키.
3. 유형 y FBI 증오 범죄 보고서 계속 하시겠습니까? 섹션을 누르고 Enter 키.
4. Wait till the installation is complete, type virtualbox, 그리고 엔터 버튼 key to open the VirtualBox.
Method 1: On Ubuntu OS
The following steps describe the method to clear the issue on VirtualBox in the Ubuntu OS.
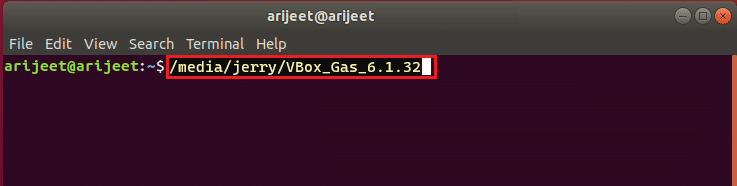
1. 열려있는 단말기 on your PC, type the following command, and press the Enter 키.
/media/jerry/VBox_Gas_6.1.32
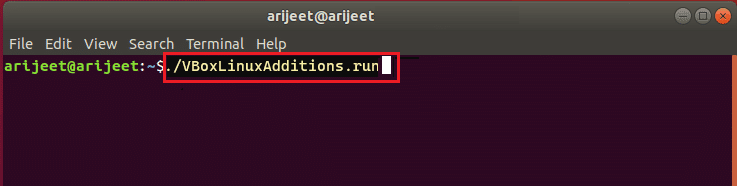
2. 다음 명령을 입력하고 Enter 키 파일을 실행합니다.
./VBoxLinuxAdditions.run
3. If you see the output message below, the installation is successful.
Running kernel modules will be replaced when the system is restarted
Method 2: On Other Ubuntu OS Versions
The following steps can be followed to fix the Virtualbox unable to insert virtual optical disk error if the OS of the VirtualBox is either Ubuntu 20, Ubuntu 21, or Ubuntu 22.
1. 열려있는 VirtualBox VM settings.
2. 마우스 오른쪽 버튼으로 컨트롤러: IDE FBI 증오 범죄 보고서 스토리지 섹션을 클릭하고 Remove disk from virtual drive 옵션을 선택합니다.
참고 : 경우 Remove disk from virtual drive option is not available, click on 첨부 파일 제거 옵션을 선택합니다.
3. 을 클릭 Force Unmount 온 버튼 VirtualBox- Question 창.
4. 열려있는 단말기 on your PC from the home menu.
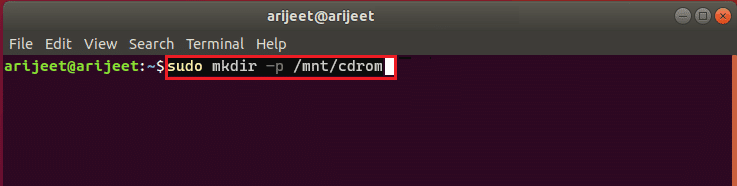
5. Type the following command and press 엔터 버튼 key to create a directory for mounting the Guest Additions installation CD.
sudo mkdir –p /mnt/cdrom
6. Type the following command and press Enter 키 to mount the files to the created directory.
sudo mount /dev/cdrom/mnt/cdrom
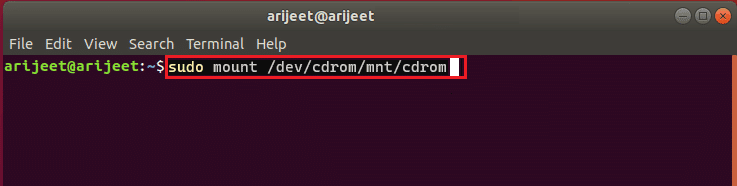
참고 : If the command doesn’t work, type the command as sudo mount –o loop /dev/cdrom/mnt/cdrom.
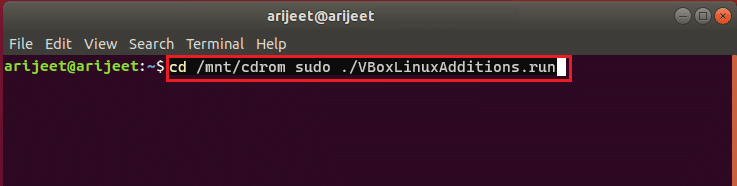
7. 다음 명령을 입력하고 엔터 버튼 실행 키 Guest Additions installation software in the directory to fix the Unable to insert the virtual optical disk error.
cd /mnt/cdrom sudo ./VBoxLinuxAdditions.run
또한 읽기 : 우분투에 GCC를 설치하는 방법
Method 3: On macOS/Linux OS
The following steps can be used to fix the Virtualbox unable to insert virtual optical disk error in VirtualBox with macOS or Linux OS. The steps mentioned are considering a macOS VirtualBox and the steps can be used on Linux OS VirtualBox.
Step I: Alter Settings in Virtual Machine
As a first step, alter the settings of the Virtual Machine by following the steps below.
1. Turn off the macOS Virtual Machine.
2. 마우스 오른쪽 버튼으로 macOS Virtual Machine device in the left pane of the 버추얼 관리자.
3. 을 클릭 설정 상단 메뉴의 옵션.
4. 을 클릭 스토리지 tab on the left pane of the window.
5. 마우스 오른쪽 버튼으로 컨트롤러: IDE 그리고 클릭 Adds optical drive 아이콘.
6. 을 클릭 Leave empty 온 버튼 VirtualBox- Question 창.
7. 선택 VBoxGuestAdditions.iso 에서 옵션 첨부 드롭다운 메뉴를 클릭하고 OK 버튼을 클릭합니다.
Step II: Run the VBox File
The next step is to run the VBox file on the Virtual Machine.
1. Turn on macOS Virtual Machine.
2. 더블 클릭 VBox_Gas to open the optical disk.
3. 그런 다음 다음을 두 번 클릭합니다. VBoxDarwinAdditions.pkg 파일을 실행합니다.
Step III: Enter Recovery Mode
The third step in this option is to enter into the recovery mode to tweak the changes to fix the Virtualbox unable to insert virtual optical disk error on your PC.
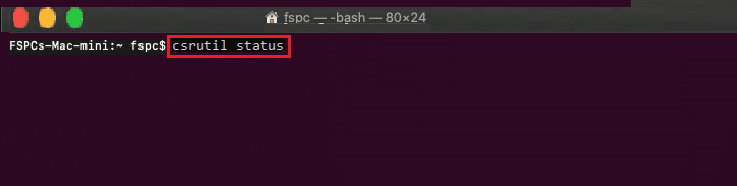
1. 열기 단말기 in macOS from the menu, type the csrutil 상태 command, and press the Enter 키 to check the status of the SIP.
2. 프레스 F12 키 to direct you to the Virtual machine’s BIOS setting.
3. 선택 관리자를 부팅 option using the arrow keys.
4. 선택 EFI Internal Shell 옵션을 누르고 야후! 열쇠를 열려면 ESI Internal Shell 콘솔.
5. 실행 FS2 command to open FS2 interactive Shell.
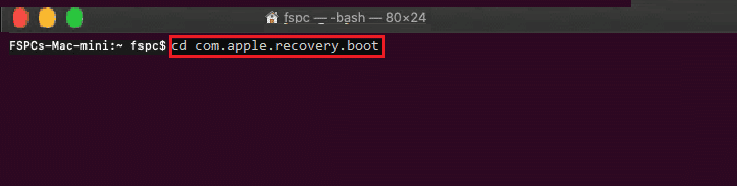
6. 다음을 입력하세요 명령 키를 누릅니다 Enter 키 to go to the recovery boot image directory.
cd com.apple.recovery.boot
7. 명령을 입력하십시오 DIR 그리고 엔터 버튼 key to view if the kernelcore 파일을 사용할 수 있습니다.
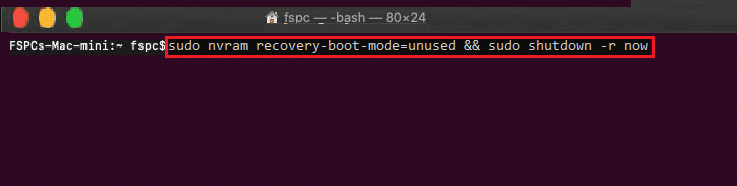
8. 열기 단말기 window, type the command, and press the 엔터 버튼 key to restart the macOS virtual machine in recovery mode.
sudo nvram recovery-boot-mode=unused && sudo shutdown –r now
또한 읽기 : Mac에서 개발자를 확인할 수 없기 때문에 수정 프로그램을 열 수 없습니다.
Step IV: Disable macOS SIP
The SIP software or System Integrity Protection in the macOS would not allow you to perform any unauthorized codes on the PC. To fix the Virtualbox unable to insert virtual optical disk error, you have to disable the software to fix the issue.
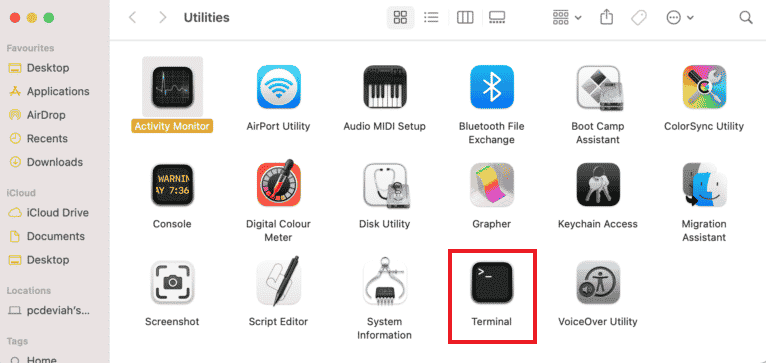
1. 열려있는 macOS 유틸리티 창을 클릭하고 단말기 옵션을 선택합니다.
2. 을 클릭 단말기 메뉴의 옵션.
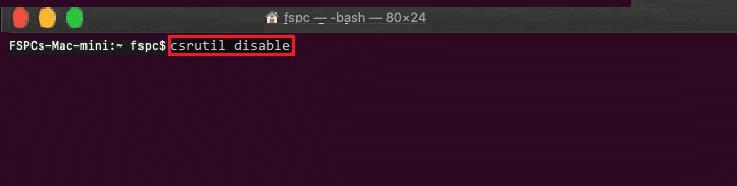
3. 다음을 입력하십시오. 비활성화 csrutil 명령을 내리고 Enter 키 to turn off the SIP.
4. 을 클릭 맥 아이콘 그리고 클릭 다시 시작 option to restart the PC.
Step V: Add VBox Guest Additions CD
The final step is to add the Virtual Machine as a new program to the PC to fix the Unable to insert the virtual optical disk error.
1. 다음 명령을 입력하고 Enter 키 to enable admin privileges to the folder.
/ 시스템 / 라이브러리 / 확장 /
2. 을 클릭 디바이스 탭하고 설치 VBox Guest Additions CD in the macOS Virtual Machine.
자주 묻는 질문
Q1. Is it free to use VirtualBox?
Ans. The open source machine platform provides a free virtual machine license to people for educational and evaluation use.
Q2. Why does the Unable to Insert the Virtual Optical Disk error pop up?
Ans. This error may occur either due to the glitches on the PC. If the VirtualBox is not properly set up on your PC, this error may pop up.
권장 사항 :
The method to fix Virtualbox unable to insert virtual optical disk error in various OS is discussed in this article. Please let us know your suggestions and queries on the topic dealt with in the comments section.

