When you try to install apps on Windows Store, you may face Error Code 0x80073cf9, which can be very frustrating as Windows Store is a reliable source to install apps. If you try to install 3rd party apps from any other source, you risk your machine to malware or infections but what other option you have if you cannot install apps from Windows Store. Well, that’s where you’re wrong this error can be fixed, and that’s what exactly we are going to teach you in this article.
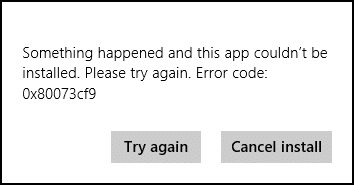
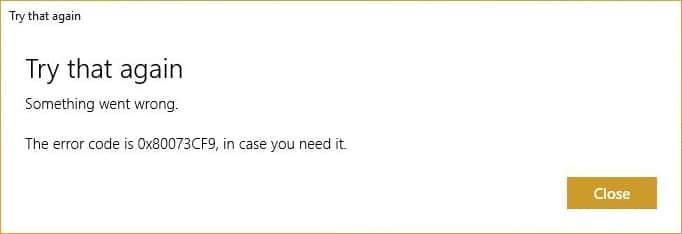
Something happened, and this app couldn’t be installed. Please try again. Error code: 0x80073cf9
There is no single cause as to why this error occurs so that various methods can fix this error. Most of the times it completely depends on the user machine configuration as to which method might work for them, so without wasting any time, let’s see how to fix this error.
Fix Windows 10 Store Error 0x80073cf9
문제가 발생하는 경우에 대비하여 복원 지점을 만드십시오.
Method 1: Create A Folder AppReadiness
1. Windows 키 + R을 누른 다음 입력 C : 윈도우 Enter를 누르십시오.
2. 폴더 찾기 AppReadniess in the Windows folder, if you can’t follow the next step.
3. Right-click in an empty area and select 새로 만들기 > 폴더.
4. Name the newly created folder as 앱 준비 Enter를 누르십시오.
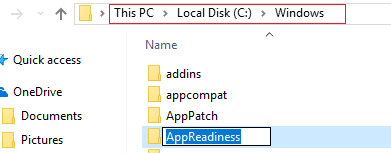
5. Reboot your PC to save changes. Again try to access the Store, and this time it might work perfectly.
Method 2: Reinstall Windows Store
1. Open Command Prompt as an 관리자.

2. Run below PowerShell command
Get-AppxPackage -AllUsers | Foreach {Add-AppxPackage -DisableDevelopmentMode-등록“$ ($ _. InstallLocation) AppXManifest.xml”}

3. Once done, close command prompt and Restart your PC.
This step re-register Windows Store apps which should automatically Fix Windows 10 Store Error 0x80073cf9.
Method 3: Create a folder AUInstallAgent
1. Windows 키 + R을 누른 다음 입력 C : 윈도우 Enter를 누르십시오.
2. 폴더 찾기 AUInstallAgent in the Windows folder, if you can’t then follow the next step.
3. Right-click in an empty area and select 새로 만들기 > 폴더.
4. Name the newly created folder as AAUInstallAgent Enter를 누르십시오.
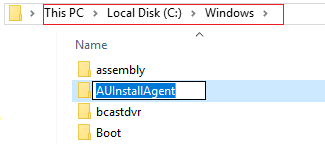
5. Reboot your PC to save changes. This step may fix Windows 10 Store Error 0x80D05001 or 0x80073cf9 but if it didn’t then continue.
Method 4: Allow Full System Access to Packages in AppRepository
1. Windows 키 + R을 누르고 다음을 입력합니다. C : ProgramDataMicrosoftWindows Enter를 누르십시오.
2. Now double click on AppRepository folder to open it, but you will receive an error:
You have been denied permission to access this folder.
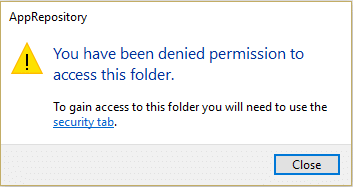
3. This means you need to take ownership of this folder before you can access it.
4. You can take ownership of the folder via the following method: How To Fix Destination Folder Access Denied Error.
5. Now you need to give the SYSTEM account, and the APPLICATION PACKAGES account full control on the folder C:ProgramDataMicrosoftWindowsAppRepositoryPackages. To this follow the next step.
6. 마우스 오른쪽 버튼으로 Packages folder 선택 속성.
7. 를 선택합니다 보안 탭 다음을 클릭합니다 고급.
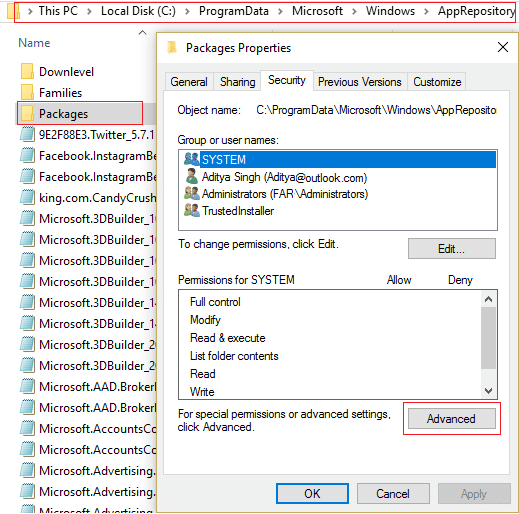
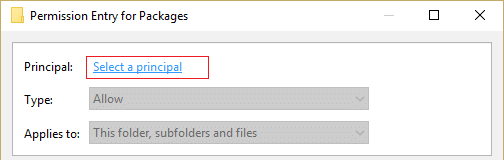
8. In Advanced Security Settings, click 추가 and click on Select a 본관.
9. 다음으로 “모든 애플리케이션 패키지” (without quote) in the field Enter the object name to select and click OK.
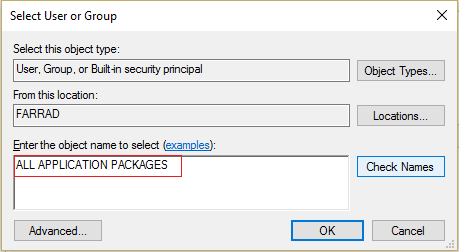
10. Now, on the next window check mark Full control and then click OK.
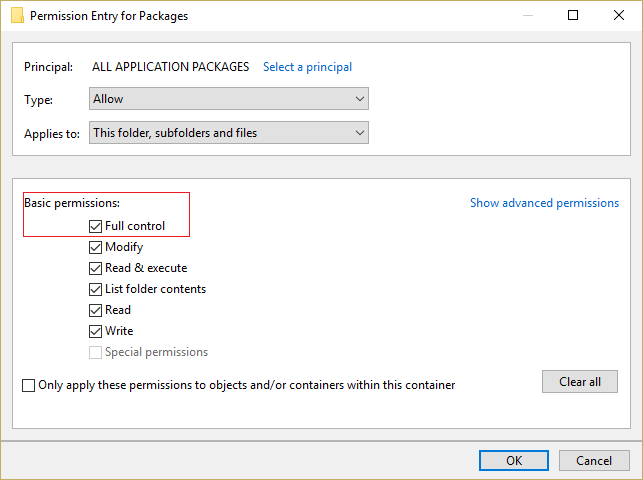
11. Do the same with the SYSTEM account. Reboot your PC to save changes.
Method 5: Rename Software Distribution Folder
1. Press Windows Key + Q to open Charms Bar and type 명령.
2. Right-click on cmd and select 관리자 권한으로 실행을 클릭합니다.
3. Type these commands and hit enter:
net stop wuauserv
ren c:windowsSoftwareDistribution softwaredistribution.old
net start wuauserv
exit
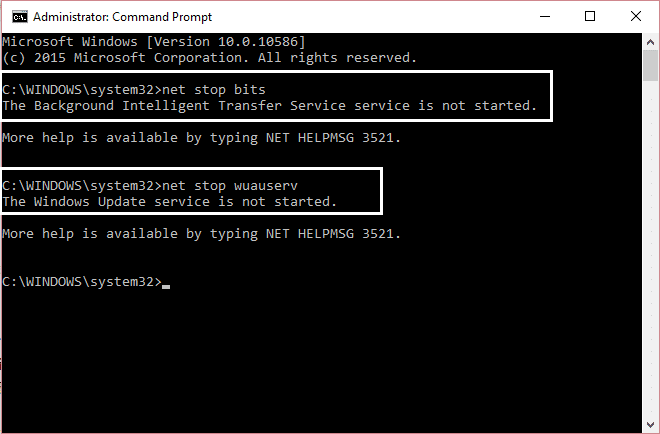
4. Reboot your PC to saves changes and again try to download updates.
방법 6: DISM(배포 이미지 서비스 및 관리) 실행
1. Windows 키 + X를 누르고 다음을 선택합니다. 명령 프롬프트(관리자).

2. Enter the following command in cmd and hit enter:
중요 사항: DISM을 사용하려면 Windows 설치 미디어가 준비되어 있어야 합니다.
DISM.exe /온라인 /Cleanup-Image /RestoreHealth /Source:C:RepairSourceWindows /LimitAccess
참고 : C:RepairSourceWindows를 복구 소스 위치로 바꿉니다.

3. Press enter to run the above command and wait for the process to complete; usually, it takes 15-20 minutes.
알림: 위의 명령이 작동하지 않으면 아래에서 시도하십시오. Dism /Image:C:offline /Cleanup-Image /RestoreHealth /Source:c:testmountwindows Dism /Online /Cleanup-Image /RestoreHealth /Source:c:testmountwindows /LimitAccess
4. After the DISM process is complete, type the following in the cmd and hit Enter: SFC / scannow를
5. Let System File Checker run and once it’s complete, restart your PC.
방법 7: CCleaner 및 Malwarebytes 실행
1. 다운로드 및 설치 CCleaner를 및 Malwarebytes.
2. 멀웨어 바이트 실행 시스템에서 유해한 파일을 검색하도록 합니다. 맬웨어가 발견되면 자동으로 제거합니다.

3. 이제 CCleaner를 실행하고 주문 청소.
4. 사용자 지정 청소에서 창 탭 기본값을 확인하고 클릭하십시오. 분석.

5. 분석이 완료되면 삭제할 파일을 확실히 제거해야 합니다.

6. 마지막으로 클리너 실행 버튼을 누르고 CCleaner가 과정을 실행하도록 합니다.
7. 시스템을 더 청소하려면 레지스트리 탭을 선택하십시오, 다음이 확인되었는지 확인합니다.

8. 클릭 문제 스캔 버튼을 누르고 CCleaner가 스캔하도록 허용한 다음 선택한 문제 수정 버튼을 클릭합니다.

9. CCleaner가 "레지스트리에 대한 변경 사항을 백업하시겠습니까?" 예를 선택하십시오..
10. 백업이 완료되면 선택한 모든 문제 수정 버튼을 클릭합니다.
11. PC를 다시 시작하여 변경 사항을 저장합니다.
방법 8: Windows 스토어 캐시 지우기
1. Windows 키 + R을 누른 다음 입력 wsreset.exe Enter를 누르십시오.
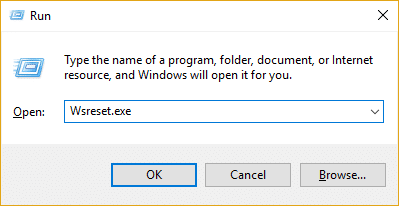
2. 프로세스가 완료되면 PC를 다시 시작합니다.
Method 9: Run Windows Update and Windows Store Apps troubleshooter
1. 유형 분쟁 조정자 Windows 검색창에서 다음을 클릭하세요. 분쟁 조정자.
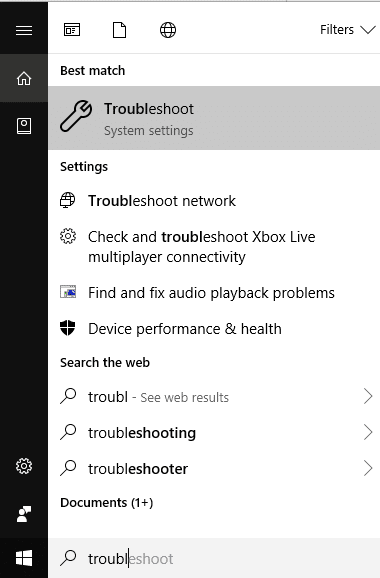
2. 다음으로 왼쪽 창에서 창 선택 모두보기.
3. 그런 다음 컴퓨터 문제 해결 목록에서 다음을 선택합니다. Windows Update를.

4. Follow on-screen instruction and let the Windows Update Troubleshoot run.

5. Now again go back to the View all window but this time select Windows 스토어 앱. Run the troubleshooter and follow on-screen instructions.
6. PC를 다시 시작하고 Windows Store에서 앱 설치를 다시 시도합니다.
권장 사항 :
그게 당신이 성공적으로 Fix Windows 10 Store Error 0x80073cf9 하지만 이 게시물과 관련하여 여전히 궁금한 점이 있으면 댓글 섹션에서 자유롭게 질문하세요.

