Microsoft는 이전 버전의 Windows 및 일부 이전 버전의 Windows 10에서 누락된 유용한 도구를 추가했습니다. MBR2GPT 이 도구를 사용하면 Windows 10 사용자가 Windows 10을 다시 설치하지 않고도 레거시 BIOS를 UEFI로 변환할 수 있습니다.
명령 프롬프트를 사용하여 MBR2GPT 도구를 호출할 수 있으며 나중에 두 개의 명령을 사용하면 레거시 BIOS에서 UEFI로 전환됩니다.
어느 것이 더 나은가: 레거시 BIOS 대 UEFI
BIOS(기본 입/출력 시스템)는 컴퓨터의 전원 버튼을 누른 후 마이크로프로세서를 시작하는 데 필요한 코드입니다. BIOS는 오래 전에 처음 등장했으며 완벽하게 작동했습니다. BIOS에는 몇 가지 제약이 있었습니다.
예를 들어 BIOS는 MBR(마스터 부트 레코드)을 사용하여 최대 파티션 용량을 2.2TB로 정의합니다. 지난 XNUMX년 반 동안의 하드웨어 개발은 새로운 펌웨어를 보증했습니다. 그런 다음 UEFI(Unified Extensible Firmware Interface)가 등장했습니다.
BIOS와 마찬가지로 UEFI는 전원 버튼을 누르고 OS를 부팅하기 전에 컴퓨터가 실행하는 저수준 소프트웨어입니다. UEFI는 더 강력하고 BIOS와 관련된 제약을 제거합니다.
예를 들어 UEFI는 최대 9ZB의 파티션을 지원하고 더 빠른 부팅 시간을 제공하며 "보안 부팅"과 같은 보안 기능을 제공합니다.
Getting Ready to Convert Legacy BIOS to UEFI
You need to get a few things in order before we talk about changing BIOS from Legacy to UEFI.
Check Your BIOS Version
Verify that you’re currently using Legacy BIOS. You don’t want to have to go through the entire process only to find out you were using UEFI the whole time.
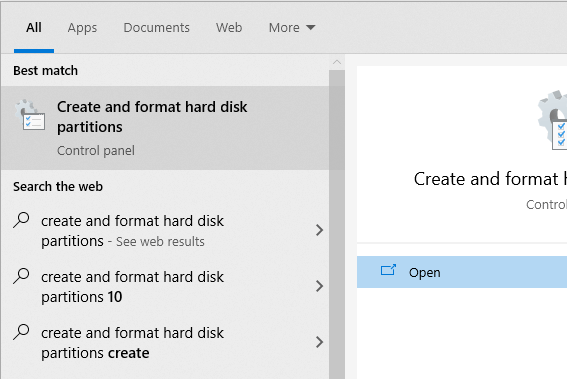
Open the Disk Management app to verify which BIOS version you’re running. Search for 하드 디스크 파티션 생성 및 포맷 in the Start Menu and open the 최고의 경기. This will take you to the Disk Management app.
In the app, right-click on the disk on which you’ve installed Windows and select 등록.
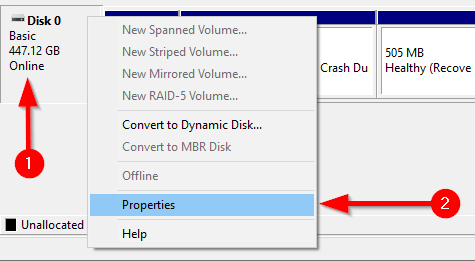
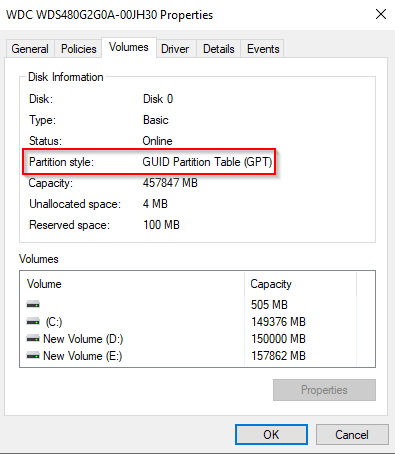
Next, you want to check your disk partition style to confirm whether you’re running the Legacy BIOS or UEFI. If you’re using BIOS, your disk partition style will be MBR. If you’re already on UEFI, the disk partition style will be GPT.
You can check the disk partition style under the 볼륨 tab in Properties. Search for 파티션 스타일 아래에 디스크 정보.
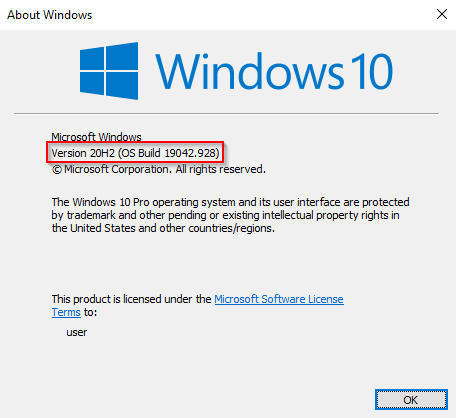
Check Your Windows Version
The MBR2GPT tool is available on Windows 10 version 1703 and later. Verify that you have the right version before starting the process by searching for winver를 in the Start Menu and opening the Best match. The new window that opens will display the version in the second line.
Legacy BIOS to UEFI Conversion Prerequisites
Assuming you’ve verified that you’re using the Legacy BIOS, there are a few other things you need to check, and in some cases, change.
- Ensure that the target disk (i.e., the Windows drive) has three or fewer partitions (drive C, D, etc., are all partitions). You can view the partitions by pressing 승 + R 그리고 달리기 diskmgmt.msc를. If you see more than three partitions, you’ll need to merge the partitions 또는 삭제합니다.
- If you’ve encrypted the target disk using BitLocker, this will interfere with the conversion process. Since Windows won’t convert an encrypted disk, you’ll need to BitLocker 비활성화 before you begin the conversion.
- After conversion, you can’t boot into Windows until you change the motherboard’s firmware settings from Legacy BIOS to UEFI. Take a quick tour of the firmware and look for the setting that allows you to switch between BIOS and UEFI before starting the conversion. The process differs across manufacturers, so you may need to look around a little. If you can’t find the setting, use the manual.
- Create a precautionary backup.
How to Change BIOS from Legacy to UEFI
Once you’ve made sure everything is in order, it’s time to use the MBR2GPT tool.
- 에 대한 검색 cmd를 in the Start Menu, right-click, and select 관리자 권한으로 실행하십시오.
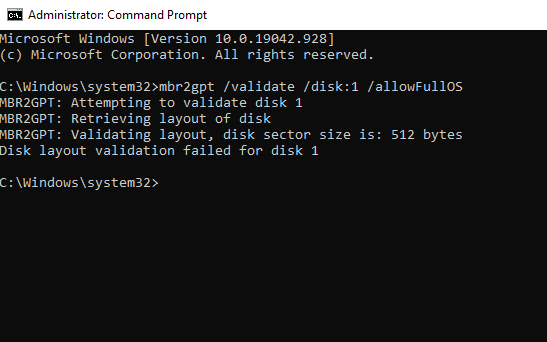
- Your disk must meet the conversion requirements for the MBR2GPT tool to be able to convert it. Check if it does by validating the disk using the following command:
mbr2gpt /validate /disk:0 /allowFullOS
If the disk you want to convert is not disk 0, replace 0 with the appropriate disk number.
If your disk doesn’t meet the conversion requirements, you’ll see an error. For instance, the following error resulted from validating a USB drive.
- If the validation was successful, run the following command to begin the conversion:
mbr2gpt /convert /disk:0 /allowFullOS
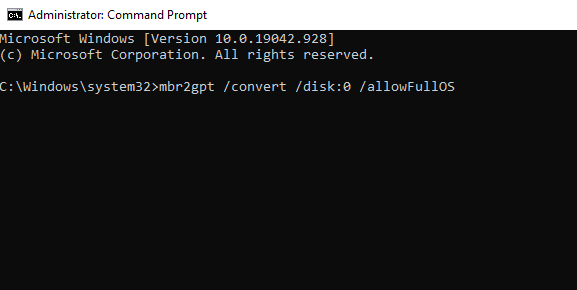
Let the conversion run, it should only take a few seconds.
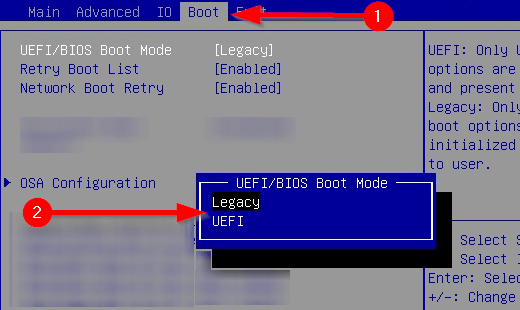
- Restart your PC and go into your motherboard’s firmware to change the settings. Assuming you already figured out how to enter the BIOS before starting the process, this should take only a few seconds. In most cases, you’ll see an option to select the Boot mode under the Boot tab/section in your firmware.
- Windows로 부팅합니다.
- Verify that you’ve successfully converted the partition using the same process you used earlier. Head to the Disk Management app, right-click on the converted disk, select 등록 > 음량, and this time around the 파티션 스타일 되어야 GUID 파티션 테이블 (GPT).
현대화된 BIOS 즐기기
UEFI에는 많은 기능이 있습니다. 대부분의 최신 시스템이 UEFI를 사용하고 있다는 점을 감안할 때 Legacy BIOS를 UEFI로 변환하려는 것은 당연합니다. 자, 모두 끝났습니다. 다행히도 Windows를 다시 설치할 필요가 없었습니다.

