If you don’t see Wireless Adapter under Network Connections neither there is a Network adapter tab under device manager then it seems like your Network Adapter is missing or not detected on your Windows 10 which is a serious issue because you won’t be able to access the Internet until the issue is resolved. In short, when you click on the Wireless icon on the system tray there won’t be any device listed in order to connect to the Internet and if you open Device Manager then you won’t see the Network Adapter tab.
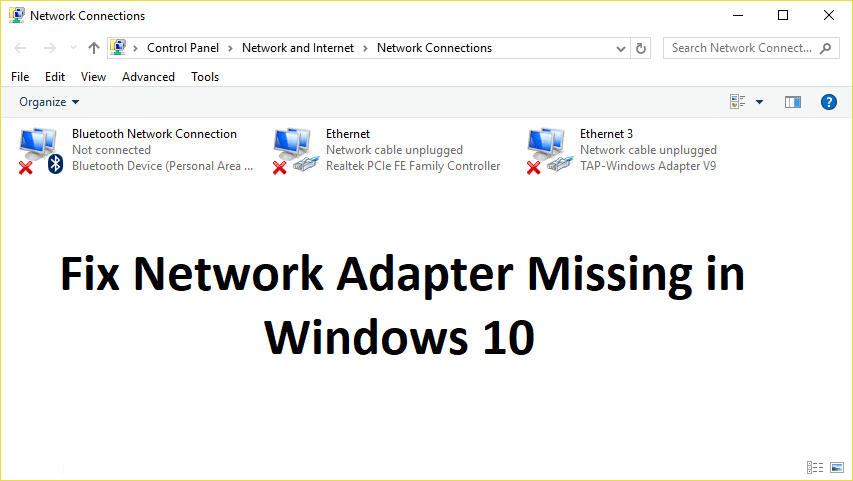
These are the reasons behind the Network Adapter missing issue:
- Network adapter missing in Device manager
- No Network Adapters showing in Device Manager
- Network Adapter Not Detected
- Network Adapter Not Found Windows 10
- No Network Adapter In Device Manager
The main cause of this issue seems to be outdated, incompatible or corrupted Network Adapter drivers. If you have recently upgraded from previous versions of Windows then it’s possible that the old drivers will not work with the new Windows and hence the issue. So without wasting any time let’s see how to actually Fix Network Adapter Missing in Windows 10 issue with the below-listed troubleshooting steps.
Note: Just make sure to uninstall any VPN software on your PC before continuing.
Fix Network Adapter Missing in Windows 10
혹시라도 문제가 생길 경우를 대비해 복원 지점을 만들어 두시기 바랍니다.
Method 1: Reboot your Computer
우리 대부분은 이 아주 기본적인 트릭을 알고 있습니다. 컴퓨터를 재부팅하면 새로 시작하여 소프트웨어 충돌을 해결할 수 있는 경우가 있습니다. 따라서 컴퓨터를 절전 모드로 전환하려는 사람이라면 컴퓨터를 다시 시작하는 것이 좋습니다.
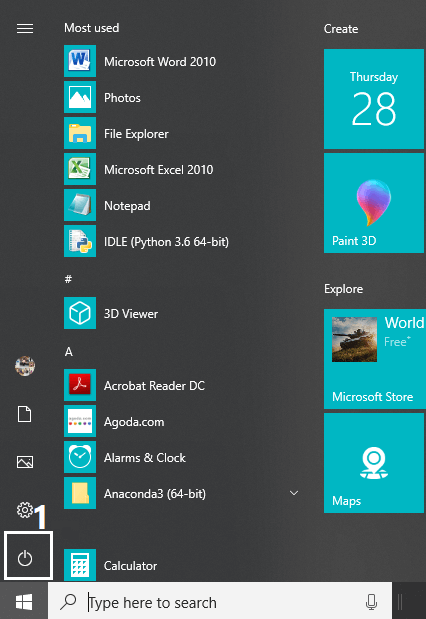
1. 클릭 시작 메뉴 다음을 클릭합니다 전원 버튼 왼쪽 하단에서 사용 가능합니다.
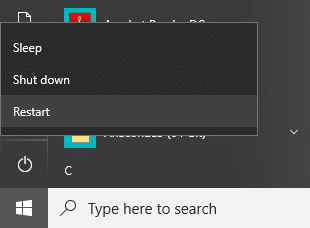
2. 다음으로 다시 시작 옵션을 선택하면 컴퓨터가 자동으로 다시 시작됩니다.
컴퓨터를 다시 시작한 후 문제가 해결되었는지 확인하세요.
Method 2: Flush DNS and Reset Winsock Components
1. Open elevated Command Prompt.
2. 이제 다음 명령을 입력하고 각 명령 다음에 Enter를 누르십시오.
ipconfig를 / 해제
ipconfig를 / flushdns를
갱신 ipconfig / all을

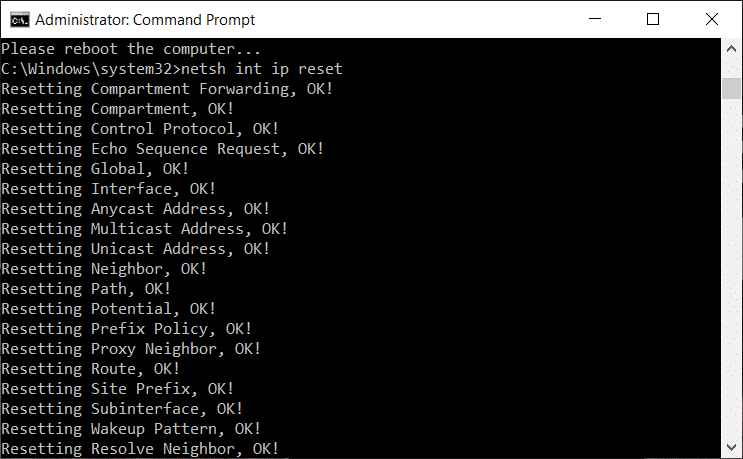
3. 다시 명령 프롬프트를 열고 다음 명령을 하나씩 입력한 후 Enter 키를 누릅니다.
ipconfig /flushdns
nbtstat –r
netsh int ip reset
netsh winsock reset
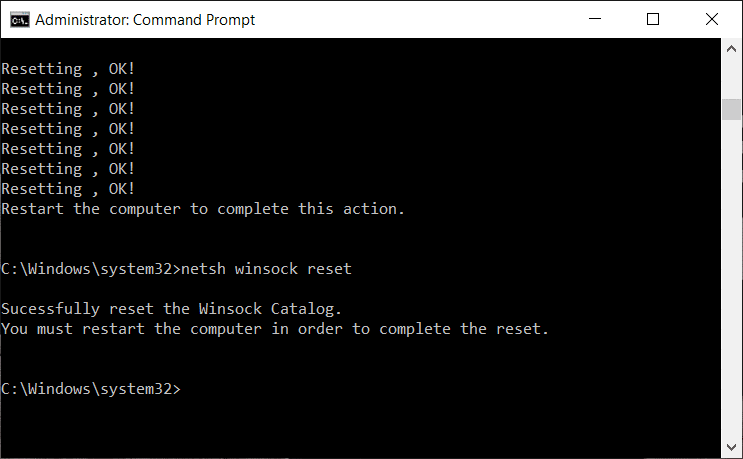
4. Reboot to apply changes. Flushing DNS seems to Fix Network Adapter Driver Issues on Windows 10.
Method 3: Run WWAN AutoConfig Service
1. Windows 키 + R을 누른 다음 입력 services.msc를 Enter를 누르십시오.

2. 찾기 WWAN AutoConfig Service in the list (press W to reach to the end of the list quickly).
3. 더블 클릭 WWAN AutoConfig Service.
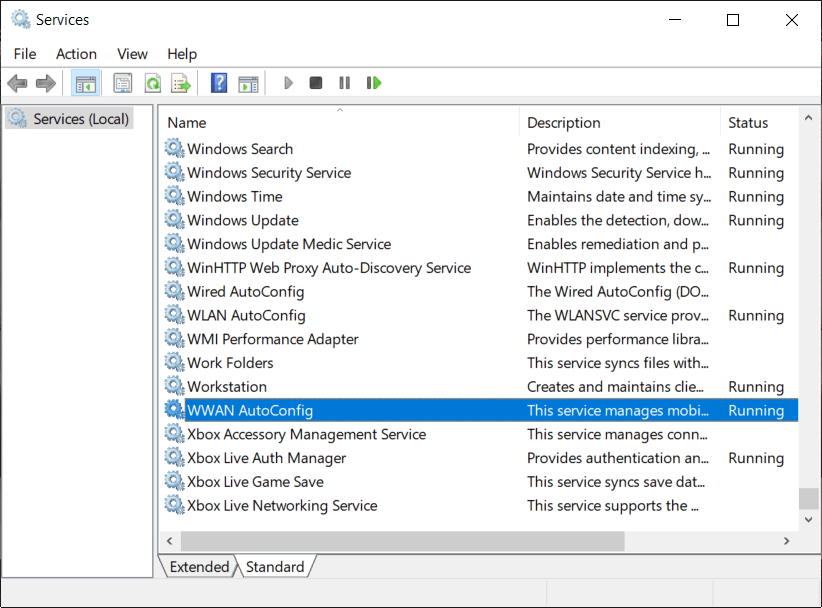
4. If the service is already running then click on Stop, then from the Startup type drop-down select 오토매틱.
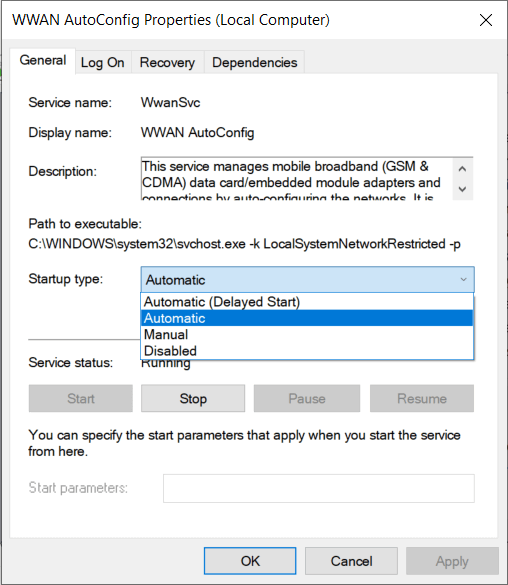
5. Click Apply followed by OK.
6. 마우스 오른쪽 버튼으로 WWAN AutoConfig Service 선택 스타트.
방법 4: 네트워크 어댑터 드라이버 업데이트
1. Windows 키 + R을 누르고 “devmgmt.msc를"를 실행 대화 상자에서 엽니다. 기기 관리자.

2. 확장 네트워크 어댑터을 클릭한 다음 와이파이 컨트롤러 (예: Broadcom 또는 Intel)을 선택하고 드라이버 소프트웨어를 업데이트하십시오.

3. 이제 '를 선택하세요.업데이트된 드라이버 소프트웨어 자동으로 검색".
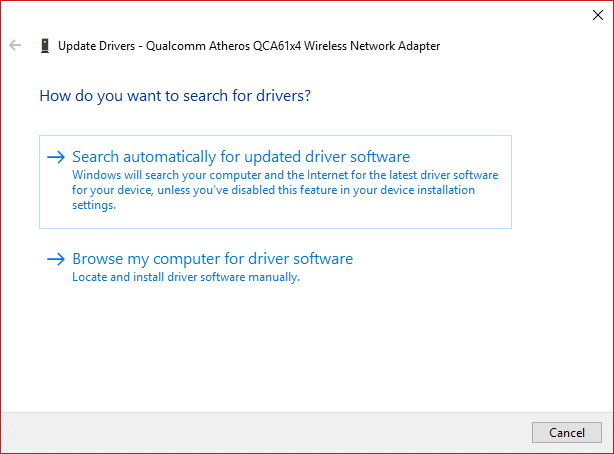
4. 지금 Windows will automatically search for the Network driver update and if new update is found, it will automatically download and install it.
5. 완료되면 모든 것을 닫고 PC를 재부팅하십시오.
6. 아직도 문제가 해결되지 않은 경우 Network Adapter Missing in Windows 10 issue, then again right-click on your WiFi controller and select 드라이버 업데이트 장치 관리자에서.
7. 이제 드라이버 소프트웨어 업데이트 Windows에서 “내 컴퓨터에서 드라이버 소프트웨어 찾아보기."

8. 이제 '를 선택하세요.내 컴퓨터에서 사용 가능한 드라이버 목록에서 선택하겠습니다."

9. 시도 나열된 버전에서 드라이버를 업데이트합니다(호환되는 하드웨어를 확인 표시하세요).
10. 위의 방법으로 문제가 해결되지 않으면 다음으로 이동하세요. 제조사의 웹사이트 드라이버를 업데이트합니다.

11. 제조사 홈페이지에서 최신 드라이버를 다운로드하여 설치한 후 PC를 다시 시작하세요.
Method 5: Uninstall Network Adapter Drivers
1. Windows 키 + R을 누르고 “devmgmt.msc를”를 입력하고 Enter 키를 눌러 장치 관리자를 엽니다.
2. 네트워크 어댑터를 확장하고 찾기 네트워크 어댑터 이름.
3. 당신이 어댑터 이름을 적어두세요 뭔가 잘못되었을 때를 대비해.
4. Right-click on your network adapter and uninstall it.

5. It will ask for confirmation 예를 선택합니다.
6. Restart your PC and Windows will automatically install the network adapter drivers again.
7. If the drivers are not installed automatically then again open the Device Manager.
8. From the Device Manager menu, click on 동작 그런 다음 "하드웨어 변경 사항 검색".

방법 6: Windows가 최신 버전인지 확인
1. 프레스 윈도우 키 + 설정을 열고 다음을 클릭합니다. 업데이트 및 보안.
![]()
2. From the left-hand side, menu click on Windows Update를.
3. 이제 "업데이트 확인" 버튼을 눌러 사용 가능한 업데이트가 있는지 확인합니다.

4. If any updates are pending then click on 업데이트를 다운로드 및 설치합니다.

5. Once the updates are downloaded, install them and your Windows will become up-to-date.
6. After the updates are installed reboot your PC to save changes.
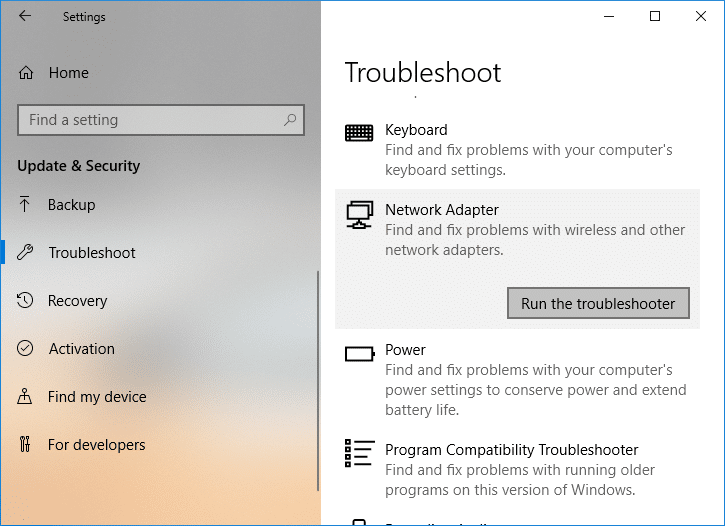
방법 7: 네트워크 어댑터 문제 해결사 실행
1. Windows 키 + I를 눌러 설정을 연 다음 업데이트 및 보안.
![]()
2. 왼쪽 메뉴에서 다음을 선택하세요. 문제를 해결하십시오.
3. 문제 해결에서 다음을 클릭하세요. 인터넷 연결 다음을 클릭합니다 문제 해결사를 실행하십시오.

4. 화면의 추가 지침에 따라 문제 해결사를 실행합니다.
5. 위 방법으로 문제가 해결되지 않으면 문제 해결 창에서 다음을 클릭하세요. 네트워크 어댑터 다음을 클릭하십시오 문제 해결사를 실행하십시오.
5. PC를 재부팅하여 변경 사항을 저장하고 가능한지 확인하세요. fix the Network Adapter Missing issue.
Method 8: Install Intel PROSet/Wireless Software
Sometimes the problem is caused due to outdated Intel PROSet Software, hence updating it seems to fix Network Adapter Missing in Windows 10 issue. 따라서, 여기에서 and download the latest version of PROSet/Wireless Software and install it. This is a third party software which manages your WiFi connection instead of Windows and if PROset/Wireless Software is outdated is can cause drivers issue in 무선 네트워크 어댑터. Hence, read How to Update Network Adapter Drivers on Windows 10.
방법 9: 네트워크 연결 재설정
1. Windows 키 + I를 눌러 설정을 연 다음 네트워크 및 인터넷.

2. 왼쪽 메뉴에서 다음을 선택하세요. 지위.
3. 이제 아래로 스크롤하여 다음을 클릭하세요. 네트워크 재설정 하단에.

4. 다시“지금 재설정' 네트워크 재설정 섹션 아래에 있습니다.

5. This will successfully reset your network adapter and once it is complete the system will be restarted.
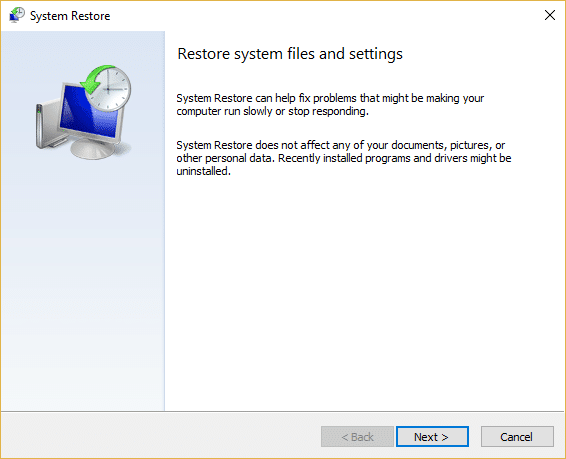
방법 10: 시스템 복원 수행
System Restore always works in resolving the error, therefore System Restore can definitely help you in fixing this error. So without wasting any time run system restore in order to resolve Network Adapter Missing issue.
Method 11: Using elevated Command Prompt
1. Windows 키 + X를 누르고 다음을 선택합니다. 명령 프롬프트 (Admin).

2. cmd에 다음 명령을 입력하고 Enter를 누르십시오.
netcfg -sn
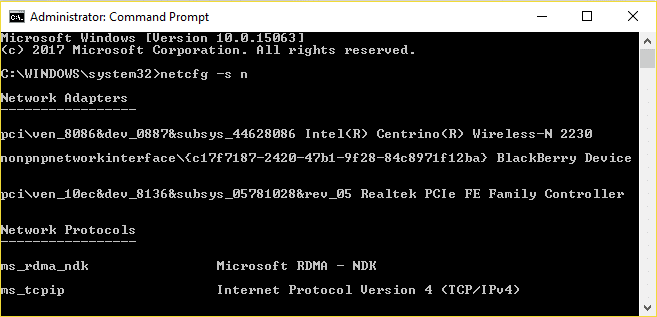
3. This will display a list of networking protocols and in that list find DNI_DNE.
4. If DNI_DNE is listed then type the following command into cmd:
reg 삭제 HKCRCLSID {988248f3-a1ad-49bf-9170-676cbbc36ba3} / va / f
netcfg -v -u dni_dne
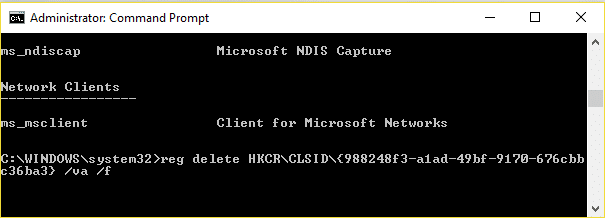
5. If you don’t see DNI_DNE listed then only run the command netcfg -v -u dni_dne.
6. Now if you receive the error 0x80004002 after trying to run the above command then you need to delete the above key manually.
7. Windows 키 + R을 누른 다음 입력 regedit를 Enter를 누르십시오.

8. Navigate to the following Registry Key:
HKEY_CLASSES_ROOTCLSID{988248f3-a1ad-49bf-9170-676cbbc36ba3}
9. Delete this key and then again type netcfg -v -u dni_dne command in cmd.
10. PC를 재부팅하여 변경 사항을 저장합니다.
당신을 위해 추천 된:
그게 당신이 성공적으로 Fix Network Adapter Missing in Windows 10 그러나 이 게시물과 관련하여 여전히 질문이 있는 경우 댓글 섹션에서 자유롭게 질문하세요.

