Process and Compressed Memory is a Windows 10 feature responsible for memory compression (also referred to as RAM compression and memory compression). This feature basically utilizes data compression to reduce the size or number of paging request to and from the auxiliary storage. In short, this feature is designed to take less amount of disk space and memory but in this case the System and Compressed Memory process start using 100% Disk and Memory, causing the affected PC to become slow.

In Windows 10, a compressions store is added to the concept of Memory Manager, which is an in-memory collection of compressed pages. So whenever the memory starts to fill up, the System and Compressed Memory process will compress the unused pages instead of writing them to the disk. The benefit of this is the amount of memory used per process is reduced, which allows Windows 10 to maintain more programs or apps in physical memory.
The problem appears to be incorrect Virtual Memory settings. Someone changed the paging file size from automatic to a particular value, virus or malware, Google Chrome or Skype, corrupt system files etc. So without wasting any time let’s see how to actually Fix 100% Disk Usage by System and Compressed Memory with the help of below-listed troubleshooting guide.
[SOLVED] 100% Disk Usage by System and Compressed Memory
혹시라도 문제가 생길 경우를 대비해 복원 지점을 만들어 두시기 바랍니다.
방법 1: 손상된 시스템 파일 복구
1. 명령 프롬프트를 엽니다. 사용자는 다음을 검색하여 이 단계를 수행할 수 있습니다. 'cmd' Enter를 누르십시오.

2. 이제 cmd에 다음을 입력하고 Enter 키를 누릅니다.
Sfc /scannow sfc /scannow /offbootdir=c: /offwindir=c:windows (위에서 실패하면 이것을 시도하십시오)
![SFC scan now command prompt | [SOLVED] 100% Disk Usage by System and Compressed Memory](https://lbsite.org/wp-content/uploads/2023/01/SFC-scan-now-command-prompt.png)
3. 위의 프로세스가 완료될 때까지 기다렸다가 완료되면 PC를 다시 시작합니다.
4. Again open cmd and type the following command and hit enter after each one:
Dism /Online /Cleanup-Image /CheckHealth Dism /Online /Cleanup-Image /ScanHealth Dism /Online /Cleanup-Image /RestoreHealth

5. DISM 명령을 실행하고 완료될 때까지 기다립니다.
6. 위 명령이 작동하지 않으면 아래 명령을 시도해 보십시오.
Dism /Image:C:offline /Cleanup-Image /RestoreHealth /Source:c:testmountwindows Dism /Online /Cleanup-Image /RestoreHealth /Source:c:testmountwindows /LimitAccess
참고 : C:RepairSourceWindows를 복구 소스(Windows 설치 또는 복구 디스크)로 교체합니다.
7. PC를 재부팅하여 변경 사항을 저장하고 가능한지 확인하세요. Fix 100% Disk Usage by System and Compressed Memory Issue.
Method 2: Set Correct Paging File Size
1. Windows 키 + R을 누른 다음 입력 sysdm.cpl을 Enter 키를 눌러 엽니 다. 시스템 등록 정보.

2.로 전환 고급 탭 다음을 클릭하십시오 성능 아래의 설정.

3. Again switch to the Advanced tab and click Change under Virtual Memory.

4. Checkmark “모든 드라이브의 페이징 파일 크기를 자동으로 관리합니다."
![Checkmark Automatically manage paging file size for all drives | [SOLVED] 100% Disk Usage by System and Compressed Memory](https://lbsite.org/wp-content/uploads/2023/02/Checkmark-Automatically-manage-paging-file-size-for-all-drives.png)
5. Click OK, then click Apply followed by OK.
6. Select Yes to Restart your PC to save changes.
방법 3: 빠른 시작 비활성화
1. Windows 키 + R을 누른 다음 control을 입력하고 Enter 키를 눌러 엽니다. 제어판.

2. 을 클릭 하드웨어 및 소리 다음을 클릭하십시오 전원 옵션.

3. 그런 다음 왼쪽 창에서 "전원 단추의 기능을 선택하십시오."

4. 이제 클릭하십시오. "현재 사용할 수없는 설정을 변경하십시오."

5. " 체크 해제빠른 시작 기능 켜기”을 클릭하십시오 변경 사항을 저장합니다.
![Uncheck Turn on fast startup | [SOLVED] 100% Disk Usage by System and Compressed Memory](https://lbsite.org/wp-content/uploads/2023/01/Uncheck-Turn-on-fast-startup.png)
6. Restart your PC and see if you’re able to Fix 100% Disk Usage by System and Compressed Memory Issue.
방법 4 : 수퍼페치 서비스 비활성화
1. Windows 키 + R을 누른 다음 입력 services.msc를 Enter를 누르십시오.

2. 찾기 슈퍼 페치 (SuperFetch) service from the list then right-click on it and select 속성.

3. Under Service status, if the service is running, click on 중지합니다.
4. 이제부터 시작 type drop-down select 사용할 수 없습니다.

5. 적용을 클릭한 후 좋아요.
6. PC를 재부팅하여 변경 사항을 저장합니다.
If the above method doesn’t disable Superfetch services then you can follow disable Superfetch using Registry:
1. Windows 키 + R을 누른 다음 입력 regedit를 Enter 키를 눌러 레지스트리 편집기를 엽니다.

2. 다음 레지스트리 키로 이동합니다.
HKEY_LOCAL_MACHINESYSTEMCurrentControlSetControlSession Manager메모리 관리PrefetchParameters
3. Make sure you have selected 프리페치 매개변수 그런 다음 오른쪽 창에서 두 번 클릭하십시오. 슈퍼페치 활성화 열쇠 change it’s value to 0 in the Value data field.

4. Click OK and close the Registry Editor.
5. PC를 다시 시작하여 변경 사항을 저장하고 가능한지 확인하세요. Fix 100% Disk Usage by System and Compressed Memory Issue.
Method 5: Adjust your PC for Best Performance
1. Windows 키 + R을 누른 다음 입력 sysdm.cpl을 Enter 키를 눌러 엽니 다. 시스템 등록 정보.
2.로 전환 Advnaced 탭을 클릭 한 다음 설정 아래에 공연.
3. Under Visual Effects checkmark “최상의 성능을 위해 조정".

4. 적용을 클릭한 후 좋아요.
5. PC를 재부팅하고 가능한지 확인하세요. Fix 100% Disk Usage by System and Compressed Memory Issue.
Method 6: Kill the Speech Runtime Executable Process
1. 프레스 Ctrl + Shift + Esc를 작업 관리자를 시작합니다.
2. 에서 프로세스 탭발견 Speech Runtime Executable.
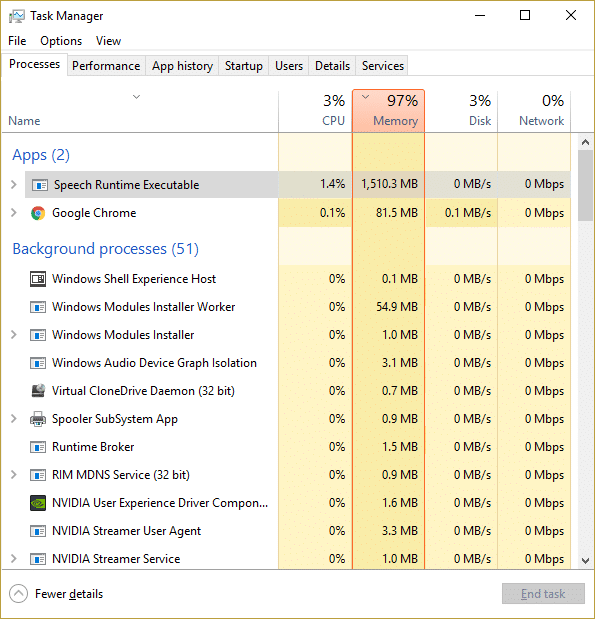
3. 마우스 오른쪽 버튼을 클릭하고 선택하세요. 작업 끝내기.
방법 7: CCleaner 및 Malwarebytes 실행
1. 다운로드 및 설치 CCleaner를 및 Malwarebytes.
2. 멀웨어 바이트 실행 시스템에서 유해한 파일을 검색하도록 합니다. 맬웨어가 발견되면 자동으로 제거합니다.

3. 이제 CCleaner를 실행하고 주문 청소.
4. 사용자 지정 청소에서 창 탭 기본값을 확인하고 클릭하십시오. 분석.
![Select Custom Clean then checkmark default in Windows tab | [SOLVED] 100% Disk Usage by System and Compressed Memory](https://lbsite.org/wp-content/uploads/2023/01/Select-Custom-Clean-then-checkmark-default-in-Windows-tab.png)
5. 분석이 완료되면 삭제할 파일을 확실히 제거해야 합니다.

6. 마지막으로 클리너 실행 버튼을 누르고 CCleaner가 과정을 실행하도록 합니다.
7. 시스템을 더 청소하려면 레지스트리 탭을 선택하십시오, 다음이 확인되었는지 확인합니다.

8. 클릭 문제 스캔 버튼을 누르고 CCleaner가 스캔하도록 허용한 다음 선택한 문제 수정 버튼을 클릭합니다.
![Once scan for issues is completed click on Fix selected Issues | [SOLVED] 100% Disk Usage by System and Compressed Memory](https://lbsite.org/wp-content/uploads/2023/01/Once-scan-for-issues-is-completed-click-on-Fix-selected-Issues.png)
9. CCleaner가 "레지스트리에 대한 변경 사항을 백업하시겠습니까?" 예를 선택하십시오..
10. 백업이 완료되면 선택한 모든 문제 수정 버튼을 클릭합니다.
11. PC를 다시 시작하여 변경 사항을 저장합니다.
Method 8: Change configuration of Google Chrome and Skype
Google 크롬 : Navigate to the following under Chrome: Settings > Show Advanced Settings > Privacy > Use a prediction service to load pages more quickly. Disable the toggle next to “Use a prediction service to load pages.”

Change configuration For Skype
1. Make sure you have exited Skype, if not end task from Task Manager for Skype.
2. Press Windows Key + R then type the following and click OK:
C:Program Files (x86)SkypePhone
3. 마우스 오른쪽 버튼으로 Skype.exe 선택 속성.

4.로 전환 보안 탭 클릭 편집하다.

5. 선택 모든 애플리케이션 패키지 under Group or user names then checkmark Write 아래에 허용하다.

6. Click Apply, followed by OK and see if you’re able to Fix 100% Disk Usage by System and Compressed Memory Issue.
Method 9: Set Correct Permission for System and Compressed Memory Process
1. Windows 키 + R을 누른 다음 입력 taskchd.msc and hit Enter to open Task Scheduler.

2. 다음 경로로 이동합니다.
Task Scheduler Library > Microsoft > Windows > MemoryDiagnostic
![Double click on ProcessMemoryDiagnostic Events | [SOLVED] 100% Disk Usage by System and Compressed Memory](https://lbsite.org/wp-content/uploads/2023/02/Double-click-on-ProcessMemoryDiagnostic-Events.png)
3. 더블 클릭 ProcessMemoryDiagnostic Events 다음을 클릭합니다 사용자 또는 그룹 변경 under Security Options.

4. 클릭 Advnaced 다음을 클릭합니다 Find Now.

5. 선택 관리자 계정 from the list then click OK.

6. 다시 확인을 클릭하십시오. to add your administrator account.
7. Checkmark 최고 권한으로 실행 확인을 클릭하십시오.

8. Follow the same steps for RunFullMemoryDiagnostic and close everything.
9. PC를 재부팅하여 변경 사항을 저장합니다.
Method 10: Disable System and Compressed Memory Process
1. Windows 키 + R을 누른 다음 입력 taskchd.msc Enter 키를 눌러 엽니 다. 작업 스케줄러.
2. 다음 경로로 이동합니다.
Task Scheduler Library > Microsoft > Windows > MemoryDiagnostic
3. 마우스 오른쪽 버튼으로 전체 메모리 진단 실행 선택 사용 안함.
![Right-click on RunFullMemoryDiagnostic and select Disable | [SOLVED] 100% Disk Usage by System and Compressed Memory](https://lbsite.org/wp-content/uploads/2023/02/Right-click-on-RunFullMemoryDiagnostic-and-select-Disable.png)
4. Close Task Scheduler and restart your PC.
권장 사항 :
그게 당신이 성공적으로 Fix 100% Disk Usage by System and Compressed Memory 그러나 이 게시물과 관련하여 여전히 질문이 있는 경우 댓글 섹션에서 자유롭게 질문하세요.

