Issues with Microsoft Outlook’s Personal Folders File format—commonly referred to as PST—have been a huge problem for years. Microsoft knows that, which is why Outlook comes with a built-in tool called Inbox Repair to help you fix corrupted PST files.
In most cases, simply running a damaged PST file through the Inbox Repair tool should be enough to patch it up. But sometimes, you must take extra action to recover lost items.

How Outlook PST File Repair Works
Outlook’s Inbox Repair tool is buried deep within the Microsoft Office installation folder on your computer, so you need to do a bit of digging to get to it. Once you’ve located and launched Inbox Repair, all you need to do is select the damaged PST file to repair it.
Giring: Inbox Repair provides an option to create a backup of the damaged PST file. Make sure to select it since you may need a copy to retrieve missing data later on.
1. Completely exit Microsoft Outlook.
2. Open File Explorer. Depending on the version of Windows that you use, navigate through the following folders:
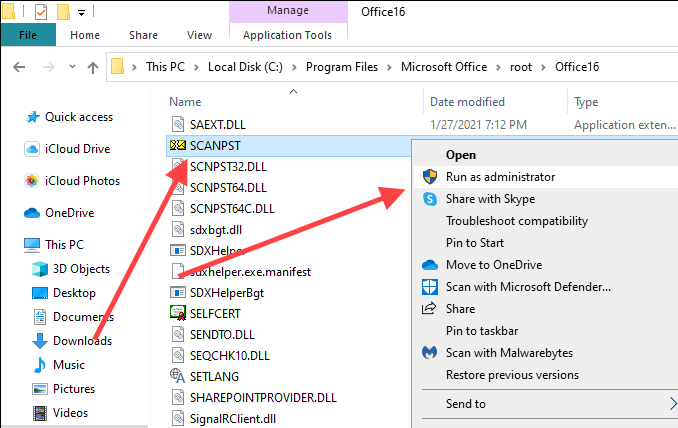
- Windows 64-bit: Local Disk (C:) > Program Files > Microsoft Office > root > Office16
- Windows 32-bit: Local Disk (C:) > Program Files (x86)> Microsoft Office > root > Office16
Not: The folder paths above apply to Outlook 2016, Outlook 2019, and Outlook 365. If you use an older version of Outlook, you must select the Ofîsa 15 (Outlook 2013), Ofîsa 14 (Outlook 2010), or Ofîsa 12 (Outlook 2007) folder instead.
3. Locate the file labeled SCANPST and run it as an administrator.
4. bikar bînin Browse button to select the Outlook PST file that you want to repair.
If you don’t know the location of the PST file, press Windows+S to open Windows Search. Then, search for it by name and include the .PST file extension. You will see the file location within the search results.
Alternatively, open Outlook and go to Wêne > Settings account > Pelên Daneyê to view the PST file’s location. Make sure to close the application after that.
5. Neqandin Destpêkirin. The Inbox Repair tool will check the PST file for issues. That should take some time.
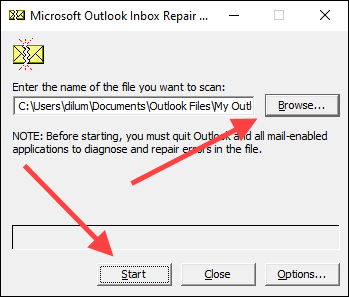
6. Check the radio button next to Berî tamîrkirinê ji pelê skankirî paşvekişandinê çêbikin Û hilbijêrin Pîne.

7. Neqandin OK to finish repairing the PST file.
Open Microsoft Outlook and it should automatically start using the PST file without issues. You will find a copy of the corrupted PST file (with the .BAK extension) in the same location as the repaired original.
Recover Lost and Found Files
Sometimes, Microsoft Outlook’s Inbox Repair tool may end up repairing a severely damaged PST file. Suppose the tool fails to place any repaired items in their original folders or locations. In that case, it will lump them into a Lost and Found folder or a set of folders under the Recovered Personal Folders awanasî.
You can recover these items by creating a new PST data file in Outlook and moving the contents from Lost and Found or Recovered Personal Folders into it.
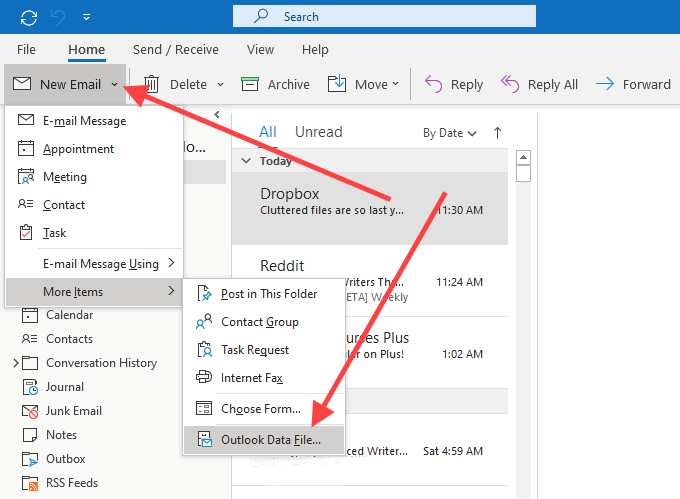
1. veke Xane tab in Outlook. Then, open the menu next to E-nameya nû, point to Tiştên Zêdetir, Û hilbijêrin Pelê Daneyên Outlook.
2. Pick the Pelê Daneyên Outlook vebijark û hilbijêrin OK.
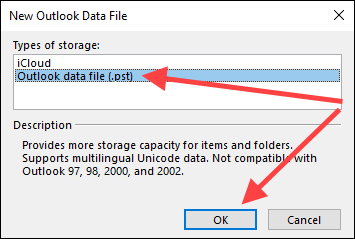
3. Specify a location on your computer, enter a name for the new PST file, and select OK.
4. Hilbijêrin Zêde icon (three dots) to the Outlook window’s lower-left corner and select Folders to switch the Outlook sidebar to Folder List view.

5. Drag the contents within Winda û Dît or Recovered Personal Folders into the new data file.
Once you’ve done that, you can choose to remove the Lost and Found folder or the Recovered Personal Folders data file from Outlook.
Recover Additional Items from PST
Suppose you notice any missing items within the repaired data file. if you also can’t find them inside the Lost and Found folder or under Recovered Personal Folders, you can try retrieving them using the backup copy of the original. Basically, you try to import the contents within the file without duplicating any items that the Inbox Recovery tool has already recovered.
1. Copy the corrupted PST file backup to your desktop.
2. guherîn .BAK extension at the end of the file name to .PST.

Not: If you can’t see the file extension, open the Wêne menu in a File Explorer window and select Peldanka peldanka û alternatîfên lêgerînê biguherînin. Dûv re, veguherîne ser Dîtinî tabloyê û qutiya li kêleka wê rakin Daxuyaniya pelên naskirî veşartin veşêre.
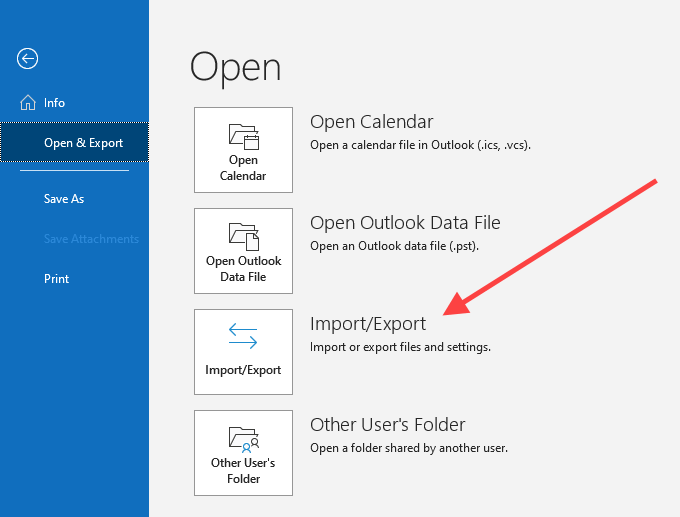
3. veke Wêne menu in Outlook and select Vekirin & Export > Import / Export.
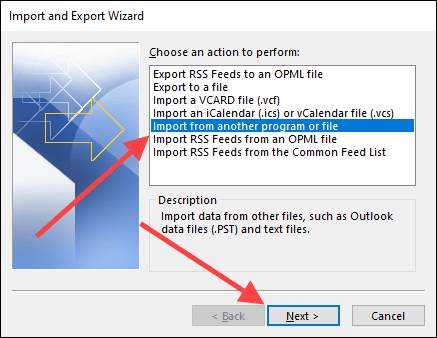
4. Neqandin Ji bernameyek an pelek din derxînin Û hilbijêrin Piştî.
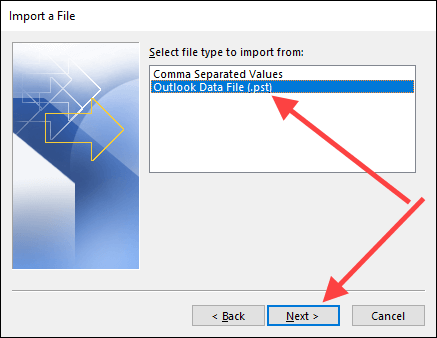
5. Neqandin Pelê Daneyên Outlook (.pst) Û hilbijêrin Piştî.
6. Neqandin Browse and select the backup copy of the corrupted PST file (the one that you just renamed).
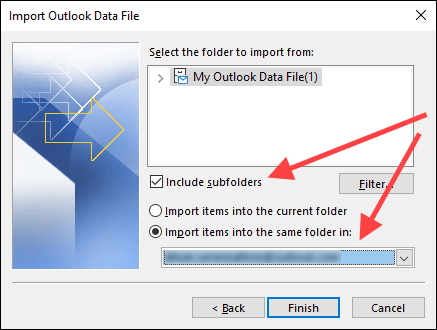
7. Neqandin Ducaran îtxal nekin Û hilbijêrin Piştî.

8. Sindoqa kêleka xwe kontrol bikin Daxuyaniyên paşnavan bicivînin. Piştre, hilbijêrin Import folders into the same folder and pick the account or data file that you want to import the items into.
9. Neqandin Qedandin.
Once Outlook finishes importing any items, you must manually confirm if the previously missing items are now present. If not, try running the Inbox Repair tool another time.
Third-Party Outlook PST Repair and Recovery Tools
A cursory search online will reveal lots of paid third-party tools that claim to repair damaged or corrupted Outlook PST files. In almost all cases, though, the Inbox Repair tool should be more than good enough for the job.
Only use a third-party recovery program if Inbox Repair fails to retrieve your data, and do your due diligence by checking online reviews thoroughly before spending any money on them.
Before we wrap up, here’s an interesting tidbit: the Inbox Repair tool also allows you to recover deleted items from Outlook.

