If you don’t see Wireless Adapter under Network Connections neither there is a Network adapter tab under device manager then it seems like your Network Adapter is missing or not detected on your Windows 10 which is a serious issue because you won’t be able to access the Internet until the issue is resolved. In short, when you click on the Wireless icon on the system tray there won’t be any device listed in order to connect to the Internet and if you open Device Manager then you won’t see the Network Adapter tab.
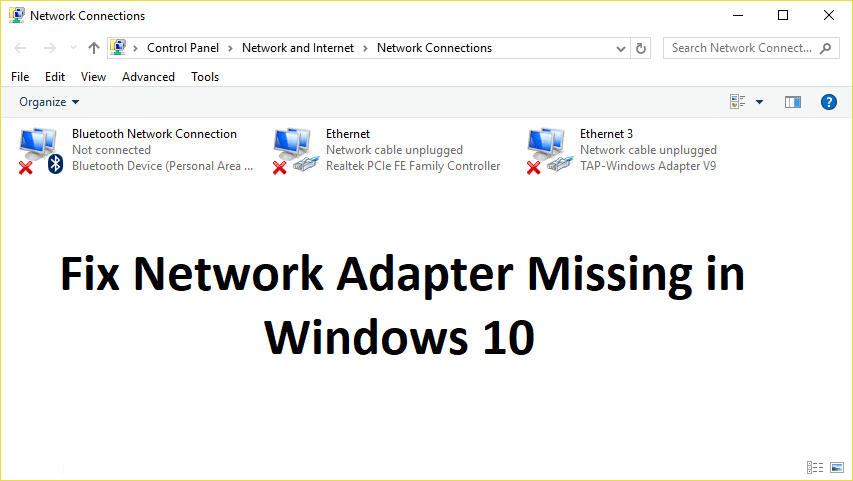
These are the reasons behind the Network Adapter missing issue:
- Network adapter missing in Device manager
- No Network Adapters showing in Device Manager
- Network Adapter Not Detected
- Network Adapter Not Found Windows 10
- No Network Adapter In Device Manager
The main cause of this issue seems to be outdated, incompatible or corrupted Network Adapter drivers. If you have recently upgraded from previous versions of Windows then it’s possible that the old drivers will not work with the new Windows and hence the issue. So without wasting any time let’s see how to actually Fix Network Adapter Missing in Windows 10 issue with the below-listed troubleshooting steps.
Note: Just make sure to uninstall any VPN software on your PC before continuing.
Windows 10до жок тармак адаптерин оңдоо
Бир нерсе туура эмес болуп калса, калыбына келтирүү чекитин түзүүнү унутпаңыз.
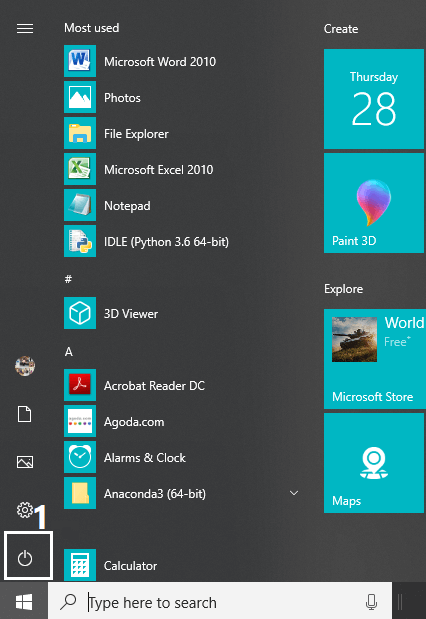
Method 1: Reboot your Computer
Most of us know about this very basic trick. Rebooting your computer can sometimes fix any software conflict by giving it a fresh start. So if you are someone who would rather put their computer on sleep, restarting your computer is a good idea.
1. чыкылдатып баштоо менюсу анан басып Кубат баскычы төмөнкү сол бурчта жеткиликтүү.
2. Андан кийин, чыкылдатыңыз Кайра жүргүзүү тандоосу менен компьютериңиз өзүн өчүрүп күйгүзөт.
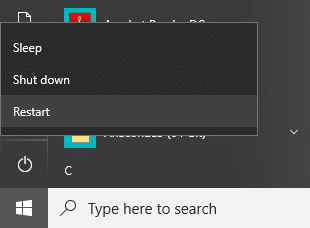
Компьютер кайра жүктөлгөндөн кийин, көйгөйүңүз чечилгенби же жокпу, текшериңиз.
Method 2: Flush DNS and Reset Winsock Components
1. Open elevated Command Prompt.
2. Эми төмөнкү буйрукту териңиз жана ар биринин артынан Enter баскычын басыңыз:
ipconfig /-релиз
ipconfig / flushdns
ipconfig / кайрадан

3. Again open Command Prompt and type the following command one by one and hit enter after each one:
ipconfig /flushdns nbtstat –r netsh int ip reset netsh winsock баштапкы абалга келтирүү
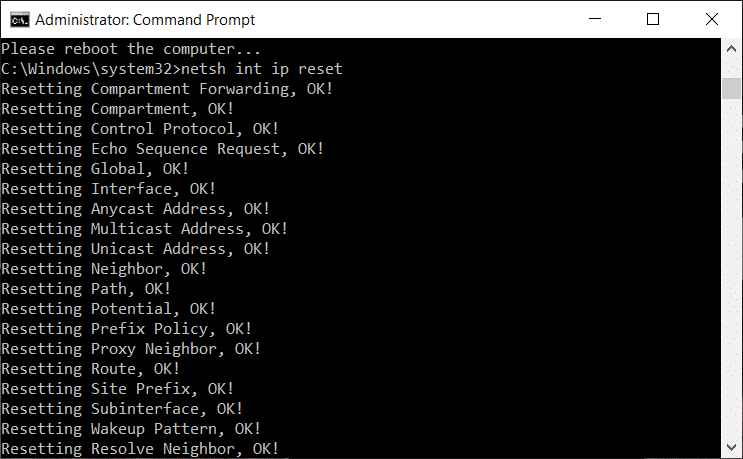
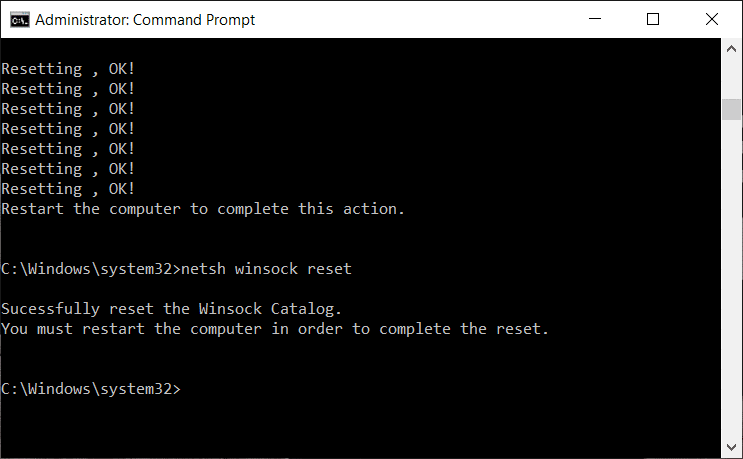
4. Өзгөртүүлөрдү колдонуу үчүн өчүрүп күйгүзүңүз. DNS тазалоо окшойт Fix Network Adapter Driver Issues on Windows 10.
Method 3: Run WWAN AutoConfig Service
1. Windows баскычын + R басып, анан териңиз services.msc -ди.

2. Табуу WWAN AutoConfig Service in the list (press W to reach to the end of the list quickly).
3. Эки жолу чыкылдатыңыз WWAN AutoConfig Service.
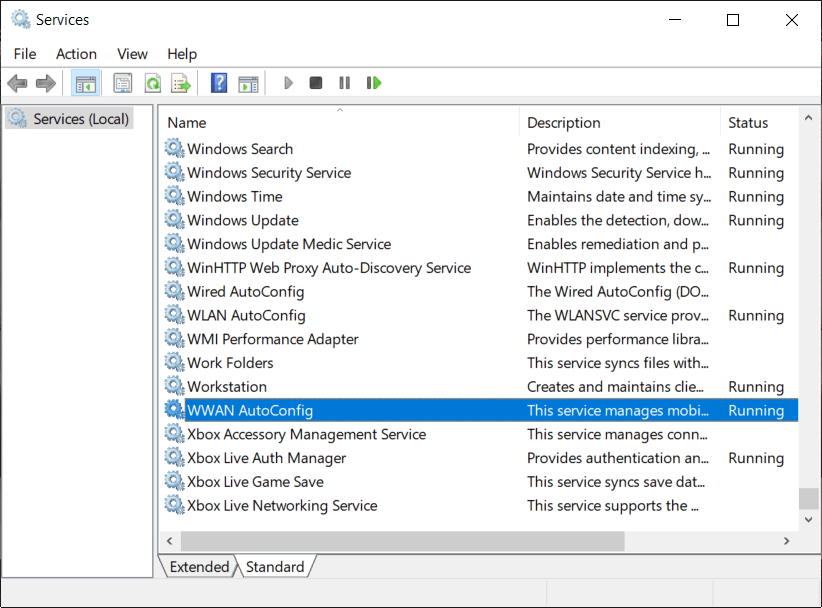
4. If the service is already running then click on Stop, then from the Startup type drop-down select Автоматтык.
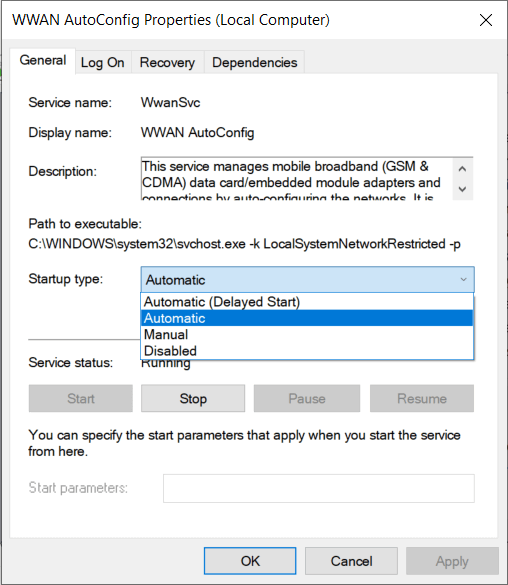
5. Click Apply followed by OK.
6. чыкылдатуу менен WWAN AutoConfig Service жана тандоо Баштоо.
Метод 4: Тармак адаптеринин драйверлерин жаңыртуу
1. Press Windows key + R and type “devmgmt.msc” in Run dialogue box to open аппарат менеджери.

2. Кеңейтүү желе ыктагычтары, андан кийин өзүңүздүн оң баскычты басыңыз Wi-Fi контроллери (мисалы, Broadcom же Intel) жана тандаңыз Драйвер программасын жаңыртыңыз.

3. Эми “Search for automatically for updated driver software".
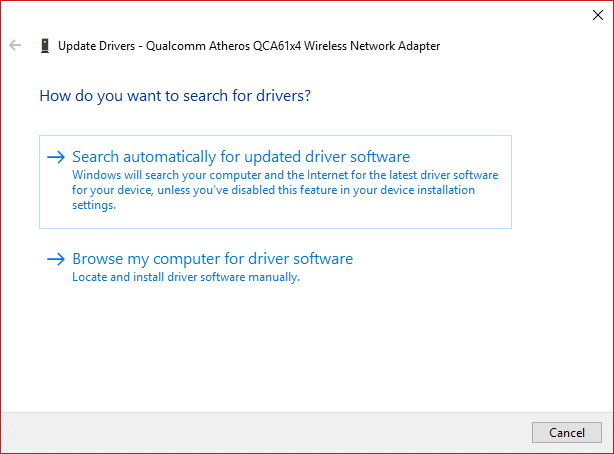
4. Азыр Windows will automatically search for the Network driver update and if new update is found, it will automatically download and install it.
5. Once finished, close everything and reboot your PC.
6. If you’re still facing the Network Adapter Missing in Windows 10 issue, then again right-click on your WiFi controller and select Драйверди жаңылоо Түзмөк башкаргычында.
7. Now, in the Update Driver Software Windows, select “айдоочу ЭЭМ үчүн программага Попса карап чыгуу.«

8. Эми “Мен компьютеримдеги жеткиликтүү драйверлердин тизмесинен тандап алайын.«

9. аракет кыл update drivers from the listed versions (make sure to checkmark compatible hardware).
10. If the above didn’t work then go to өндүрүүчүнүн сайты айдоочуларды жаңыртуу.

11. Download and install the latest driver from the manufacturer’s website then restart your PC.
Method 5: Uninstall Network Adapter Drivers
1. Windows баскычын + R басып, андан соң "devmgmt.msc” жана Түзмөк башкаргычын ачуу үчүн Enter баскычын басыңыз.
2. Тармак адаптерлерин жайып, табыңыз тармак адаптериңиздин аталышы.
3. Сизге ишениңиз адаптердин атын жазып алыңыз бир нерсе туура эмес болуп калса.
4. Right-click on your network adapter and uninstall it.

5. It will ask for confirmation Ооба тандаңыз.
6. Restart your PC and Windows will automatically install the network adapter drivers again.
7. If the drivers are not installed automatically then again open the Device Manager.
8. From the Device Manager menu, click on иш-аракеттер анда чыкылдатыңыз "аппараттык өзгөрүүлөргө издөө".

Метод 6: Windows жаңыртылганын текшериңиз
1. басма сөз Windows ачкычы + I to open Settings then click on Жаңыртуу жана Коопсуздук.
![]()
2. From the left-hand side, menu click on Windows Update.
3. Now click on the “билүү үчүн текшерүү” баскычын басып, жеткиликтүү жаңыртууларды текшериңиз.

4. If any updates are pending then click on Жаңыртууларды жүктөп алыңыз жана орнотуңуз.

5. Once the updates are downloaded, install them and your Windows will become up-to-date.
6. After the updates are installed reboot your PC to save changes.
Method 7: Run Network Adapter Troubleshooter
1. Орнотууларды ачуу үчүн Windows баскычын + I басыңыз, андан кийин басыңыз Жаңыртуу жана Коопсуздук.
![]()
2. From the left-hand menu select Көйгөйлөрдү чечүү.
3. Under Troubleshoot click on Интернетке туташуулар анан чыкылдатуу Кыйынчылыктарды жоюуну иштетүү.

4. Мүчүлүштүктөрдү аныктагычты иштетүү үчүн экрандагы кийинки нускамаларды аткарыңыз.
5. If the above didn’t fix the issue then from the Troubleshoot window, click on Network адаптер анан басып Кыйынчылыктарды жоюуну иштетүү.
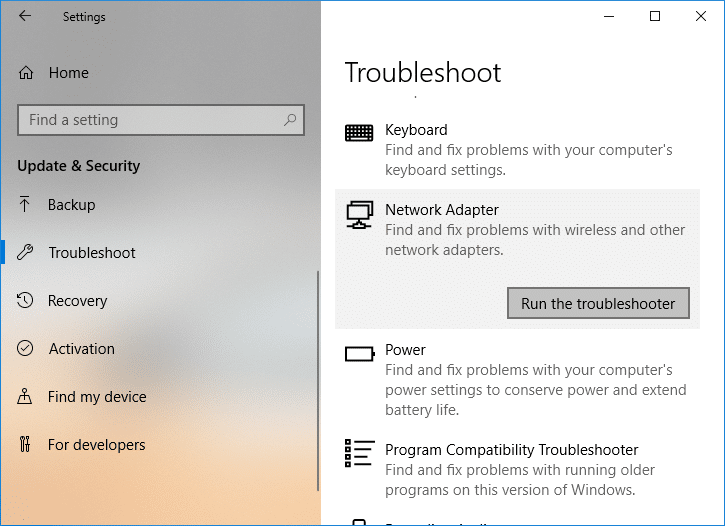
5. Өзгөртүүлөрдү сактоо үчүн компьютериңизди өчүрүп күйгүзүңүз жана мүмкүнбү же жокпу, көрүңүз fix the Network Adapter Missing issue.
Метод 8: Intel PROSet/Зымсыз программасын орнотуу
Кээде көйгөй эскирген Intel PROSet Программасынан улам келип чыгат, ошондуктан аны жаңыртып жаткандай сезилет fix Network Adapter Missing in Windows 10 issue. Ошондуктан, бул жакка жана PROSet/Wireless Программасынын эң акыркы версиясын жүктөп алып, аны орнотуңуз. Бул Windowsтун ордуна Wi-Fi туташууңузду башкарган үчүнчү тараптын программалык камсыздоосу жана PROset/Wireless Программасы эскирип калса, драйверлердин көйгөйүн жаратышы мүмкүн. Зымсыз тармак адаптери. Hence, read How to Update Network Adapter Drivers on Windows 10.
Метод 9: Тармакка туташууну баштапкы абалга келтирүү
1. Орнотууларды ачуу үчүн Windows баскычын + I басыңыз, андан кийин басыңыз Тармак жана Интернет.

2. From the left-hand menu select Статус.
3. Now scroll down and click on Тармакты баштапкы абалына келтирүү түбүндө.

4. Дагы "чыкылдатыңызэми кайра орнотуу” under Network reset section.

5. This will successfully reset your network adapter and once it is complete the system will be restarted.
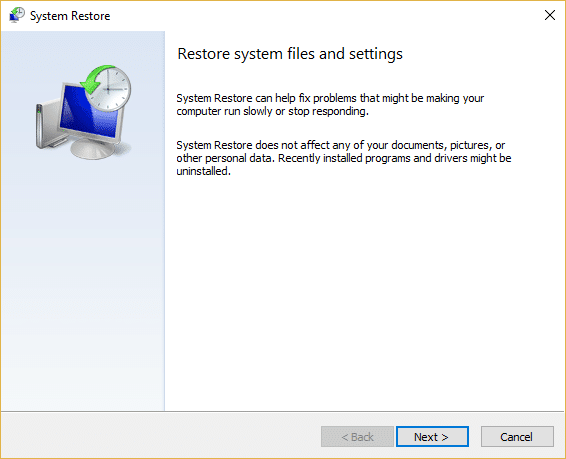
Метод 10: Системаны калыбына келтирүү
Системаны калыбына келтирүү дайыма катаны чечүүдө иштейт, ошондуктан Системаны калыбына келтирүү бул катаны оңдоого сөзсүз жардам берет. Ошентип, убакытты текке кетирбестен, системаны калыбына келтирүү үчүн иштетиңиз resolve Network Adapter Missing issue.
Method 11: Using elevated Command Prompt
1. Windows Key + X баскычтарын басып, анан тандаңыз Команда киргизүүгө чакыруу (Admin).

2. cmdге төмөнкү буйрукту терип, Enter баскычын басыңыз:
netcfg –s n
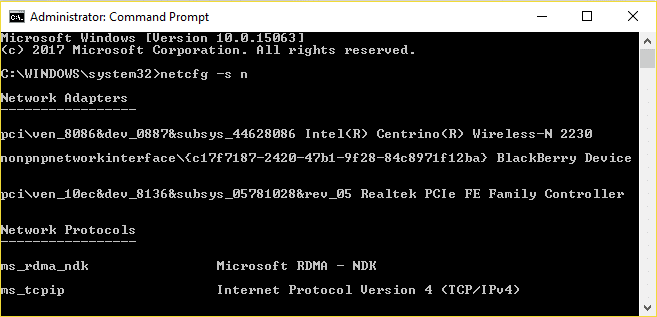
3. This will display a list of networking protocols and in that list find DNI_DNE.
4. If DNI_DNE is listed then type the following command into cmd:
reg жок кылуу HKCRCLSID {988248f3-a1ad-49bf-9170-676cbbc36ba3} / va / f
netcfg -v -u dni_dne
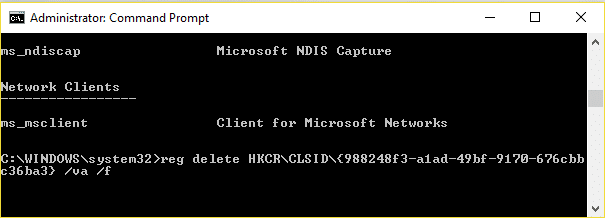
5. If you don’t see DNI_DNE listed then only run the command netcfg -v -u dni_dne.
6. Now if you receive the error 0x80004002 after trying to run the above command then you need to delete the above key manually.
7. Windows баскычын + R басып, анан териңиз regedit -ди.

8. Navigate to the following Registry Key:
HKEY_CLASSES_ROOTCLSID{988248f3-a1ad-49bf-9170-676cbbc36ba3}
9. Delete this key and then again type netcfg -v -u dni_dne command in cmd.
10. Өзгөртүүлөрдү сактоо үчүн компьютериңизди өчүрүп күйгүзүңүз.
Сизге сунушталган:
Бул сиз ийгиликтүү болдуңуз Windows 10до жок тармак адаптерин оңдоо бирок сизде дагы эле бул пост боюнча кандайдыр бир суроолор болсо, анда аларды комментарий бөлүмүнөн сурасаңыз болот.

