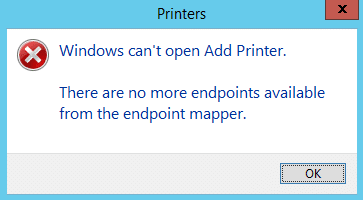
Fix There are no more endpoints available from the endpoint mapper: If you’re facing this error then this means either you are trying to install a printer or you’re sharing your drive within your network. Generally ‘No More Endpoints Available’ error occur when you try to join a domain but the Windows services are corrupted and therefore, conflicting with other services which won’t let you join that particular domain and ultimately causing the error. Anyway, this error is very annoying and that’s why troubleshooter is here to fix this error via the following troubleshooting steps.
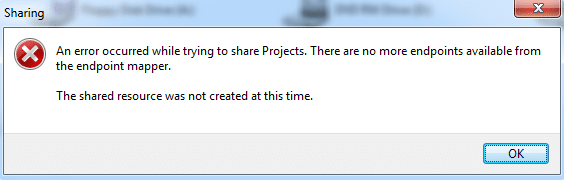
When attempting to join a client to an Active Directory domain, you may receive the following error:
The following error occurred attempting to join the domain <domain>:
There are no more endpoints available from the endpoint mapper.
Error 1753: There are no more endpoints available from the endpoint mapper.
Соңку чекиттин картасынан башка акыркы чекиттер жок [SOLVED]
Бир нерсе туура эмес болуп калса, калыбына келтирүү чекитин түзүүнү унутпаңыз.
Method 1: Delete the Internet key to remove RPC restriction
1.Press Windows Key + R анан териңиз regedit жана реестр редакторун ачуу үчүн Enter баскычын басыңыз.

2. Төмөнкү реестр ачкычына өтүңүз:
ComputerHKEY_LOCAL_MACHINESoftwareMicrosoftRpcInternet
3. Чычкандын оң баскычын басыңыз Internet key жана тандоо Жок кылуу.
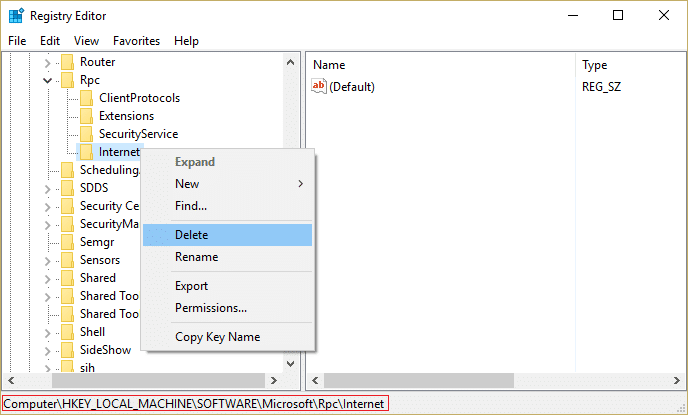
4.Өзгөртүүлөрдү сактоо үчүн компьютериңизди кайра жүктөңүз.
Method 2: Verify that Remote Procedure Call (RPC) Services are Started
1.Press Windows Key + R анан териңиз services.msc -ди.

2.Locate the following services:
Алыскы Процедуралык Чакыруу
Remote Procedure Call Locator
ByProcessManager
If you are trouble adding a printer then make sure following services are also running:
Басып чыгаруу спулери
DCOM Server Process Launcher
RPC Endpoint Mapper
3.Right-click and select касиеттери for above services.
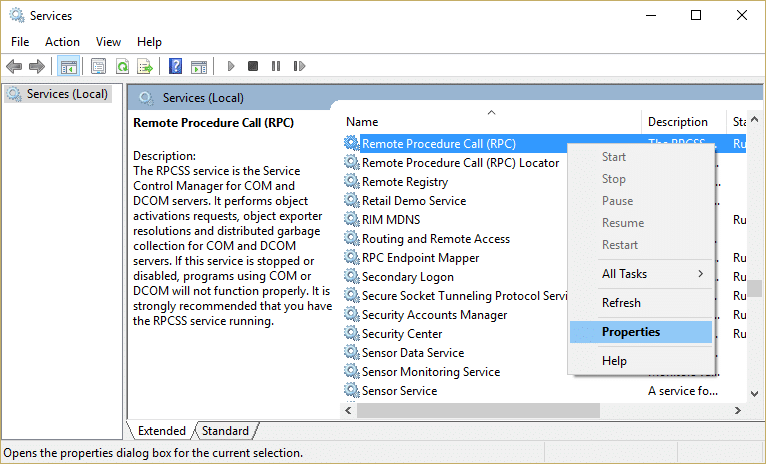
4.Next, make sure the Startup type is Automatic жана services are running.
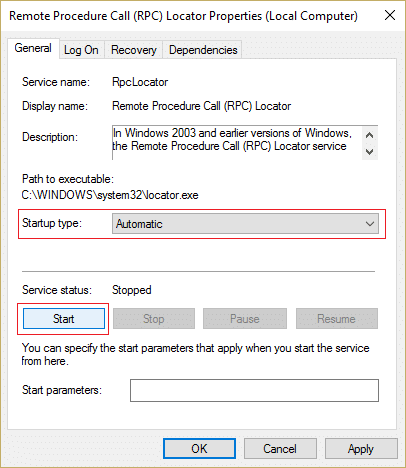
5.If the above services are stopped make sure to Run them from properties window.
6.Reboot your PC to save changes and the error “There are no more endpoints available from the endpoint mapper” may be resolved.
Method 3: Temporary Disable Antivirus жана Firewall
Кээде антивирус программасы себеп болушу мүмкүн “There are no more endpoints available from the endpoint mapper” and in order to verify this is not the case here, you need to disable your antivirus for a limited time so that you can check if the error still appears when the antivirus is off.
1. Чычкандын оң баскычын басыңыз Антивирус программасынын сөлөкөтү системалык тактадан жана тандаңыз Өчүрүү.

2.Андан кийин, кайсы убакыт алкагын тандаңыз Антивирус өчүрүлгөн бойдон калат.

Эскертүү: мүмкүн болгон эң аз убакытты тандаңыз, мисалы 15 мүнөт же 30 мүнөт.
3.Аткарылгандан кийин, дагы бир жолу WiFi тармагына туташууга аракет кылып, ката чечилген же жокпу, текшериңиз.
4.Windows Key + I баскычтарын басыңыз, анан тандаңыз Control Panel.

5. Кийинки, чыкылдатыңыз Система жана коопсуздук.
6.Андан кийин басыңыз Windows Firewall.

7.Эми сол терезе панелинен Windows Firewall күйгүзүү же өчүрүү баскычын чыкылдатыңыз.

8.Windows Firewall өчүрүү тандаңыз жана компьютериңизди өчүрүп күйгүзүңүз. Again try to connect to the WiFi network and see if the issue is resolved or not.
Эгерде жогорудагы ыкма иштебесе, брандмауэрди кайра күйгүзүү үчүн дал ошол эле кадамдарды аткарыңыз.
Method 4: Run Print Troubleshooter
1.Windows Издөө тилкесине "көйгөйлөрдү чечүү" деп жазыңыз жана басыңыз Кыйынчылыктарды оңдоо.

2.Next, сол терезе панелинен тандоо Баарын көрүү.
3.Андан кийин компьютер көйгөйлөрүн чечүү тизмесинен тандаңыз Принтер.

4.Экрандагы нускамаларды аткарыңыз жана Принтердин Мүчүлүштүктөрүн жоюучуну иштетиңиз.
5.Restart your PC and the error “There are no more endpoints available from the endpoint mapper” may be resolved.
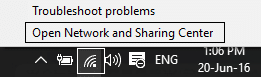
Method 5: Change advanced sharing settings
1.Right-click on Wireless icon on system tray and click on Open Тармак жана бөлүшүү борбору.
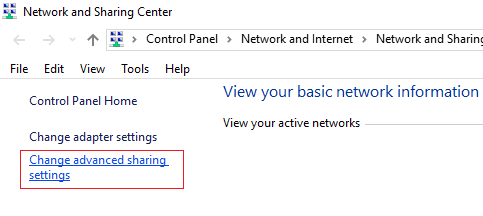
2.Click жөнүндө өнүккөн бөлүшүү тууралоолорун өзгөртүү in the left-hand window.
3.Enable the Network discovery, File and printer sharing and Public folder.
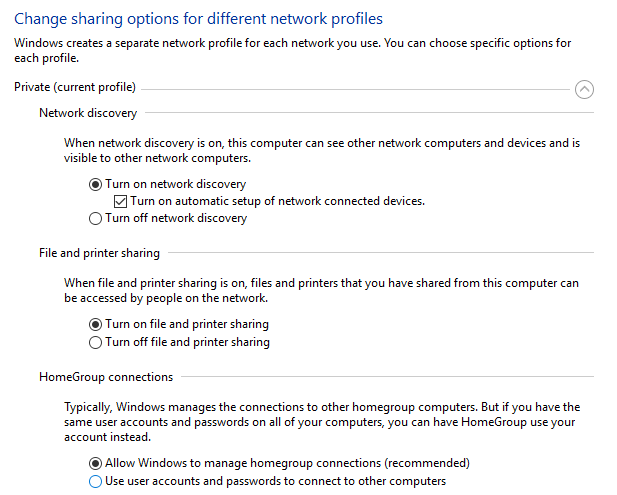
4.Click Save changes and close everything. Reboot your PC to save changes.
Method 6: Registry fix for Sharing error
1. Жүктөө MpsSvc.reg жана BFE.reg files. Double-click on them to run and to add these files to the registry.
2.Өзгөртүүлөрдү сактоо үчүн компьютериңизди кайра жүктөңүз.
3.Press Windows Key + R анан териңиз regedit жана реестр редакторун ачуу үчүн Enter баскычын басыңыз.
4.Андан кийин, төмөнкү реестр ачкычына өтүңүз:
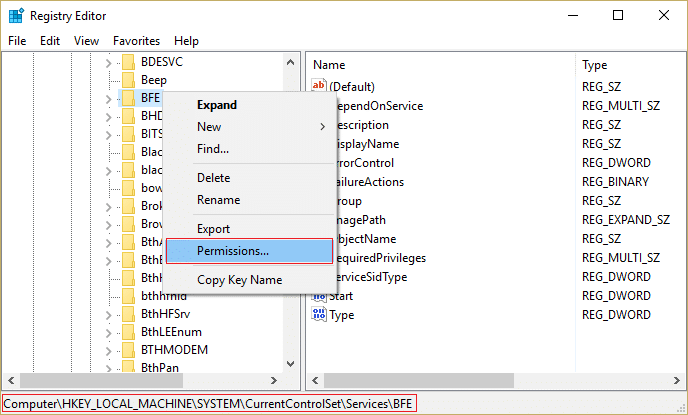
ComputerHKEY_LOCAL_MACHINESYSTEMCurrentControlSetServicesBFE
5.Right-click the BFE key and select Permissions.
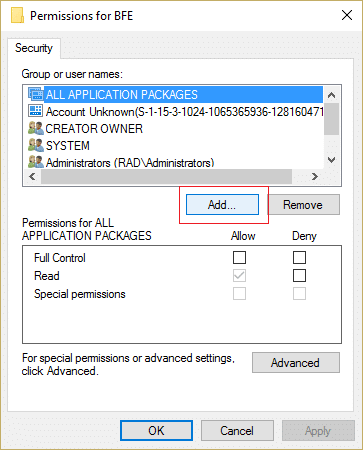
6.In the next window that opens, click the Add button.
7.Type “Ар бир адам” (without quotes) under the field Enter the object names to select and then click on Аттарды текшерүү.
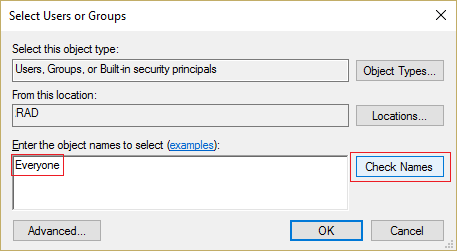
8.Now once the name is verified click OK.
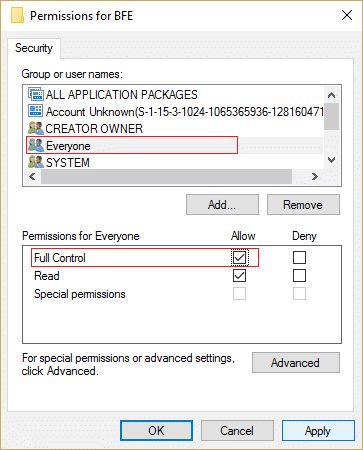
9.Everyone should be now added to the Group or user names section.
10.Тандоону унутпаңыз Ар бир адам from the list and check mark толук Control option in Allow column.
11. Колдонуу жана андан кийин OK баскычын басыңыз.
12.Press Windows Key + R анан териңиз services.msc -ди.
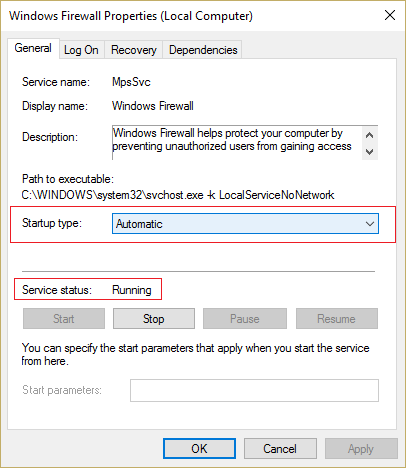
13.Find the below services and right-click on them then select касиеттери:
Filtering Engine
Windows Firewall
14.Enable them both in the Properties window (click on Start) and make sure their Startup түрү коюлду Автоматтык.
15.That’s it you may have Fix There are no more endpoints available from the endpoint mapper but if not then run SFC and CHKDSK in the next step.
Метод 7: Системалык файлдарды текшергичти (SFC) иштетүү жана Дискти текшерүү (CHKDSK)
1.Press Windows Key + X анан басыңыз Command Prompt (Admin).

2. Эми cmdге төмөнкүнү териңиз жана enter баскычын басыңыз:
Sfc /scannow sfc /scannow /offbootdir=c: /offwindir=c:windows

3.Жогорудагы процесс бүткүчө күтө туруңуз жана компьютериңизди өчүрүп күйгүзүңүз.
4.Андан кийин, бул жерден CHKDSK иштетиңиз Текшерүү Disk Utility (CHKDSK) менен Файл системасынын каталарын оңдоо.
5.Жогорудагы процессти аягына чыгарыңыз жана өзгөртүүлөрдү сактоо үчүн компьютериңизди кайра жүктөңүз.
Метод 8: DISM иштетүү (Deployment Image Servicing and Management)
1.Press Windows Key + X анан тандоо Command Prompt (Admin).

2. cmdге төмөнкү буйрукту киргизиңиз жана enter баскычын басыңыз:
маанилүү иш: DISM болгондо, сизде Windows орнотуу медиасы даяр болушу керек.
DISM.exe /Online /Cleanup-Image /RestoreHealth /Булак:C:RepairSourceWindows /LimitAccess
Эскертүү: C:RepairSourceWindows'ту оңдоо булагыңыздын жайгашкан жери менен алмаштырыңыз

2.Кирүү баскычын басып, жогорудагы буйрукту иштетиңиз жана процесстин аягына чыгышын күтүңүз, адатта, 15-20 мүнөт талап кылынат.
ЭСКЕРТҮҮ: Эгерде жогорудагы буйрук иштебесе, анда төмөндө аракет кылып көрүңүз: Dism /Image:C:offline /Cleanup-Image /RestoreHealth /Source:c:testmountwindows Dism /Online /Cleanup-Image /RestoreHealth /Source:c:testmountwindows /LimitAccess
3. DISM процесси аяктагандан кийин, cmdге төмөнкүнү териңиз жана Enter баскычын басыңыз: СЭМБ / scannow
4.Let System File Checker run and once it’s complete, restart your PC. Check if the Windows 10 Slow Shutdown problem is resolved or not.
Сизге сунушталган:
Бул сиз ийгиликтүү болдуңуз Fix There are no more endpoints available from the endpoint mapper бирок бул пост боюнча дагы эле кандайдыр бир суроолоруңуз болсо, аларды комментарий бөлүмүнөн сурасаңыз болот.

