Enable or Disable Secure Login in Windows 10: Secure Login is a security feature of Windows 10 which when enabled requires users to press Ctrl + Alt + delete on the lock screen before they can sign in using their username and password in Windows 10. Secure Sign just adds an extra layer of security to your sign-in screen which is always a good thing to make your PC is more secure. The main problem occurs when a virus or malware programs mimic a sign-in screen in order to retrieve username & password information from users. In such cases, Ctrl + Alt + delete ensures that you are seeing the authentic sign-in screen.

This security setting is disabled by default and thus you need to follow this tutorial in order to enable the secure logon. There are many additionals benefit of using secure logon so it’s recommended you enable it. So without wasting any time let’s see How to Enable or Disable Secure Login in Windows 10 which requires the user to press Ctrl+Alt+Delete on the lock screen before signing in to Windows 10.
Enable or Disable Secure Login in Windows 10
Fac ut punctum in casu restituat quod siet.
Method 1: Enable or Disable Secure Sign-in in Netplwiz
1.Press Windows Key + R tunc typus netplwiz quod ledo Penetro aperire Rationes User.
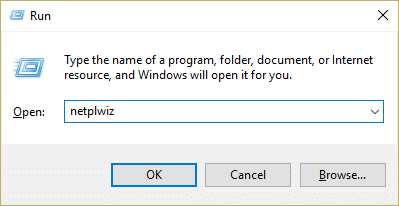
2.Switch to Provectus tab et checkmark “Require users to press Ctrl+Alt+Delete” box at the bottom under the Secure sign-in to enable secure login in Windows 10.
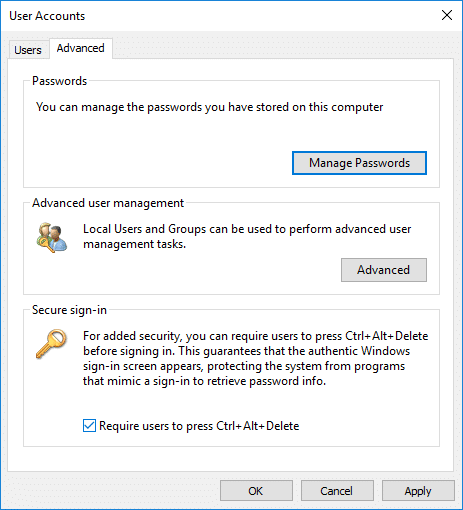
3.Click Applicare sequitur OK.
4.If in future you need to disable secure login then simply Licens "Require users to press Ctrl+Alt+Delete"Buxum.
Method 2: Enable or Disable Secure Login in Local Security Policy
Nota: This method will only work for Windows Pro, Education and Enterprise edition. For Windows 10 Home users, you can follow skip tis method inseatd follow method 3.
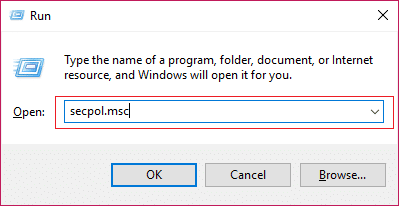
1.Press Windows Key + R tunc typus secpol.msc quod ledo Penetro.
2.Navigate to the following policy:
Locus Politiae> Securitatis Options
3. Fac eligere Securitas Options then in the right window pane double-click on “Interactive Logon: Do not require CTRL+ALT+DEL” to open its properties.
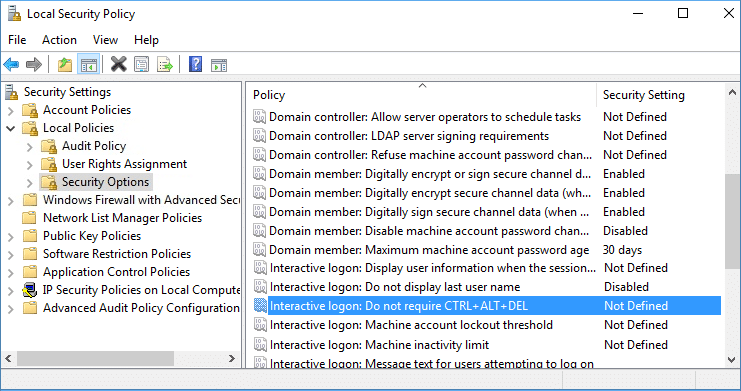
4.Now to enable secure login in Windows 10, select disabled et tunc deprime Applicare sequitur OK.
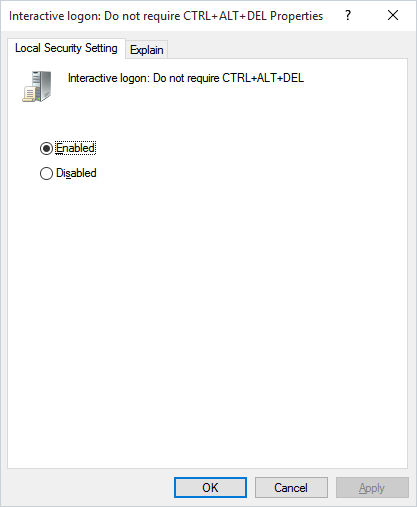
5.If you need to disable secure login then select Enabled and click OK.
6.Close Local Security Policy window and restart your PC.
Method 3: Enable or Disable Secure Login in Windows 10 using Registry Editor
1.Press Windows Key + R tunc typus regedit quod ledo Penetro.

2.Navigate in sequentibus subcriptio key:
HKEY_LOCAL_MACHINESOFTWAREMicrosoftWindows NTCurrentVersionWinlogon
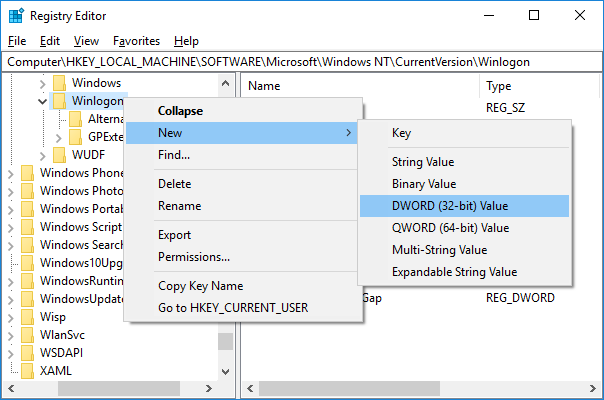
3. Fac eligere Winlogon then in the right window pane double-click on DisableCAD.

Nota: If you can’t find the DisableCAD then right-click on Winlogon then select New> DWORD (XXXII-frenum) Value and name this DWORD as DisableCAD.
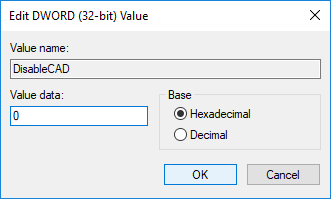
4.Now in the value data field type the following and click OK:
To Disable Secure Logon: 1
To Enable Secure Logon: 0
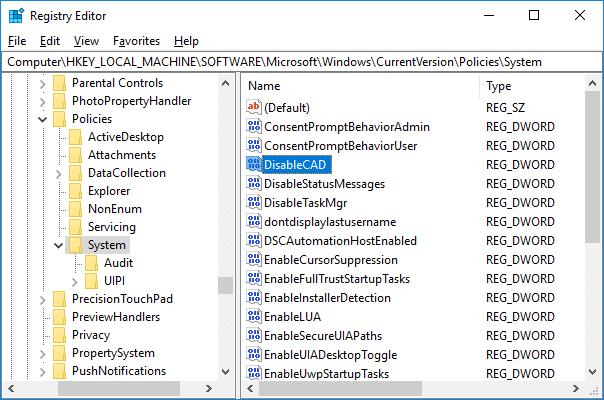
5.Next, navigate to the following registry key and follow the steps 3 & 4 here:
HKEY_LOCAL_MACHINESOFTWAREMicrosoftWindowsCurrentVersionPoliciesSystem
6.Close Registry Editor then restart your PC to save changes.
Recommended:
Hoc est quod bene didicisti How to Enable or Disable Secure Login in Windows 10 sed si aliquas quaestiones de hac doceo adhuc habes, tunc liberum senties eas in sectione commenti interrogare.

![Add a Printer in Windows 10 [GUIDE]](https://lbsite.org/wp-content/uploads/2023/02/Add-a-Printer-in-Windows-10.png "Add a Printer in Windows 10 [GUIDE]")