Process and Compressed Memory is a Windows 10 feature responsible for memory compression (also referred to as RAM compression and memory compression). This feature basically utilizes data compression to reduce the size or number of paging request to and from the auxiliary storage. In short, this feature is designed to take less amount of disk space and memory but in this case the System and Compressed Memory process start using 100% Disk and Memory, causing the affected PC to become slow.

In Windows 10, a compressions store is added to the concept of Memory Manager, which is an in-memory collection of compressed pages. So whenever the memory starts to fill up, the System and Compressed Memory process will compress the unused pages instead of writing them to the disk. The benefit of this is the amount of memory used per process is reduced, which allows Windows 10 to maintain more programs or apps in physical memory.
The problem appears to be incorrect Virtual Memory settings. Someone changed the paging file size from automatic to a particular value, virus or malware, Google Chrome or Skype, corrupt system files etc. So without wasting any time let’s see how to actually Fix 100% Disk Usage by System and Compressed Memory with the help of below-listed troubleshooting guide.
[SOLVED] 100% Disk Usage by System and Compressed Memory
Fac ut punctum restituat, si modo aliquid errat.
Modus IV: Restituo Corrupti Ratio Lima
1. Open To order Promptus. A user potest praestare hunc gradum quaerendo 'CmdoptH' et tunc premere Intra.

2. Nunc typus sequentia in cmd et hit intrant;
Sfc / scannow sfc / scannow / offbootdir=c: /offwindir=c: fenestras (si supra fallit, tenta hoc unum)
![SFC scan now command prompt | [SOLVED] 100% Disk Usage by System and Compressed Memory](https://lbsite.org/wp-content/uploads/2023/01/SFC-scan-now-command-prompt.png)
3. Exspecta processum praedictum ad perficiendum et semel factum, sileo PC tuum.
4. Iterum aperi cmd et typus mandatum sequentem et post unumquemque hit ingredere;
Dism / Online / Tersus-Image / CheckHealth Dism / Online / Tersus-Image / ScanHealth Dism / Online / Tersus-Image /RestoreHealth

5. DiSM iubeat ut perficiat et opperiatur.
6. Si superius mandatum non operatur tunc experiri in inferius:
Dism /Image:C:offline / Tersus-Image /RestoreHealth /Source:c:testmountwindows Dism / Online / Tersus-Image / RestoreHealth / Source: c: testmountwindows / LimitAccess
Nota: Repone C: RepairSourceWindows cum fonte reparationis (Fenestrae Installation or Recuperatio Disc).
7. Reboot vestram PC servare mutationes et vide si vales Fix 100% Disk Usage by System and Compressed Memory Issue.
Method 2: Set Correct Paging File Size
1. Press Fenestra Key + R tunc typus sysdm.cpl quod ledo Penetro aperire Ratio Properties.

SWITCH PB 2. ad Provectus tab ad hanc paginam deindeque deprime Occasus sub euismod.

3. Again switch to the Advanced tab and click Change under Virtual Memory.

4. Checkmark “Sponte administrare paging lima amplitudo pro omnibus foras mittit."
![Checkmark Automatically manage paging file size for all drives | [SOLVED] 100% Disk Usage by System and Compressed Memory](https://lbsite.org/wp-content/uploads/2023/02/Checkmark-Automatically-manage-paging-file-size-for-all-drives.png)
5. Click OK, then click Apply followed by OK.
6. Select Yes to Restart your PC to save changes.
Modus XI: inactivare Fast Satus
1. Press Fenestra Key + R tunc typus imperium ac hit Intra aperire Imperium Panel.

2. Click Hardware et Sanus tunc click Vox Bene.

3. Deinde e fenestra sinistra pane selecto "Elige quod bullarum non virtute."

4. Iam click "Mutata occasus, qui sunt currently unavailable."

5. Licens "Illuminationes ieiunium startup"And click Nisi mutat.
![Uncheck Turn on fast startup | [SOLVED] 100% Disk Usage by System and Compressed Memory](https://lbsite.org/wp-content/uploads/2023/01/Uncheck-Turn-on-fast-startup.png)
6. Restart your PC and see if you’re able to Fix 100% Disk Usage by System and Compressed Memory Issue.
Method 4: Disable Superfetch Service
1. Press Fenestra Key + R tunc typus services.msc quod ledo Penetro.

2. Reperio Super arcessere service from the list then right-click on it and select Substantia.

3. Under Service status, if the service is running, click on Prohibere.
4. Nunc, a Start up type drop-down select Disabled.

5. Click Applicare, sequitur OK.
6. Reboot vestram PC servare mutationes.
If the above method doesn’t disable Superfetch services then you can follow disable Superfetch using Registry:
1. Press Fenestra Key + R tunc typus regedit et intra hit ut Editor aperire Subcriptio.

2. navigare ad hoc subcriptio key:
HKEY_LOCAL_MACHINESYSTEMCurrentControlSetControlSession ManagerMemory ManagementPrefetchParameters
3. Make sure you have selected PrefetchParameters in dextra fenestra geminus click Admitte Superfetch et clavem change it’s value to 0 in the Value data field.

4. Click OK and close the Registry Editor.
5. Sileo vestri PC servare mutationes et vide si vales Fix 100% Disk Usage by System and Compressed Memory Issue.
Method 5: Adjust your PC for Best Performance
1. Press Fenestra Key + R tunc typus sysdm.cpl quod ledo Penetro aperire Ratio Properties.
SWITCH PB 2. ad Advanced tab et deprime occasus sub Euismod.
3. Under Visual Effects checkmark “Ad adjust optimus perficientur".

4. Click Applicare, sequitur OK.
5. Reboot your PC and see if you’re able to Fix 100% Disk Usage by System and Compressed Memory Issue.
Method 6: Kill the Speech Runtime Executable Process
1. Press CtrlTab + + Shift Esc Procurator Negotium mittere.
2. In processus tab, inveniet Speech Runtime Executable.
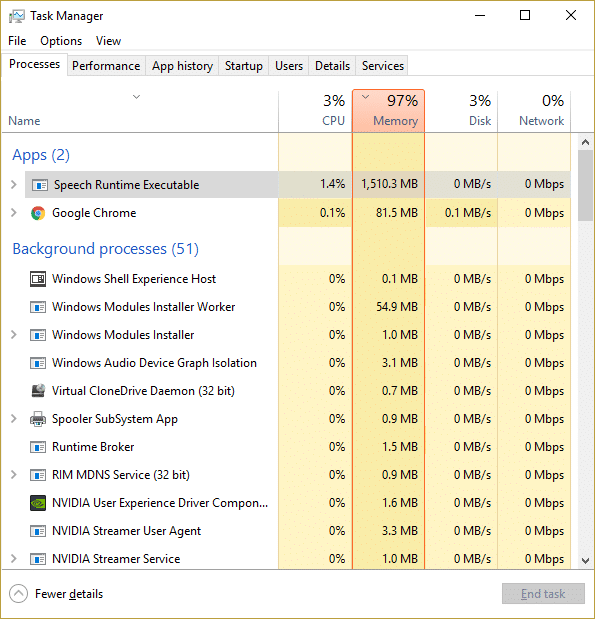
3. Ius-click in ea et eligere Negotium finem.
Modus III: Curre CCleaner et Malwarebytes
1. Download quod install CCleaner & Malwarebytes.
2. Currere Malwarebytes et rationi tuae noxiae imagini scandat. Si malware inveniatur, statim eas removebit.

3. Nunc currere CCleaner et eligere more Tersus.
4. sub Custom Tersus, select the Windows tab et checkmark defaltis ac click " analyze.
![Select Custom Clean then checkmark default in Windows tab | [SOLVED] 100% Disk Usage by System and Compressed Memory](https://lbsite.org/wp-content/uploads/2023/01/Select-Custom-Clean-then-checkmark-default-in-Windows-tab.png)
5. Cum Analyse perfecta est, fac certum te esse limas delendas removere.

6 denique click in Currere luctus puga pyga et CCleaner percurrat.
7. Ut porro ratio tua emundat; Subcriptio tab eligereatque ea quae sequuntur impediuntur;

8. Click in Scan pro Exitus button et permitte CCleaner ut scan, deinde deprime Fix Selectae Exitus puga pyga.
![Once scan for issues is completed click on Fix selected Issues | [SOLVED] 100% Disk Usage by System and Compressed Memory](https://lbsite.org/wp-content/uploads/2023/01/Once-scan-for-issues-is-completed-click-on-Fix-selected-Issues.png)
9 Cum CCleaner quaerit "Visne tergum mutationes subcriptio?" Ita eligere.
10. Cum tergum tuum compleverit, deprime Omnes figere Exitus Selectae puga pyga.
11. Sileo vestri PC servare mutationes.
Method 8: Change configuration of Google Chrome and Skype
Nam Google Chrome: Navigate to the following under Chrome: Settings > Show Advanced Settings > Privacy > Use a prediction service to load pages more quickly. Disable the toggle next to “Use a prediction service to load pages.”

Change configuration For Skype
1. Make sure you have exited Skype, if not end task from Task Manager for Skype.
2. Press Windows Key + R then type the following and click OK:
C:Program Files (x86)SkypePhone
3. Vox-click skype.exe et eligere Substantia.

4. Myers Security tab et click Edit.

5. select Omnes APPLICANDIS PACKAGES under Group or user names then checkmark Write sub Patitur.

6. Click Apply, followed by OK and see if you’re able to Fix 100% Disk Usage by System and Compressed Memory Issue.
Method 9: Set Correct Permission for System and Compressed Memory Process
1. Press Fenestra Key + R tunc typus Taskschd.msc and hit Enter to open Task Scheduler.

2. navigare ad hanc viam;
Task Scheduler Library > Microsoft > Windows > MemoryDiagnostic
![Double click on ProcessMemoryDiagnostic Events | [SOLVED] 100% Disk Usage by System and Compressed Memory](https://lbsite.org/wp-content/uploads/2023/02/Double-click-on-ProcessMemoryDiagnostic-Events.png)
3. Geminus click in ProcessMemoryDiagnostic Events hanc paginam deindeque deprime Integer lacinia, quam mutatio Group under Security Options.

4. Click Advanced hanc paginam deindeque deprime Find Now.

5. Select tuum propter administrator from the list then click OK.

6. Iterum click OK to add your administrator account.
7. Checkmark Priuilegiorum currere in excelsis hanc paginam deindeque deprime OK.

8. Follow the same steps for RunFullMemoryDiagnostic and close everything.
9. Reboot vestram PC servare mutationes.
Method 10: Disable System and Compressed Memory Process
1. Press Fenestra Key + R tunc typus Taskschd.msc quod ledo Penetro aperire Negotium Scheduler.
2. navigare ad hanc viam;
Task Scheduler Library > Microsoft > Windows > MemoryDiagnostic
3. Vox-click RunFullMemoryDiagnostic et eligere Disable.
![Right-click on RunFullMemoryDiagnostic and select Disable | [SOLVED] 100% Disk Usage by System and Compressed Memory](https://lbsite.org/wp-content/uploads/2023/02/Right-click-on-RunFullMemoryDiagnostic-and-select-Disable.png)
4. Close Task Scheduler and restart your PC.
Recommended:
Id est tibi bene Fix 100% Disk Usage by System and Compressed Memory sed si adhuc quaestiones de hac re habes, tunc liberum habes eas in sectione commenti interrogare.

