Fix The Service Couldn’t Be Started Windows Defender Error 0x80070422: Windows Defender is a malware protection software which is inbuilt into Windows 10. Now it is used widely by Windows users because it’s reliable, but in some cases, users also installed 3rd party Antivirus software such as Norton, Quick Heal etc which is not recommend because they corrupt the files of Windows Defender. Once you completely uninstall 3rd party antivirus you won’t be able to use Windows Defender properly because files required by it have already been corrupted and can no longer be used.
“The service couldn’t be started.
The service cannot be started, either because it is disabled or because it has no enabled devices associated with it.”
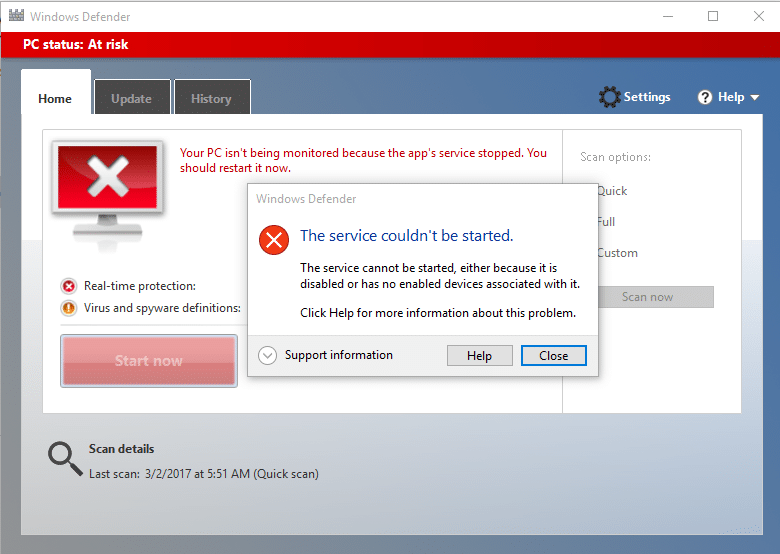
Windows Defender is turned off when you use a 3rd party Antivirus and once you uninstall the Antivirus software you won’t be able to turn ON Windows Defender. If you try to enable Windows Defender you will face the error “The Service Couldn’t Be Started” with error code 0x80070422. So without wasting any time let’s see how to actually Fix The Service Couldn’t Be Started Windows Defender Error 0x80070422 with the help of below-listed troubleshooting guide.
Fix The Service Couldn’t Be Started Windows Defender Error 0x80070422
ໃຫ້ແນ່ໃຈວ່າສ້າງຈຸດຟື້ນຟູພຽງແຕ່ໃນກໍລະນີທີ່ມີບາງຢ່າງຜິດພາດ.
ວິທີທີ່ 1: ດໍາເນີນການ SFC ແລະ CHKDSK
1.ກົດ Windows Key + X ແລ້ວກົດໃສ່ Command Prompt (Admin).

2. ຕອນນີ້ພິມໃສ່ໃນ cmd ແລະກົດ enter:
Sfc / scannow sfc /scannow /offbootdir=c: /offwindir=c:windows (ຖ້າຂ້າງເທິງນີ້ລົ້ມເຫລວ, ໃຫ້ລອງອັນນີ້)

3.ລໍຖ້າສໍາລັບຂະບວນການຂ້າງເທິງນີ້ເພື່ອສໍາເລັດຮູບແລະເຮັດເມື່ອ restart PC ຂອງທ່ານ.
4.ຕໍ່ໄປ, ແລ່ນ CHKDSK ຈາກທີ່ນີ້ ແກ້ໄຂຂໍ້ຜິດພາດຂອງລະບົບໄຟລ໌ດ້ວຍ Check Disk Utility(CHKDSK).
5.ໃຫ້ຂະບວນການຂ້າງເທິງນີ້ສໍາເລັດແລະອີກເທື່ອຫນຶ່ງ reboot PC ຂອງທ່ານເພື່ອຊ່ວຍປະຢັດການປ່ຽນແປງ.
Method 2: Temporarily Disable 3rd party Antivirus
1.ຄລິກຂວາໃສ່ປຸ່ມ ໄອຄອນໂປຣແກຣມຕ້ານໄວຣັສ ຈາກຖາດລະບົບແລະເລືອກ ປິດການໃຊ້ວຽກ

2.Next, ເລືອກເຟຣມທີ່ໃຊ້ເວລາສໍາລັບການທີ່ Antivirus ຈະຍັງຄົງຖືກປິດໃຊ້ງານ.

ຫມາຍເຫດ: ເລືອກຈໍານວນຫນ້ອຍທີ່ສຸດຂອງເວລາທີ່ເປັນໄປໄດ້ສໍາລັບການຍົກຕົວຢ່າງ 15 ນາທີຫຼື 30 ນາທີ.
3.Once done, again try to run Windows Defender and check if the error resolves or not.
4.ກົດ Windows Key + X ແລ້ວເລືອກ Control Panel

5.ຕໍ່ໄປ, ໃຫ້ຄລິກໃສ່ ລະບົບແລະຄວາມປອດໄພ.
6.ຫຼັງຈາກນັ້ນ, ໃຫ້ຄລິກໃສ່ Windows Firewall.

7.Now ຈາກປ່ອງຢ້ຽມຊ້າຍ pane ໃຫ້ຄລິກໃສ່ເປີດ Windows Firewall ຫຼືປິດ.

8.ເລືອກ ປິດ Windows Firewall ແລະ restart PC ຂອງທ່ານ. Again try to open Windows Defender and see if you’re able to Fix The Service Couldn’t Be Started Windows Defender Error 0x80070422.
ຖ້າວິທີການຂ້າງເທິງນີ້ບໍ່ໄດ້ຜົນ, ໃຫ້ແນ່ໃຈວ່າເຮັດຕາມຂັ້ນຕອນດຽວກັນເພື່ອເປີດ Firewall ຂອງທ່ານອີກເທື່ອຫນຶ່ງ.
ວິທີທີ 3: ໃຫ້ແນ່ໃຈວ່າ Windows ອັບເດດແລ້ວ
1.ກົດ Windows Key + I ຈາກນັ້ນເລືອກ ປັບປຸງແລະຄວາມປອດໄພ.

2.ຕໍ່ໄປ, ອີກເທື່ອຫນຶ່ງຄລິກ ກວດສອບການປັບປຸງ ແລະໃຫ້ແນ່ໃຈວ່າຈະຕິດຕັ້ງການອັບເດດທີ່ຍັງຄ້າງຢູ່.

3.ຫຼັງຈາກການປັບປຸງໄດ້ຖືກຕິດຕັ້ງ reboot PC ຂອງທ່ານແລະເບິ່ງວ່າທ່ານສາມາດ Fix The Service Couldn’t Be Started Windows Defender Error 0x80070422.
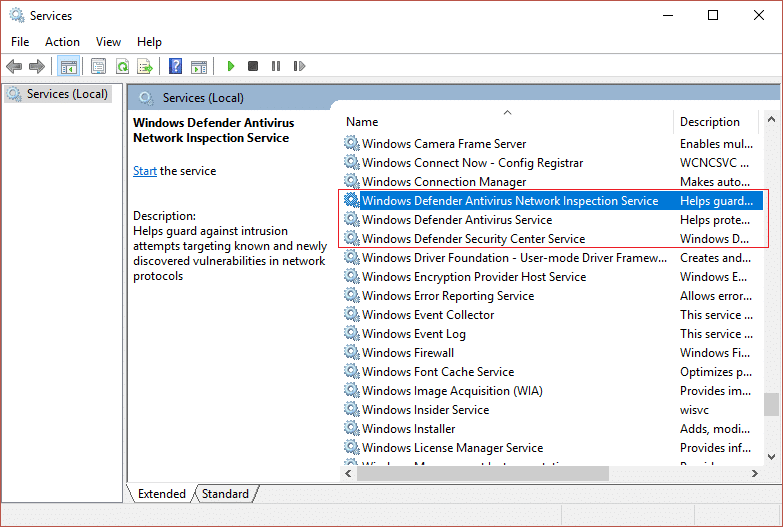
Method 4: Make sure Windows Defender service is set to Automatic
ຫມາຍເຫດ: If Windows Defender service is grayed out in Services Manager then follow this post.
1.ກົດ Windows Key + R ແລ້ວພິມ servicesmsc ແລະກົດ Enter.

2.Find the following services in the Services window:
Windows Defender Antivirus Network Inspection Service
Windows Defender Antivirus Service
Windows Defender Security Center Service
3.Double-click on each of them and make sure their Startup type is set to ອັດຕະໂນມັດ and click Start if the services are not already running.
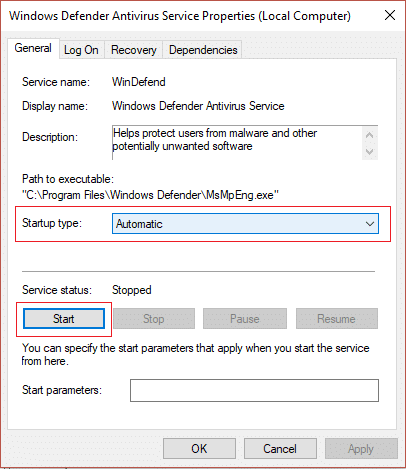
4.ກົດ Apply ຕາມດ້ວຍ OK.
5.Reboot PC ຂອງທ່ານເພື່ອບັນທຶກການປ່ຽນແປງແລະເບິ່ງວ່າທ່ານສາມາດ Fix The Service Couldn’t Be Started Windows Defender Error 0x80070422.
Method 5: Enable Windows Defender through Registry Editor
1.ກົດ Windows Key + R ແລ້ວພິມ regedit ແລະກົດ Enter.

2.ນຳທາງໄປຫາກະແຈການລົງທະບຽນຕໍ່ໄປນີ້:
HKEY_LOCAL_MACHINES ລະບົບເຄື່ອງຈັກການຂັບລົດການບໍລິການສຸຂະພາບດີ
3.Now ສິດຄລິກໃສ່ WinDefend ແລະເລືອກເອົາ ການອະນຸຍາດ.
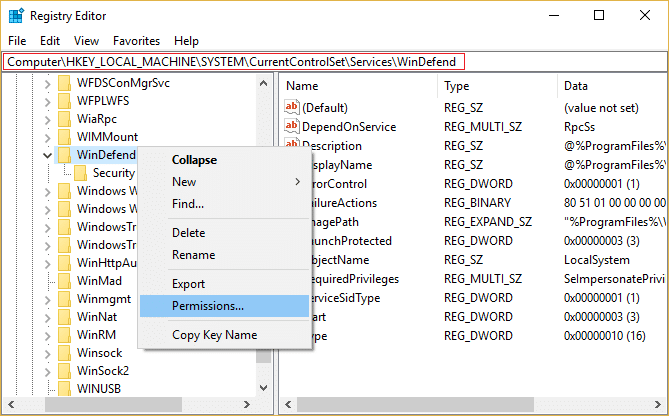
4.Follow this guide in order to take full control or ownership of the above registry key.
5.After that make sure you have selected WinDefend then in the right window double-click on Start DWORD.
6.Change the value to 2 in the value data field and click OK.
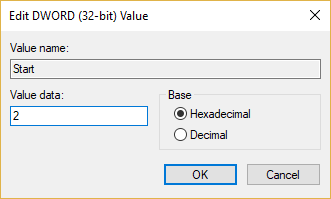
7.Close Registry Editor and reboot your PC.
8.Again try to enable Windows Defender and this time it should work.
ວິທີທີ່ 6: ດໍາເນີນການ CCleaner ແລະ Malwarebytes
1.ດາວໂຫລດແລະຕິດຕັ້ງ CCleaner & Malwarebytes.
2.ແລ່ນ Malwarebytes ແລະປ່ອຍໃຫ້ມັນສະແກນລະບົບຂອງທ່ານສໍາລັບໄຟລ໌ອັນຕະລາຍ.
3.ຖ້າຫາກວ່າ malware ຖືກພົບເຫັນ, ມັນຈະເອົາໃຫ້ເຂົາເຈົ້າອັດຕະໂນມັດ.
4.ຕອນນີ້ແລ່ນ CCleaner ແລະໃນສ່ວນ "Cleaner", ພາຍໃຕ້ແຖບ Windows, ພວກເຮົາແນະນໍາໃຫ້ກວດເບິ່ງການເລືອກຕໍ່ໄປນີ້ເພື່ອເຮັດຄວາມສະອາດ:

5.ເມື່ອໃດທີ່ທ່ານໄດ້ເຮັດໃຫ້ແນ່ໃຈວ່າຈຸດທີ່ເຫມາະສົມແມ່ນການກວດສອບ, ພຽງແຕ່ຄລິກໃສ່ ແລ່ນ Cleaner, ແລະໃຫ້ CCleaner ດໍາເນີນການຫຼັກສູດຂອງມັນ.
6. ເພື່ອເຮັດຄວາມສະອາດລະບົບຂອງທ່ານຕື່ມອີກເລືອກແຖບ Registry ແລະໃຫ້ແນ່ໃຈວ່າມີການກວດສອບຕໍ່ໄປນີ້:

7.ເລືອກ Scan for Issue ແລະອະນຸຍາດໃຫ້ CCleaner ສະແກນ, ຈາກນັ້ນຄລິກ ແກ້ໄຂບັນຫາທີ່ເລືອກ.
8. ເມື່ອ CCleaner ຖາມ “ທ່ານຕ້ອງການການປ່ຽນແປງສໍາຮອງຂໍ້ມູນກັບການຈົດທະບຽນ?” ເລືອກ Yes.
9. ເມື່ອການສໍາຮອງຂໍ້ມູນຂອງທ່ານສໍາເລັດ, ເລືອກແກ້ໄຂບັນຫາທີ່ເລືອກທັງຫມົດ.
10.Restart PC ຂອງທ່ານເພື່ອບັນທຶກການປ່ຽນແປງ ແລະເບິ່ງວ່າທ່ານສາມາດ Fix The Service Couldn’t Be Started Windows Defender Error 0x80070422.
Method 7: Refresh or Reset your PC
1.Press Windows Key + I to open Settings then select ປັບປຸງແລະຄວາມປອດໄພ.
2.From left-hand menu select Recovery ແລະກົດທີ່“ເລີ່ມຕົ້ນ” under Reset this PC.

3.Select the option to ຮັກສາໄຟລ໌ຂອງຂ້ອຍ.

4.Follow the instructions on the screen to complete the process.
5.This will take some time and your computer will restart.
ວິທີທີ່ 8: ການສ້ອມແປງຕິດຕັ້ງ Windows 10
ວິທີການນີ້ແມ່ນວິທີສຸດທ້າຍເພາະວ່າຖ້າຫາກວ່າບໍ່ມີຫຍັງເຮັດວຽກອອກ, ວິທີການນີ້ແນ່ນອນຈະແກ້ໄຂທຸກບັນຫາກັບ PC ຂອງທ່ານ. ການສ້ອມແປງການຕິດຕັ້ງພຽງແຕ່ໃຊ້ການຍົກລະດັບໃນສະຖານທີ່ເພື່ອສ້ອມແປງບັນຫາກັບລະບົບໂດຍບໍ່ມີການລຶບຂໍ້ມູນຜູ້ໃຊ້ທີ່ມີຢູ່ໃນລະບົບ. ດັ່ງນັ້ນປະຕິບັດຕາມບົດຄວາມນີ້ເພື່ອເບິ່ງວິທີການສ້ອມແປງຕິດຕັ້ງ Windows 10 ໄດ້ຢ່າງງ່າຍດາຍ.
ແນະນໍາສໍາລັບທ່ານ:
ນັ້ນແມ່ນ, ທ່ານໄດ້ປະສົບຜົນສໍາເລັດ Fix The Service Couldn’t Be Started Windows Defender Error 0x80070422 ແຕ່ຖ້າທ່ານຍັງມີຄໍາຖາມໃດໆກ່ຽວກັບຄູ່ມືນີ້, ກະລຸນາຖາມພວກເຂົາຢູ່ໃນສ່ວນຄໍາເຫັນ.

