If the wireless icon or network icon is missing from Windows Taskbar, then it’s possible that the network service might not be running or some 3rd party application is conflicting with system tray notifications which can easily be resolved by restarting Windows Explorer and starting network services. In addition to above causes sometimes its also possible that the issue is caused by incorrect Windows settings.
![]()
By default, the WiFi icon or Wireless icon always appears in the Taskbar in Windows 10. The network status is automatically refreshed when your PC is either connected or disconnected from a network. So without wasting any time let’s see how to Fix WiFi Icon Missing From Taskbar In Windows 10 with the help o the below-listed guide.
ແກ້ໄຂໄອຄອນ WiFi ທີ່ຫາຍໄປຈາກແຖບວຽກໃນ Windows 10
Make sure to create a restore point, just in case something goes wrong.
Method 1: Restore missing wireless icon
1. From the taskbar, click on the small “up arrow” which shows system tray notifications and check if WiFi icon is hidden there.
![]()
2. Sometimes the Wifi icon is accidentally dragged to this area and to fix this issue drag the icon back to its original place.
3. Reboot PC ຂອງທ່ານເພື່ອບັນທຶກການປ່ຽນແປງ.
ວິທີ 2: ເປີດໃຊ້ໄອຄອນ WiFi ຈາກການຕັ້ງຄ່າ
1. Press Windows Key + I open Settings then click on ການປັບແຕ່ງສ່ວນບຸກຄົນ.

2. From the left-hand menu, select Taskbar
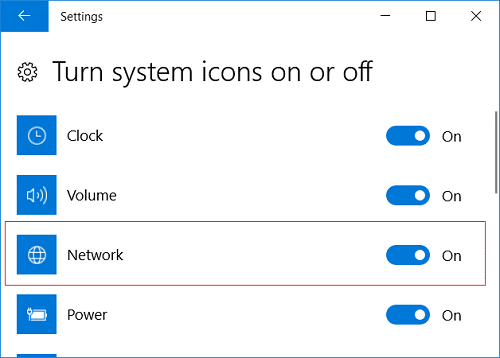
3. Scroll down to the bottom then under Notification area click on “ເປີດຫລືປິດໄອຄອນລະບົບ."
![]()
4. ໃຫ້ແນ່ໃຈວ່າໄດ້ toggle for Network or WiFi is enabled, if not click on it to enable it.
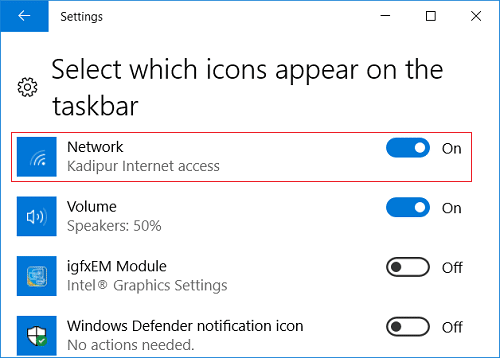
5. Press back arrow then under the same heading click on “ເລືອກຮູບສັນຍາລັກທີ່ປາກົດໃນແຖບ taskbar."
![]()
6. ໃຫ້ແນ່ໃຈວ່າ Network or Wireless is set to enable.
7. Restart your PC to save changes and see if you’re able to Fix WiFi Icon Missing From Taskbar In Windows 10.
ວິທີທີ່ 3: Restart Windows Explorer
1 ກົດປຸ່ມ Ctrl + Shift + Esc keys together to launch the ຜູ້ຈັດການວຽກງານ.
2. ຊອກຫາ explorer.exe in the list then right-click on it and select End Task.

3. Now, this will close the Explorer and to run it again, click File > Run new task.

4 ປະເພດ explorer.exe and hit OK to restart the Explorer.

5. Exit Task Manager, and this should Fix WiFi Icon Missing From Taskbar In Windows 10.
Method 4: Restart Network Services
1. ກົດ Windows Key + R ແລ້ວພິມ servicesmsc ແລະກົດ Enter.

2. Find the below-listed services then make sure they are running by right-clicking on each of them and selecting ເລີ່ມຕົ້ນ:
ການໂທຂັ້ນຕອນຫ່າງໄກສອກຫຼີກ
ການເຊື່ອມຕໍ່ເຄືອຂ່າຍ
Plug and Play
ຕົວຈັດການການເຊື່ອມຕໍ່ການເຂົ້າເຖິງໄລຍະໄກ
ໂທລະໂຄ່ງ
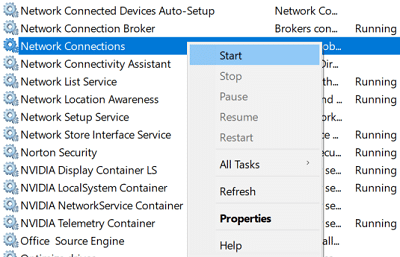
3. Once you have started all the services, again check if the WiFi icon is back or not.
Method 5: Enable Network icon in Group Policy Editor
1. ກົດ Windows Key + R ແລ້ວພິມ gpeditmsc ແລະກົດ Enter.

2. Now, under Group Policy Editor, navigate to the following path:
ການ ກຳ ນົດຄ່າຂອງຜູ້ໃຊ້> ແມ່ແບບບໍລິຫານ> Start Menu ແລະ Taskbar
3. Make sure to select Start Menu and Taskbar in the right window pane double-click on Remove the networking icon.
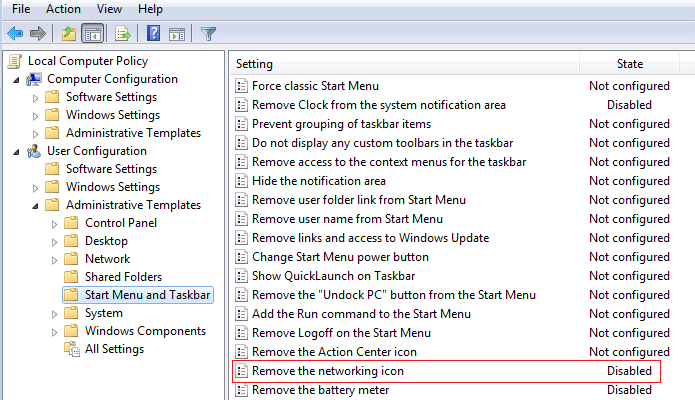
4. Once the Properties window opens, select ຄົນພິການ ແລະຫຼັງຈາກນັ້ນໃຫ້ຄລິກໃສ່ Apply ປະຕິບັດຕາມດ້ວຍ OK.
![]()
5. Restart Windows Explorer and again check if you’re able to Fix WiFi Icon Missing From Taskbar In Windows 10.
ວິທີທີ່ 6: Registry Fix
1. ກົດ Windows Key + R ແລ້ວພິມ regedit ແລະກົດ Enter ເພື່ອເປີດ Registry Editor.

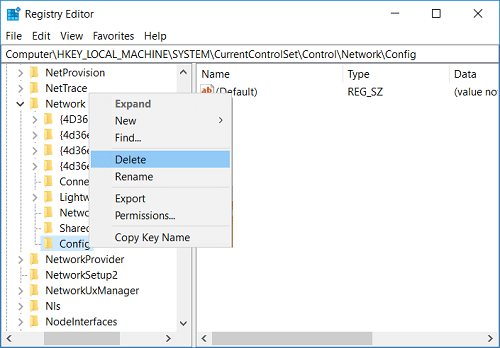
2. Navigate to the following registry key:
HKEY_LOCAL_MACHINESYSTEMCurrentControlSetControlNetwork
3. Now under this key, locate the Config key then right-click on it and select ລົບ.
4. If you don’t find the above key, then no worries continue.
5. Restart PC ຂອງທ່ານເພື່ອບັນທຶກການປ່ຽນແປງ.
Method 7: Run Network Adapter Troubleshooter
1. Right-click on the network icon and select Troubleshoot problems.
![]()
2. ປະຕິບັດຕາມ ຄຳ ແນະ ນຳ ໃນ ໜ້າ ຈໍ.
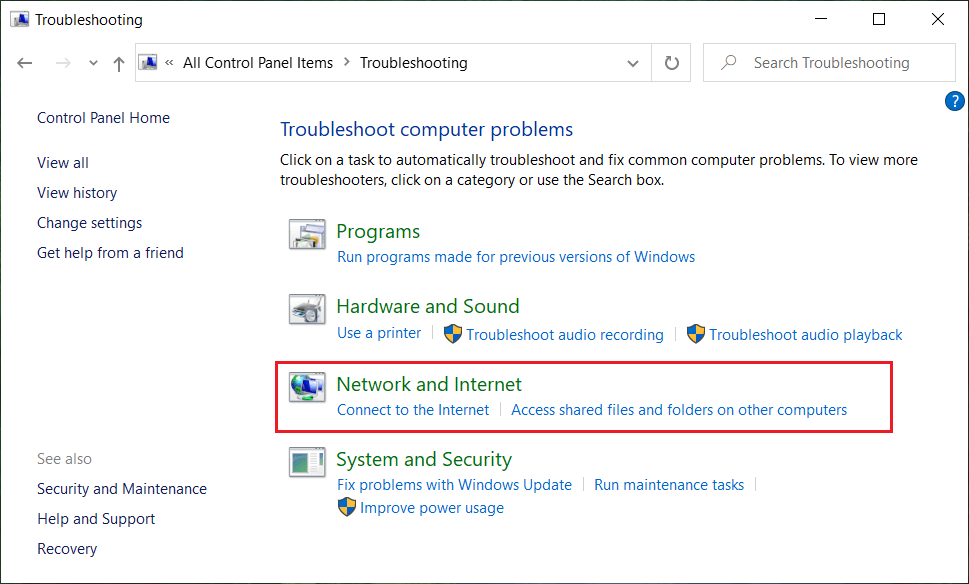
3. Open control panel and search ການແກ້ໄຂບັນຫາ in the Search Bar on the top right side and click on ການແກ້ໄຂບັນຫາ.

4. ໃນປັດຈຸບັນ, ເລືອກ “ເຄືອຂ່າຍແລະອິນເຕີເນັດ."
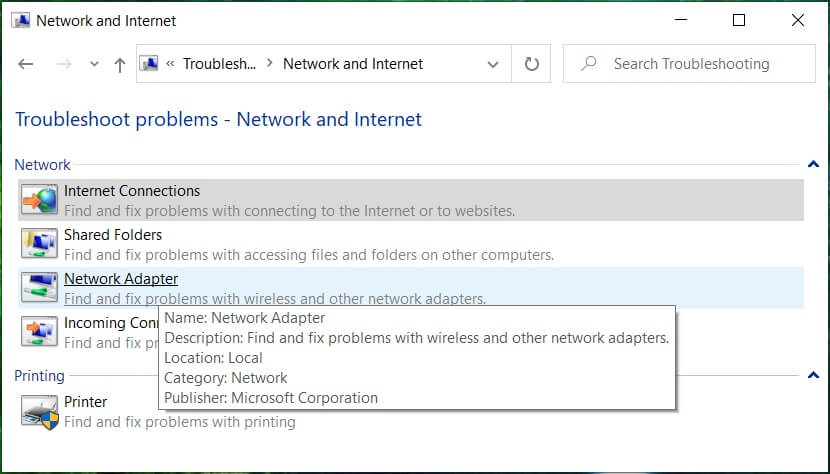
5. In the next screen, click on the ຜູ້ດັດແປງເຄືອຂ່າຍ.
6. Follow the on-screen instruction to Fix WiFi Icon Missing From Taskbar In Windows 10.
Method 8: Reinstall Network Adapter
1. ກົດ Windows Key + R ແລ້ວພິມ devmgmtmsc ແລະກົດ Enter ເພື່ອເປີດ Device Manager.

2. Expand Network Adapters then right-click on your wireless adapter and select ຖອນການຕິດຕັ້ງ.

3. Reboot your PC to save changes and again open Device Manager.
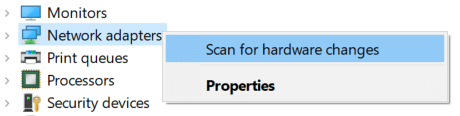
4. Now right-click on Network Adapters ແລະເລືອກເອົາ ສະແກນຫາການປ່ຽນແປງຮາດແວ.
5. If the issue is resolved by now, you don’t need to continue but if the problem still exists, then continue.
6. ກົດຂວາໃສ່ປຸ່ມ wireless adapter under Network Adapters ແລະເລືອກເອົາ Update Driver

7. ເລືອກ“ຄົ້ນຫາຄອມພິວເຕີຂອງຂ້ອຍສໍາລັບຊອບແວທີ່ຂັບຂີ່."

8. ກົດປຸ່ມ“ ອີກເທື່ອ ໜຶ່ງ”ໃຫ້ຂ້ອຍເລືອກເອົາຈາກບັນຊີລາຍຊື່ຂອງໄດເວີທີ່ມີຢູ່ໃນຄອມພິວເຕີຂອງຂ້ອຍ."

9. Select the latest available driver from the list and click Next.
10. Reboot PC ຂອງທ່ານເພື່ອບັນທຶກການປ່ຽນແປງ.
ແນະນໍາໃຫ້:
ນັ້ນແມ່ນທ່ານໄດ້ສໍາເລັດຜົນ ແກ້ໄຂໄອຄອນ WiFi ທີ່ຫາຍໄປຈາກແຖບວຽກໃນ Windows 10 ແຕ່ຖ້າທ່ານຍັງມີຄໍາຖາມໃດໆກ່ຽວກັບຂໍ້ຄວາມນີ້, ກະລຸນາຖາມພວກເຂົາຢູ່ໃນສ່ວນຄໍາເຫັນ.

