Today, even the most basic Windows applications such as Alarm, Clock, and Calculator are designed to let you perform a number of varying tasks in addition to the obvious chores. In the Calculator app, a new mode was made available to all users in the May 2020 build of Windows 10. As the name implies, it can be used to plot equations on a graph and analyze functions. This graphing mode is quite helpful if you are a student or an employee making presentations, especially if your career is in mechanical and architectural streams. Although, for most users, the graphing mode is greyed out or disabled by default. It thus needs to be enabled manually. Today, we will teach you how to enable or disable Calculator Graphing Mode in Windows 10.

ວິທີການເປີດໃຊ້ຮູບແບບການຄິດໄລ່ຕາຕະລາງໃນ Windows 10
The Calculator application itself has four different modes built into it along with a bunch of converters.
- The first one is called the ຮູບແບບມາດຕະຖານ which will let you perform basic arithmetic calculations.
- ຕໍ່ໄປແມ່ນໄດ້ ຮູບແບບວິທະຍາສາດ which allows advanced calculations with the use of trigonometric functions and exponents.
- It is followed by a ໂໝດໂປຣແກຣມເມີ for performing programming-related calculations.
- And finally, the new Graphing mode to plot equations on a graph.
Why Enable Graphing Mode in Calculator?
- ມັນຊ່ວຍໃຫ້ທ່ານ visualize the concept of Algebraic equations like functions, polynomials, quadratics.
- It allows you to work on parametric & polar graphing which is hard to draw on paper.
- In Trigonometry functions, it helps you to figure out amplitude, period, and phase shift.
- In programming, if your projects are based on data sets and spreadsheets, you can rely on this for accurate data.
Enabling graphing mode in the calculator application is actually a very easy task and involves editing either Group Policy Editor or Windows Registry. Both of these applications store important settings pertaining to Windows OS and its applications, so be extremely careful when following the steps to avoid prompting any errors or damaging your system altogether. In this article, we have detailed two different ways to enable Calculator Graphing Mode in Windows 10 and also provided a basic walkthrough of the model at the end.
Method 1: Through Local Group Policy Editor
This method is applicable if you are using Professional and Enterprise editions of Windows 10. Though, if you have a Home edition then you will not be allowed to access the Group Policy Editor. So, try the other method.
Step I: Determine Your Windows 10 Edition
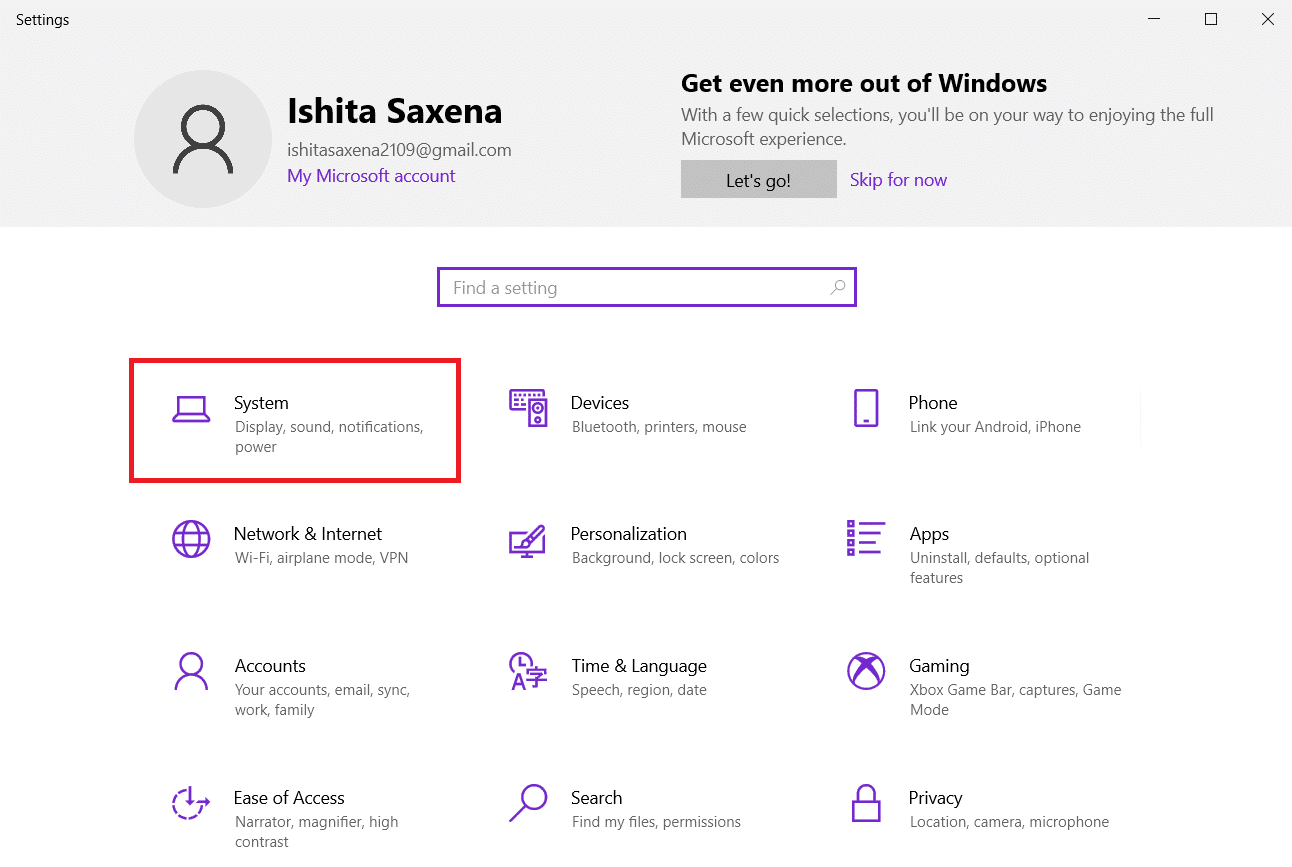
1. ເປີດ ການຕັ້ງຄ່າ ໂດຍການກົດແປ້ນພິມ ປຸ່ມ Windows + I together, and select ລະບົບ, ດັ່ງທີ່ສະແດງ.
2. ຄລິກ ກ່ຽວກັບ ໃນແຜງດ້ານຊ້າຍ.
3. ກວດເບິ່ງ ຂໍ້ມູນຈໍາເພາະຂອງ Windows ສ່ວນ.
Step II: Enable or Disable Calculator Graphing Mode in Windows 10
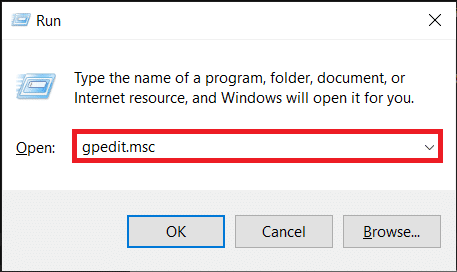
1 ຕີ ປຸ່ມ Windows + R ພ້ອມໆກັນທີ່ຈະເປີດ ການດໍາເນີນງານ ກ່ອງໂຕ້ຕອບ
2 ປະເພດ gpeditmsc ແລະຄລິກໃສ່ OK button to launch ບັນນາທິການນະໂຍບາຍກຸ່ມທ້ອງຖິ່ນ.
3. ໄດ້ຮັບ User Configuration > Administrative Templates > Windows Components > Calculator in the left pane by clicking on the ໄອຄອນລູກສອນ at the side of each folder.
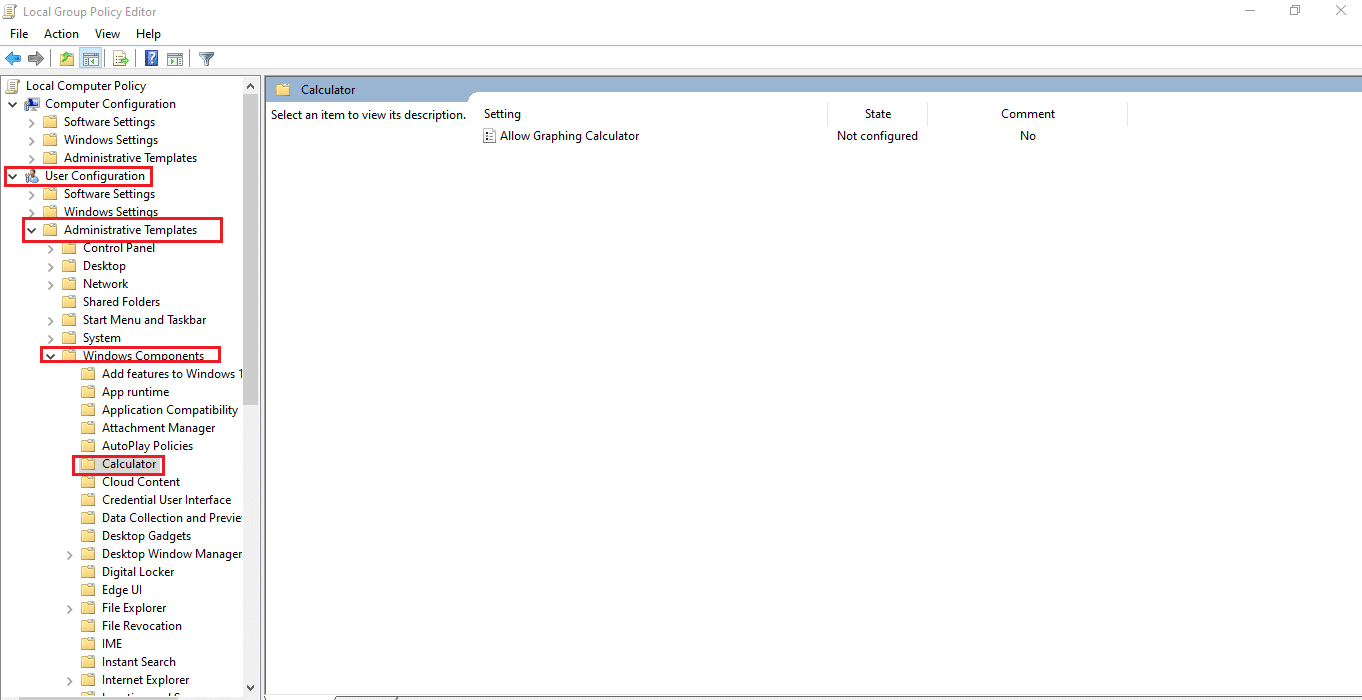
4 ໃຫ້ຄລິກໃສ່ Allow Graphing Calculator entry in the right pane. Then, select the policy setting option shown highlighted.
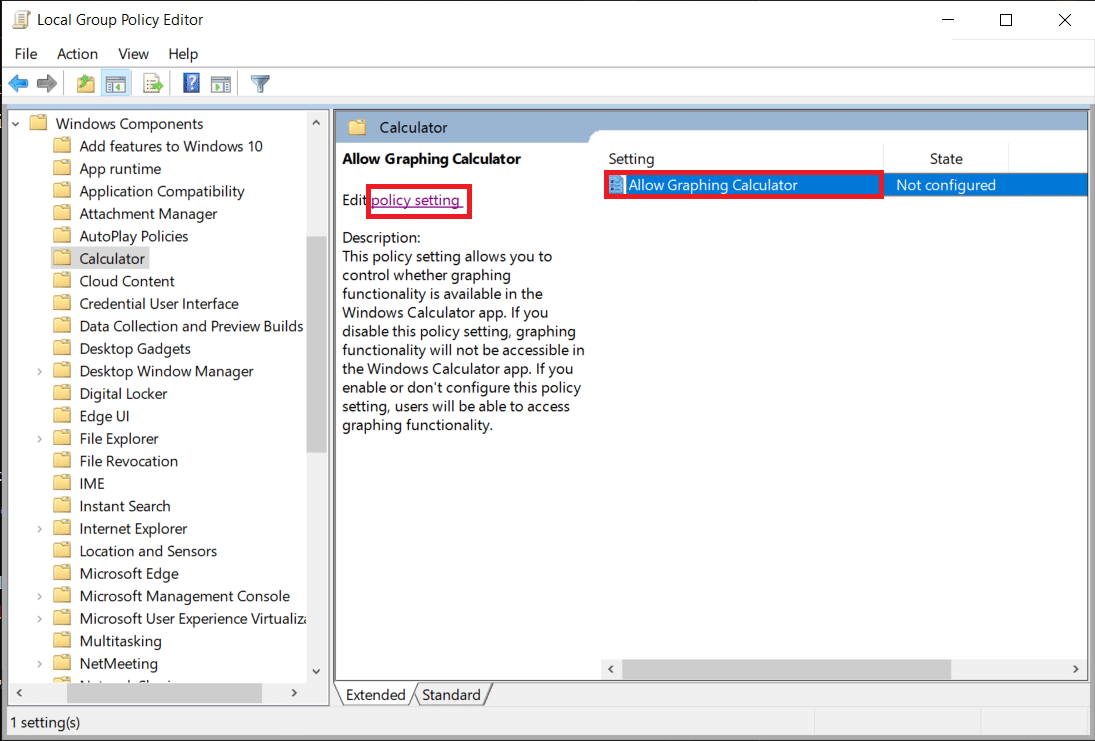
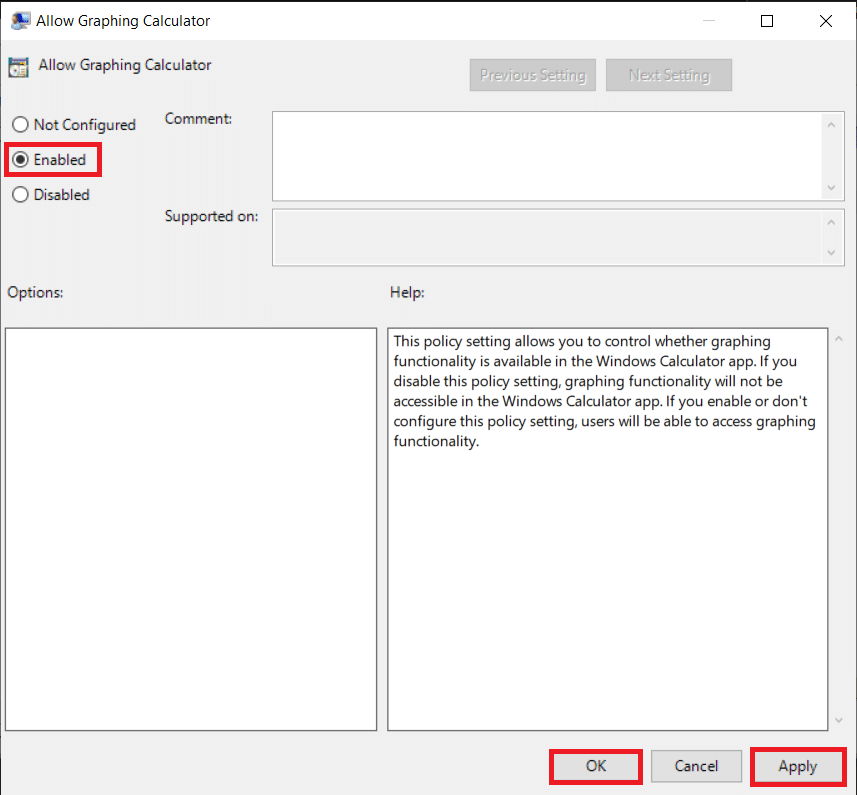
5 ໃຫ້ຄລິກໃສ່ ເປີດການ ປຸ່ມວິທະຍຸແລະກົດ ສະຫມັກຂໍເອົາ ເພື່ອຊ່ວຍປະຢັດການປ່ຽນແປງ.
ຫມາຍເຫດ: If you haven’t previously altered the entry, it will be in Not Configured state, by default.
6. Close down all the programs and perform a ເລີ່ມລະບົບໃ່.
7. ຂອງທ່ານ ເຄື່ອງຄິດເລກ app will show ກາຟິກ option once your PC boots back on.

ຫມາຍເຫດ: To disable graphing calculator on Windows 10 computer, select ຄົນພິການ option in 5 ຂັ້ນຕອນ.
ຍັງອ່ານ: ແກ້ໄຂເຄື່ອງຄິດໄລ່ບໍ່ເຮັດວຽກໃນ Windows 10
Method 2: Through Registry Editor
If for some reason you weren’t able to enable the graphing mode from the group policy editor, editing the Windows registry will also do the trick. Follow the given steps to enable or disable Calculator graphing mode on Windows 10 PCs:
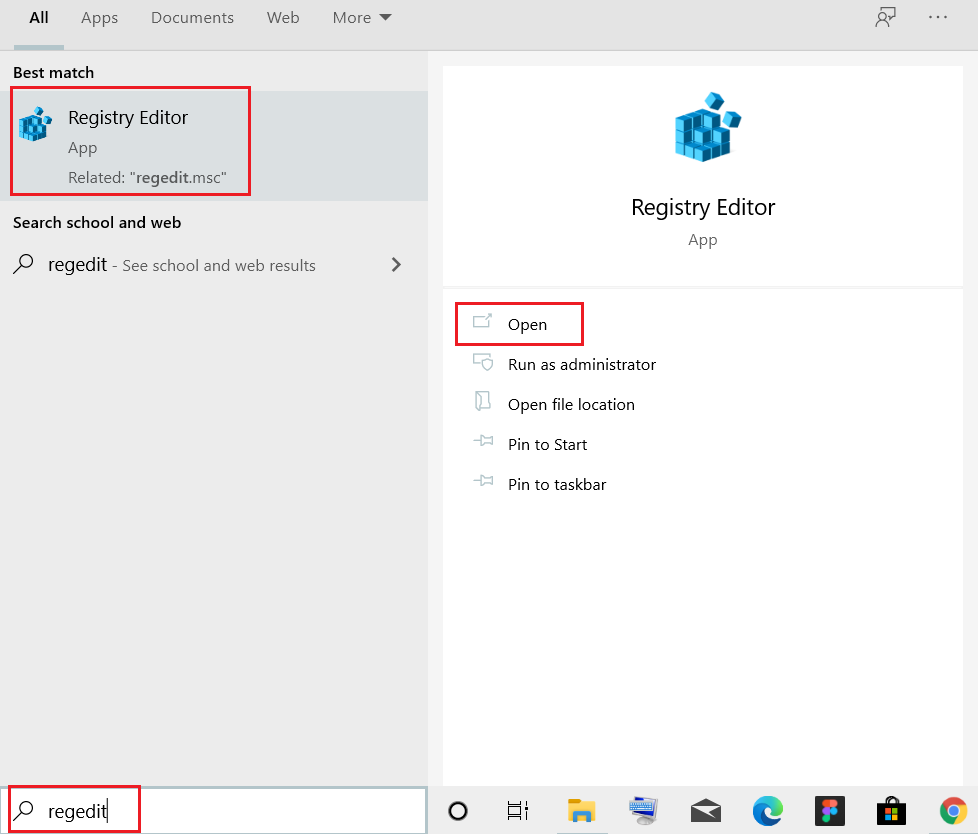
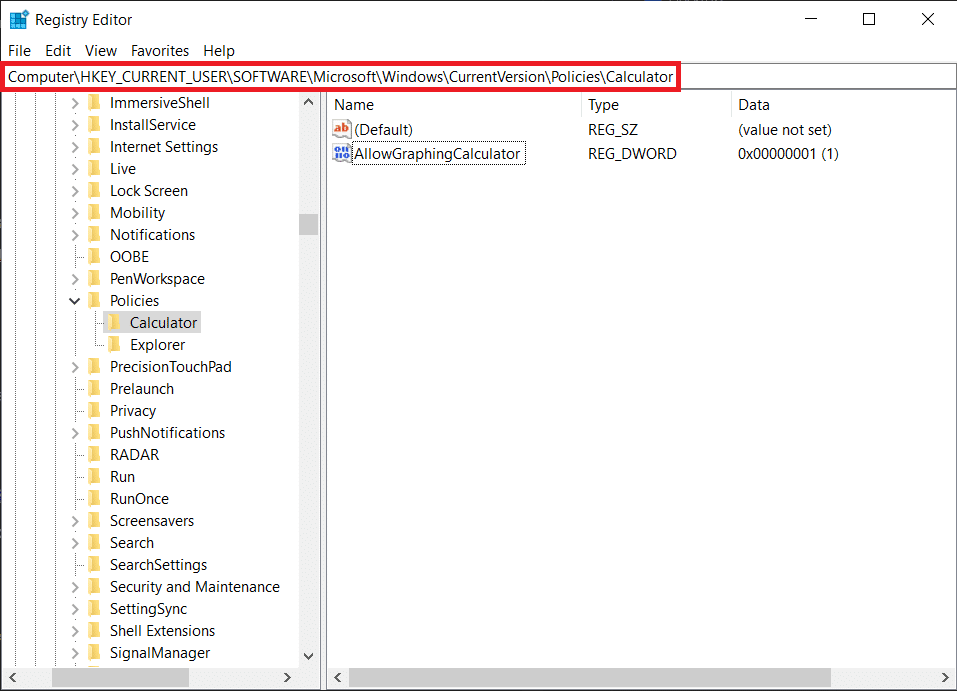
1 ໃຫ້ຄລິກໃສ່ ເລີ່ມຕົ້ນ, ປະເພດ regedit, ແລະຄລິກໃສ່ ເປີດ ການເປີດຕົວ Registry Editor.
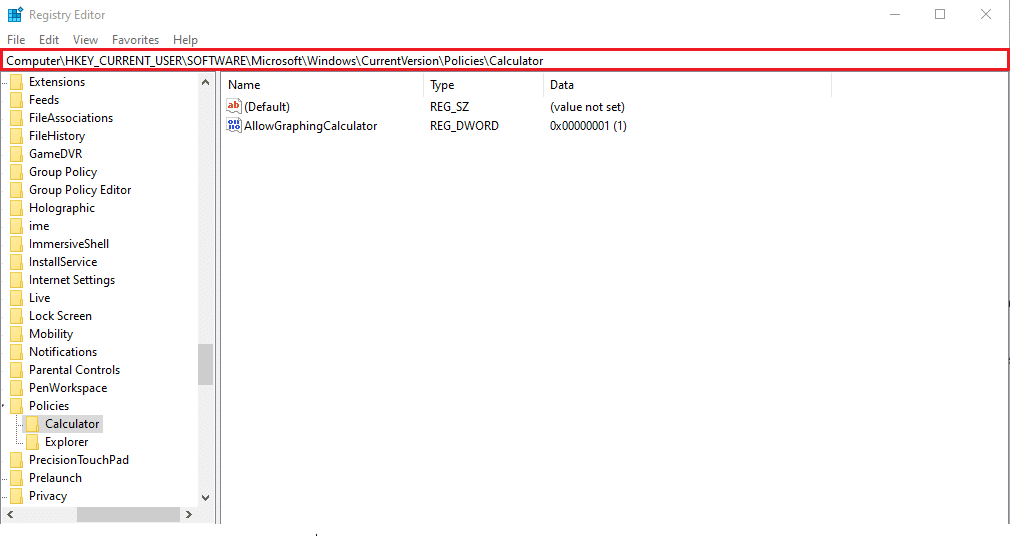
2. Paste the following location ເສັ້ນທາງ in the address bar and hit the ກະລຸນາໃສ່ key
HKEY_CURRENT_USERSOFTWAREMicrosoftWindowsCurrentVersionPoliciesCalculator
ຫມາຍເຫດ: It is quite possible you did not find the Calculator folder. You will therefore need to create one manually. Right-click on ນະໂຍບາຍ ແລະຄິກ ໃຫມ່ ປະຕິບັດຕາມໂດຍ ທີ່ສໍາຄັນ. Name the key as ເຄື່ອງຄິດເລກ.
ຫມາຍເຫດ: If the Calculator key was already present on your PC, chances are the AllowGraphingCalculator value also exists. Otherwise, you will again need to manually create the value.
3. ກົດຂວາໃສ່ປຸ່ມ blank space. ກົດ ໃໝ່ > ມູນຄ່າ DWORD (32-bit). ຊື່ ມູນຄ່າ as AllowGraphingCalculator.
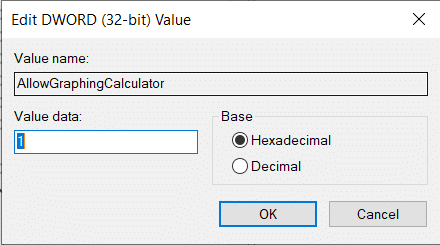
4. ໃນປັດຈຸບັນ, ຄລິກຂວາໃສ່ AllowGraphingCalculator ແລະຄິກ ແກ້ໄຂ.
5 ປະເພດ 1 ພາຍໃຕ້ການ ຂໍ້ມູນມູນຄ່າ: to enable the feature. Click on OK ບັນທຶກ.
6. ອອກຈາກ Registry Editor ແລະ ເລີ່ມຕົ້ນໃຫມ່ PC ຂອງທ່ານ.
ຫມາຍເຫດ: If you wish to disable Graphing mode in the future, change the ມູນຄ່າຂໍ້ມູນ to 0 in 5 ຂັ້ນຕອນ.
How to Use Calculator Graphing Mode
Step I: Access Graphing Mode
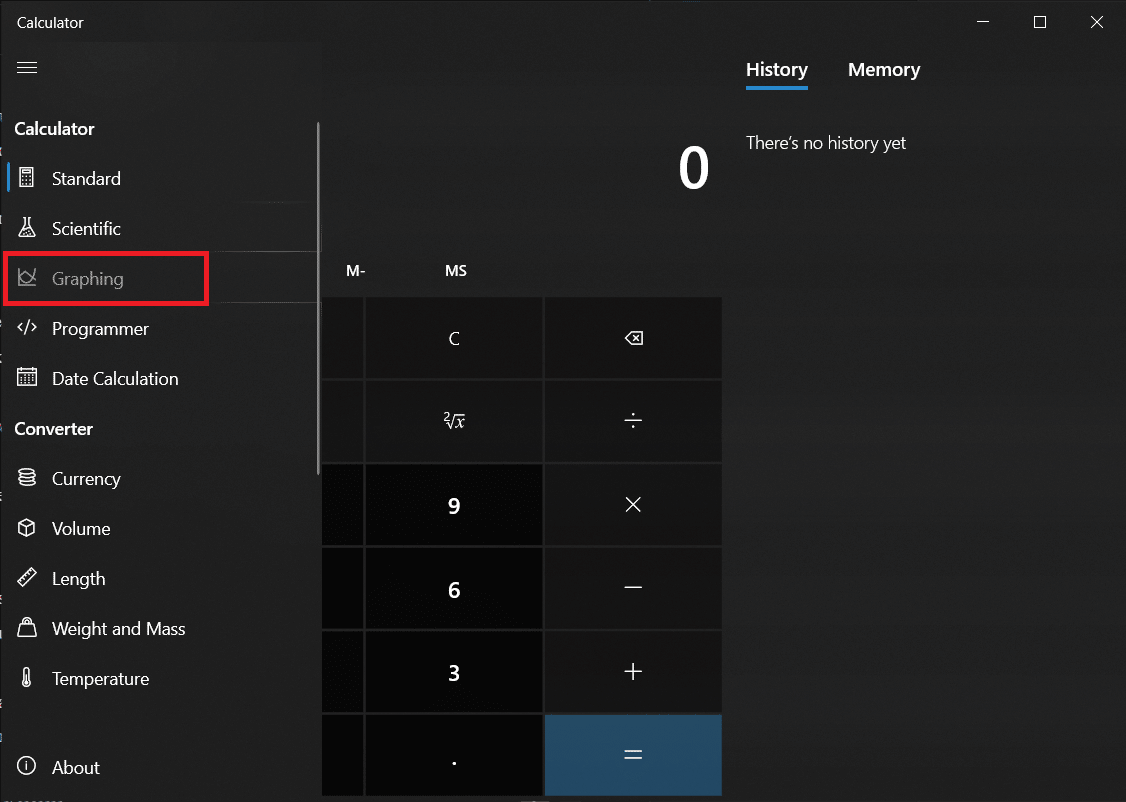
1. ເປີດ ເຄື່ອງຄິດເລກ ຄໍາຮ້ອງສະຫມັກ.
2 ໃຫ້ຄລິກໃສ່ hamburger (three horizontal lines) icon present at the top-left corner.
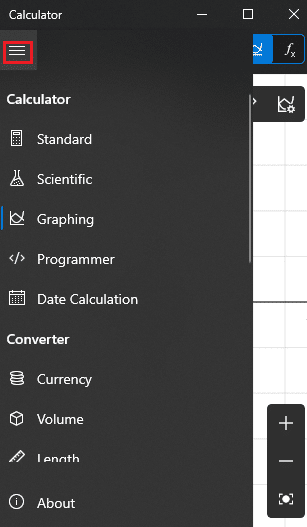
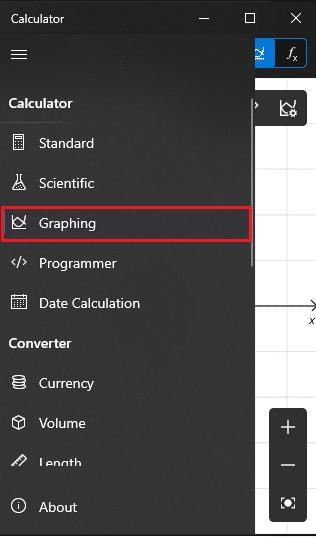
3. In the ensuing menu, click on ກາຟິກ, ດັ່ງທີ່ສະແດງ.
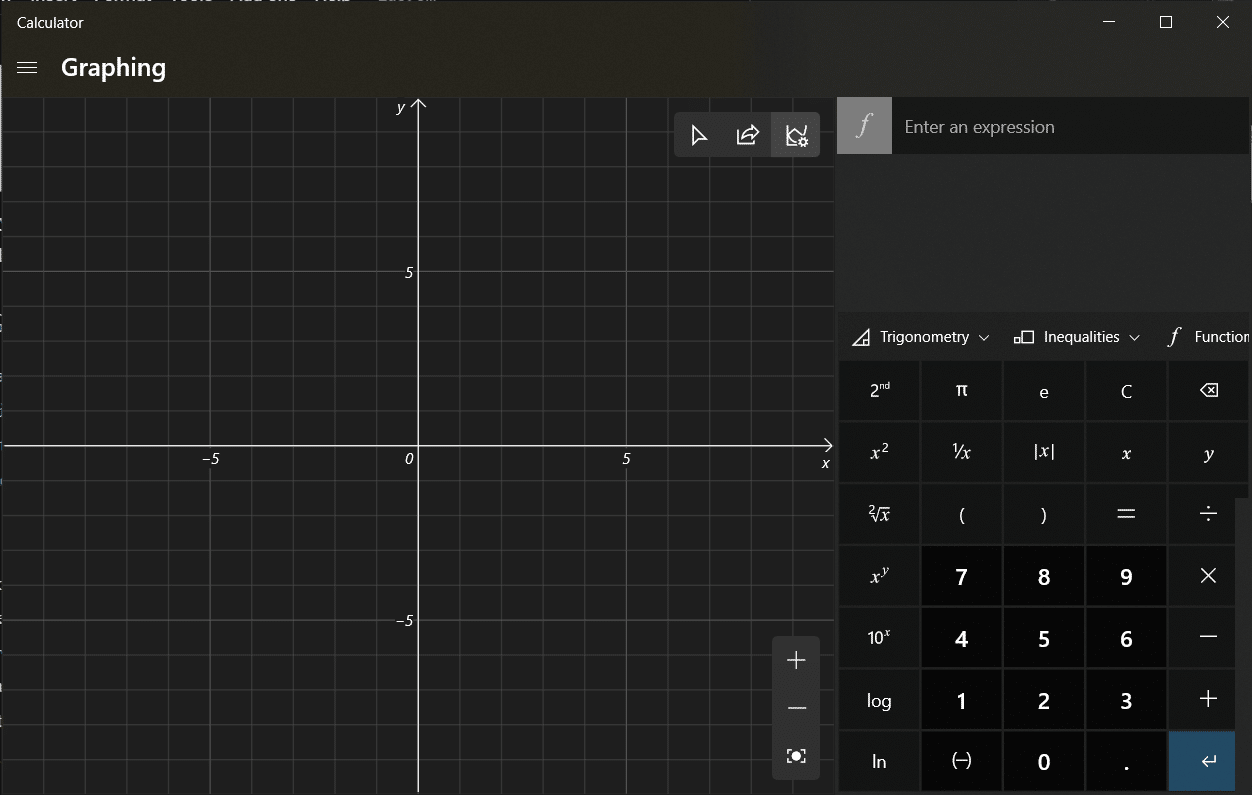
4. Within a split second, you will be greeted with an empty graph on the left pane and a familiar-looking calculator numeric pad on the right, as shown below.
ຍັງອ່ານ: ແກ້ໄຂເຄື່ອງຄິດເລກ Windows 10 ຫາຍໄປຫຼືຫາຍໄປ
Step II: Plot Equations
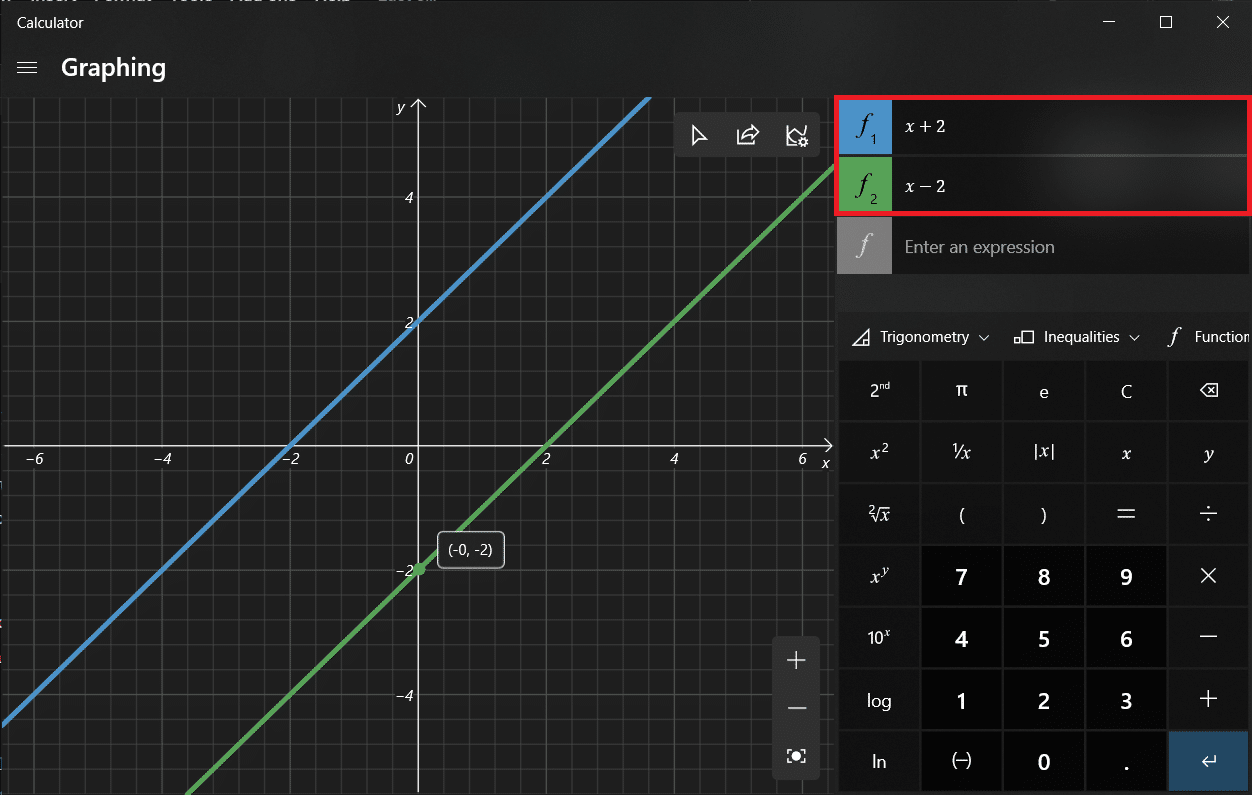
1 ກະລຸນາໃສ່ ສົມຜົນ (ຕົວຢ່າງ x +1, x-2) on the top right fields for f1 & f2 fields, ດັ່ງທີ່ສະແດງ.
2. Simply, hit ກະລຸນາໃສ່ on your keyboard after typing out the equation to plot it.
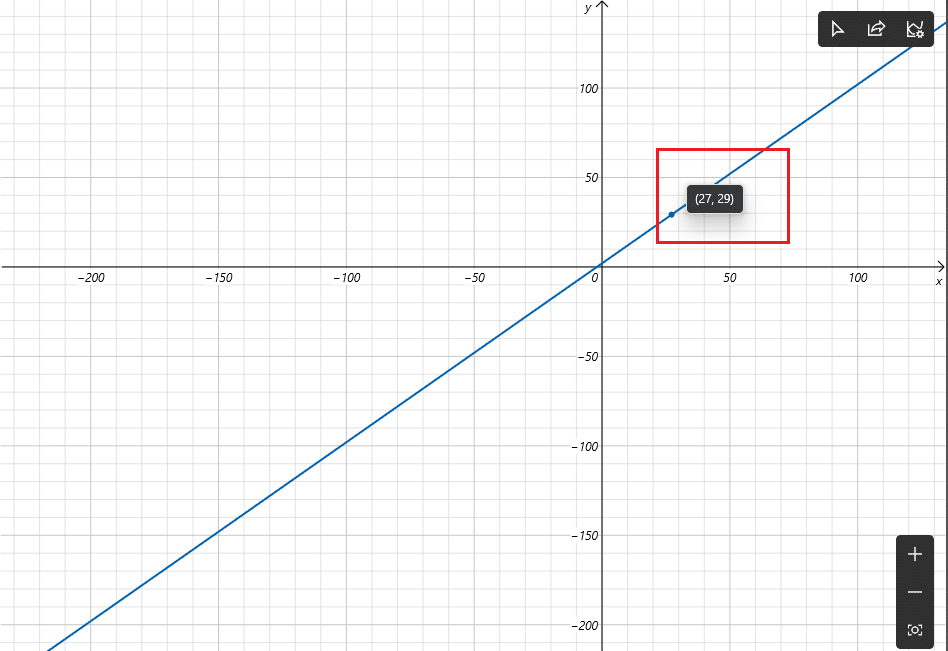
3. Hover the mouse pointer over the plotted line ເພື່ອຮັບເອົາ exact coordinates of that point, as illustrated below.
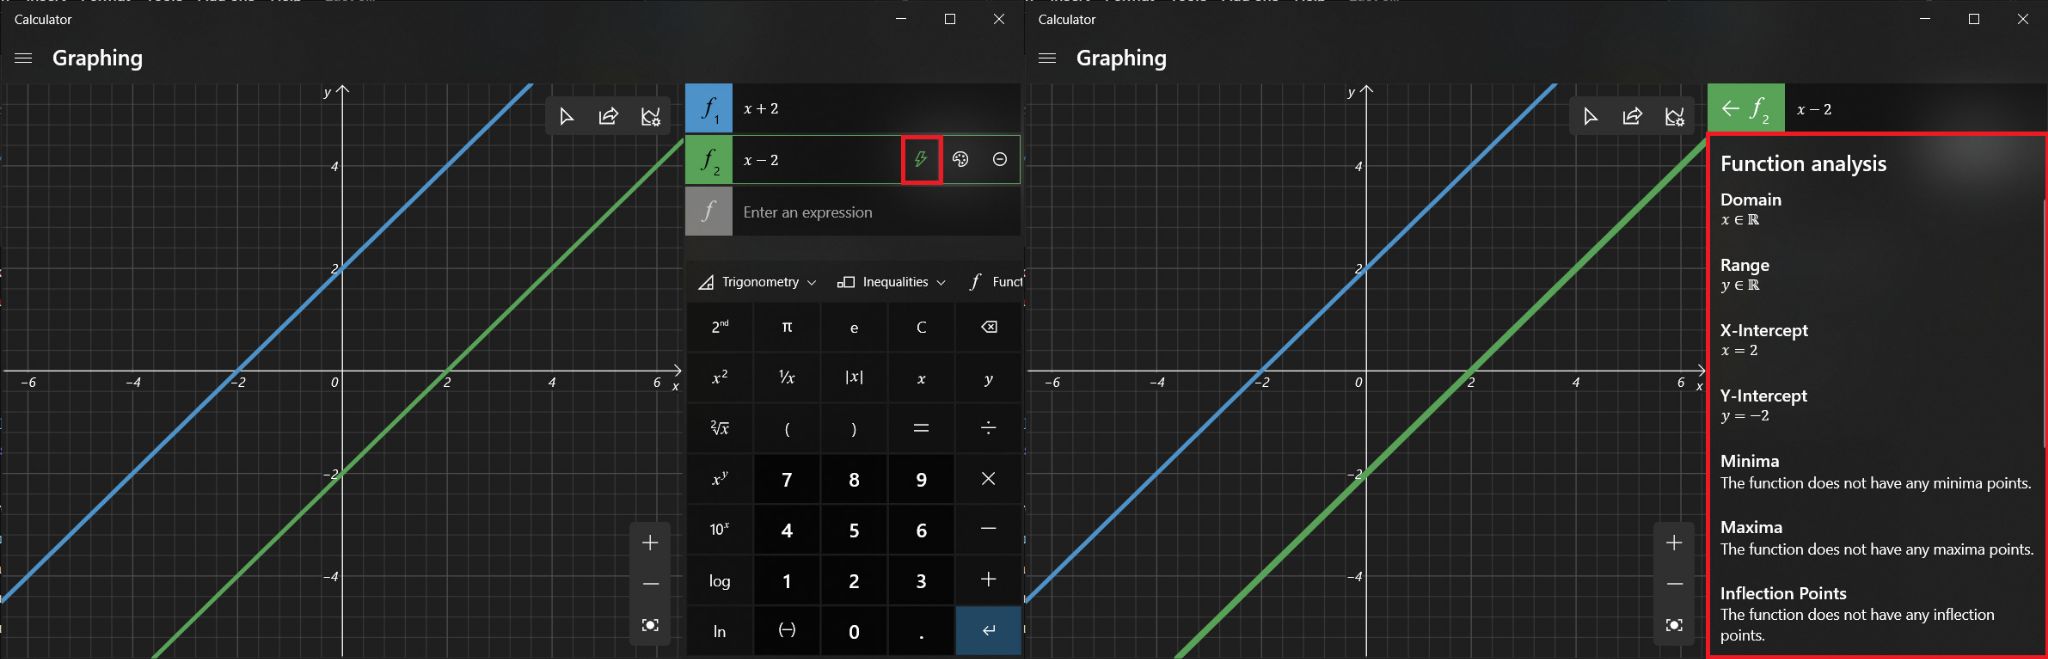
Step III: Analyze Equations
Apart from plotting equations, the graphing mode can also be used to analyze equations, although not all of them. To check the functional analysis of an equation, click on the lightning icon ຕໍ່ໄປນີ້.
ຍັງອ່ານ: ແກ້ໄຂແອັບຯ Outlook ຈະບໍ່ເປີດໃນ Windows 10
Step IV: Change the Style of the Plotted line
1 ໃຫ້ຄລິກໃສ່ paint palette icon ເພື່ອເປີດ Line Options.
2A. This will let you change the style of the plotted line as:
2B. Select the ສີ from the color options provided.
![]()
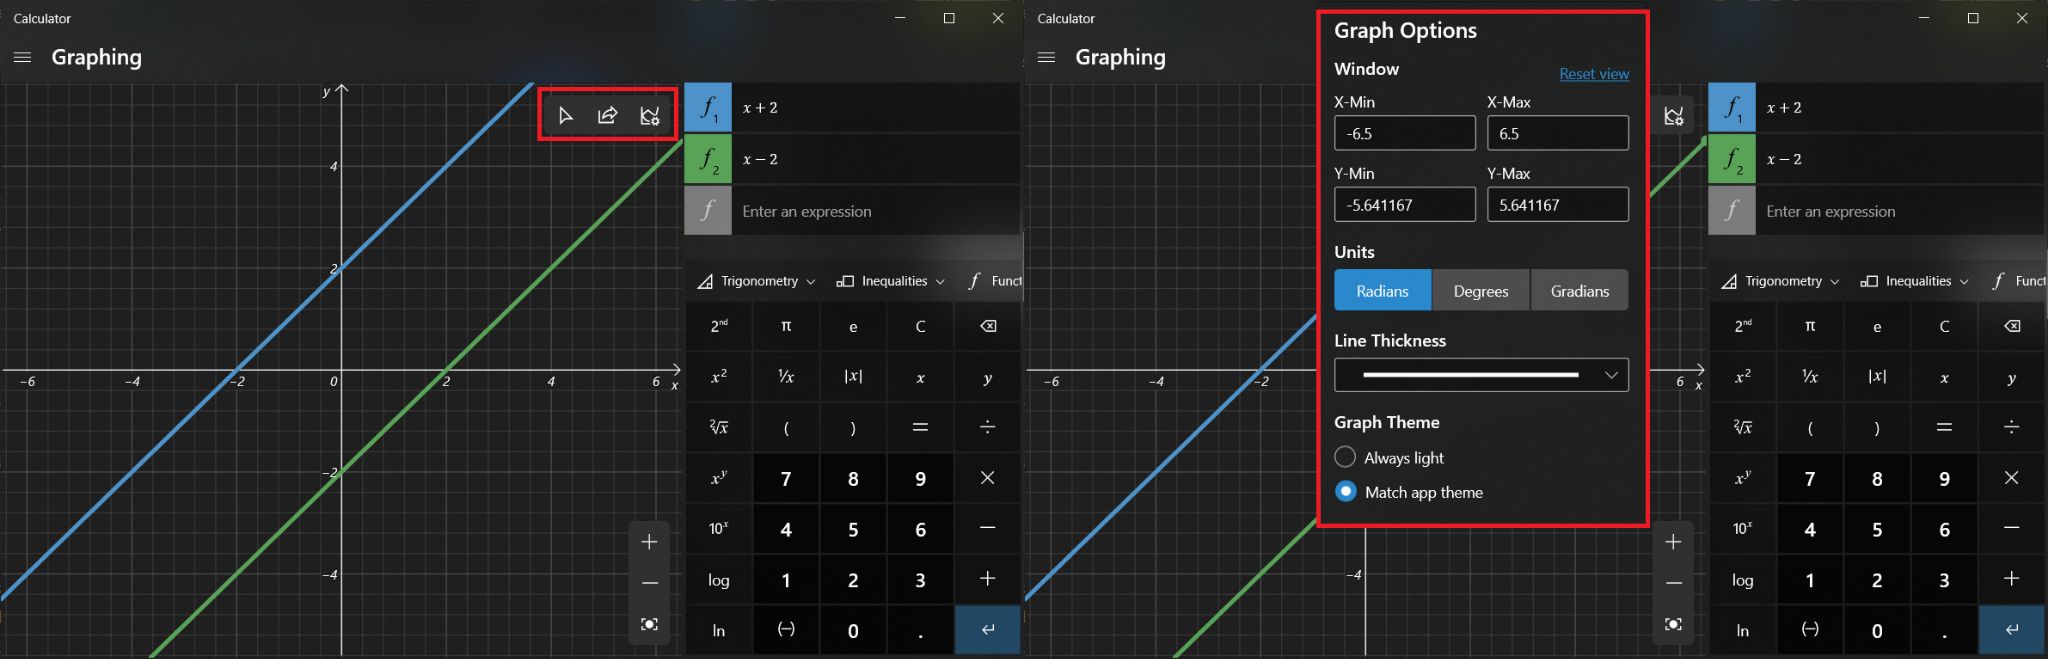
Step V: Use Graph Options
Once the equations are mapped, three new options become active at the top-right corner of the graph window.
1. The first option lets you trace the plotted lines using the mouse or keyboard.
2. The next one is to share the graph via mail.
3. And the last one allows you to customize the graph which allows you to:
- change the minimum and maximum values of X and Y,
- switch between different units like degrees, radians, & gradians,
- adjust the line thickness and
- modify graph theme.
ແນະນໍາໃຫ້:
Hope so the above method helped you to enable, use or disable Calculator Graphing Mode in Windows 10. Drop your queries/suggestions below and share with us all the crazy graphs you plot using it.

![Fix WiFi not Working in Windows 10 [100% Working]](https://lbsite.org/wp-content/uploads/2023/02/Fix-WiFi-not-Working-in-Windows-10.jpg "Fix WiFi not Working in Windows 10 [100% Working]")