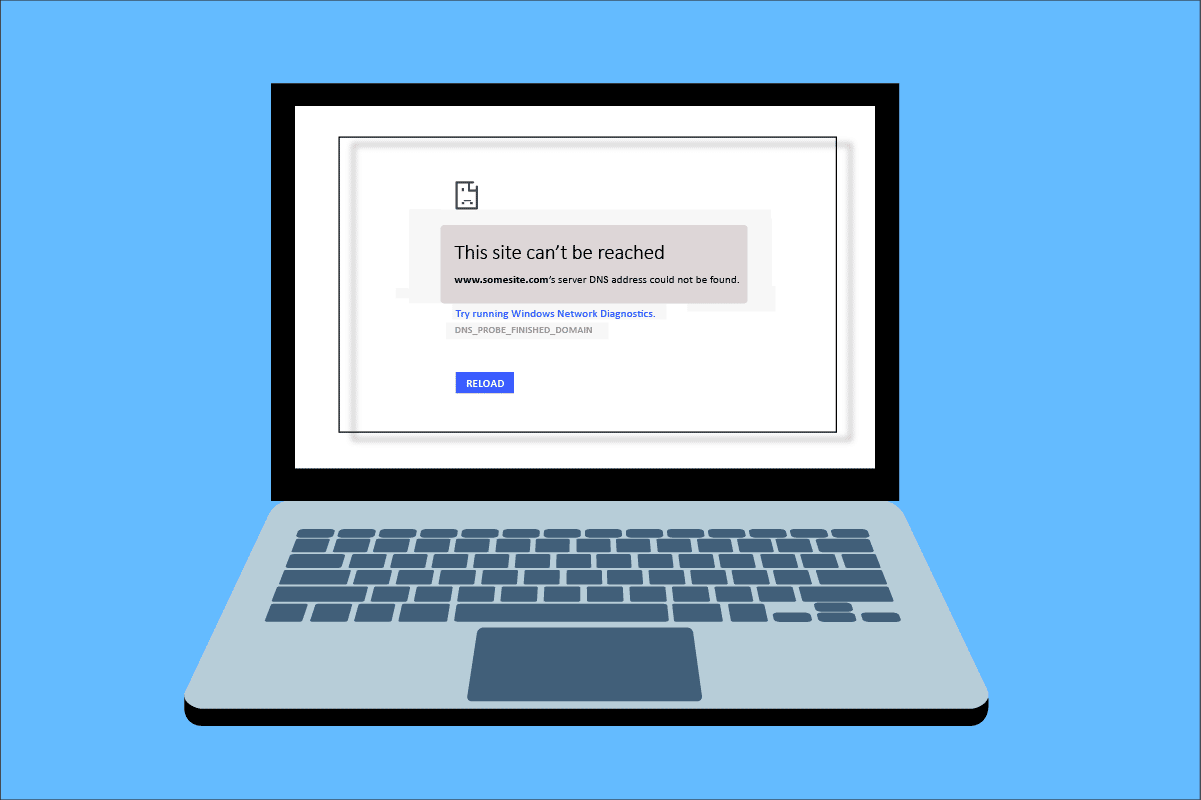
While surfing internet in your browser, you may face Server IP address could not be found error. This is a common issue for the Google Chrome users. We bring to you a helpful guide that will fix server IP address could not be found error on Windows 10. So, continue reading!
How to Fix Server IP Address Could Not be Found on Windows 10
One of the most popular web browser is Google Chrome. However if you are facing the error while browsing in the Chrome browser, then do not worry! This issue may be caused due to various reasons like;
- Нестабилна интернет конекција
- Corrupt Browser Cache and Cookies
- Incorrect IP Address
- Corrupt DNS Cache
- Outdated Network Drivers
Here, we have listed all possible methods to fix the said issue on Windows 10.
Method 1: Troubleshoot Network Adapter
The said issue may occur due to your network error. You can run the network adapter troubleshooter to fix any errors with your network adapter. Read our guide to troubleshoot network connectivity on Windows 10.

Метод 2: Исчистете го кешот на прелистувачот
The cache files in your web browser may get corrupt. You can try to clear the cache and cookies of your browser and try to check if the error still persists or not. Follow these steps to clear browser cache.
1. Стартувај го Chrome browser from Windows search bar as shown.

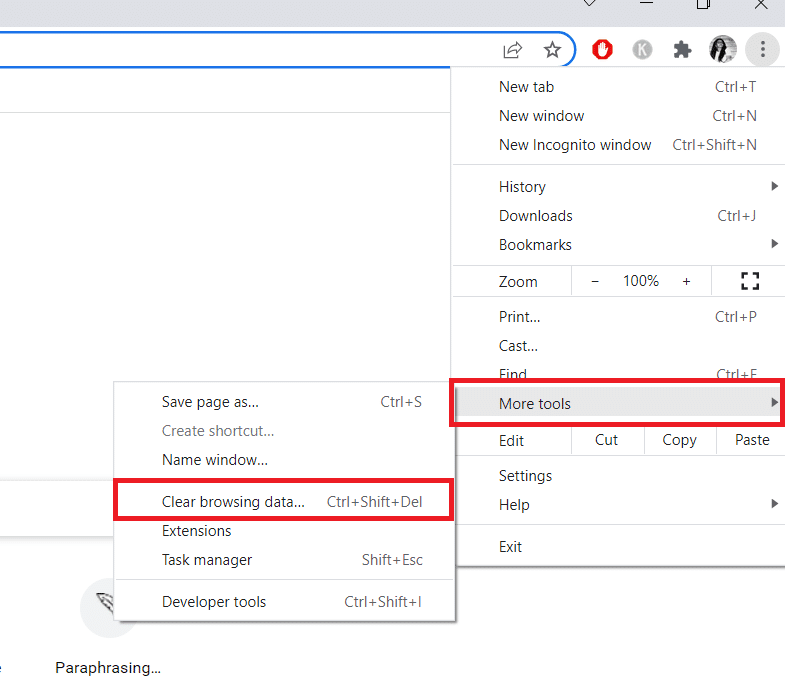
2. Сега, кликнете на икона со три точки на горниот десен агол.
3. Овде, кликнете на Повеќе алатки опција.
4. Следно, кликнете на Исчистете го прелистувањето податоци… опција.
Забелешка: Можете да напишете chrome: // поставувања / clearBrowserData in the search bar to launch the browser history page directly.
5. Овде, изберете го Временски период in the next window. Check the boxes marked:
- Колачиња и други податоци за локацијата
- Кеширани слики и датотеки.
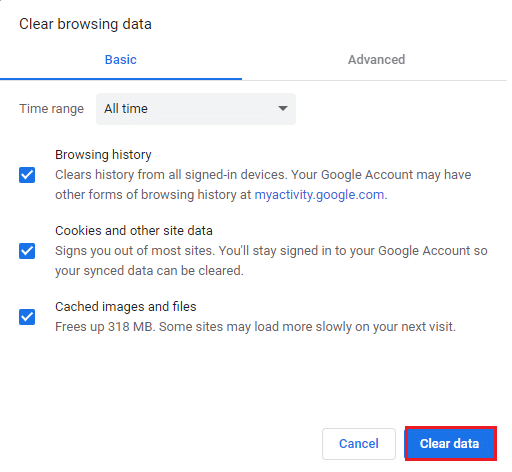
6. На крајот, кликнете на Исчисти податоци.
Исто така прочитајте: Fix This Plugin is Not Supported error in Chrome
Method 3: Clear DNS Cache
You can try to clear the DNS cache to fix server IP address could not be found error. Follow our guide to flush and reset the DNS cache in Windows 10.
Method 4: Release and Renew IP Address
Here are the steps to release and renew the IP address.
1. Удри на Windows клуч, тип Command Prompt, и кликнете на Стартувај како администратор.

2. Firstly you should flush the DNS cache as shown in Метод 2.
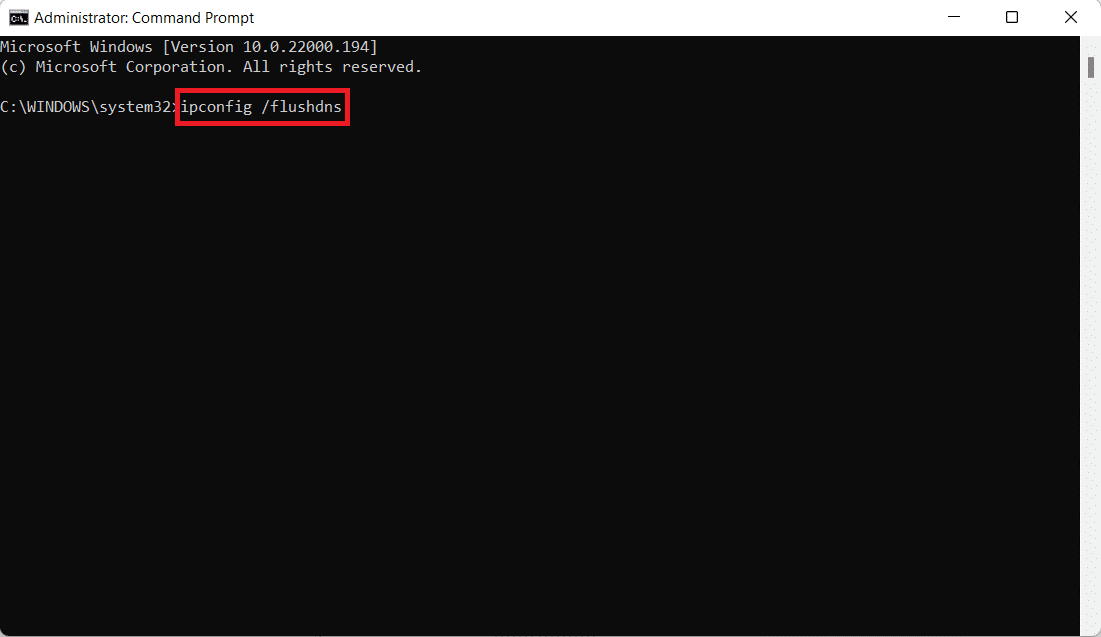
3. Once the above process is complete, type ipconfig / release и притиснете го копчето Внесете клучните.

4. Потоа, напишете ipconfig / обнови и хит Внесете to renew your IP.

Исто така прочитајте: Fix No WiFi Networks Found in Windows 10
Метод 5: Променете ја DNS адресата
Incorrect DNS address also cause this said Chrome error. You can change your DNS address to fix the error. Follow the given steps to change DNS address.
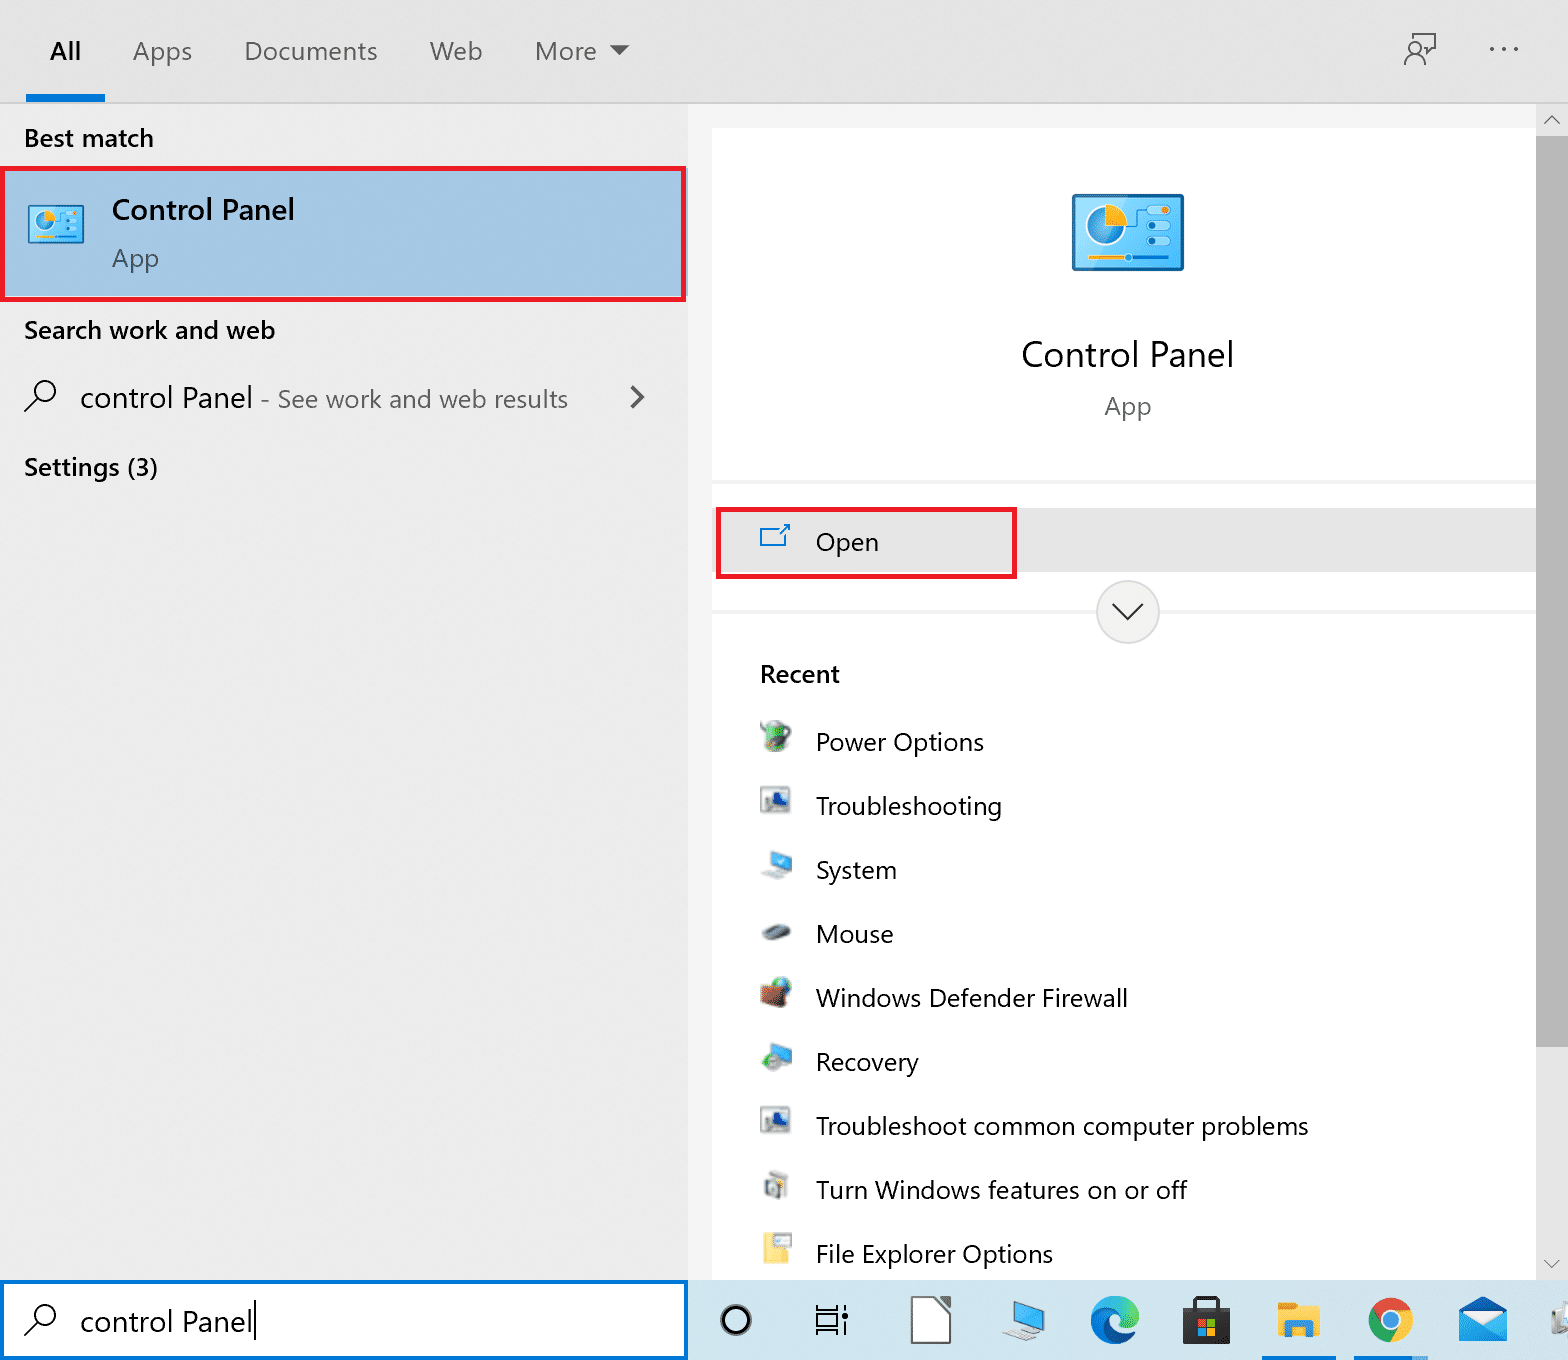
1. Притиснете го копчето Windows клуч, тип контролен панел и кликнете на Отворено.
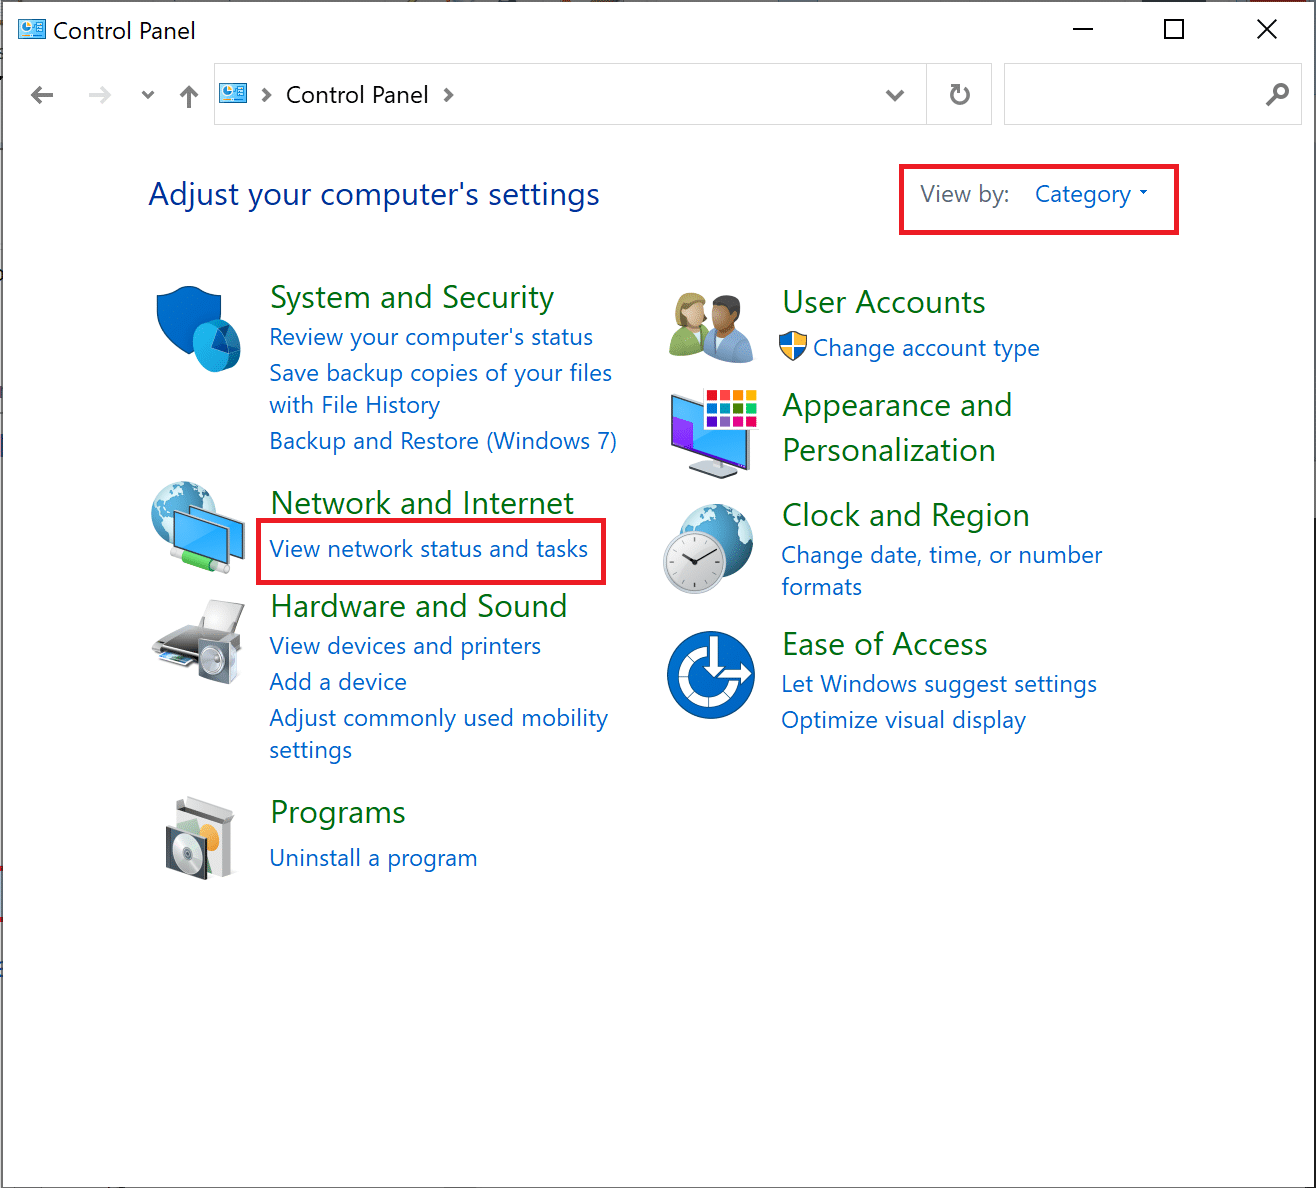
2. Поставете Преглед од > категорија и кликнете на Погледнете го статусот и задачите на мрежата.
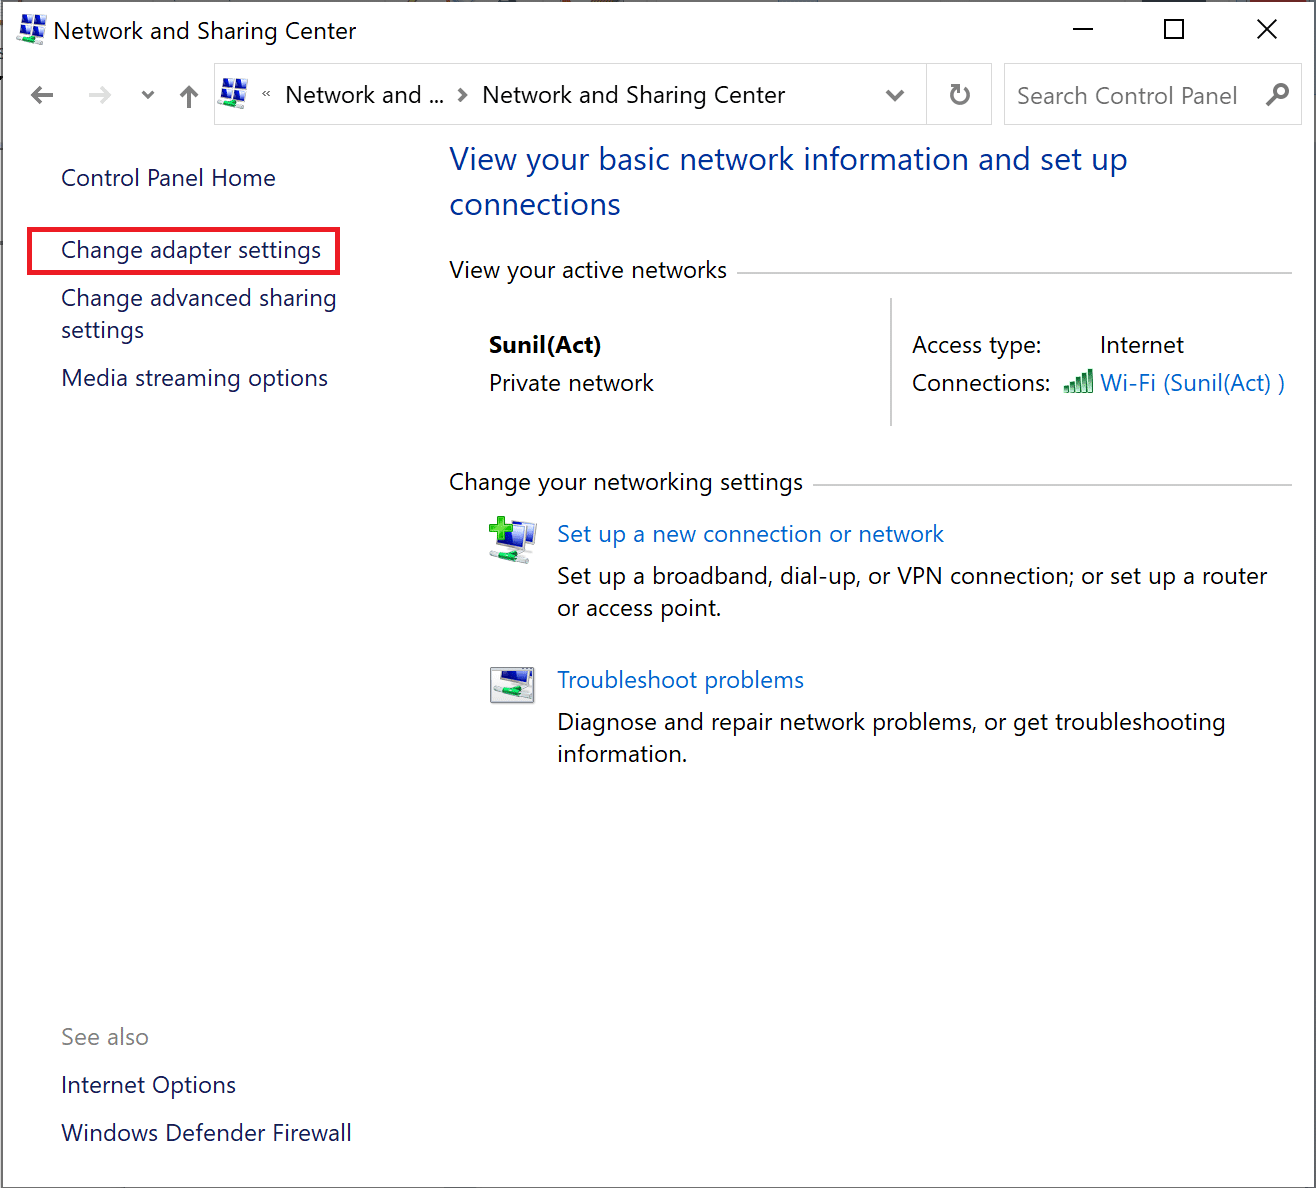
3. Сега, кликнете на Промена на подесувањата на адаптерот option at the left sidebar.
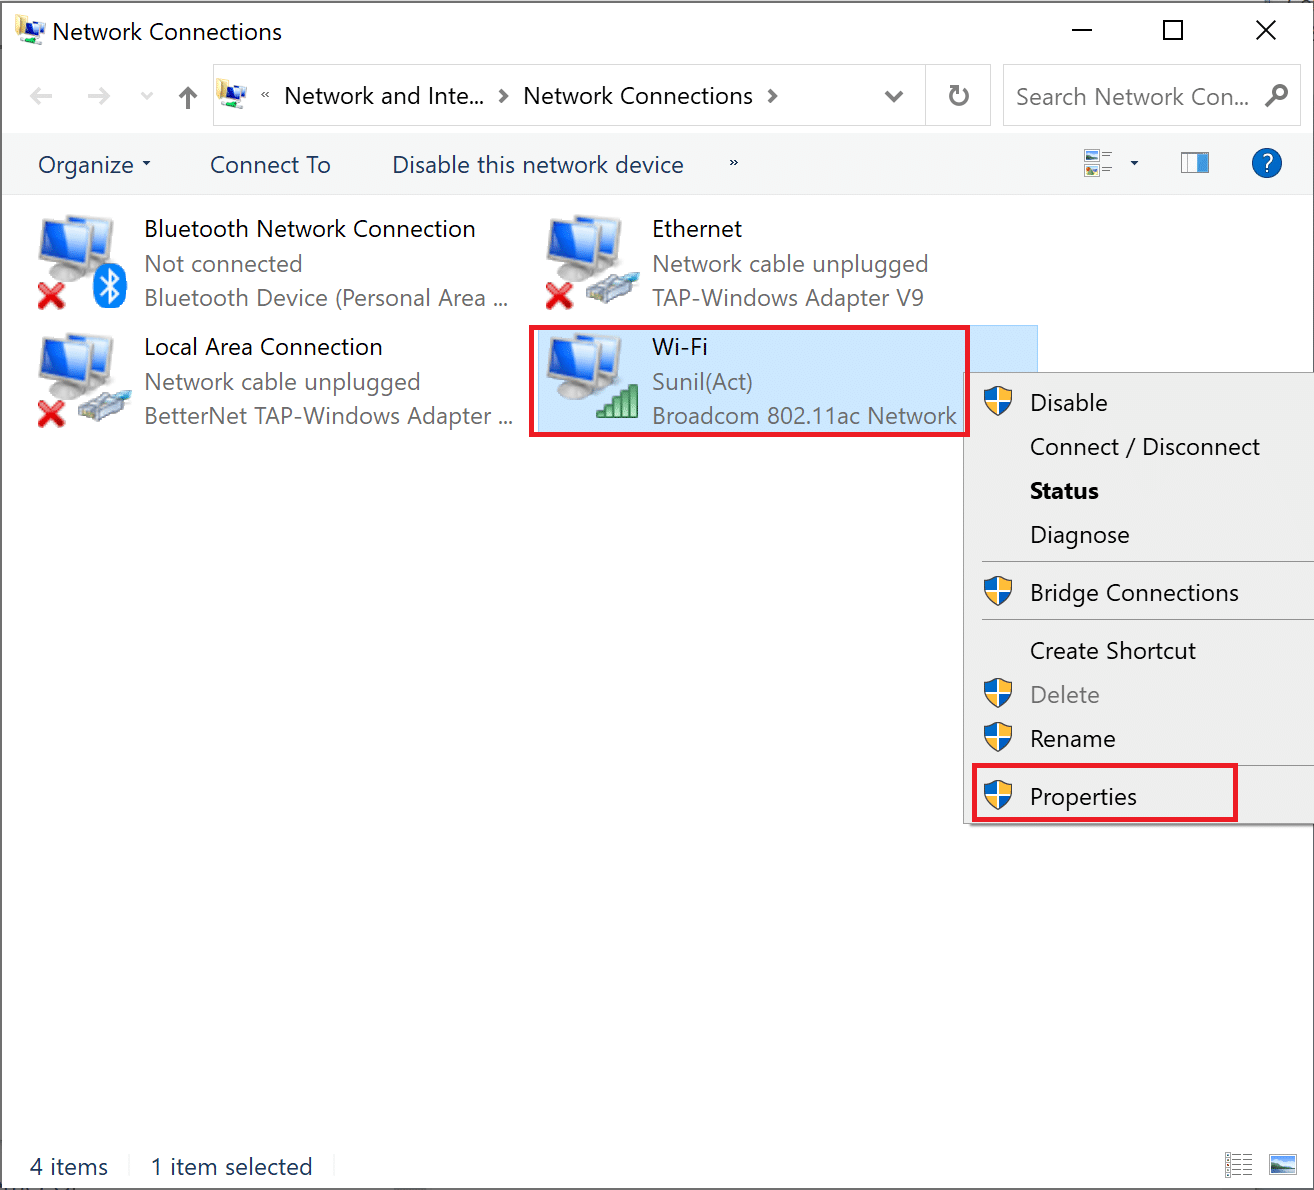
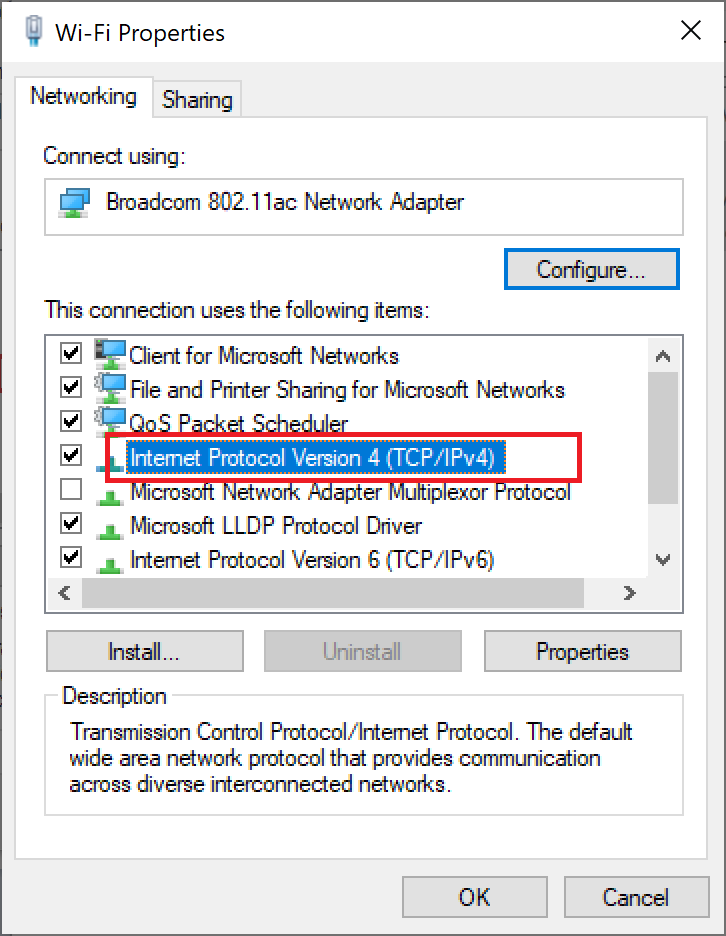
4. Next, right-click on your currently active internet connection and select Својства, како што е нагласено.
5. In the Properties window, double-click on Верзија за интернет протокол 4 (TCP / IPv4).
6. Next, check the options titled Добијте IP адреса автоматски Користете ги следниве адреси на DNS-серверот, како што е нагласено.
6a. For the Preferred DNS server, enter the Google Public DNS address as: 8.8.8.8
6b. And, In the Алтернативен ДНС-сервер, enter the other Google Public DNS as: 8.8.4.4
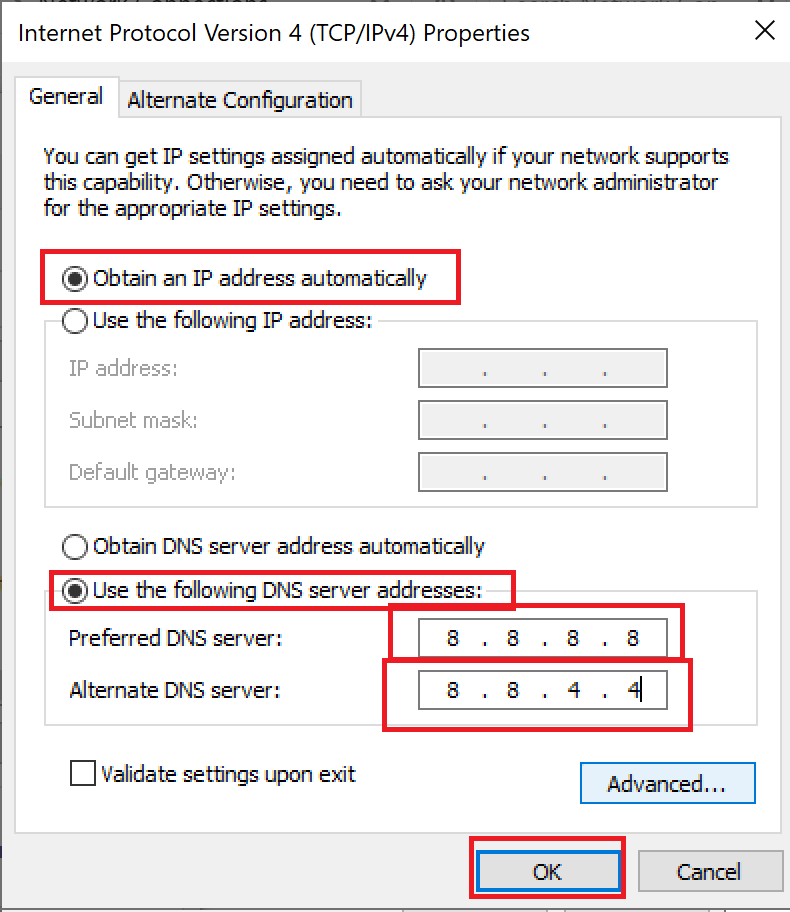
7. На крај, кликнете на OK да ги зачувате промените и рестартирајте го компјутерот.
Method 6: Restart DNS Cache
You can follow these steps to restart DNS cache.
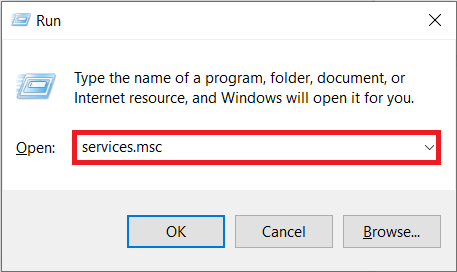
1. Притиснете го копчето Windows + R копчиња заедно да се отвори Испратена дијалог-кутија.
2. Then type services.msc и притиснете го копчето Внесете клуч да се отвори Услуги прозорец.
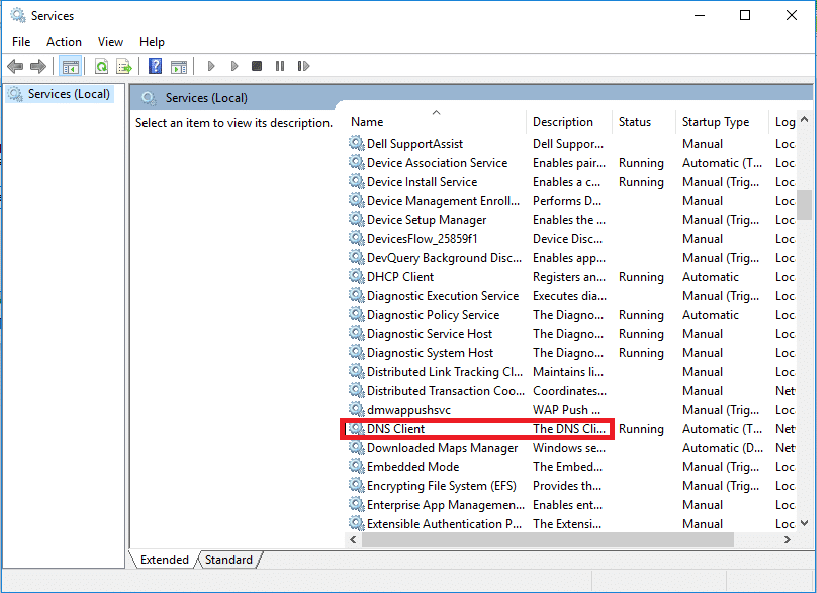
3. Right-click on Клиент за ДНС и одберете Рестарт.
Забелешка: If you find no restart option and unable to restart it from this method, you do not need to worry. You just need to open an elevated Command Prompt on your system.
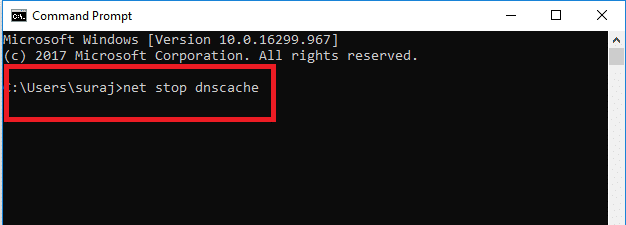
4. Напишете го следново команда и притиснете го копчето Внесете клуч.
нето стоп dnscache
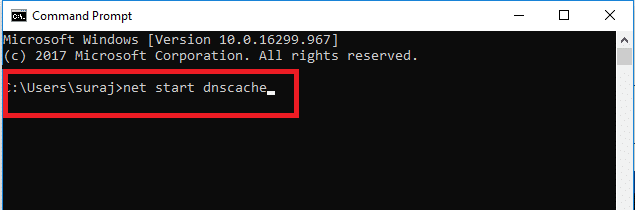
5. To start it again, type the given команда и хит на Внесете клуч.
нето стартување на dnscache
Исто така прочитајте: Како да ги ресетирате мрежните поставки на Windows 10
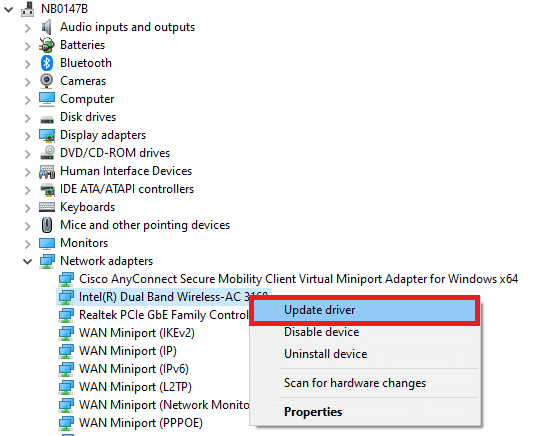
Метод 7: Ажурирајте го мрежниот драјвер
Outdated network drive also can cause server IP address could not be found error. If you do not have the latest driver versions installed, then this may create bugs and can result in the unstable network connection. So, updating your network driver is necessary for a good network connection. Read our guide to update network drivers on Windows 10.
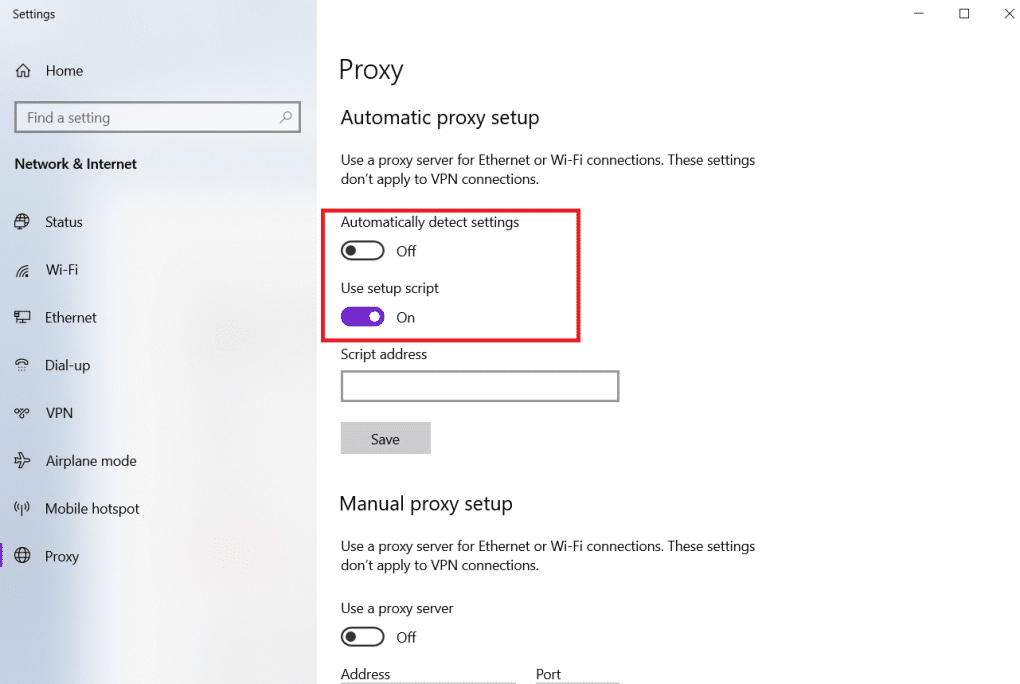
Method 8: Verify Proxy Settings
If you are using a proxy server, then using a particular proxy can create issues with your internet. You can change your proxy server to solve this problem. Follow the steps listed below to verify proxy settings.
1. Удри на Windows клуч и тип Меѓу и кликнете на Променете ги поставките за прокси од резултатите од пребарувањето.
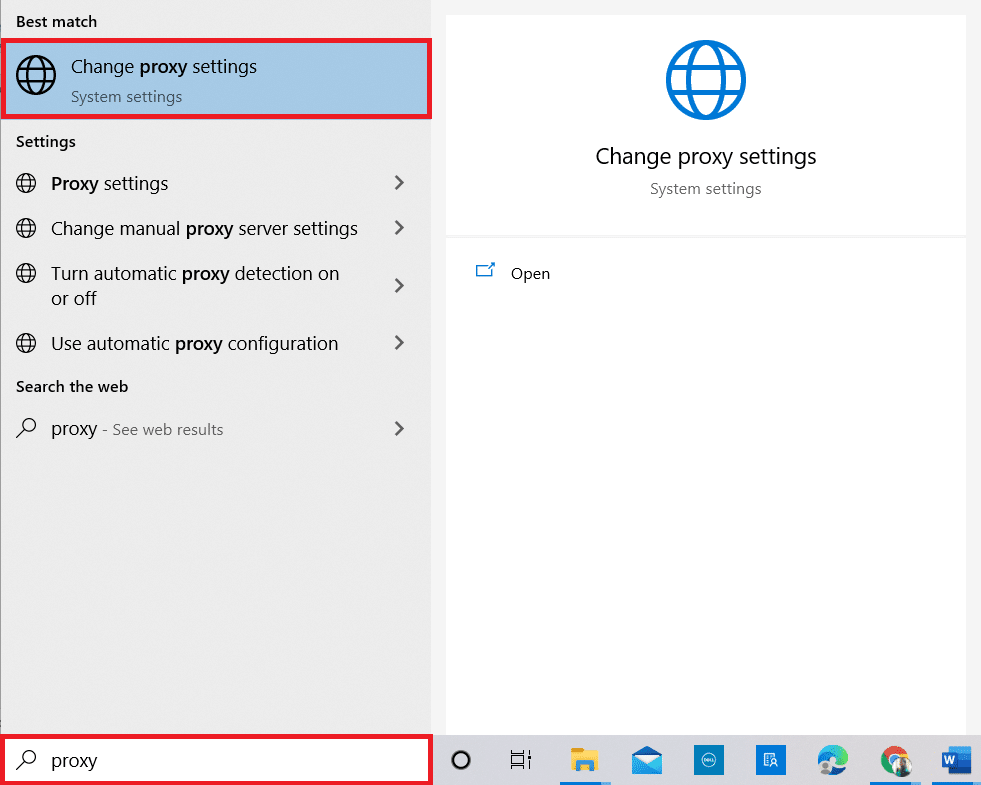
2. Here, switch on the toggle for Автоматски откријте ги прилагодувањата.
Препорачано:
We hope that you learned how to fix server IP address could not be found on Windows 10. Feel free to reach out to us with your queries and suggestions via the comments section below. Let us know what you want to learn about next.

