Issues with Microsoft Outlook’s Personal Folders File format—commonly referred to as PST—have been a huge problem for years. Microsoft knows that, which is why Outlook comes with a built-in tool called Inbox Repair to help you fix corrupted PST files.
In most cases, simply running a damaged PST file through the Inbox Repair tool should be enough to patch it up. But sometimes, you must take extra action to recover lost items.

How Outlook PST File Repair Works
Outlook-ийн Ирсэн имэйлийг засах хэрэгсэл нь таны компьютер дээрх Microsoft Office-ийн суулгацын хавтсанд гүн оршдог тул та үүнд хүрэхийн тулд бага зэрэг ухах хэрэгтэй. Inbox Repair-г олж, ажиллуулсны дараа та гэмтсэн PST файлыг сонгоход л хангалттай.
Анхаарах зүйл: Inbox Repair provides an option to create a backup of the damaged PST file. Make sure to select it since you may need a copy to retrieve missing data later on.
1. Completely exit Microsoft Outlook.
2. Open File Explorer. Depending on the version of Windows that you use, navigate through the following folders:
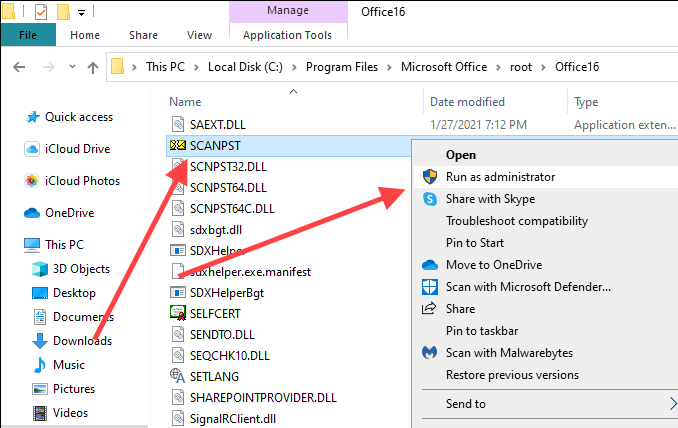
- Windows 64 бит: Local Disk (C:) > Program Files > Microsoft Office > root > Office16
- Windows 32 бит: Local Disk (C:) > Program Files (x86)> Microsoft Office > root > Office16
Тайлбар: The folder paths above apply to Outlook 2016, Outlook 2019, and Outlook 365. If you use an older version of Outlook, you must select the Оффис15 (Outlook 2013), Оффис14 (Outlook 2010), or Оффис12 (Outlook 2007) folder instead.
3. Locate the file labeled SCANPST and run it as an administrator.
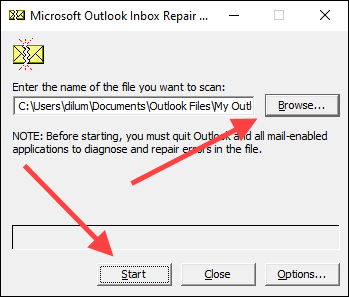
4. ашиглах харах button to select the Outlook PST file that you want to repair.
If you don’t know the location of the PST file, press Windows+S to open Windows Search. Then, search for it by name and include the .PST file extension. You will see the file location within the search results.
Alternatively, open Outlook and go to Файлын > Дансны Тохиргоо > Өгөгдлийн файлууд to view the PST file’s location. Make sure to close the application after that.
5. Сонгох Start. The Inbox Repair tool will check the PST file for issues. That should take some time.
6. Check the radio button next to Засвар хийхээсээ өмнө сканнердсан файлыг нөөцлөөрэй сонгох засвар.

7. Сонгох OK to finish repairing the PST file.
Open Microsoft Outlook and it should automatically start using the PST file without issues. You will find a copy of the corrupted PST file (with the .BAK extension) in the same location as the repaired original.
Recover Lost and Found Files
Sometimes, Microsoft Outlook’s Inbox Repair tool may end up repairing a severely damaged PST file. Suppose the tool fails to place any repaired items in their original folders or locations. In that case, it will lump them into a Lost and Found folder or a set of folders under the Recovered Personal Folders шошго.
You can recover these items by creating a new PST data file in Outlook and moving the contents from Lost and Found or Recovered Personal Folders into it.
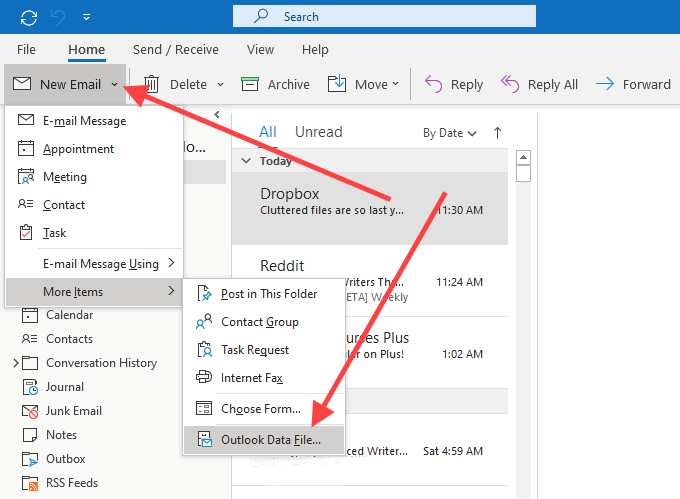
1. Нээх Нүүр хуудас tab in Outlook. Then, open the menu next to шинэ И-мэйл, зааж өгнө Илүү олон зүйлс, сонгох Outlook мэдээллийн файл.
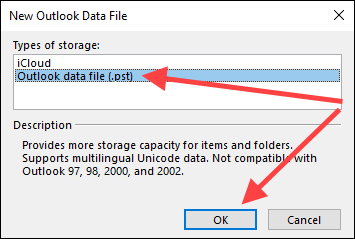
2.-г сонгоно уу Outlook мэдээллийн файл сонголтыг сонгоод сонгоно уу OK.
3. Specify a location on your computer, enter a name for the new PST file, and select OK.
4. Сонгох дэлгэрэнгүй icon (three dots) to the Outlook window’s lower-left corner and select Фолдерууд to switch the Outlook sidebar to Folder List view.

5. Drag the contents within Алдагдсан ба олдсон or Recovered Personal Folders into the new data file.
Once you’ve done that, you can choose to remove the Lost and Found folder or the Recovered Personal Folders data file from Outlook.
Recover Additional Items from PST
Suppose you notice any missing items within the repaired data file. if you also can’t find them inside the Lost and Found folder or under Recovered Personal Folders, you can try retrieving them using the backup copy of the original. Basically, you try to import the contents within the file without duplicating any items that the Inbox Recovery tool has already recovered.
1. Copy the corrupted PST file backup to your desktop.
2. өөрчлөх .BAK extension at the end of the file name to .PST.

Тайлбар: If you can’t see the file extension, open the Файлын menu in a File Explorer window and select Фолдер болон хайлтын сонголтыг өөрчлөх. Дараа нь руу шилжинэ үү харах таб болон хажууд байгаа хайрцгийн сонголтыг арилгана уу Мэдэгдэж буй файлын төрлүүдийн өргөтгөлүүдийг нуух.
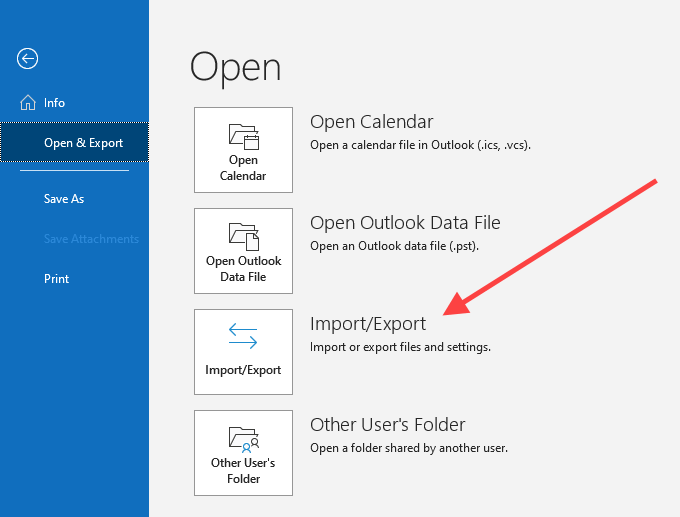
3. Нээх Файлын menu in Outlook and select Нээх, экспортлох > Импорт / Экспорт.
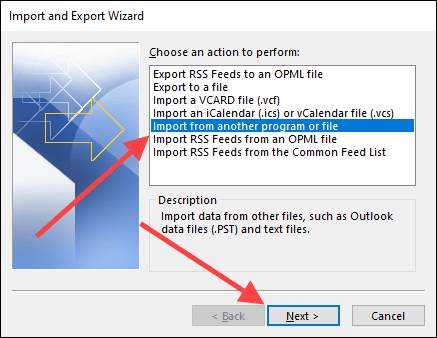
4. Сонгох Өөр програм эсвэл файлаас импортлох сонгох Дараа нь.
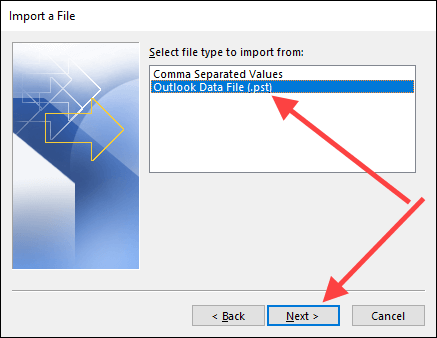
5. Сонгох Outlook мэдээллийн файл (.pst) сонгох Дараа нь.
6. Сонгох харах and select the backup copy of the corrupted PST file (the one that you just renamed).
7. Сонгох Давхардсан хуулбарыг оруулж болохгүй сонгох Дараа нь.

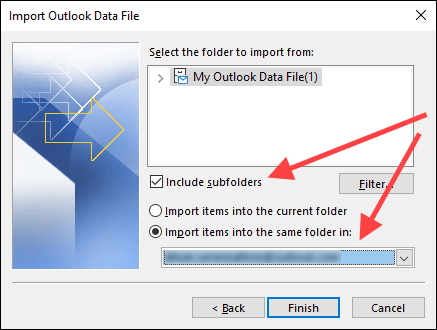
8. Хажуугийн хайрцгийг шалгана уу Дэд хавтсыг оруулна уу. Дараа нь сонгоно уу Import folders into the same folder and pick the account or data file that you want to import the items into.
9. Сонгох Finish.
Once Outlook finishes importing any items, you must manually confirm if the previously missing items are now present. If not, try running the Inbox Repair tool another time.
Third-Party Outlook PST Repair and Recovery Tools
A cursory search online will reveal lots of paid third-party tools that claim to repair damaged or corrupted Outlook PST files. In almost all cases, though, the Inbox Repair tool should be more than good enough for the job.
Only use a third-party recovery program if Inbox Repair fails to retrieve your data, and do your due diligence by checking online reviews thoroughly before spending any money on them.
Before we wrap up, here’s an interesting tidbit: the Inbox Repair tool also allows you to recover deleted items from Outlook.

