3 Ways to Check if a Disk Uses MBR or GPT Partition in Windows 10: Namely, there are two hard disk partition styles GPT (Jadual Partition GUID) and MBR (Rekod Boot Induk) which can be used for a disk. Now, most of the Windows 10 users aren’t aware of which partition they are using and therefore, this tutorial will help them figure out whether they are using MBR or GPT Partition style. The modern version of Windows uses GPT partition which is required for booting Windows in UEFI mode.

Whereas older Windows operating system uses MBR which was required for booting Windows into BIOS mode. Both of the partition styles are just different ways of storing the partition table on a drive. Master Boot Record (MBR) is a special boot sector located at the beginning of a drive which contains information about the bootloader for the installed OS and drive’s logical partitions. MBR partition style can only work with disks which are up to 2TB in size and it only supports up to four primary partitions.
GUID Partition Table (GPT) is a new partition style replacing the old MBR and if your drive is GPT then every partition on your drive has a globally unique identifier or GUID – a random string so long that every GPT partition in the whole world has its own unique identifier. GPT supports up to 128 partition rather than the 4 primary partitions limited by MBR and GPT keeps a backup of the partition table at the end of the disk whereas MBR only store boot data at only one place.
Furthermore, GPT disk provides greater reliability due to replication and cyclical redundancy check (CRC) protection of the partition table. In short, GPT is the best disk partition style out there which supports all the latest features and gives you more room for working smoothly on your system. So without wasting any time let’s see How to Check if a Disk Uses MBR or GPT Partition in Windows 10 with the help of the below-listed tutorial.
3 Ways to Check if a Disk Uses MBR or GPT Partition in Windows 10
Pastikan anda membuat titik pemulihan sekiranya berlaku masalah.
Method 1: Check if a Disk Uses MBR or GPT Partition in Device Manager
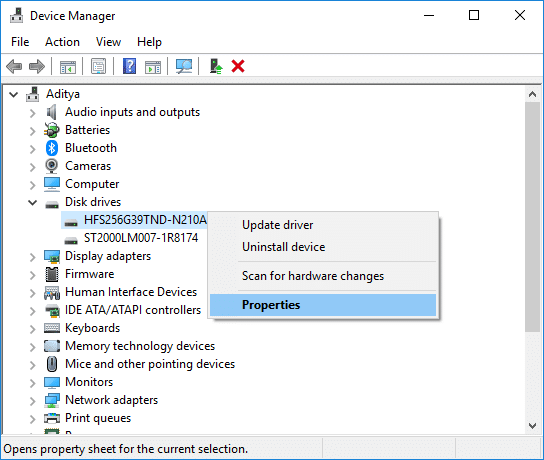
1.Tekan Windows Key + R kemudian taip devmgmt.msc dan tekan Enter untuk membuka Pengurus peranti.

2.Expand Disk drives then klik kanan pada cakera you want to check and select Sifat.
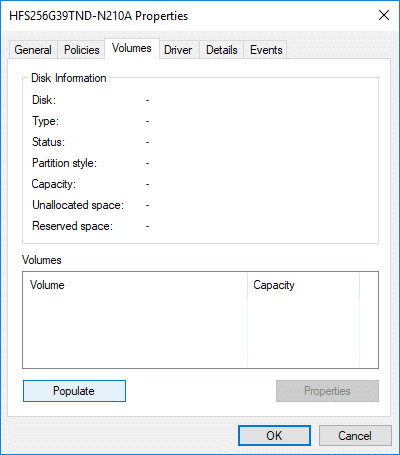
3.Under Disk Properties switch to Tab Jilid dan klik pada Populate button di bawah.
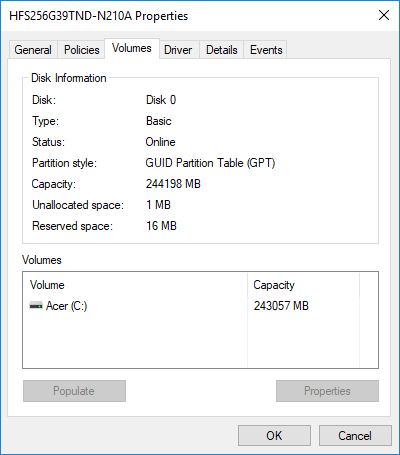
4. Sekarang di bawah "Gaya partition” see if the Partition style for this disk is GUID Partition Table (GPT) or Master Boot Record (MBR).
Juga Baca: Betulkan Pemeriksaan Cakera Tidak Dapat Dilakukan Kerana Windows Tidak Dapat Mengakses Cakera
Method 2: Check if a Disk Uses MBR or GPT Partition in Disk Management
1.Tekan Windows Key + R kemudian taip diskmgmt.msc dan tekan Enter untuk membuka Pengurusan Disk.

2. Sekarang right-click on the “Disk #” (instead of # there will be number e.g. Disk 1 or Disk 0) you want to check and select Sifat.
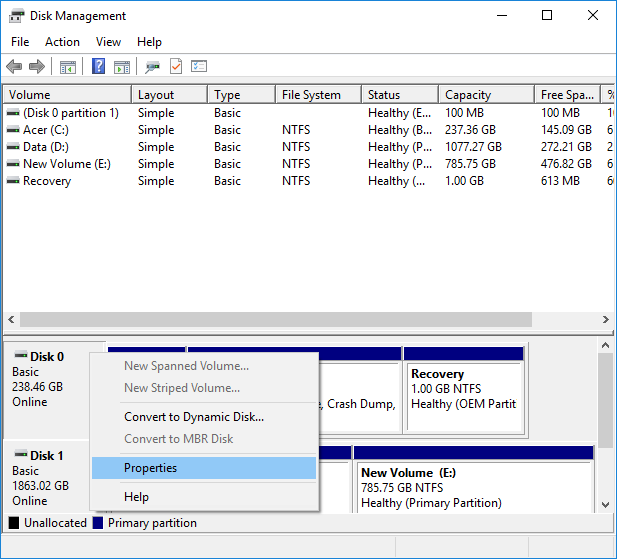
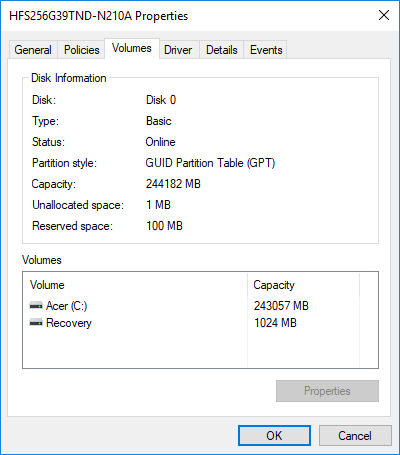
3.Inside the Disk properties window switch to Volumes tab.
4.Next, under “Partiton style” see if the Partition style for this disk is GUID Partition Table (GPT) or Master Boot Record (MBR).
5.Once finished, you can close the Disk Management window.
Ini adalah How to Check if a Disk Uses MBR or GPT Partition in Windows 10, but if you still want to use another method than continue.
Method 3: Check if a Disk Uses MBR or GPT Partition in Command Prompt
1.Tekan Windows Key + X kemudian pilih Promosi Perintah (Admin).

2. Taip perintah berikut satu persatu dan tekan Enter selepas setiap satu:
diskpart
senarai cakera
3.Now you will see all the disk with information such as status, size, free etc but you need to check if the Disk # has a * (asterisk) in its GPT column or not.
Catatan: Instead of “Disk #” there will be number e.g. Disk 1 or Disk 0.
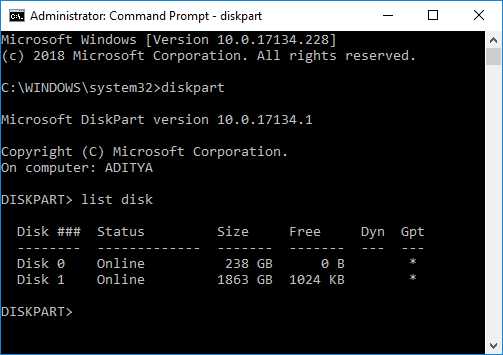
4.If the Disk # has a * (asterisk) in its GPT column maka ini disk has a GPT partition style. Whereas, if the Disk # doesn’t
have a * (asterisk) in its GPT column then this disk will have an MBR partition style.
Lawatan:
Itu sahaja anda telah berjaya belajar How to Check if a Disk Uses MBR or GPT Partition in Windows 10 tetapi jika anda masih mempunyai sebarang soalan mengenai tutorial ini, sila tanya mereka di bahagian komen.

