Fix The Service Couldn’t Be Started Windows Defender Error 0x80070422: Windows Defender is a malware protection software which is inbuilt into Windows 10. Now it is used widely by Windows users because it’s reliable, but in some cases, users also installed 3rd party Antivirus software such as Norton, Quick Heal etc which is not recommend because they corrupt the files of Windows Defender. Once you completely uninstall 3rd party antivirus you won’t be able to use Windows Defender properly because files required by it have already been corrupted and can no longer be used.
“The service couldn’t be started.
The service cannot be started, either because it is disabled or because it has no enabled devices associated with it.”
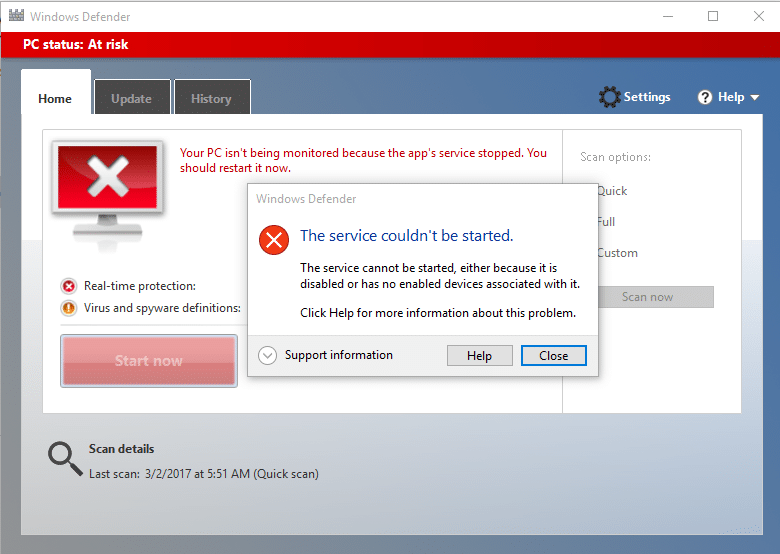
Windows Defender is turned off when you use a 3rd party Antivirus and once you uninstall the Antivirus software you won’t be able to turn ON Windows Defender. If you try to enable Windows Defender you will face the error “The Service Couldn’t Be Started” with error code 0x80070422. So without wasting any time let’s see how to actually Fix The Service Couldn’t Be Started Windows Defender Error 0x80070422 with the help of below-listed troubleshooting guide.
Fix The Service Couldn’t Be Started Windows Defender Error 0x80070422
Pastikan anda membuat titik pemulihan sekiranya berlaku masalah.
Kaedah 1: Jalankan SFC dan CHKDSK
1.Tekan Windows Key + X kemudian klik pada Promosi Perintah (Admin).

2. Sekarang taip yang berikut dalam cmd dan tekan enter:
Sfc /scannow sfc /scannow /offbootdir=c: /offwindir=c:windows (Jika di atas gagal, cuba yang ini)

3.Tunggu proses di atas selesai dan setelah selesai mulakan semula PC anda.
4.Seterusnya, jalankan CHKDSK dari sini Betulkan Ralat Sistem Fail dengan Semak Utiliti Cakera (CHKDSK).
5. Biarkan proses di atas selesai dan but semula PC anda untuk menyimpan perubahan.
Method 2: Temporarily Disable 3rd party Antivirus
1.Klik kanan pada Ikon Program Antivirus daripada dulang sistem dan pilih Lumpuhkan.

2.Seterusnya, pilih rangka masa yang Antivirus akan kekal dilumpuhkan.

Nota: Pilih jumlah masa terkecil yang mungkin contohnya 15 minit atau 30 minit.
3.Once done, again try to run Windows Defender and check if the error resolves or not.
4.Tekan Windows Key + X kemudian pilih Panel Kawalan.

5.Seterusnya, klik pada Sistem dan keselamatan.
6. Kemudian klik pada Windows Firewall.

7. Sekarang dari anak tetingkap kiri klik pada Hidupkan atau matikan Windows Firewall.

8.Pilih Matikan Windows Firewall dan mulakan semula PC anda. Again try to open Windows Defender and see if you’re able to Fix The Service Couldn’t Be Started Windows Defender Error 0x80070422.
Jika kaedah di atas tidak berfungsi pastikan anda mengikuti langkah yang sama untuk menghidupkan Firewall anda semula.
Kaedah 3: Pastikan Windows dikemas kini
1.Tekan Windows Key + I kemudian pilih Kemas kini & Keselamatan.

2.Seterusnya, klik sekali lagi Semak kemas kini dan pastikan anda memasang sebarang kemas kini yang belum selesai.

3.Selepas kemas kini dipasang but semula PC anda dan lihat jika anda boleh melakukannya Fix The Service Couldn’t Be Started Windows Defender Error 0x80070422.
Method 4: Make sure Windows Defender service is set to Automatic
Catatan: If Windows Defender service is grayed out in Services Manager then follow this post.
1.Tekan Windows Key + R kemudian taip services.msc dan tekan Enter.

2.Find the following services in the Services window:
Windows Defender Antivirus Network Inspection Service
Windows Defender Antivirus Service
Windows Defender Security Center Service
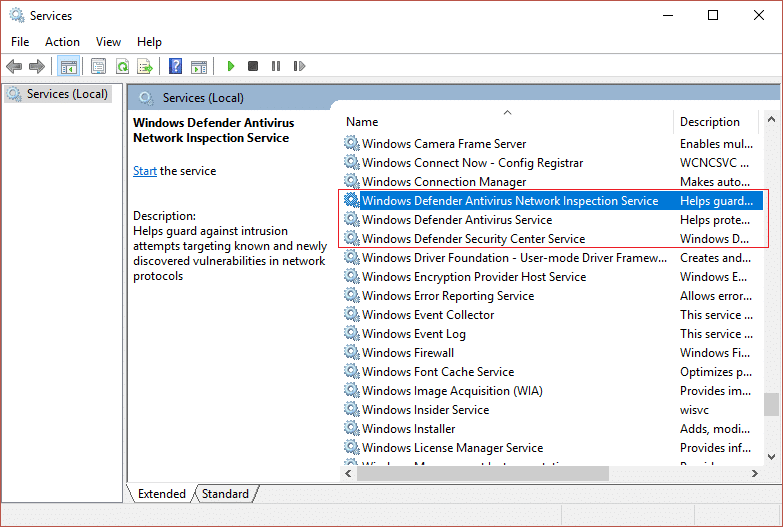
3.Double-click on each of them and make sure their Startup type is set to automatik and click Start if the services are not already running.
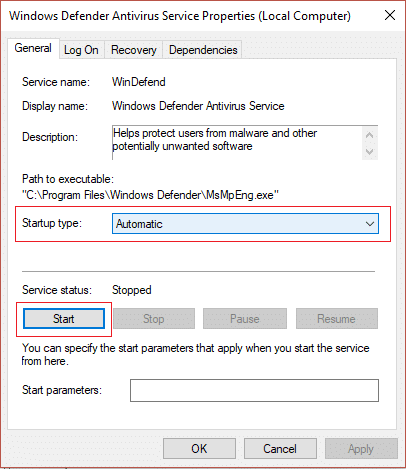
4.Klik Apply diikuti dengan OK.
5. But semula PC anda untuk menyimpan perubahan dan lihat sama ada anda boleh melakukannya Fix The Service Couldn’t Be Started Windows Defender Error 0x80070422.
Method 5: Enable Windows Defender through Registry Editor
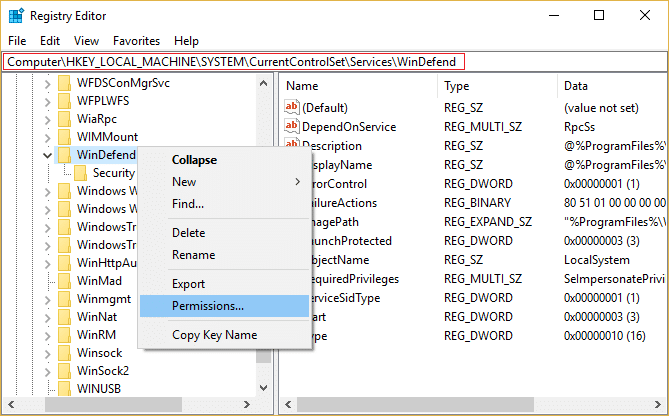
1.Tekan Windows Key + R kemudian taip regedit dan tekan Enter.

2. Navigasi ke kunci pendaftaran berikut:
HKEY_LOCAL_MACHINESYSTEMContentControlSetServicesWinDefend
3.Now right-click on WinDefend dan pilih Kebenaran.
4.Follow this guide in order to take full control or ownership of the above registry key.
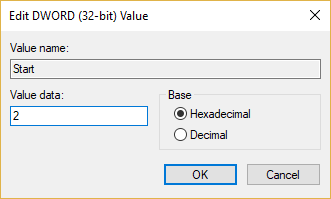
5.After that make sure you have selected WinDefend then in the right window double-click on Start DWORD.
6.Change the value to 2 in the value data field and click OK.
7.Close Registry Editor and reboot your PC.
8.Again try to enable Windows Defender and this time it should work.
Kaedah 6: Jalankan CCleaner dan Malwarebytes
1.Muat turun dan pasang CCleaner & Malwarebytes.
2.Jalankan Malwarebytes dan biarkan ia mengimbas sistem anda untuk mengesan fail berbahaya.
3.Jika perisian hasad ditemui ia akan mengalih keluarnya secara automatik.
4. Sekarang lari CCleaner dan dalam bahagian "Pembersih", di bawah tab Windows, kami cadangkan menyemak pilihan berikut untuk dibersihkan:

5.Setelah anda memastikan mata yang betul disemak, cuma klik Jalankan Cleaner, dan biarkan CCleaner berjalan dengan lancar.
6. Untuk membersihkan sistem anda selanjutnya pilih tab Registry dan pastikan yang berikut disemak:

7. Pilih Imbas Isu dan benarkan CCleaner mengimbas, kemudian klik Betulkan Isu Terpilih.
8. Apabila CCleaner bertanya “Adakah anda mahukan perubahan sandaran pada pendaftaran?” pilih Ya.
9.Setelah sandaran anda selesai, pilih Betulkan Semua Isu Terpilih.
10. Mulakan semula PC anda untuk menyimpan perubahan dan lihat jika anda boleh melakukannya Fix The Service Couldn’t Be Started Windows Defender Error 0x80070422.
Method 7: Refresh or Reset your PC
1.Press Windows Key + I to open Settings then select Kemas kini & Keselamatan.
2.From left-hand menu select pemulihan dan klik pada "Bermula” under Reset this PC.

3.Pilih pilihan untuk Simpan fail saya.

4.Follow the instructions on the screen to complete the process.
5.This will take some time and your computer will restart.
Kaedah 8: Baiki Pasang Windows 10
Kaedah ini adalah pilihan terakhir kerana jika tiada apa-apa yang berjaya maka kaedah ini pasti akan membaiki semua masalah dengan PC anda. Pembaikan Pasang hanya menggunakan peningkatan di tempat untuk membaiki isu dengan sistem tanpa memadamkan data pengguna yang terdapat pada sistem. Jadi ikuti artikel ini untuk melihat Cara Membaiki Pasang Windows 10 Dengan Mudah.
Disyorkan untuk anda:
Itu sahaja, anda telah berjaya Fix The Service Couldn’t Be Started Windows Defender Error 0x80070422 tetapi jika anda masih mempunyai sebarang soalan mengenai panduan ini, sila tanya mereka di bahagian komen.

