Issues with Microsoft Outlook’s Arquivo de pastas pessoais format—commonly referred to as PST—have been a huge problem for years. Microsoft knows that, which is why Outlook comes with a built-in tool called Inbox Repair to help you fix corrupted PST files.
In most cases, simply running a damaged PST file through the Inbox Repair tool should be enough to patch it up. But sometimes, you must take extra action to recover lost items.

How Outlook PST File Repair Works
A ferramenta de reparo da caixa de entrada do Outlook está enterrada na pasta de instalação do Microsoft Office em seu computador, então você precisa pesquisar um pouco para acessá-la. Depois de localizar e iniciar o Inbox Repair, tudo o que você precisa fazer é selecionar o arquivo PST danificado para repará-lo.
Importante: Inbox Repair provides an option to create a backup of the damaged PST file. Make sure to select it since you may need a copy to retrieve missing data later on.
1. Completely exit Microsoft Outlook.
2. Open File Explorer. Depending on the version of Windows that you use, navigate through the following folders:
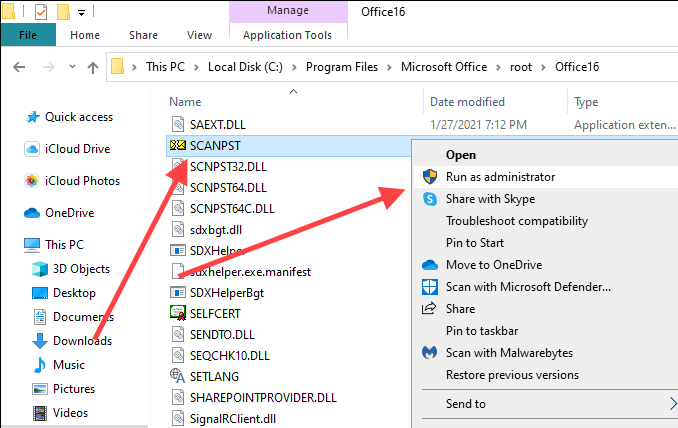
- Windows 64-bit: Local Disk (C:) > Program Files > Microsoft Office > root > Office16
- Windows 32-bit: Local Disk (C:) > Program Files (x86)> Microsoft Office > root > Office16
Observação: The folder paths above apply to Outlook 2016, Outlook 2019, and Outlook 365. If you use an older version of Outlook, you must select the Office15 (Outlook 2013), Office14 (Outlook 2010), or Office12 (Outlook 2007) folder instead.
3. Locate the file labeled SCANPS e execute-o como administrador.
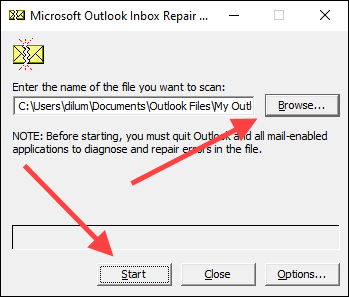
4. Utilizar a Procurar button to select the Outlook PST file that you want to repair.
If you don’t know the location of the PST file, press Windows+S to open Windows Search. Then, search for it by name and include the .PST file extension. You will see the file location within the search results.
Alternatively, open Outlook and go to Envie o > Configurações de conta > Arquivos de Dados to view the PST file’s location. Make sure to close the application after that.
5. Selecionar Início. The Inbox Repair tool will check the PST file for issues. That should take some time.
6. Check the radio button next to Faça backup do arquivo digitalizado antes de reparar e selecione reparação.

7. Selecionar OK to finish repairing the PST file.
Open Microsoft Outlook and it should automatically start using the PST file without issues. You will find a copy of the corrupted PST file (with the .BAK extension) in the same location as the repaired original.
Recover Lost and Found Files
Sometimes, Microsoft Outlook’s Inbox Repair tool may end up repairing a severely damaged PST file. Suppose the tool fails to place any repaired items in their original folders or locations. In that case, it will lump them into a Lost and Found folder or a set of folders under the Recovered Personal Folders rótulo.
You can recover these items by creating a new PST data file in Outlook and moving the contents from Lost and Found or Recovered Personal Folders into it.
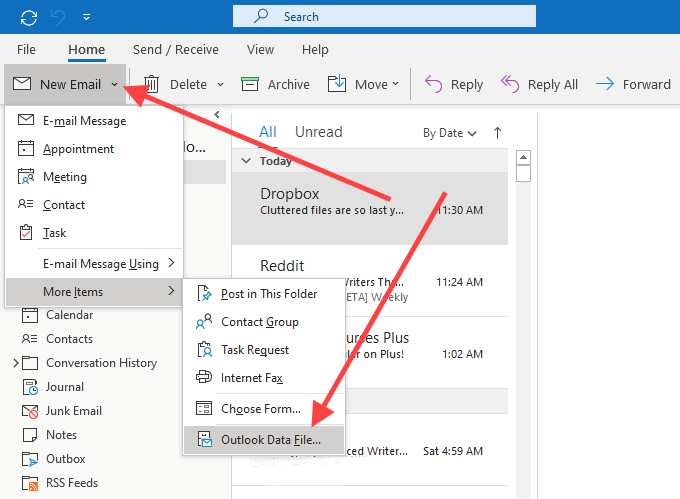
1. Abra a Início tab in Outlook. Then, open the menu next to Novo Email, aponta para Mais itens, e selecione Arquivo de dados do Outlook.
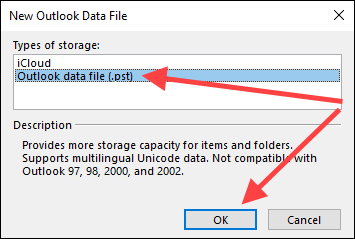
2. Escolha o Arquivo de dados do Outlook opção e selecione OK.
3. Specify a location on your computer, enter a name for the new PST file, and select OK.
4. Selecione a Mais icon (three dots) to the Outlook window’s lower-left corner and select pastas to switch the Outlook sidebar to Folder List view.

5. Drag the contents within Perdidos e Achados or Pastas pessoais recuperadas into the new data file.
Once you’ve done that, you can choose to remove the Lost and Found folder or the Recovered Personal Folders data file from Outlook.
Recover Additional Items from PST
Suppose you notice any missing items within the repaired data file. if you also can’t find them inside the Lost and Found folder or under Recovered Personal Folders, you can try retrieving them using the backup copy of the original. Basically, you try to import the contents within the file without duplicating any items that the Inbox Recovery tool has already recovered.
1. Copy the corrupted PST file backup to your desktop.
2. Mudar o .ATRÁS extension at the end of the file name to .PST.

Observação: If you can’t see the file extension, open the Envie o menu in a File Explorer window and select Alterar pasta e opções de pesquisa. Em seguida, mude para o Ver guia e desmarque a caixa ao lado de Ocultar as extensões dos tipos de arquivo conhecidos.
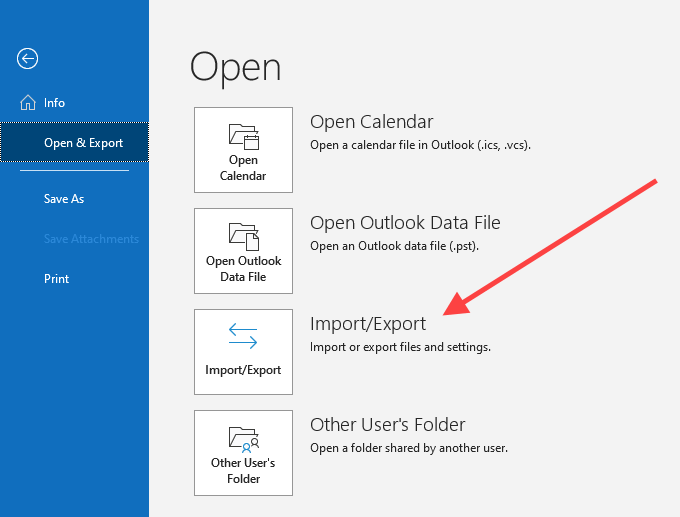
3. Abra a Envie o menu in Outlook and select Abrir e exportar > Import / Export.
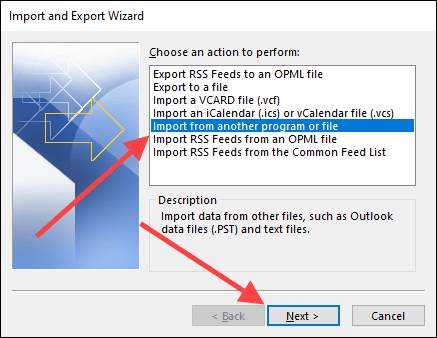
4. Selecionar Importar de outro programa ou arquivo e selecione Próximo.
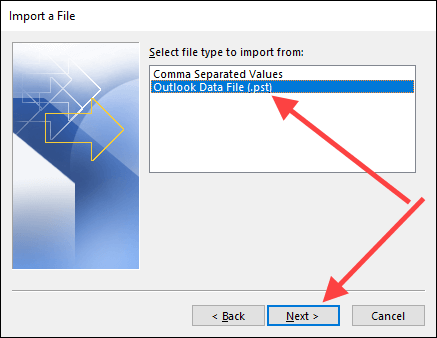
5. Selecionar Arquivo de dados do Outlook (.pst) e selecione Próximo.
6. Selecionar Procurar and select the backup copy of the corrupted PST file (the one that you just renamed).
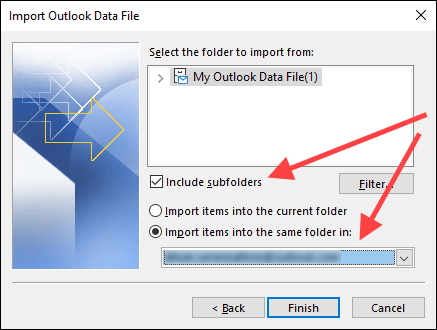
7. Selecionar Não importe duplicatas e selecione Próximo.

8. Marque a caixa ao lado de Incluir subpastas. Então, selecione Importar pastas para a mesma pasta and pick the account or data file that you want to import the items into.
9. Selecionar Acabamento.
Once Outlook finishes importing any items, you must manually confirm if the previously missing items are now present. If not, try running the Inbox Repair tool another time.
Third-Party Outlook PST Repair and Recovery Tools
A cursory search online will reveal lots of paid third-party tools that claim to repair damaged or corrupted Outlook PST files. In almost all cases, though, the Inbox Repair tool should be more than good enough for the job.
Only use a third-party recovery program if Inbox Repair fails to retrieve your data, and do your due diligence by checking online reviews thoroughly before spending any money on them.
Before we wrap up, here’s an interesting tidbit: the Inbox Repair tool also allows you to recover deleted items from Outlook.

