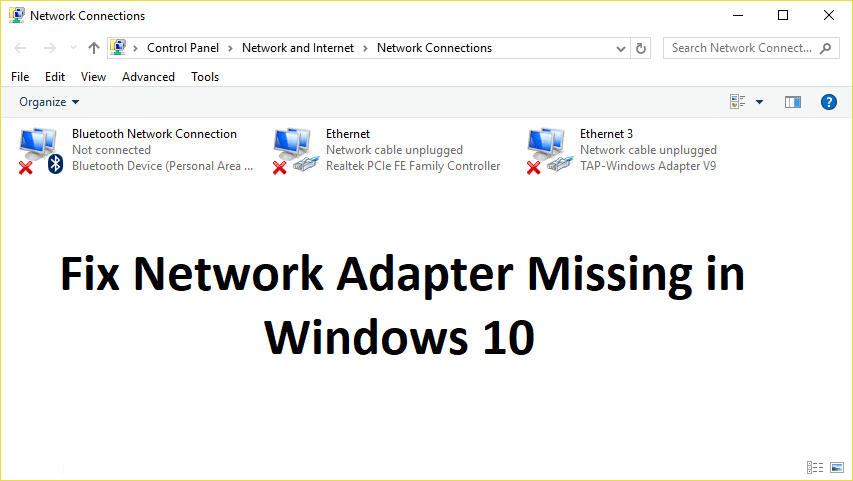
If you don’t see Wireless Adapter under Network Connections neither there is a Network adapter tab under device manager then it seems like your Network Adapter is missing or not detected on your Windows 10 which is a serious issue because you won’t be able to access the Internet until the issue is resolved. In short, when you click on the Wireless icon on the system tray there won’t be any device listed in order to connect to the Internet and if you open Device Manager then you won’t see the Network Adapter tab.
These are the reasons behind the Network Adapter missing issue:
- Network adapter missing in Device manager
- No Network Adapters showing in Device Manager
- Network Adapter Not Detected
- Network Adapter Not Found Windows 10
- No Network Adapter In Device Manager
The main cause of this issue seems to be outdated, incompatible or corrupted Network Adapter drivers. If you have recently upgraded from previous versions of Windows then it’s possible that the old drivers will not work with the new Windows and hence the issue. So without wasting any time let’s see how to actually Fix Network Adapter Missing in Windows 10 issue with the below-listed troubleshooting steps.
Note: Just make sure to uninstall any VPN software on your PC before continuing.
Remediați adaptorul de rețea lipsă în Windows 10
Asigurați-vă că ați creat un punct de restaurare în cazul în care ceva nu merge bine.
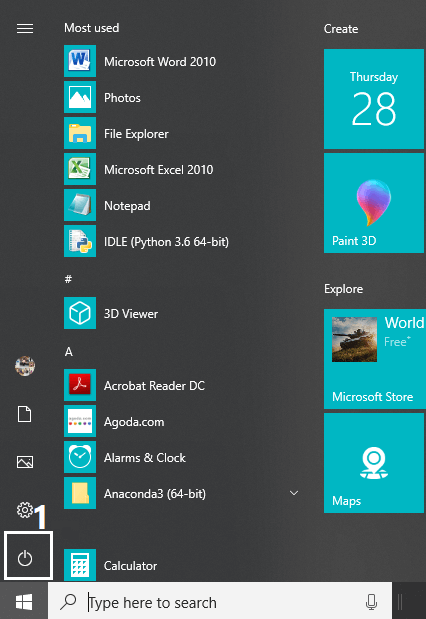
Method 1: Reboot your Computer
Most of us know about this very basic trick. Rebooting your computer can sometimes fix any software conflict by giving it a fresh start. So if you are someone who would rather put their computer on sleep, restarting your computer is a good idea.
1. Faceți clic pe meniul Start și apoi faceți clic pe Butonul de pornire disponibil în colțul din stânga jos.
2. Apoi, faceți clic pe Repornire opțiunea și computerul se va reporni singur.
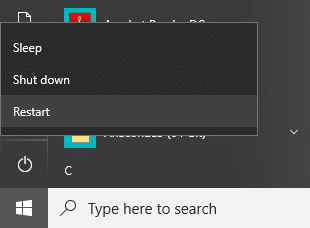
După ce computerul repornește, verificați dacă problema dvs. este rezolvată sau nu.
Method 2: Flush DNS and Reset Winsock Components
1. Open elevated Command Prompt.
2. Now type the following command and press Enter after each one:
ipconfig / release
ipconfig / flushdns
ipconfig / renew

3. Again open Command Prompt and type the following command one by one and hit enter after each one:
ipconfig /flushdns
nbtstat –r
netsh int ip reset
netsh winsock reset
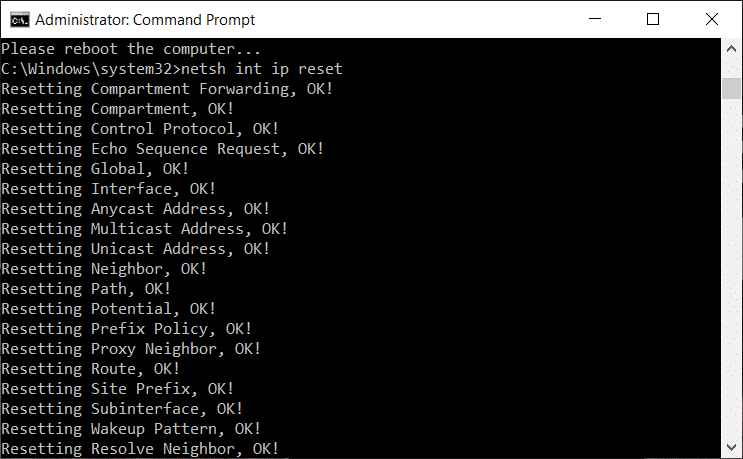
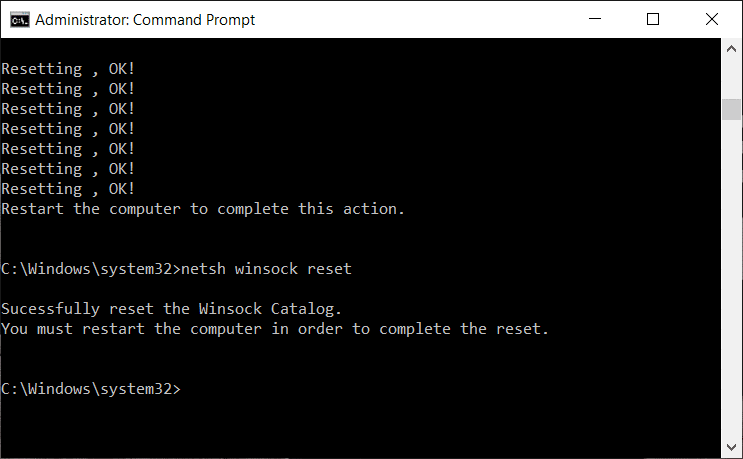
4. Reboot to apply changes. Flushing DNS seems to Fix Network Adapter Driver Issues on Windows 10.
Method 3: Run WWAN AutoConfig Service
1. Apăsați tasta Windows + R apoi tastați services.msc și apăsați Enter.

2. Găsiți WWAN AutoConfig Service in the list (press W to reach to the end of the list quickly).
3. Faceți dublu clic pe WWAN AutoConfig Service.
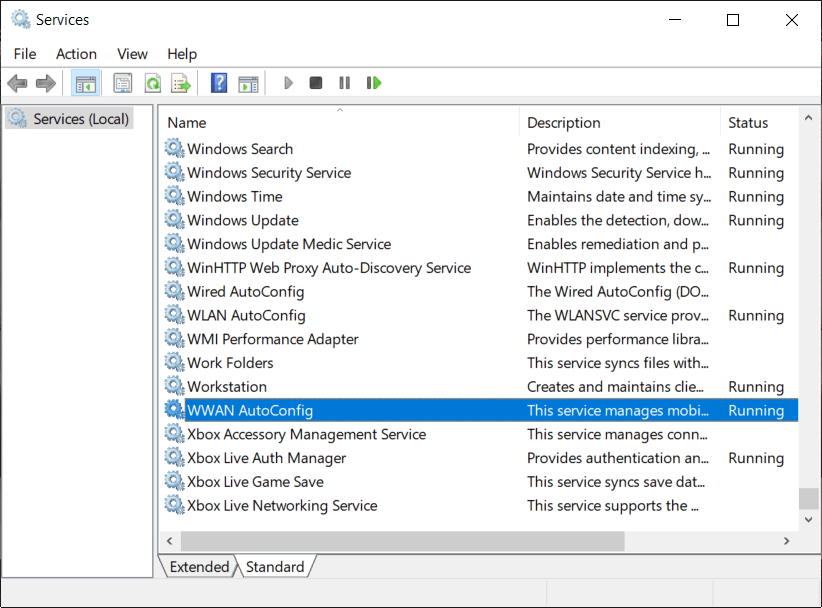
4. If the service is already running then click on Stop, then from the Startup type drop-down select Automat.
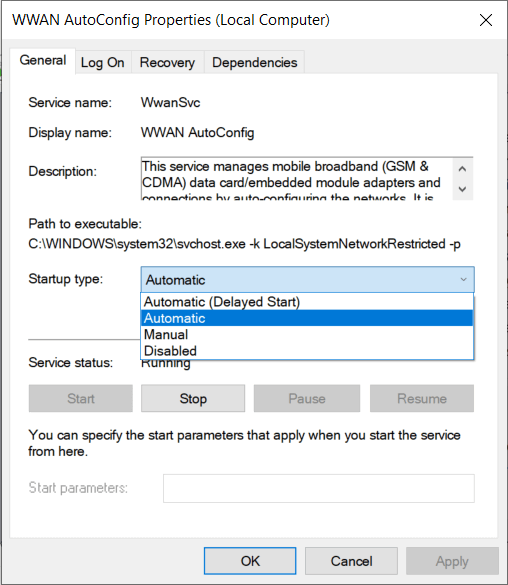
5. Click Apply followed by OK.
6. Faceți clic dreapta pe butonul WWAN AutoConfig Service și selectați Start.
Metoda 4: Actualizați driverele adaptorului de rețea
1. Press Windows key + R and type “devmgmt.msc” in Run dialogue box to open manager de dispozitiv.

2. Extindeți Adaptoare de rețea, apoi faceți clic dreapta pe dvs Controler Wi-Fi (de exemplu Broadcom sau Intel) și selectați Actualizați software-ul driverului.

3. Acum selectați „Search for automatically for updated driver software".
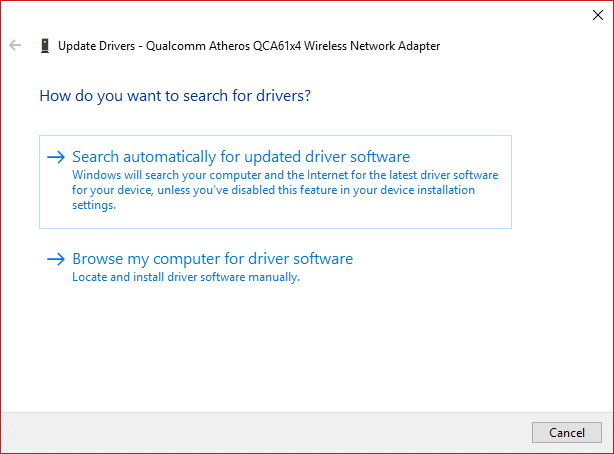
4. Acum Windows will automatically search for the Network driver update and if new update is found, it will automatically download and install it.
5. Once finished, close everything and reboot your PC.
6. If you’re still facing the Network Adapter Missing in Windows 10 issue, then again right-click on your WiFi controller and select Actualizați driver-ul în Manager dispozitive.
7. Now, in the Update Driver Software Windows, select “Răsfoiți computerul pentru software-ul driverului.

8. Acum selectați „Permiteți-mi să aleg dintr-o listă de drivere disponibile pe computerul meu.

9. Încercați să update drivers from the listed versions (make sure to checkmark compatible hardware).
10. If the above didn’t work then go to site-ul producătorului pentru a actualiza driverele.

11. Download and install the latest driver from the manufacturer’s website then restart your PC.
Method 5: Uninstall Network Adapter Drivers
1. Apăsați tasta Windows + R apoi tastați „devmgmt.msc” și apăsați Enter pentru a deschide Device Manager.
2. Extindeți adaptoare de rețea și găsiți numele adaptorului de rețea.
3. Asigurați-vă că notează numele adaptorului doar în cazul în care ceva nu merge bine.
4. Right-click on your network adapter and uninstall it.

5. It will ask for confirmation selectați Da.
6. Restart your PC and Windows will automatically install the network adapter drivers again.
7. If the drivers are not installed automatically then again open the Device Manager.
8. From the Device Manager menu, click on Acțiune apoi faceți clic pe „Scanați modificările hardware".

Metoda 6: Asigurați-vă că Windows este actualizat
1. presa Cheia Windows + I to open Settings then click on Actualizare și securitate.
![]()
2. From the left-hand side, menu click on Windows Update.
3. Now click on the “Verifică pentru actualizări” pentru a verifica dacă există actualizări disponibile.

4. If any updates are pending then click on Descărcați și instalați actualizări.

5. Once the updates are downloaded, install them and your Windows will become up-to-date.
6. After the updates are installed reboot your PC to save changes.
Metoda 7: rulați instrumentul de depanare a adaptorului de rețea
1. Apăsați tasta Windows + I pentru a deschide Setări, apoi faceți clic pe Actualizare și securitate.
![]()
2. From the left-hand menu select Depanarea.
3. Under Troubleshoot click on Conexiuni la Internet apoi faceți clic pe Rulați depanatorul.

4. Urmați instrucțiunile suplimentare de pe ecran pentru a rula instrumentul de depanare.
5. If the above didn’t fix the issue then from the Troubleshoot window, click on Adaptor de rețea apoi faceți clic pe Rulați depanatorul.
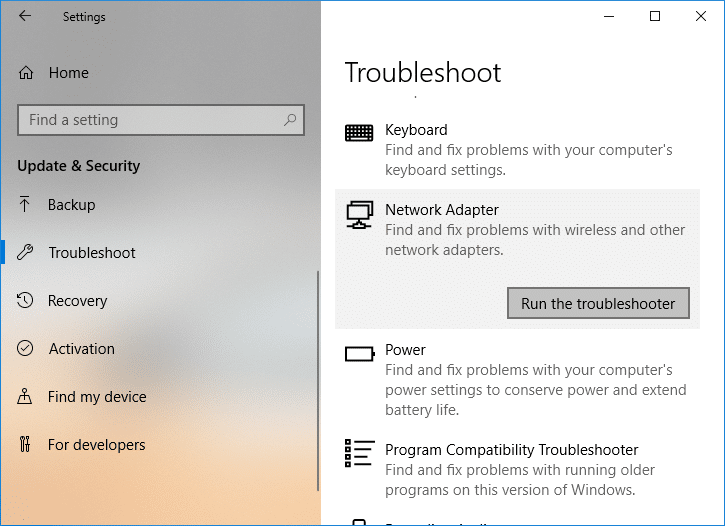
5. Reporniți computerul pentru a salva modificările și pentru a vedea dacă puteți fix the Network Adapter Missing issue.
Metoda 8: Instalați software-ul Intel PROSet/Wireless
Uneori, problema este cauzată de software-ul Intel PROSet învechit, deci actualizarea pare să fie fix Network Adapter Missing in Windows 10 issue. Prin urmare, du-te aici și descărcați cea mai recentă versiune de PROSet/Wireless Software și instalați-o. Acesta este un software terță parte care vă gestionează conexiunea WiFi în loc de Windows și, dacă software-ul PROset/Wireless este învechit, poate cauza probleme ale driverelor în Adaptor de rețea fără fir. Hence, read How to Update Network Adapter Drivers on Windows 10.
Metoda 9: Resetați conexiunea la rețea
1. Apăsați tasta Windows + I pentru a deschide Setări, apoi faceți clic pe Rețea și Internet.

2. From the left-hand menu select Stare.
3. Now scroll down and click on Resetare rețea în partea de jos.

4. Faceți din nou clic pe „Resetați acum” under Network reset section.

5. This will successfully reset your network adapter and once it is complete the system will be restarted.
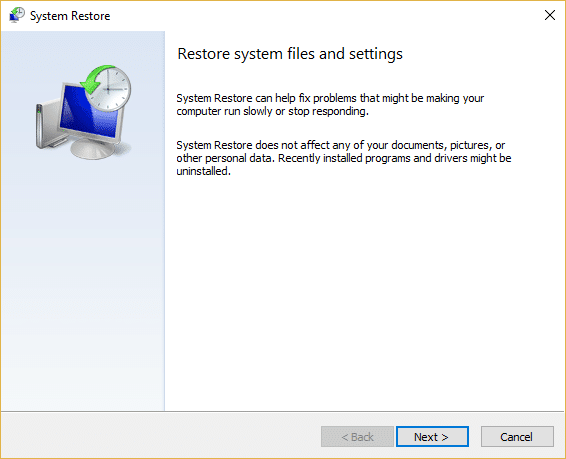
Metoda 10: Efectuați o restaurare a sistemului
Restaurarea sistemului funcționează întotdeauna în rezolvarea erorii, prin urmare Restaurarea sistemului vă poate ajuta cu siguranță să remediați această eroare. Deci, fără a pierde timp, executați restaurarea sistemului pentru a resolve Network Adapter Missing issue.
Method 11: Using elevated Command Prompt
1. Apăsați tasta Windows + X apoi selectați Comandă Prompt (Admin).

2. Tastați următoarea comandă în cmd și apăsați Enter:
netcfg –s n
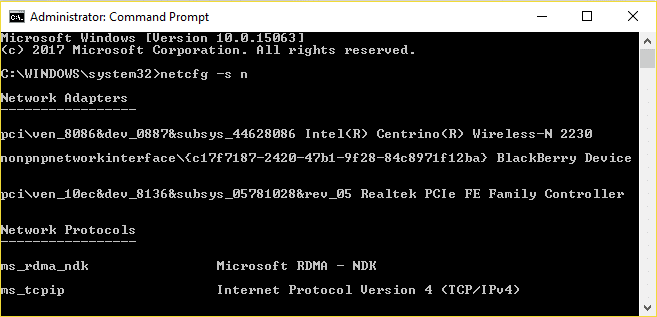
3. This will display a list of networking protocols and in that list find DNI_DNE.
4. If DNI_DNE is listed then type the following command into cmd:
șterge reg HKCRCLSID {988248f3-a1ad-49bf-9170-676cbbc36ba3} / va / f
netcfg -v -u zile_dne
5. If you don’t see DNI_DNE listed then only run the command netcfg -v -u dni_dne.
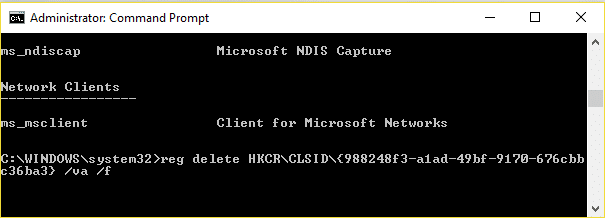
6. Now if you receive the error 0x80004002 after trying to run the above command then you need to delete the above key manually.
7. Apăsați tasta Windows + R apoi tastați regedit și apăsați Enter.

8. Navigate to the following Registry Key:
HKEY_CLASSES_ROOTCLSID{988248f3-a1ad-49bf-9170-676cbbc36ba3}
9. Delete this key and then again type netcfg -v -u zile_dne command in cmd.
10. Reporniți computerul pentru a salva modificările.
Recomandat pentru tine:
Asta ai cu succes Remediați adaptorul de rețea lipsă în Windows 10 dar dacă mai aveți întrebări cu privire la această postare, nu ezitați să le întrebați în secțiunea de comentarii.

