What is DLNA Server & How to enable it on Windows 10: There was a time not long ago when people used DVD’s, Blu-ray, etc. to watch movies or songs on their TV, but nowadays you don’t need to purchase a CD or DVD anymore. This is because now you can directly connect your PC to your TV and enjoy any movies or songs directly on your TV. But now you must be wondering how does one connect their PC to TV to enjoy streaming moves or songs? The Answer to this question is that you can connect your PC to the TV using DLNA server.
DLNA Server: DLNA stands for Digital Living Network Alliance is a special software protocol and non-profit collaborative standards organization which allows devices such as TVs and media boxes on your network to discover media content stored on your PC. It enables you to share digital media between multimedia devices. DLNA is quite useful as it allows you to share media collection stored at one place with various devices with just one click. You can easily create a DLNA server on Windows 10 and start using media collection of your computer.
DLNA is also compatible with smartphones and can be used to stream content on HDTV which means if you have some cool or entertaining content on your smartphones and you want to watch it on a big screen, then you can do so by using DLNA server. Here your smartphone will act as the remote control.
DLNA works with cables, satellites, and telecom so that they can ensure data protection on each end, i.e. from where it is transferring data to and where data is transferring. DLNA certified devices include smartphones, tablets, PCs, TV sets, etc. DLNA can be used to share videos, pictures, images, movies, etc.
Now we have discussed all about DLNA server and its uses but one thing which you still need to discuss is how to enable DLNA on Windows 10? Well, don’t worry with a couple of clicks, you can enable the built-in DLNA server in Windows 10 and start streaming your media files.
How to Enable DLNA Server on Windows 10
Asigurați-vă că ați creat un punct de restaurare în cazul în care ceva nu merge bine.
Windows 10 does not provide an option to enable DLNA server through Settings so you need to use Control Panel in order to enable DLNA server. To enable DLNA server on Windows 10, follow the below steps:
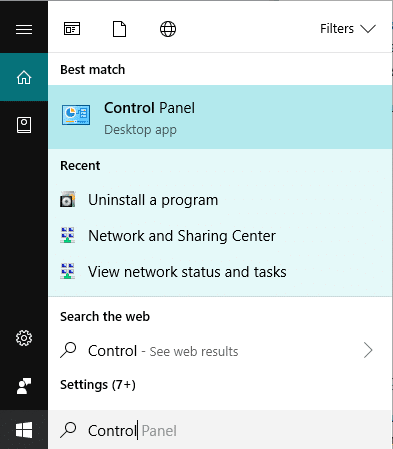
1.Tip panoul de control in the Windows search bar then click on Panou de control din rezultatul căutării.
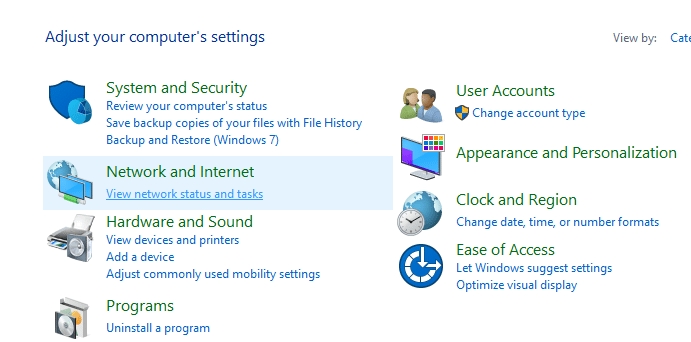
2.Click pe Rețea și Internet opțiune.
Notă: Asigurați-vă că selectați Categorii from the “View by:” drop-down.
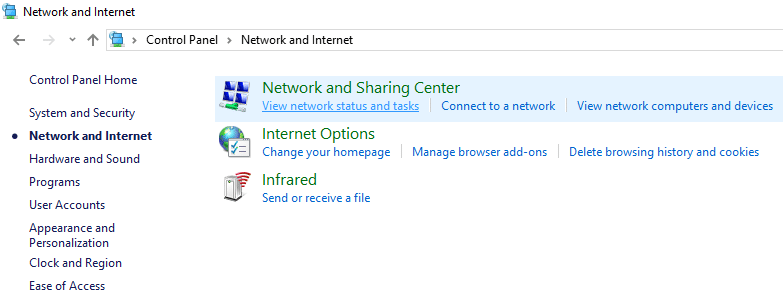
3.Under Network and Internet, click on Centrul de rețea și partajare.
4. Faceți clic pe Modificați setările de partajare avansate” link from the left-hand window pane.
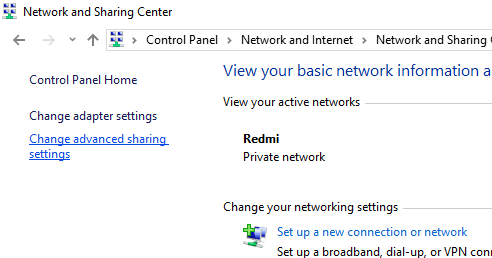
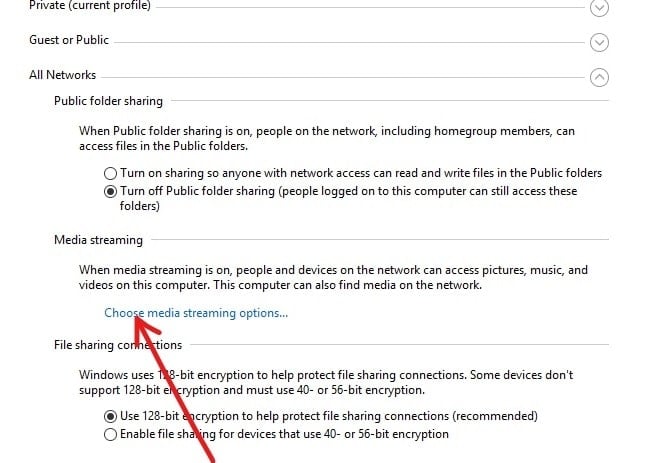
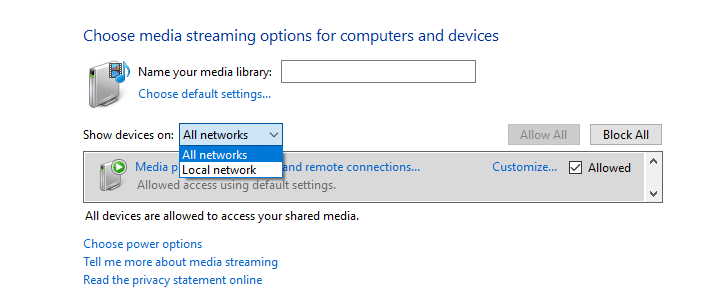
5.Under Change sharing options, click on the downwards arrow next to All Network.
![]()
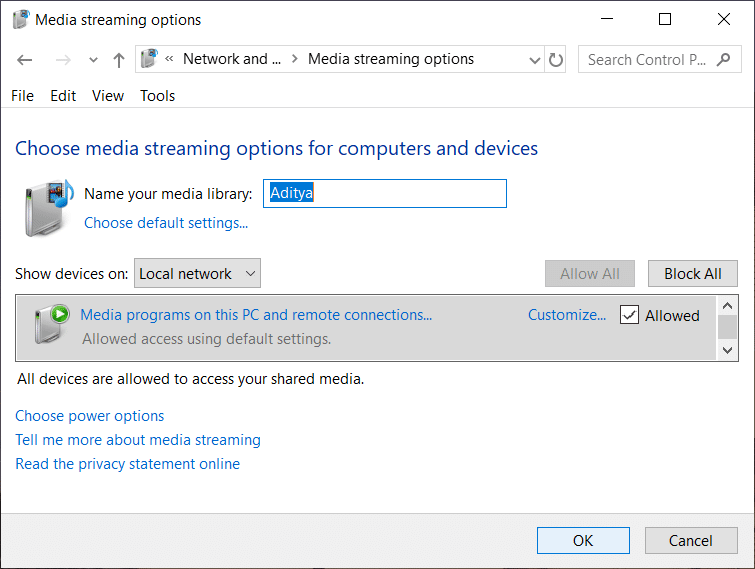
6. Faceți clic pe „Alegeți opțiunile de streaming media” link under Media streaming section.
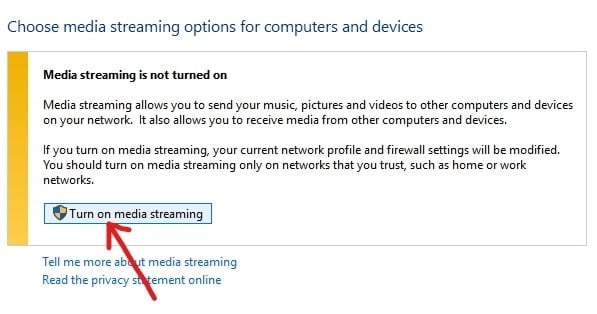
7.A new dialog box will appear, click on Turn on Media Streaming butonul.
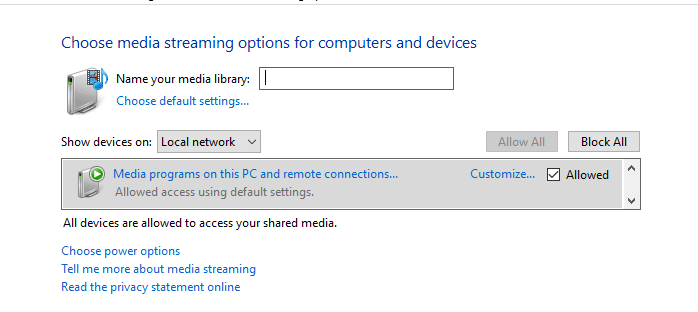
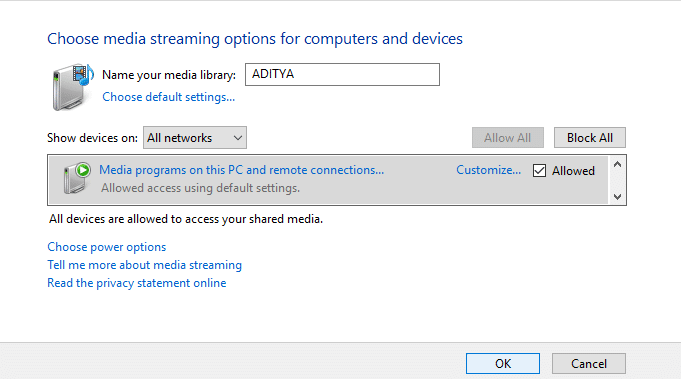
8.On the next screen, you will see the following options:
a.The first option is to enter a custom name for your media library so that you can easily identify it whenever you want to access its content.
b.Second option is to whether to show the devices on Local network or All network. By default, it is set to Local network.
c.Last option is where you will see a list of DLNA enabled devices which shows which devices are currently allowed access to your media content. You can always uncheck Allowed option next to the devices you don’t want to share your multimedia content.
9.Name your network multimedia library and choose devices which will be able to read it.
Notă: If you want all the devices to able to access this media library then choose All network from the “Show devices on” drop-down.
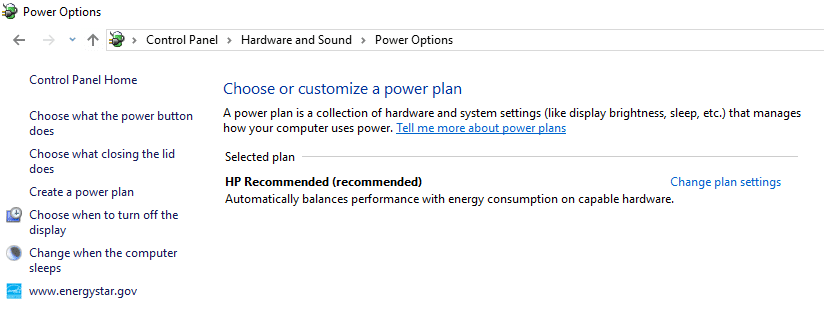
10.If your PC is sleeping then the multimedia content will not be available to other devices, so you need to click the “Choose power options” link and configure your PC to stay awake.
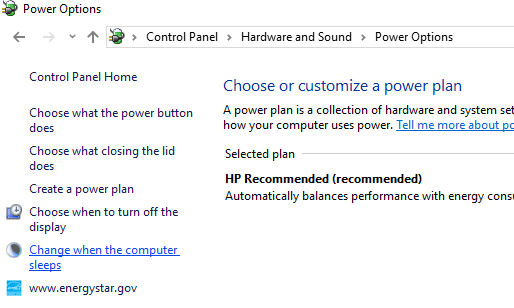
11.Now from the left-hand window pane click on “Schimbați când computerul inactivează"Link.
12.Next, you will be able to edit your power plan settings, make sure to change the sleep timing accordingly.
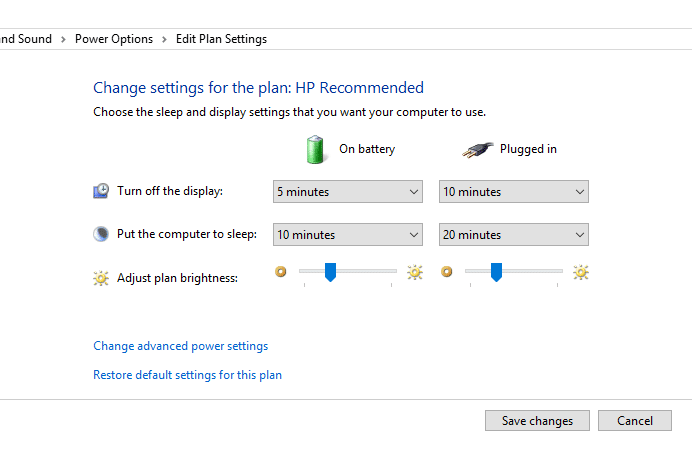
13.Finally, to save changes click on the Save changes button.
14.Go back and click on the Butonul OK available at the bottom of the screen.
Once you have completed the steps the DLNA server is now enabled and your account libraries (Music, Pictures, and Videos) will automatically be shared to any streaming devices to which you have given access to. And if you have chosen All networks then your multimedia data will be visible to all the devices.
Now you have watched content from your PC on the TV and it must be a thrilling experience to watch it on a big screen but if you have decided that you don’t need DLNA server any more or you just don’t like the idea of sharing content from your PC then you can easily disable the DLNA server whenever you want.
How to Diable DLNA Server on Windows 10
If you want to disable DLNA server then you can do so by following steps below:
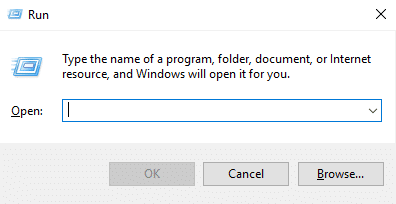
1. Apăsați Windows Key + R pentru a deschide caseta de dialog Run.
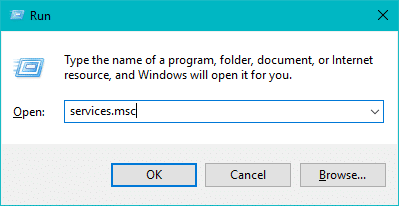
2.Type the below command in the Run box and hit Enter:
services.msc
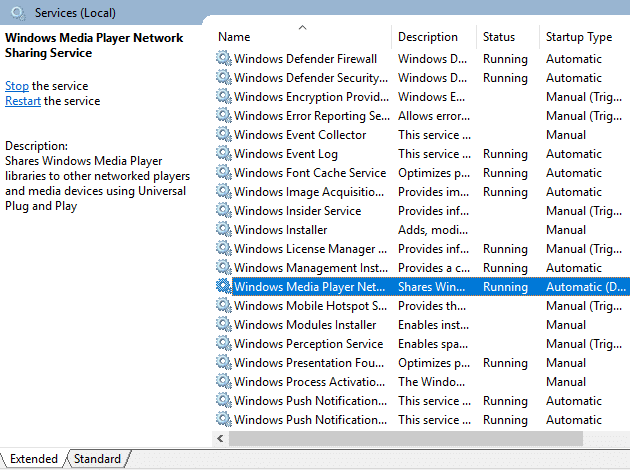
3.This will open the Services window as shown in the below image.
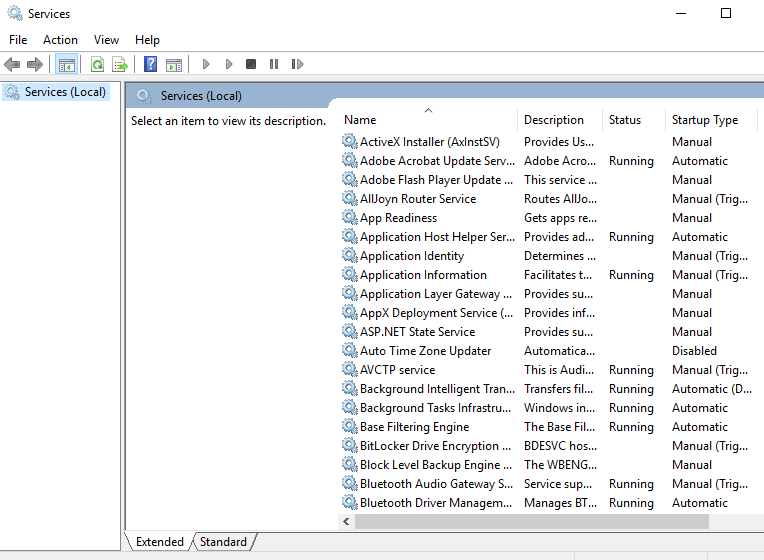
4.Now find Servicii de partajare în rețea Windows Media Player".
5.Double-click on it and the below dialog box will appear.
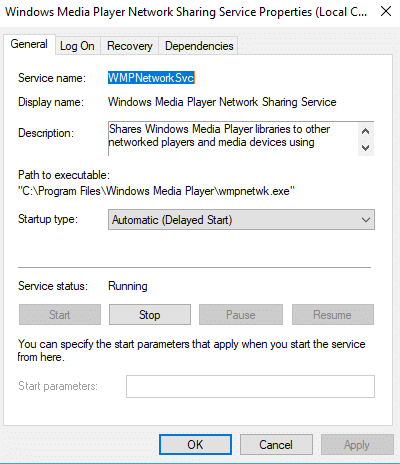
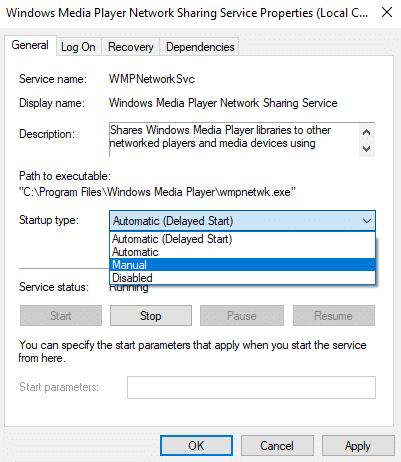
6.Setați Startup type as Manual by choosing Manual option from the dropdown menu.
7. Faceți clic pe Butonul Stop pentru a opri serviciul.
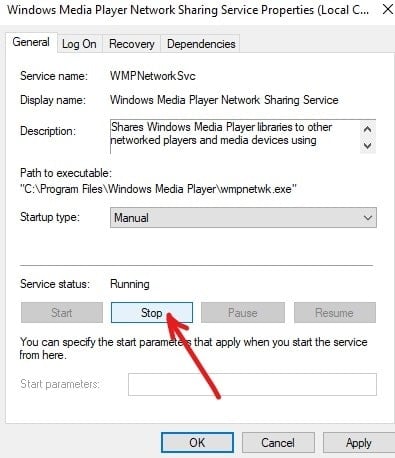
8.Click Apply followed by OK to save changes.
After completing the above steps, your DLNA server which was earlier enabled will be disabled successfully and no other device will be able to access your PC multimedia content.
Recomandat:
Sper că acest articol a fost util și că acum puteți cu ușurință Enable DLNA Server on Windows 10, dar dacă mai aveți întrebări cu privire la acest tutorial, atunci nu ezitați să le întrebați în secțiunea de comentarii.

