All the corrupt files in your system can be analyzed and repaired by several built-in tools in Windows 10 system. One such command-line tool is ملازمت جي تصويري جي خدمت ۽ انتظام or ڊسڪ, which assists in servicing and preparing Windows images on Windows Recovery Environment, Windows Setup, and Windows PE. This tool could also help you in repairing the corrupt files even if System File Checker is not working correctly. Yet, sometimes you may receive Windows 10 DISM Error 87 due to varied reasons. This guide will help you fix DISM Error 87 in Windows 10 PC.
How to Fix DISM Error 87 in Windows 10
What causes DISM Error 87 in Windows 10?
Several reasons contribute to Windows 10 DISM Error 87. A few of them are discussed below.
- Command Line has an Error – Wrongly typed command line can cause the said error. For example, when you have typed an incorrect code or any incorrect spaces exist before the /سوراخ.
- Bug in Windows 10 System – When there is an update pending in your system or if your system has a hidden bug, then you might face DISM Error 87. Installing all the new updates available can fix the issue in your system.
- Running Commands in Regular Command Prompt Window – Few commands are validated only if you have administrative privileges.
- Outdated Version of DISM – If you try to apply or use a Windows 10 image using an old version of DISM in your system, you will face DISM Error 87. In this case, use the correct wofadk.sys filter driver and try applying the Windows 10 image using an apt DISM version.
Now that you have a basic idea about what causes DISM Error 87 in Windows 10, continue reading the article to learn how to fix the said problem. A list of methods is compiled and arranged according to user convenience. So, one by one, implement these until you find a solution for your Windows 10 desktop/laptop.
Method 1: Type Commands with Correct Spelling & Spacing
The most common mistake users make is of either typing an incorrect spelling or leaving an incorrect spacing before or after the / character. To fix this error, type the command correctly.
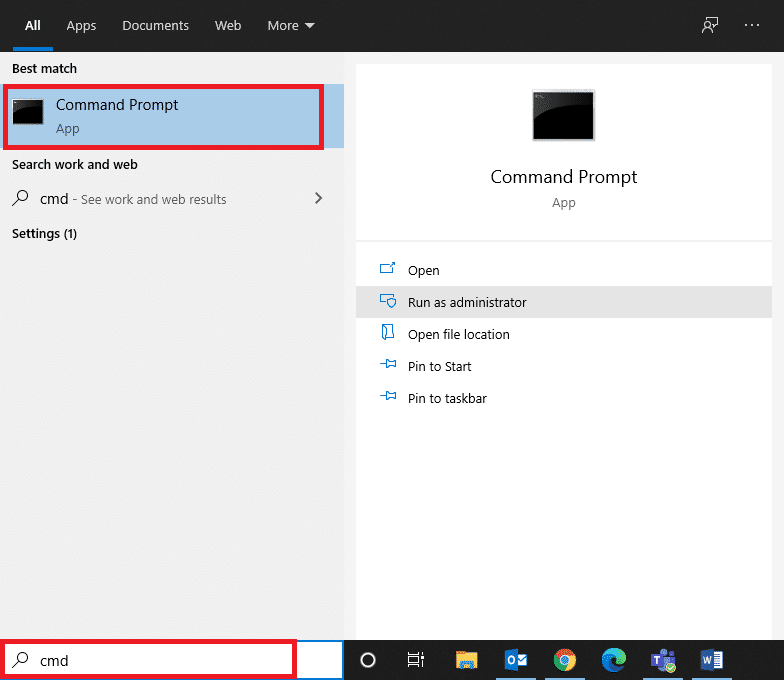
1. لانچ ڪمانڊ پرامٽ جي ذريعي ونڊوز سرچ بار، جيئن ڏيکاريل آهي.
2. Type the following command with spelling and spacing as mentioned:
DISM.exe / آن لائن / صفائي-تصوير / سکينٿٿ
OR
ڊسڪ ڊسڪ / آن لائن / صاف ڪرڻ-تصوير / بحالي واري جڳهه
3. Once you hit درج ڪريو you will see some data pertaining to the DISM tool displayed on the screen, as depicted.
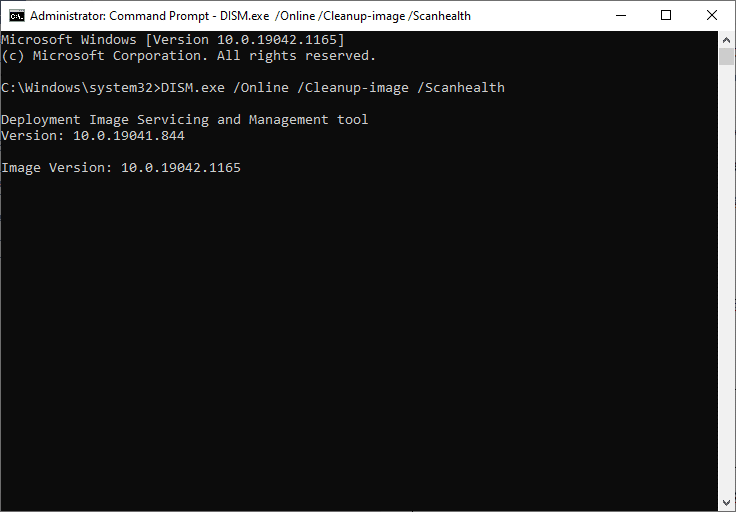
4. The said command should get executed and fetch results.
Method 2: Run Command Prompt with Administrative Privileges
Even if you type the command with correct spelling and spacing, you may encounter Windows 10 DISM Error 87 due to lack of administrative privileges. Hence, do as follows:
1. پريس ڪريو ونڊوز ڪيٻو ۽ قسم cmd سرچ بار ۾.
2. تي ڪلڪ ڪريو منتظم طور تي هليو in the right pane to launch Command Prompt with administrative privileges.

3. ٽائپ ڪريو حڪم as earlier and hit شامل ڪريو.
Now, your command will be executed and Windows 10 DISM Error 87 will be fixed. If not, try the next solution.
پڻ پڙهيو Fix DISM Error 14098 Component Store has been corrupted
Method 3: Run System File Checker and CHKDSK
Windows 10 users can automatically, scan and repair their system files by running System File Checker (SFC) and Check Disk (CHKDSK) commands. These are built-in tools that let the user delete files and fix Windows 10 DISM Error 87. Steps to run SFC and CHKDSK are given below:
1. لانچ ڪمانڊر ايڊمنسٽريٽر جي حيثيت ۾ using the steps explained in طريقو 2.
2. ھيٺ ڏنل حڪم ٽائيپ ڪريو: ايس سي سي / اسڪانو ۽ پريس ڪريو اهم داخل ڪريو.
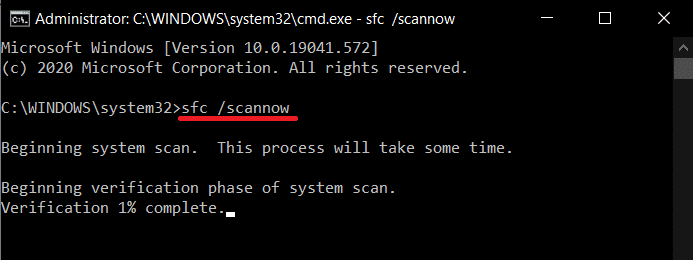
Now, System File Checker will begin its process. All the programs in your system will be scanned and will be repaired automatically.
3. لاء انتظار ڪريو تصديق 100٪ مڪمل statement to appear, and once done, پنهنجي پي سي وري شروع ڪريو.
Check if Windows 10 DISM Error 87 is fixed. If not, follow the steps further.
نوٽ: Before executing the CHKDSK tool, make sure you do not need to recover any deleted files in your system since this tool cannot restore the recoverable data.
4. ٻيهر، لانچ Command Prompt as an administrator.
5. قسم CHKDSK C:/r and hit شامل ڪريو، جيئن ڏيکاريل آهي.
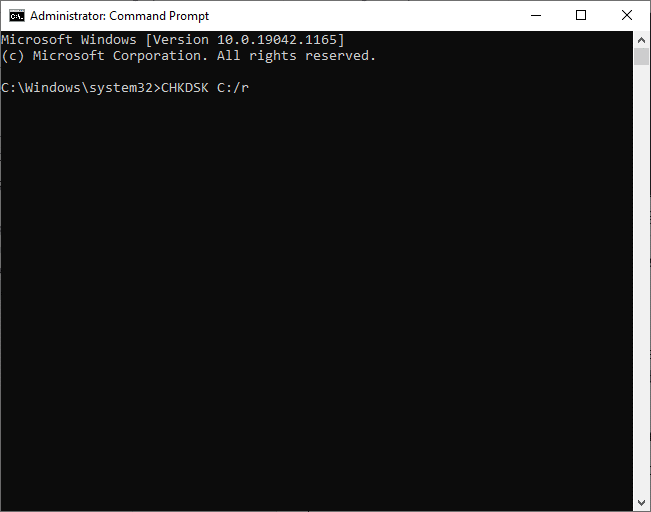
6. آخرڪار، عمل جي ڪاميابيءَ سان هلڻ جو انتظار ڪريو ۽ بند دري.
پڻ پڙهيو Fix DISM Source Files Could not be Found Error
طريقو 4: ونڊوز او ايس کي اپڊيٽ ڪريو
If you did not obtain any results by the above-mentioned methods, then there might be bugs in your system. Microsoft releases updates periodically, to fix the bugs in your system. Therefore, always ensure that you use your system in its updated version. Otherwise, the files in the system will not be compatible with the DISM files leading to DISM Error 87 in Windows 10 computers.
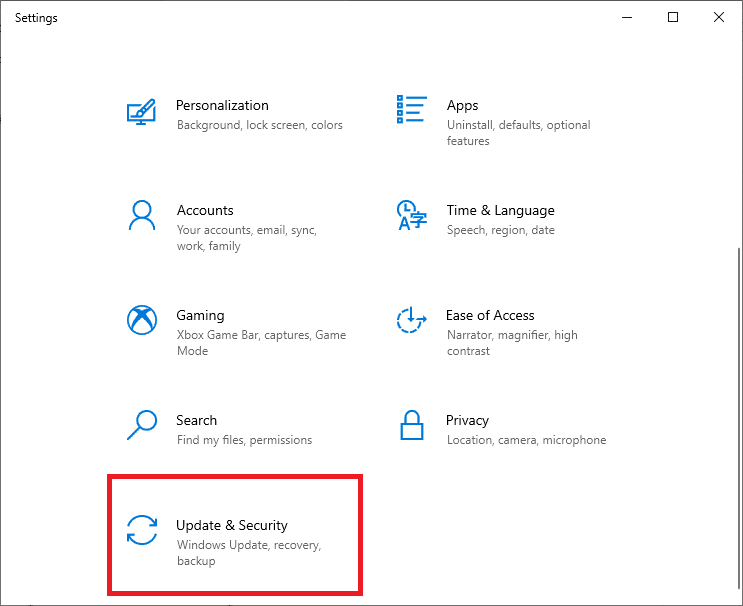
1. پريس ڪريو ونڊوز + مان چابيون گڏ ڪرڻ لاءِ جوڙ توھان جي سسٽم ۾.
2. هاڻي ، چونڊيو تازه ڪاري ۽ سيڪيورٽي، جيئن ڏيکاريل آهي.
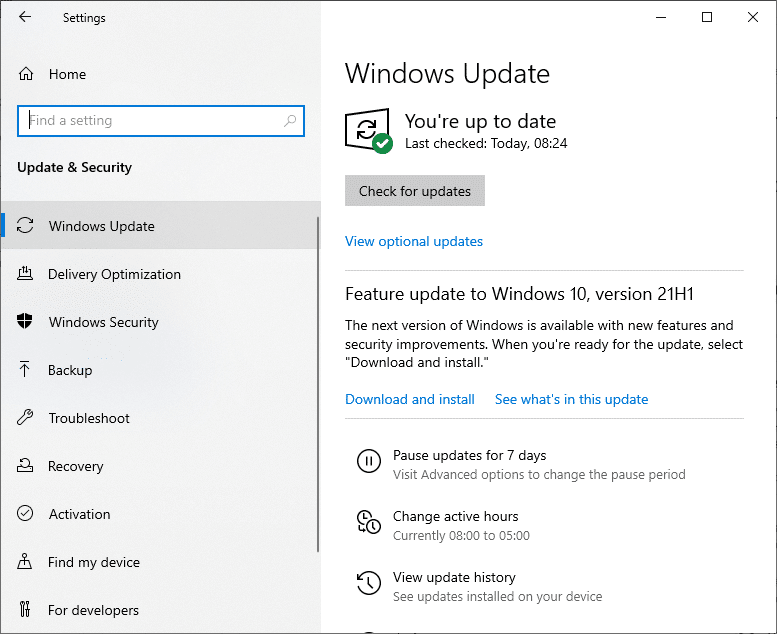
3. اڳيون، ڪلڪ ڪريو اپڊيٽ لاء چيڪ ڪريو بٽڻ
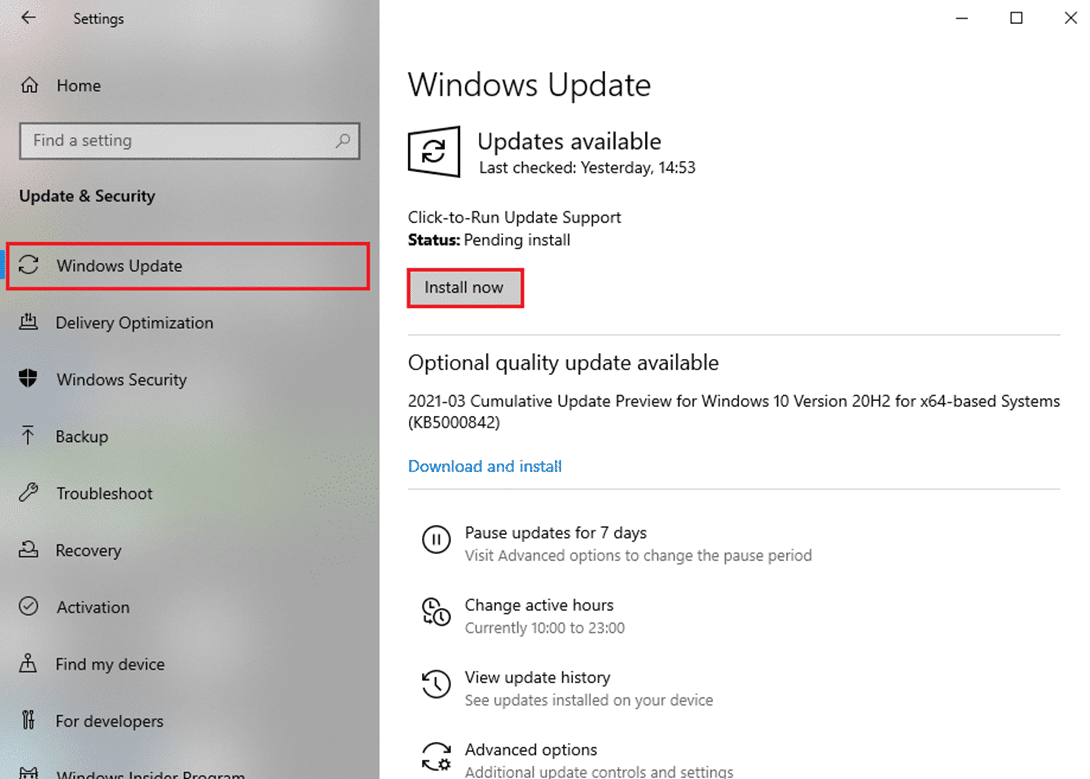
3A. تي ڪلڪ ڪريو هاڻي نصب ڪريو ڊائون لوڊ ۽ انسٽال ڪرڻ لاءِ تازه ڪاريون دستياب آهن.
3B. جيڪڏهن توهان جو سسٽم اڳ ۾ ئي تازو آهي، پوء اهو ڏيکاريندو توهان کي تاريخ آهي message, as depicted.
4. پنهنجو سسٽم ٻيهر شروع ڪريو ۽ چيڪ ڪريو ته مسئلو حل ڪيو ويو آهي هاڻي.
پڻ پڙهيو درست ڪريو DISM غلطي 0x800f081f ۾ Windows 10
Method 5: Use the Correct Version of DISM
When you execute command lines on older versions of DISM on Windows 8.1 or earlier, you are bound to face Windows 10 DISM Error 87. But this problem can be fixed when you use the correct version of DISM in Windows 10 with the correct Wofadk.sys filter driver. The Operating System used by DISM is the Host deployment environment. The DISM supports the following platforms in several Windows versions, as listed below:
| Host deployment environment | Target Image: Windows 11 or WinPE for Windows 11 | Target Image: Windows 10 or WinPE for Windows 10 | Target Image: Windows 8.1, Windows Server 2016, Windows Server 2012 R2, or WinPE 5.0 (x86 or x64) |
| ونڊوز 11 | سهائتا | سهائتا | سهائتا |
| Windows 10 (x86 or x64) | Supported, using the Windows 11 version of DISM | سهائتا | سهائتا |
| Windows Server 2016 (x86 or x64) | Supported, using the Windows 11 version of DISM | سهائتا | سهائتا |
| Windows 8.1 (x86 or x64) | Supported, using the Windows 11 version of DISM | Supported, using the Windows 10 version of DISM | سهائتا |
| Windows Server 2012 R2 (x86 or x64) | Supported, using the Windows 11 version of DISM | Supported, using the Windows 10 version of DISM | سهائتا |
| Windows 8 (x86 or x64) | نٿي ڏني وئي | Supported, using the Windows 10 version of DISM | Supported, using the Windows 8.1 version of DISM or later |
| Windows Server 2012 (x86 or x64) | Supported, using the Windows 11 version of DISM | Supported, using the Windows 10 version of DISM | Supported, using the Windows 8.1 version of DISM or later |
| Windows 7 (x86 or x64) | نٿي ڏني وئي | Supported, using the Windows 10 version of DISM | Supported, using the Windows 8.1 version of DISM or later |
| Windows Server 2008 R2 (x86 or x64) | Supported, using the Windows 11 version of DISM | Supported, using the Windows 10 version of DISM | Supported, using the Windows 8.1 version of DISM or later |
| Windows Server 2008 SP2 (x86 or x64) | نٿي ڏني وئي | نٿي ڏني وئي | Supported, using the Windows 8.1 version of DISM or later |
| WinPE for Windows 11 x64 | سهائتا | Supported: X64 target image only | Supported: X64 target image only |
| WinPE for Windows 10 x86 | سهائتا | سهائتا | سهائتا |
| WinPE for Windows 10 x64 | Supported, using the Windows 11 version of DISM | Supported: X64 target image only | Supported: X64 target image only |
| WinPE 5.0 x86 | Supported, using the Windows 11 version of DISM | Supported, using the Windows 10 version of DISM | سهائتا |
| WinPE 5.0 x64 | Supported, using the Windows 11 version of DISM | Supported, using the Windows 10 version of DISM: X64 target image only | Supported: X64 target image only |
| WinPE 4.0 x86 | نٿي ڏني وئي | Supported, using the Windows 10 version of DISM | Supported, using the Windows 8.1 version of DISM or later |
| WinPE 4.0 x64 | نٿي ڏني وئي | Supported, using the Windows 10 version of DISM: X64 target image only | Supported, using the Windows 8.1 version of DISM or later: X64 target image only |
| WinPE 3.0 x86 | نٿي ڏني وئي | Supported, using the Windows 10 version of DISM | Supported, using the Windows 8.1 version of DISM or later |
| WinPE 3.0 x64 | نٿي ڏني وئي | Supported, using the Windows 10 version of DISM: X64 target image only | Supported, using the Windows 8.1 version of DISM or later: X64 target image only |
Thus, when you use DISM for an image service, always ensure what version you are using and whether it is compatible with the device or not. Run DISM commands only if you are sure that you are using the correct DISM version.
Method 6: Perform Clean Installation
If none of the methods have helped you solve the issue, you can try to reinstall Windows. Here’s how to fix DISM Error 87 in Windows 10 by performing a clean installation of Windows:
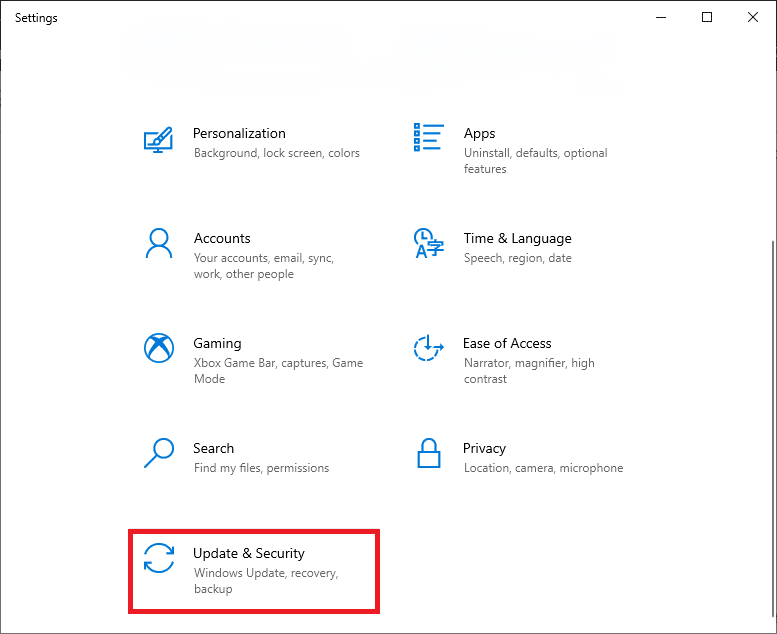
1. ڏانهن وڃو سيٽنگون> تازه ڪاري ۽ سيڪيورٽي جيئن هدايت ڪئي وئي آهي طريقو 3.
2. ھاڻي، چونڊيو واپس آڻڻ option from the left pane and click on شروع ڪر ساڄي پينل ۾.
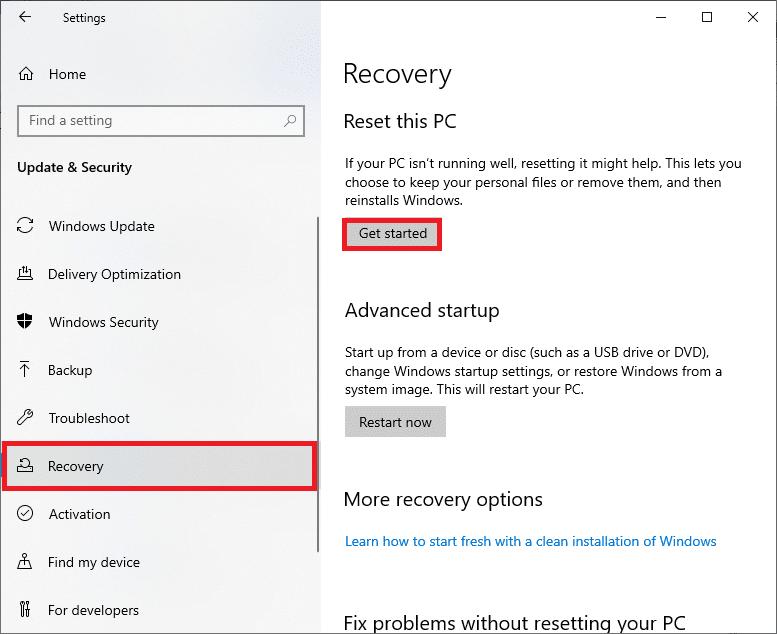
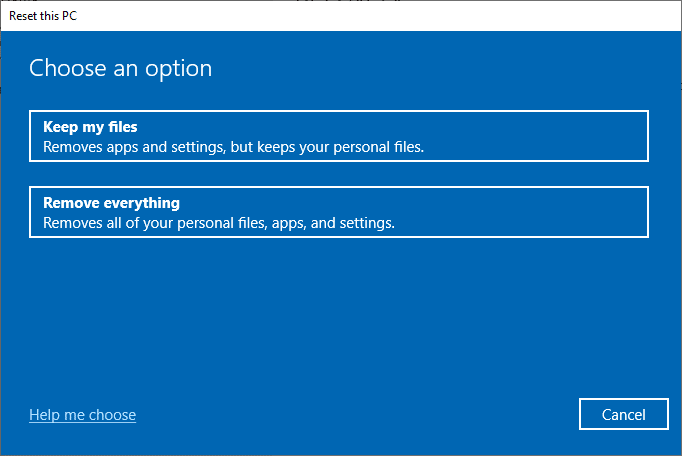
3. Here, choose an option from the هي پي سي ريٽ ڪريو دري
- منهنجيون فائلون رکو option will remove apps and settings but keeps your personal files.
- هن هر شيء ختم ڪريو option will remove all your personal files, apps, and settings.
4. آخر ۾، جي تابعداري ڪريو اسڪرين اسڪرين جون هدايتون to complete the reset process.
سفارش
اسان کي اميد آهي ته هي گائيڊ مددگار هو ۽ توهان قابل هئا fix DISM Error 87 in Windows 10. اسان کي ٻڌايو ته ڪهڙو طريقو توهان لاء بهترين ڪم ڪيو. انهي سان گڏ، جيڪڏهن توهان وٽ هن مضمون جي حوالي سان ڪي سوال / صلاحون آهن، پوء انهن کي تبصرو سيڪشن ۾ ڇڏڻ لاء آزاد محسوس ڪريو.

