Process and Compressed Memory is a Windows 10 feature responsible for memory compression (also referred to as RAM compression and memory compression). This feature basically utilizes data compression to reduce the size or number of paging request to and from the auxiliary storage. In short, this feature is designed to take less amount of disk space and memory but in this case the System and Compressed Memory process start using 100% Disk and Memory, causing the affected PC to become slow.

In Windows 10, a compressions store is added to the concept of Memory Manager, which is an in-memory collection of compressed pages. So whenever the memory starts to fill up, the System and Compressed Memory process will compress the unused pages instead of writing them to the disk. The benefit of this is the amount of memory used per process is reduced, which allows Windows 10 to maintain more programs or apps in physical memory.
The problem appears to be incorrect Virtual Memory settings. Someone changed the paging file size from automatic to a particular value, virus or malware, Google Chrome or Skype, corrupt system files etc. So without wasting any time let’s see how to actually Fix 100% Disk Usage by System and Compressed Memory with the help of below-listed troubleshooting guide.
[SOLVED] 100% Disk Usage by System and Compressed Memory
پڪ ڪريو ته بحال پوائنٽ ٺاهيو، صرف صورت ۾ ڪجهه غلط ٿي وڃي.
طريقو 1: خراب سسٽم فائلن جي مرمت ڪريو
1. کوليو ڪمانڊ پرامپٽ. استعمال ڪندڙ هن قدم کي انجام ڏئي سگهي ٿو ڳولا ڪندي 'سي ايم ڊي' ۽ پوء داخل ڪريو.

2. ھاڻي ھيٺ ڏنل cmd ۾ ٽائيپ ڪريو ۽ انٽر کي دٻايو.
Sfc/scannow sfc/scannow/offbootdir=c: /offwindir=c:windows (جيڪڏهن مٿيان ناڪام ٿئي ته پوءِ هي ڪوشش ڪريو)
![SFC scan now command prompt | [SOLVED] 100% Disk Usage by System and Compressed Memory](https://lbsite.org/wp-content/uploads/2023/01/SFC-scan-now-command-prompt.png)
3. Wait for the above process to finish and once done, restart your PC.
4. Again open cmd and type the following command and hit enter after each one:
Dism/آن لائن/Cleanup-Image/CheckHealth Dism/Online/Cleanup-Image/ScanHealth Dism/Online/Cleanup-Image/RestoreHealth

5. DISM حڪم کي هلائڻ ڏيو ۽ ان جي ختم ٿيڻ جو انتظار ڪريو.
6. جيڪڏهن مٿي ڏنل حڪم ڪم نٿو ڪري ته هيٺ ڏنل حڪم تي ڪوشش ڪريو.
Dism/Image:C:offline/Cleanup-Image/RestoreHealth/Source:c:testmountwindows Dism/آن لائن/Cleanup-Image/RestoreHealth/ذريعو:c:testmountwindows/LimitAccess
نوٽ: C:RepairSourceWindows کي پنھنجي مرمت جي ماخذ سان تبديل ڪريو (ونڊوز تنصيب يا وصولي ڊسڪ).
7. تبديلين کي بچائڻ لاءِ پنھنجي پي سي کي ريبوٽ ڪريو ۽ ڏسو ته ڇا توھان ڪري سگھوٿا Fix 100% Disk Usage by System and Compressed Memory Issue.
Method 2: Set Correct Paging File Size
1. پريس ڪريو Windows Key + R پوءِ ٽائپ ڪريو sysdm.cpl ۽ داخل ٿيڻ کي کوليو System Properties.

2. ڏانھن مٽايو ڳوڙھي واري ٽيب ۽ پوء تي ڪلڪ ڪريو ڪارڪردگي جي تحت سيٽنگون.

3. Again switch to the Advanced tab and click Change under Virtual Memory.

4. Checkmark “خودڪار طور تي تمام ڊرائيو لاء پينجنگ فائل سائيز کي منظم ڪريو."
![Checkmark Automatically manage paging file size for all drives | [SOLVED] 100% Disk Usage by System and Compressed Memory](https://lbsite.org/wp-content/uploads/2023/02/Checkmark-Automatically-manage-paging-file-size-for-all-drives.png)
5. Click OK, then click Apply followed by OK.
6. Select Yes to Restart your PC to save changes.
طريقو 3: فاسٽ شروعاتي بند ڪريو
1. پريس ڪريو Windows Key + R پوءِ ٽائپ ڪريو ڪنٽرول ۽ دٻايو Enter کولڻ لاءِ ڪنٽرول پينل.

2. تي ڪلڪ ڪريو ھارڊويئر ۽ صوتي پوءِ ڪلڪ ڪريو پاور اختيار.

3. پوء، کاٻي ونڊو پين مان چونڊيو "چونڊيو جيڪو طاقت جي بٽڻ چونڊيو."

4. هاڻي ڪلڪ ڪريو "سيٽنگون تبديل ڪريو جيڪي ھن وقت دستياب ناھي."

5. چيڪ ڪريو "روزانو هلائڻ شروع ڪريو”۽ ڪلڪ ڪريو تبديليون محفوظ ڪريو
![Uncheck Turn on fast startup | [SOLVED] 100% Disk Usage by System and Compressed Memory](https://lbsite.org/wp-content/uploads/2023/01/Uncheck-Turn-on-fast-startup.png)
6. Restart your PC and see if you’re able to Fix 100% Disk Usage by System and Compressed Memory Issue.
Method 4: Disable Superfetch Service
1. پريس ڪريو Windows Key + R پوءِ ٽائپ ڪريو خدمتون .msc ۽ داخل ٿيو.

2. ڳوليو سپر مارڪيٽ service from the list then right-click on it and select ملڪيت.

3. Under Service status, if the service is running, click on رکو.
4. Now, from the شروعاتي type drop-down select معطل ٿيل

5. لاڳو ڪريو تي ڪلڪ ڪريو، بعد ۾ ٺيڪ.
6. تبديلين کي بچائڻ لاءِ پنھنجي پي سي کي ريبوٽ ڪريو.
If the above method doesn’t disable Superfetch services then you can follow disable Superfetch using Registry:
1. پريس ڪريو Windows Key + R پوءِ ٽائپ ڪريو ريڊيڪل ۽ رجسٽري ايڊيٽر کولڻ لاءِ Enter کي دٻايو.

2. ھيٺ ڏنل رجسٽري چيڪ ڏانھن وڃو:
HKEY_LOCAL_MACHINESYSTEMCurrentControlSetControlSession ManagerMemory ManagementPrefetchParameters
3. Make sure you have selected PrefetchParameters پوءِ ساڄي ونڊو ۾ ڊبل ڪلڪ ڪريو مددگار نظارو کوليو چاٻي ۽ change it’s value to 0 in the Value data field.

4. Click OK and close the Registry Editor.
5. تبديلين کي بچائڻ لاءِ پنھنجي پي سي کي ريسٽارٽ ڪريو ۽ ڏسو ته توھان ڪري سگھوٿا Fix 100% Disk Usage by System and Compressed Memory Issue.
Method 5: Adjust your PC for Best Performance
1. پريس ڪريو Windows Key + R پوءِ ٽائپ ڪريو sysdm.cpl ۽ داخل ٿيڻ کي کوليو System Properties.
2. ڏانھن مٽايو اعلي درجي tab ۽ پوء تي ڪلڪ ڪريو جوڙ هيٺ ڪارڪردگي
3. Under Visual Effects checkmark “بهترين ڪارڪردگي لاء ترتيب ڏيو".

4. لاڳو ڪريو تي ڪلڪ ڪريو، بعد ۾ ٺيڪ.
5. Reboot your PC and see if you’re able to Fix 100% Disk Usage by System and Compressed Memory Issue.
Method 6: Kill the Speech Runtime Executable Process
1. پريس Ctrl + Shift + Esc ٽاسڪ مئنيجر شروع ڪرڻ لاء.
2. ۾ پروسيس ٽيب، ڳولهيو Speech Runtime Executable.
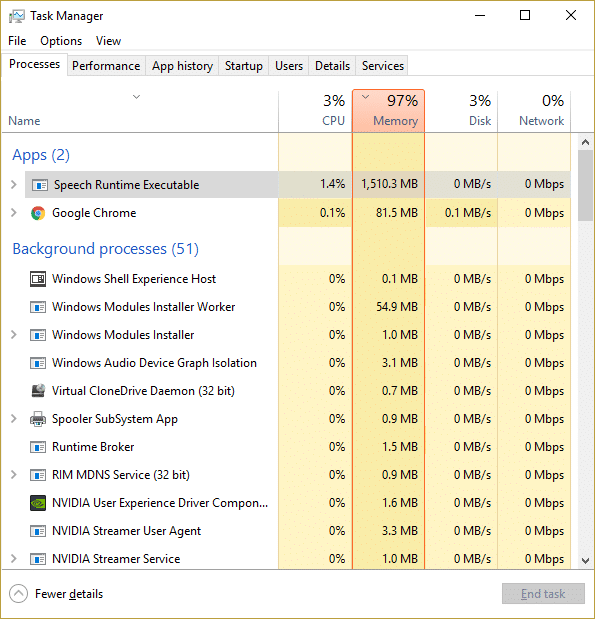
3. ان تي صحيح ڪلڪ ڪريو ۽ چونڊيو آخر ختم ڪريو.
طريقو 7: هلائيندڙ CCleaner ۽ Malwarebytes
1. ڊائون لوڊ ۽ انسٽال ڪريو CCleaner ۽ Malwarebytes.
2. Malwarebytes هلايو ۽ ان کي توهان جي سسٽم کي نقصانڪار فائلن لاء اسڪين ڪرڻ ڏيو. جيڪڏهن مالويئر مليو آهي، اهو خودڪار طريقي سان انهن کي هٽائي ڇڏيندو.

3. ھاڻي CCleaner ھلايو ۽ چونڊيو ڪسٽم صاف.
4. ڪسٽم صاف جي تحت، چونڊيو ونڊوز ٽيب ۽ چيڪ مارڪ ڊفالٽ ۽ ڪلڪ ڪريو تجزيي ڪريو.
![Select Custom Clean then checkmark default in Windows tab | [SOLVED] 100% Disk Usage by System and Compressed Memory](https://lbsite.org/wp-content/uploads/2023/01/Select-Custom-Clean-then-checkmark-default-in-Windows-tab.png)
5. هڪ دفعو تجزيو مڪمل ٿي چڪو آهي، پڪ ڪريو ته توهان کي پڪ آهي ته توهان فائلن کي ختم ڪرڻ لاء ختم ڪيو وڃي.

6. آخر ۾، تي ڪلڪ ڪريو صفائي هلائيندڙ بٽڻ دٻايو ۽ CCleaner کي ان جو ڪورس هلائڻ ڏيو.
7. توھان جي سسٽم کي وڌيڪ صاف ڪرڻ لاء، رجسٽري ٽيب کي منتخب ڪريو، ۽ پڪ ڪريو ته هيٺ ڏنل چيڪ ٿيل آهن:

8. تي ڪلڪ ڪريو مسئلن لاء اسڪين بٽڻ دٻايو ۽ CCleaner کي اسڪين ڪرڻ جي اجازت ڏيو، پوء تي ڪلڪ ڪريو منتخب ٿيل مسئلا حل ڪريو بٽڻ
![Once scan for issues is completed click on Fix selected Issues | [SOLVED] 100% Disk Usage by System and Compressed Memory](https://lbsite.org/wp-content/uploads/2023/01/Once-scan-for-issues-is-completed-click-on-Fix-selected-Issues.png)
9. جڏهن CCleaner پڇي ٿو "ڇا توهان رجسٽري ۾ بيڪ اپ تبديليون چاهيو ٿا؟" ها ، چونڊيو.
10. هڪ دفعو توهان جو بيڪ اپ مڪمل ڪيو آهي، تي ڪلڪ ڪريو سڀ چونڊيل مسئلا حل ڪريو بٽڻ
11. تبديلين کي بچائڻ لاءِ پنھنجي پي سي کي وري شروع ڪريو.
Method 8: Change configuration of Google Chrome and Skype
Google Chrome لاء Navigate to the following under Chrome: Settings > Show Advanced Settings > Privacy > Use a prediction service to load pages more quickly. Disable the toggle next to “Use a prediction service to load pages.”

Change configuration For Skype
1. Make sure you have exited Skype, if not end task from Task Manager for Skype.
2. Press Windows Key + R then type the following and click OK:
C:Program Files (x86)SkypePhone
3. صحيح ڪلڪ ڪريو skype.exe ۽ چونڊيو ملڪيت.

4. ڏانھن مٽايو سيڪيورٽي ٽيب ۽ ڪلڪ ڪريو ترميم ڪريو

5. چونڊيو سڀ ايپليڪيشن پيڪيجز under Group or user names then checkmark Write هيٺ اجازت ڏيو.

6. Click Apply, followed by OK and see if you’re able to Fix 100% Disk Usage by System and Compressed Memory Issue.
Method 9: Set Correct Permission for System and Compressed Memory Process
1. پريس ڪريو Windows Key + R پوءِ ٽائپ ڪريو Taskschd.msc and hit Enter to open Task Scheduler.

2. ھيٺ ڏنل رستو ڏانھن وڃو:
Task Scheduler Library > Microsoft > Windows > MemoryDiagnostic
![Double click on ProcessMemoryDiagnostic Events | [SOLVED] 100% Disk Usage by System and Compressed Memory](https://lbsite.org/wp-content/uploads/2023/02/Double-click-on-ProcessMemoryDiagnostic-Events.png)
3. ڊبل ڪلڪ ڪريو ProcessMemoryDiagnostic Events ۽ پوء ڪلڪ ڪريو صارف يا گروپ تبديل ڪريو under Security Options.

4. ڪلڪ ڪريو اعلي درجي ۽ پوء ڪلڪ ڪريو Find Now.

5. پنھنجي چونڊيو منتظم جو اڪائونٽ from the list then click OK.

6. ٻيهر ٺيڪ ڪريو to add your administrator account.
7. Checkmark تمام گهڻي امتياز سان هليو ۽ پوءِ ڪلڪ ڪريو ٺيڪ.

8. Follow the same steps for RunFullMemoryDiagnostic and close everything.
9. تبديلين کي بچائڻ لاءِ پنھنجي پي سي کي ريبوٽ ڪريو.
Method 10: Disable System and Compressed Memory Process
1. پريس ڪريو Windows Key + R پوءِ ٽائپ ڪريو Taskschd.msc ۽ داخل ٿيڻ کي کوليو ٽاسڪ شيڊولر.
2. ھيٺ ڏنل رستو ڏانھن وڃو:
Task Scheduler Library > Microsoft > Windows > MemoryDiagnostic
3. صحيح ڪلڪ ڪريو رن فل ميموري تشخيص ۽ چونڊيو ناھي.
![Right-click on RunFullMemoryDiagnostic and select Disable | [SOLVED] 100% Disk Usage by System and Compressed Memory](https://lbsite.org/wp-content/uploads/2023/02/Right-click-on-RunFullMemoryDiagnostic-and-select-Disable.png)
4. Close Task Scheduler and restart your PC.
صلاح ڏني ته:
اهو توهان کي ڪاميابي سان آهي Fix 100% Disk Usage by System and Compressed Memory پر جيڪڏھن توھان اڃا تائين ھن پوسٽ جي حوالي سان ڪي سوال آھن، انھن کان پڇڻ لاء آزاد محسوس ڪريو تبصري جي سيڪشن ۾.

