If the wireless icon or network icon is missing from Windows Taskbar, then it’s possible that the network service might not be running or some 3rd party application is conflicting with system tray notifications which can easily be resolved by restarting Windows Explorer and starting network services. In addition to above causes sometimes its also possible that the issue is caused by incorrect Windows settings.
![]()
By default, the WiFi icon or Wireless icon always appears in the Taskbar in Windows 10. The network status is automatically refreshed when your PC is either connected or disconnected from a network. So without wasting any time let’s see how to Fix WiFi Icon Missing From Taskbar In Windows 10 with the help o the below-listed guide.
Windows 10 හි කාර්ය තීරුවේ නොමැති WiFi නිරූපකය නිවැරදි කරන්න
Make sure to create a restore point, just in case something goes wrong.
Method 1: Restore missing wireless icon
1. From the taskbar, click on the small “ඉහළ ඊතලය” which shows system tray notifications and check if WiFi icon is hidden there.
![]()
2. Sometimes the Wifi icon is accidentally dragged to this area and to fix this issue drag the icon back to its original place.
3. වෙනස්කම් සුරැකීමට ඔබේ පරිගණකය නැවත ආරම්භ කරන්න.
ක්රමය 2: සැකසීම් වලින් WiFi නිරූපකය සක්රිය කරන්න
1. Press Windows Key + I open Settings then click on පුද්ගලීකරණය.

2. From the left-hand menu, select කාර්ය තීරුව.
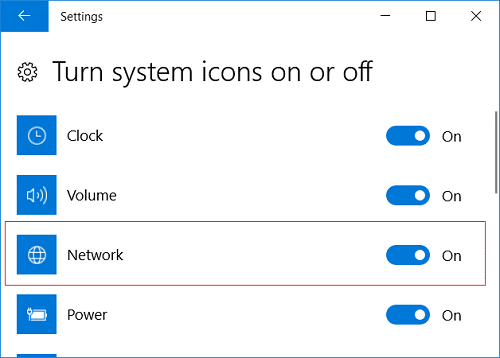
3. Scroll down to the bottom then under Notification area click on “පද්ධති අයිකන සක්රිය හෝ අක්රිය කරන්න."
![]()
4. තහවුරු කර ගන්න toggle for Network or WiFi is enabled, if not click on it to enable it.
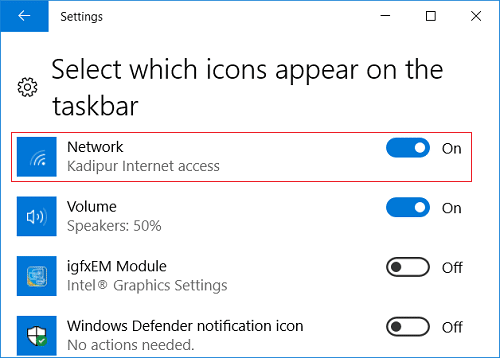
5. Press back arrow then under the same heading click on “කාර්ය තීරුවේ දිස්වන අයිකන තෝරන්න."
![]()
6. වග බලා ගන්න Network or Wireless is set to enable.
7. Restart your PC to save changes and see if you’re able to Fix WiFi Icon Missing From Taskbar In Windows 10.
ක්රමය 3: වින්ඩෝස් එක්ස්ප්ලෝරර් නැවත ආරම්භ කරන්න
1. මුද්රණය කරන්න Ctrl + Shift + Esc දියත් කිරීමට යතුරු එකට කාර්ය කළමනාකරු.
2. සොයා ගන්න ගවේෂණය කරන්න in the list then right-click on it and select End Task.

3. Now, this will close the Explorer and to run it again, click File > Run new task.

4. වර්ගය ගවේෂණය කරන්න and hit OK to restart the Explorer.

5. Exit Task Manager, and this should Fix WiFi Icon Missing From Taskbar In Windows 10.
Method 4: Restart Network Services
1. Windows Key + R ඔබා ඉන්පසු ටයිප් කරන්න services.msc හා Enter.

2. Find the below-listed services then make sure they are running by right-clicking on each of them and selecting ආරම්භයක්:
Remote procedure call
ජාල සම්බන්ධතා
Plug and Play
දුරස්ථ ප්රවේශ සම්බන්ධතා කළමනාකරු
දුරකථන
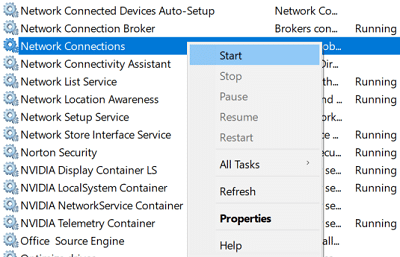
3. Once you have started all the services, again check if the WiFi icon is back or not.
Method 5: Enable Network icon in Group Policy Editor
1. Windows Key + R ඔබා ඉන්පසු ටයිප් කරන්න gpedit.msc හා Enter.

2. Now, under Group Policy Editor, navigate to the following path:
පරිශීලක වින්යාසය> පරිපාලන සැකිලි> ආරම්භක මෙනුව සහ කාර්ය තීරුව
3. Make sure to select Start Menu and Taskbar in the right window pane double-click on Remove the networking icon.
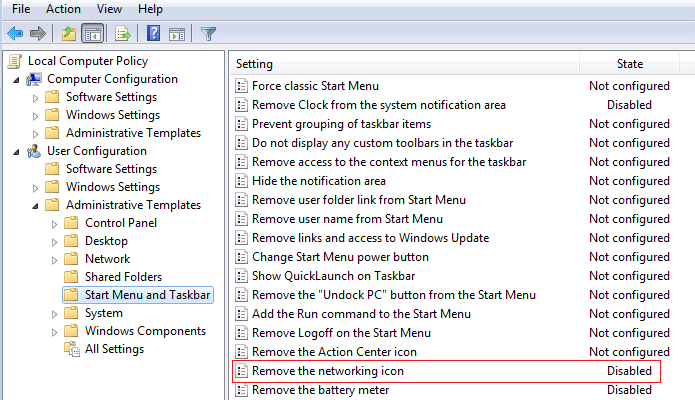
4. Once the Properties window opens, select ආබාධිත ඉන්පසු OK මගින් අයදුම් කරන්න ක්ලික් කරන්න.
![]()
5. Restart Windows Explorer and again check if you’re able to Fix WiFi Icon Missing From Taskbar In Windows 10.
ක්රමය 6: රෙජිස්ට්රි නිවැරදි කිරීම
1. Windows Key + R ඔබා ඉන්පසු ටයිප් කරන්න රීඩේට් සහ Registry Editor විවෘත කිරීමට Enter ඔබන්න.

2. පහත රෙජිස්ට්රි යතුර වෙත සංචාලනය කරන්න:
HKEY_LOCAL_MACHINESYSTEMCurrentControlSetControlNetwork
3. Now under this key, locate the Config key then right-click on it and select මකන්න.
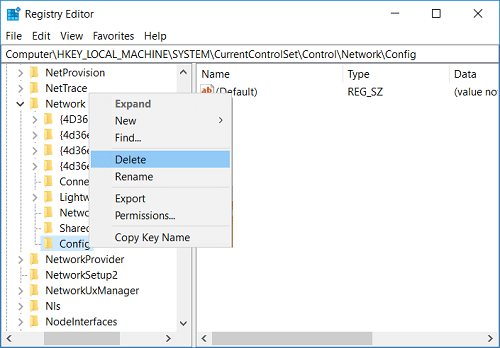
4. If you don’t find the above key, then no worries continue.
5. වෙනස්කම් සුරැකීමට ඔබේ පරිගණකය නැවත ආරම්භ කරන්න.
Method 7: Run Network Adapter Troubleshooter
1. Right-click on the network icon and select ගැටළු නිරාකරණය කරන්න.
![]()
2. තිරයේ ඇති උපදෙස් අනුගමනය කරන්න.
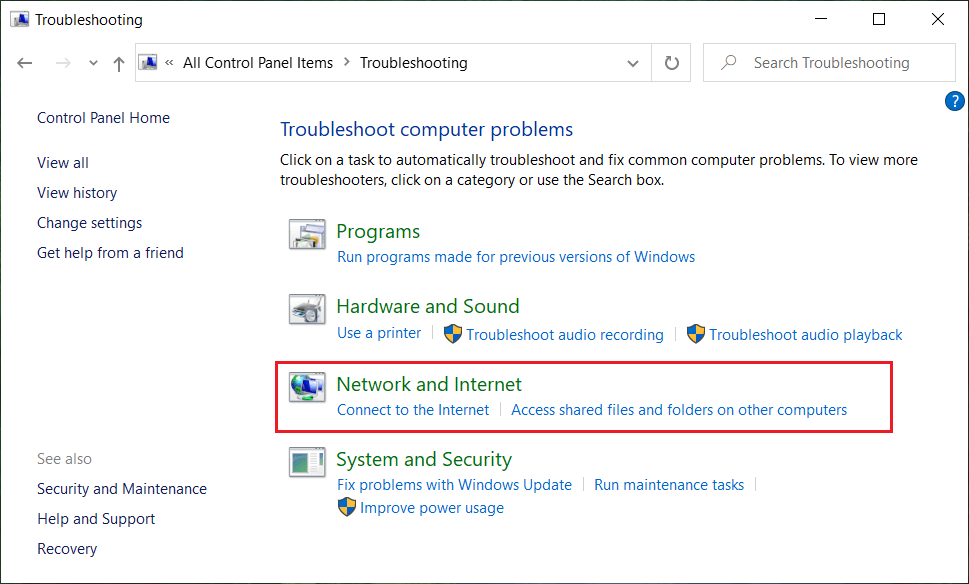
3. Open control panel and search දෝෂගවේෂණය in the Search Bar on the top right side and click on දෝෂගවේෂණය.

4. දැන්, තෝරන්න "ජාල සහ අන්තර්ජාලය."
5. In the next screen, click on the ජාල ඇඩැප්ටරය.
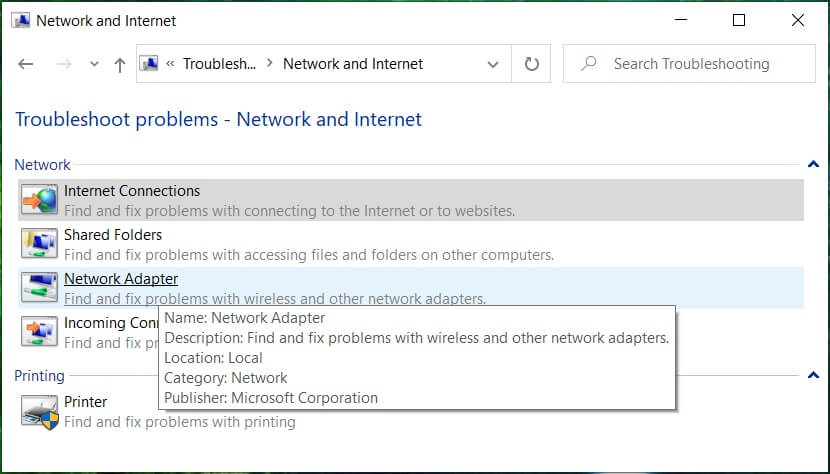
6. Follow the on-screen instruction to Fix WiFi Icon Missing From Taskbar In Windows 10.
Method 8: Reinstall Network Adapter
1. Windows Key + R ඔබා ඉන්පසු ටයිප් කරන්න devmgmt.msc සහ උපාංග කළමනාකරු විවෘත කිරීමට Enter ඔබන්න.

2. Expand Network Adapters then right-click on your wireless adapter and select අස්ථාපනය කරන්න.

3. Reboot your PC to save changes and again open Device Manager.
4. Now right-click on ජාල ඇඩැප්ටර තෝරන්න දෘඪාංග වෙනස්කම් සඳහා ස්කෑන් කරන්න.
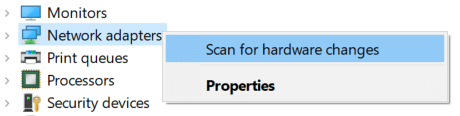
5. If the issue is resolved by now, you don’t need to continue but if the problem still exists, then continue.
6. දකුණු-ක්ලික් කරන්න wireless adapter under Network Adapters තෝරන්න ධාවක යාවත්කාලීන කරන්න.

7. තෝරන්න "ධාවක මෘදුකාංග සඳහා මගේ පරිගණකය පිරික්සන්න."

8. නැවතත් “මත ක්ලික් කරන්නමගේ පරිගණකයේ පවතින ධාවක ලැයිස්තුවෙන් තෝරා ගැනීමට මට ඉඩ දෙන්න."

9. Select the latest available driver from the list and click Next.
10. වෙනස්කම් සුරැකීමට ඔබේ පරිගණකය නැවත ආරම්භ කරන්න.
නිර්දේශ:
ඔබට සාර්ථක වී ඇත්තේ එයයි Windows 10 හි කාර්ය තීරුවේ නොමැති WiFi නිරූපකය නිවැරදි කරන්න නමුත් ඔබට තවමත් මෙම පළ කිරීම සම්බන්ධයෙන් කිසියම් ප්රශ්නයක් ඇත්නම්, අදහස් දැක්වීමේ කොටසේ ඔවුන්ගෙන් විමසීමට නිදහස් වන්න.

