Being a big tech geek, I hate when my Windows machine isn’t working flawlessly. I figure if I can’t get my computer working perfectly, then what kind of tech person am I? Obviously, trying to get everything to work perfectly means spending a lot of time fixing issues that probably don’t cause any major issues with my system.
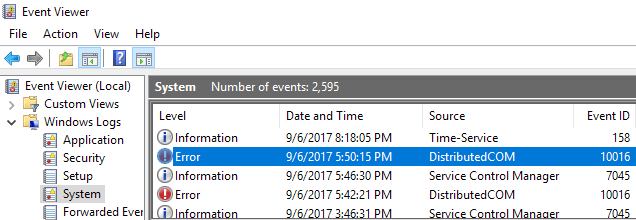
However, it’s still fun and you get to learn a lot. In this article, I’m talking about fixing the error that shows up in Event Viewer related to DistributedCOM. I noticed I had no other errors in my System log other than a few every day with an Event ID of 10016. The basic error message was the same:
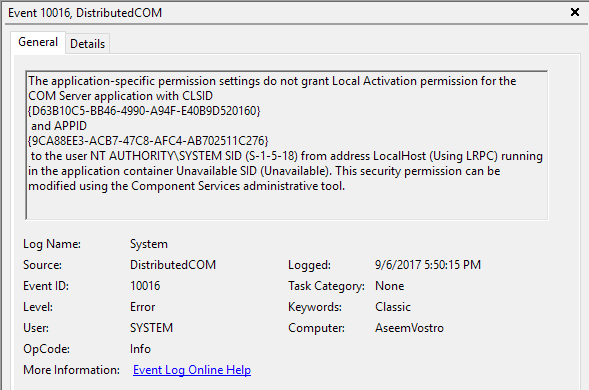
The application-specific permission settings do not grant Local Activation permission for the COM Server application
It also listed out a CLSID, an APPID, an SID and something about modifying permissions using Component Services.
After reading through some dense forum posts, I was able to fix this error so that it no longer appeared in the Event Viewer. It’s quite a process, so make sure you have an hour or two to spare before you start.
Step 1 – Check the Process
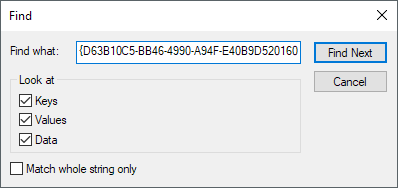
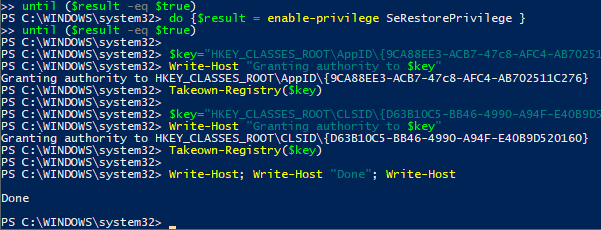
The first thing we have to do is figure out which process or service is associated with the CLASS ID listed in the error. To do this, go ahead and copy the CLSID listed in the event description. In my case, it started with {D63B10C5. Ia mautinoa e kopiina uma le taofi.
Now you need to open the registry editor by clicking on start and typing in faʻatonutonu. A e maua le faʻamaumauga o le resitala, kiliki faʻatonutonu ae te'i ane maua. Go ahead and paste the CLSID into the search box and press Enter.
After some time, you should get a result under the HK_CLASSES_ROOTCLSID ki. I le itu taumatau, e tatau ona i ai ni ki se lua ma le lē oʻo mai one should list out the name of the service. In my case and probably yours also, it should be Tagata fai pisinisi.
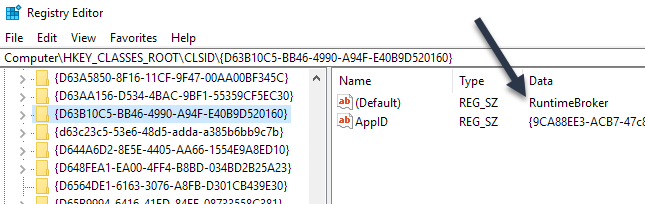
The AppID should also match what is listed in the error message. Next, we have to run a script so that we can make changes to the permissions in Component Services for this service.
Step 2 – Run PowerShell Script
To fix this problem, we have to edit some permissions in Component Services for RuntimeBroker, but before we can do that we have to run a script that will allow us to make those changes.
To run PowerShell as an Administrator, you need to click on āmata, i totonu mana and then right-click on the result and choose Taumafai e avea ma pule.

Now go ahead and download the text file linked here and copy all the code and paste it into the PowerShell window (if you just right-click in the PowerShell window, it will paste whatever is in the clipboard). Then just press ulu and you should see the word faia printed out.
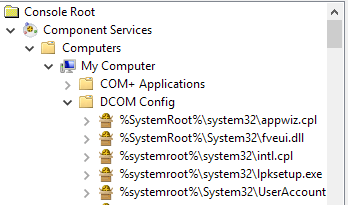
Step 3 – Open Component Services
E mafai ona e tatala Auaunaga Faʻatonu just like you opened PowerShell in Step 2. Click on Start and type in component services. You don’t have to run this program as administrator. Once there, navigate to the following location:
Component Services - Computers - My Computer - DCOM Config
Tusi i lalo seia e maua Taimi Taimi Broker. In my case, there were two of them! How do you know which one is the listed in the error?
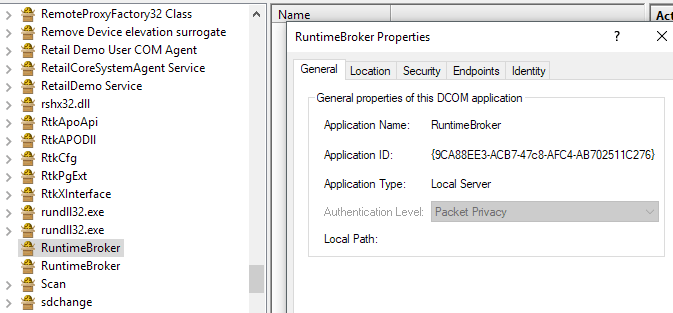
Right-click on each of them and choose meatotino. I luga o le Aoao tab, you’ll see Talosaga ID, which should match the AppID from the error message. If you are getting errors in Event Viewer with an ID of 10016 and more than one CLSID, then it could be that both RuntimeBrokers need to be fixed. In my case, I only had to fix one.
Step 4 – Correct Permissions
Lastly, we need to modify the permissions. While in the RuntimeBroker properties window, click on the Security tab.

le faʻatonutonu faamau i lalo Tatalaina ma Faʻatinoina Faʻatagaga should be clickable. If it’s greyed out, the PowerShell script didn’t run properly. When you click on edit, you might see a popup dialog warning you about unrecognized permissions.
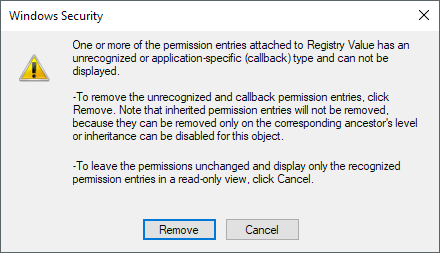
Here you DO NOT WANT to click on aveese. Na'o le kiliki i luga o le solo button. Now you’ll see a list of default accounts and you might also see an Account Unknown lisiina
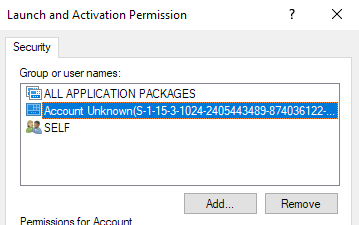
You want to make sure you leave the Account Unknown as is. Do not remove it. At this point, you should be left with FA'ATA'IGA UMA ma SELF. Now we have to add two accounts. Click faʻaopoopo ma faʻailoga i totonu System ona kiliki ai lea Siaki Igoa. kiliki OK and it will add that account to the list.

kiliki faʻaopoopo again and this time type in Auaunaga Fa'alotoifale and follow the same steps.
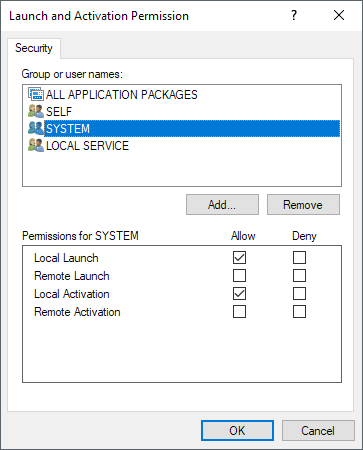
Once both have been added, click on them one at a time and select the Local Launch ma Fa'alotoifale Fa'atosina checkboxes under Faataga. That’s about it! Now go ahead and restart your computer and you should no longer see that error appear in the Event View logs. Enjoy!

