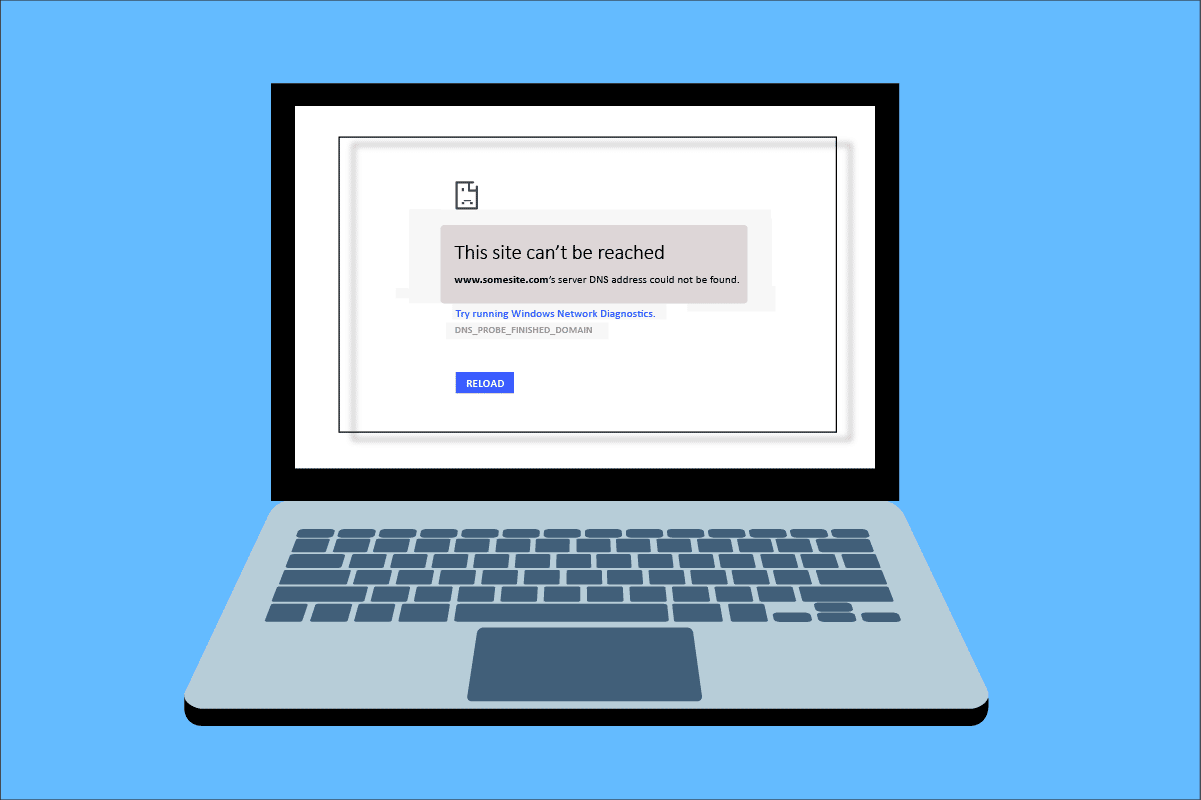
While surfing internet in your browser, you may face Server IP address could not be found error. This is a common issue for the Google Chrome users. We bring to you a helpful guide that will fix server IP address could not be found error on Windows 10. So, continue reading!
How to Fix Server IP Address Could Not be Found on Windows 10
One of the most popular web browser is Google Chrome. However if you are facing the error while browsing in the Chrome browser, then do not worry! This issue may be caused due to various reasons like;
- Isku-xidhka Internet-ka ee Aan degganayn
- Corrupt Browser Cache and Cookies
- Incorrect IP Address
- Corrupt DNS Cache
- Outdated Network Drivers
Here, we have listed all possible methods to fix the said issue on Windows 10.
Method 1: Troubleshoot Network Adapter
The said issue may occur due to your network error. You can run the network adapter troubleshooter to fix any errors with your network adapter. Read our guide to troubleshoot network connectivity on Windows 10.

Habka 2: Nadiifi Cache Browser
The cache files in your web browser may get corrupt. You can try to clear the cache and cookies of your browser and try to check if the error still persists or not. Follow these steps to clear browser cache.
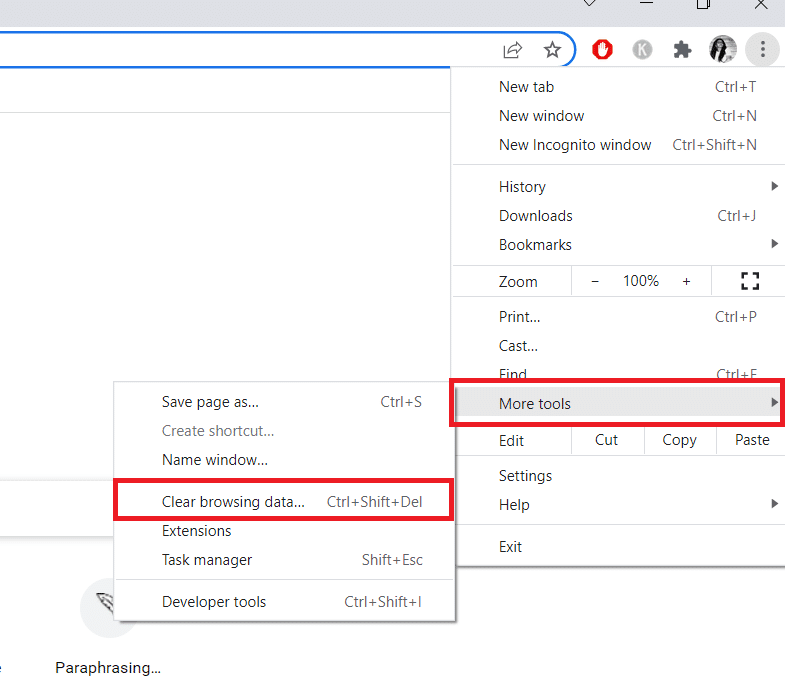
1. La bilaabo Chrome browser from Windows search bar as shown.

2. Hadda, guji icon saddex-dhibcood dhinaca kore ee midig.
3. Halkan, ku dhufo Qalabyo badan doorasho.
4. Marka xigta, dhagsii Nadiifi baarista xogta… doorasho.
Fiiro gaar ah: Waad qori kartaa chrome: // settings / clearBrowserData in the search bar to launch the browser history page directly.
5. Halkan, dooro Waqtiga in the next window. Check the boxes marked:
- Kukiyada iyo macluumaadka kale ee goobta iyo
- Sawirro xiran iyo faylal.
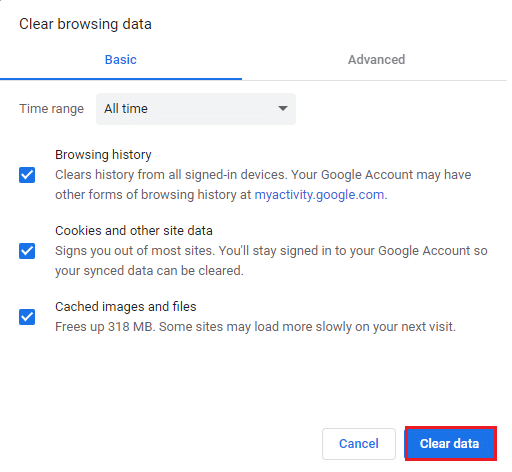
6. Ugu dambeyntii, dhagsii Nadiifi xogta.
Sidoo kale Akhri: Fix This Plugin is Not Supported error in Chrome
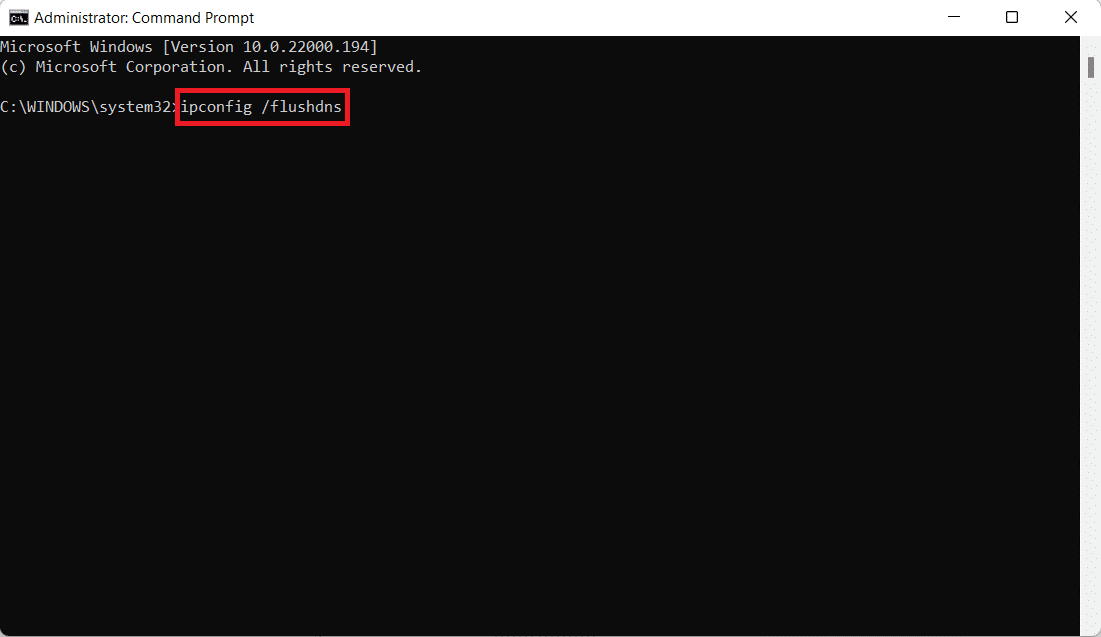
Habka 3: Nadiifi DNS Cache
You can try to clear the DNS cache to fix server IP address could not be found error. Follow our guide to flush and reset the DNS cache in Windows 10.
Method 4: Release and Renew IP Address
Here are the steps to release and renew the IP address.
1. Ku dhufo Furaha Windows, nooca Amar Amar, oo guji Ku maamul maamulaha.

2. Firstly you should flush the DNS cache as shown in Habka 2.
3. Once the above process is complete, type ipconfig / sii deyn oo riix Ku qor muhiimka ah.

4. Markaas, ku qor ipconfig / cusbooneysiin iyo garaacaan Ku qor to renew your IP.

Sidoo kale Akhri: Fix No WiFi Networks Found in Windows 10
Habka 5: Beddel cinwaanka DNS
Incorrect DNS address also cause this said Chrome error. You can change your DNS address to fix the error. Follow the given steps to change DNS address.
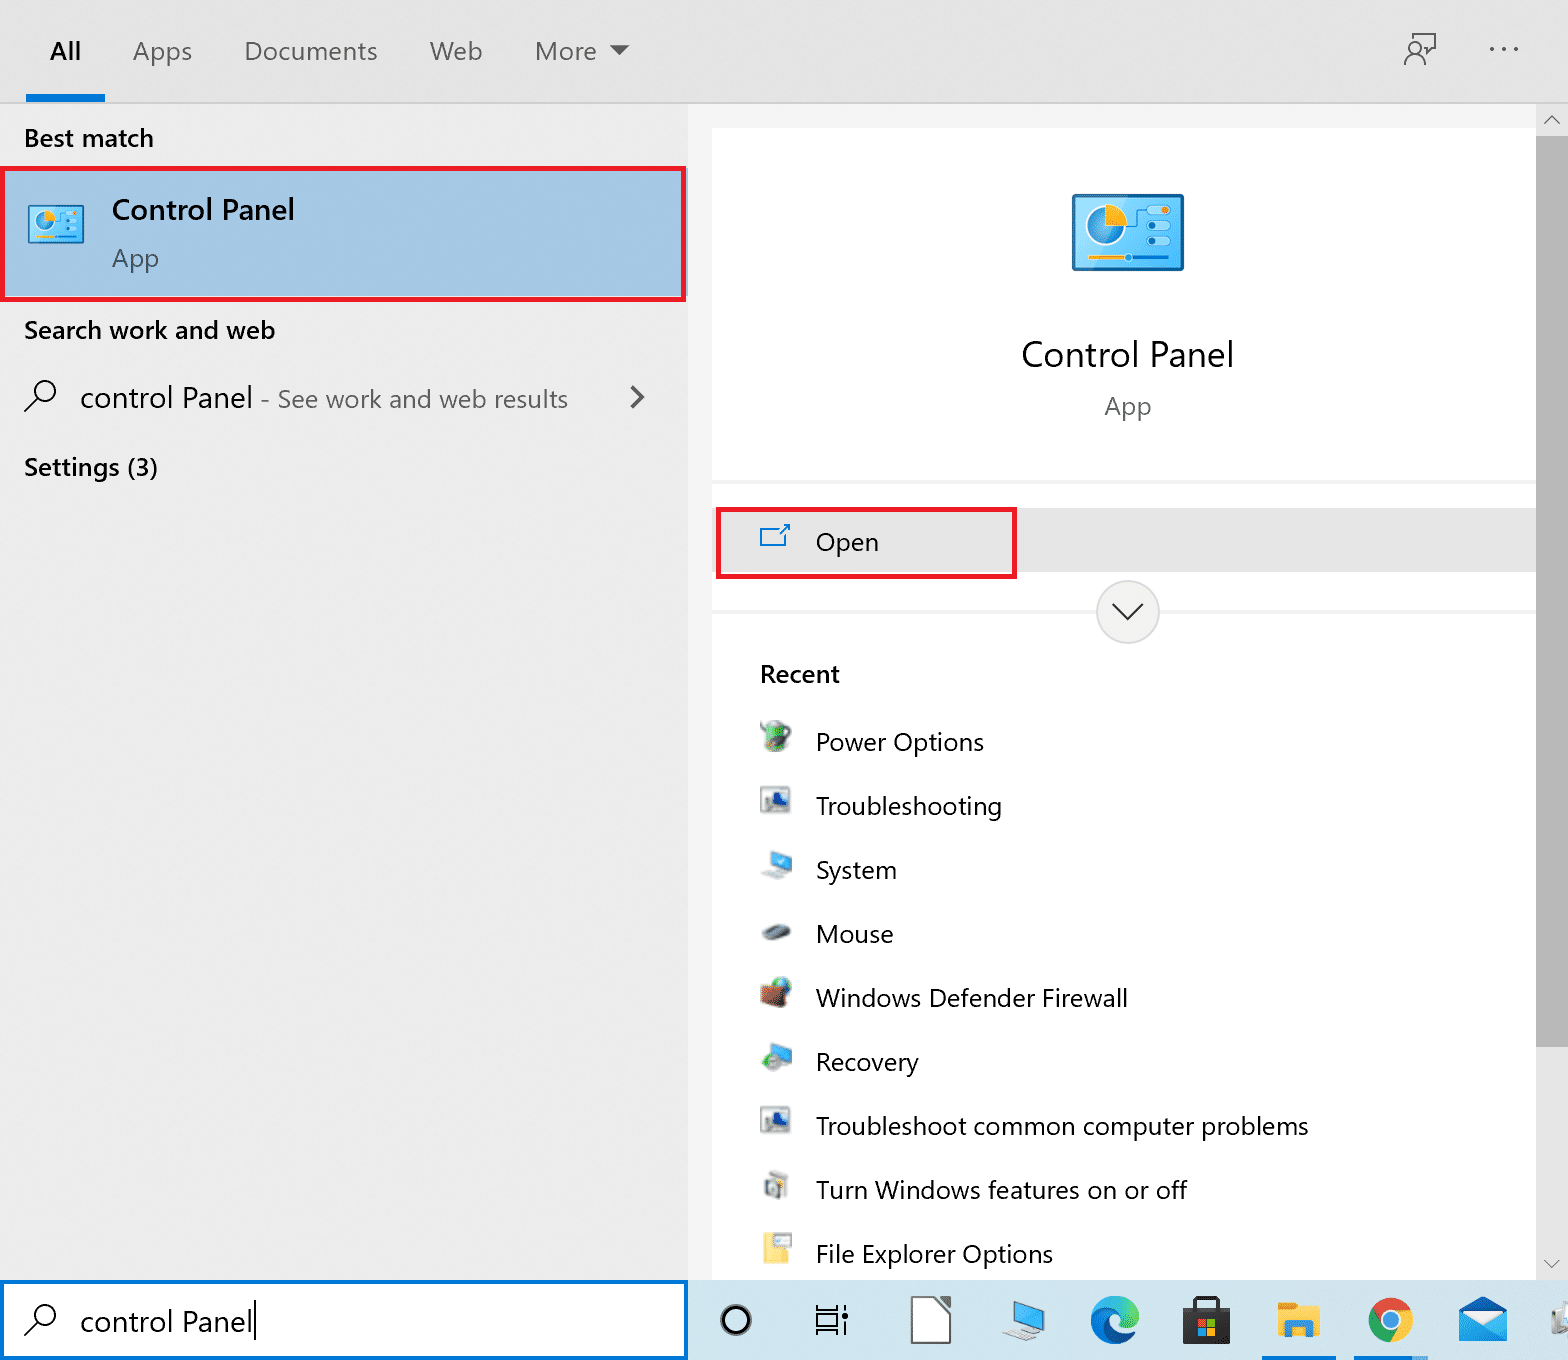
1. Taabo riix Furaha Windows, nooca Control Panel iyo guji Open.
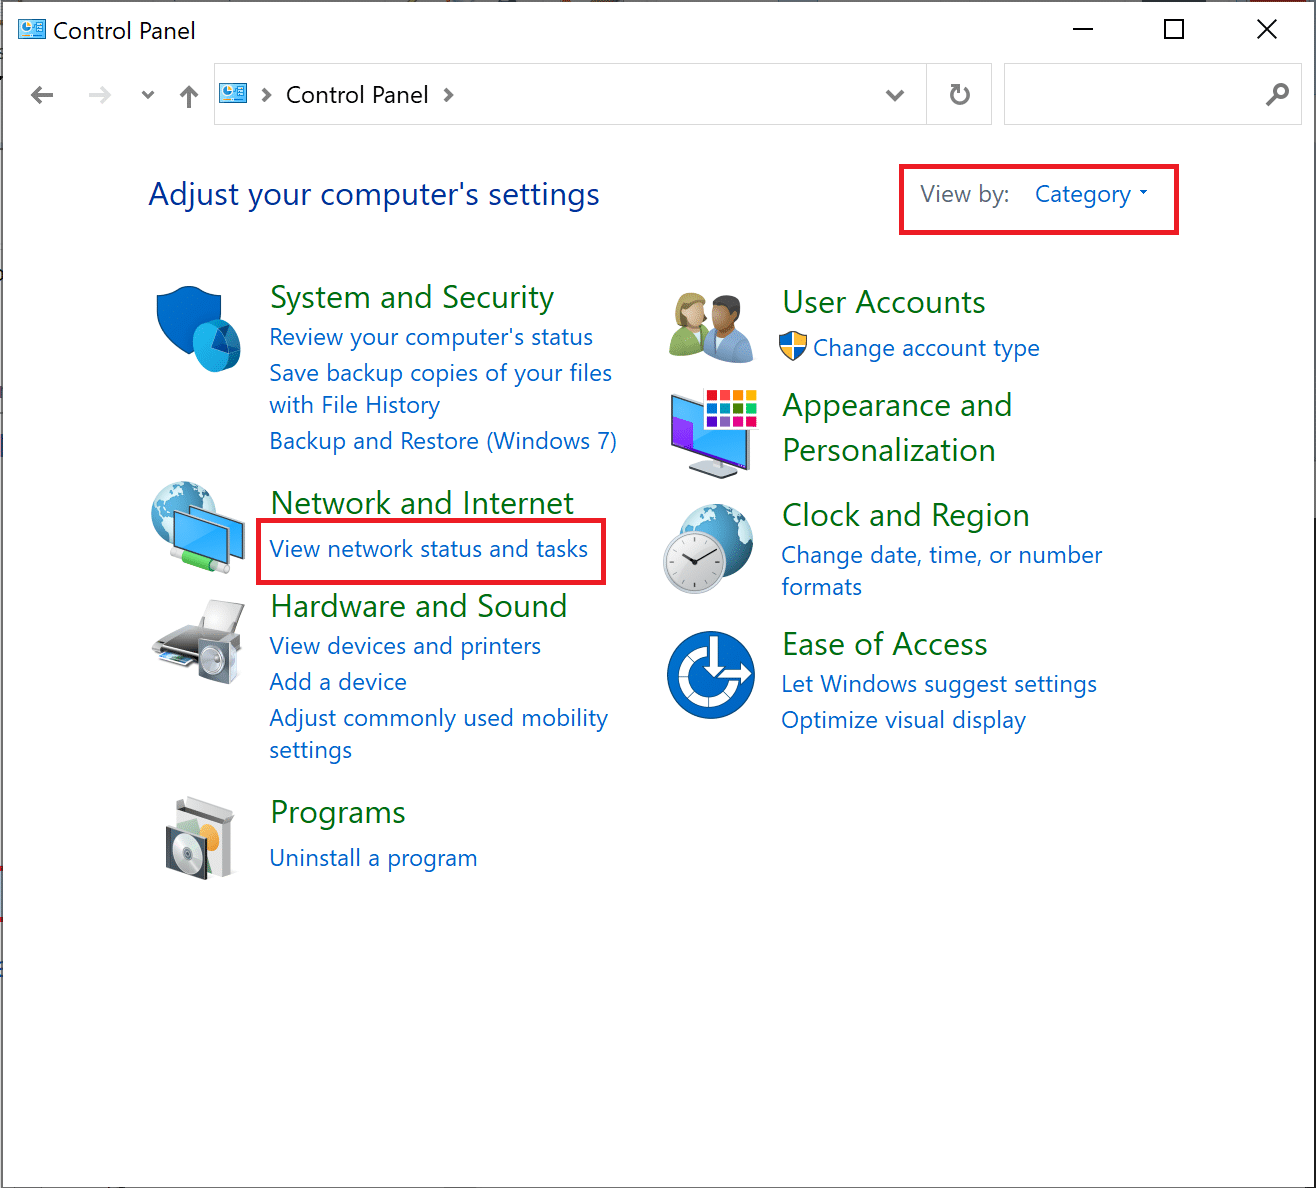
2. Samee Fiiri by > Noocyada iyo guji Arag xaalada shabakada iyo howlaha.
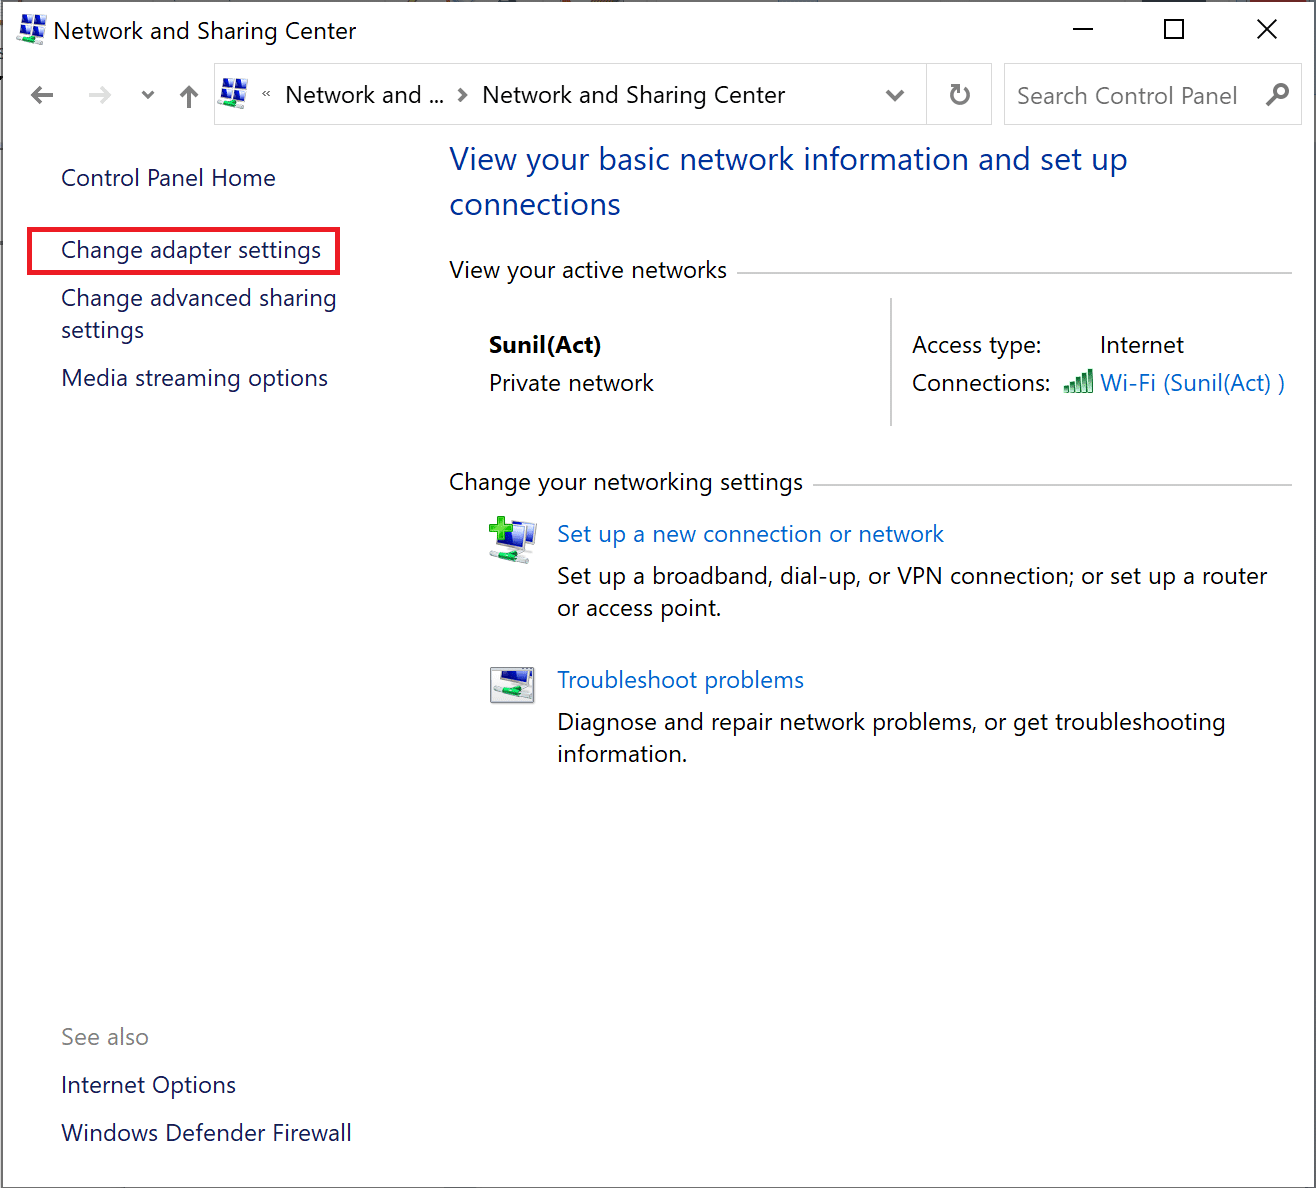
3. Hadda, guji Bedel qaabka adapter option at the left sidebar.
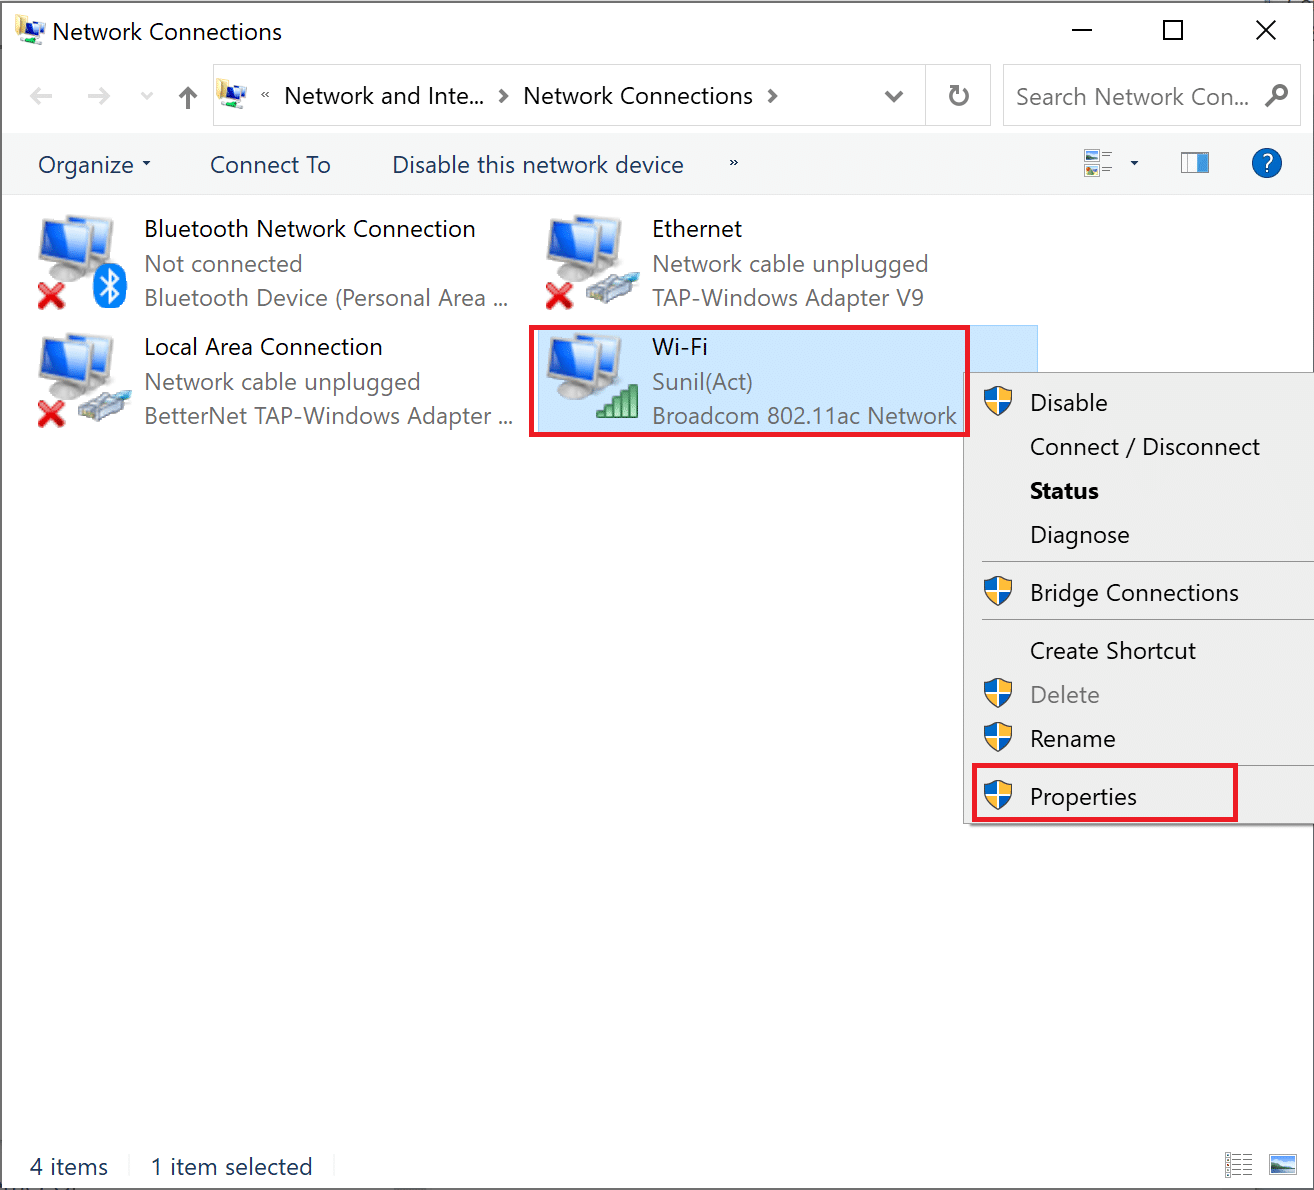
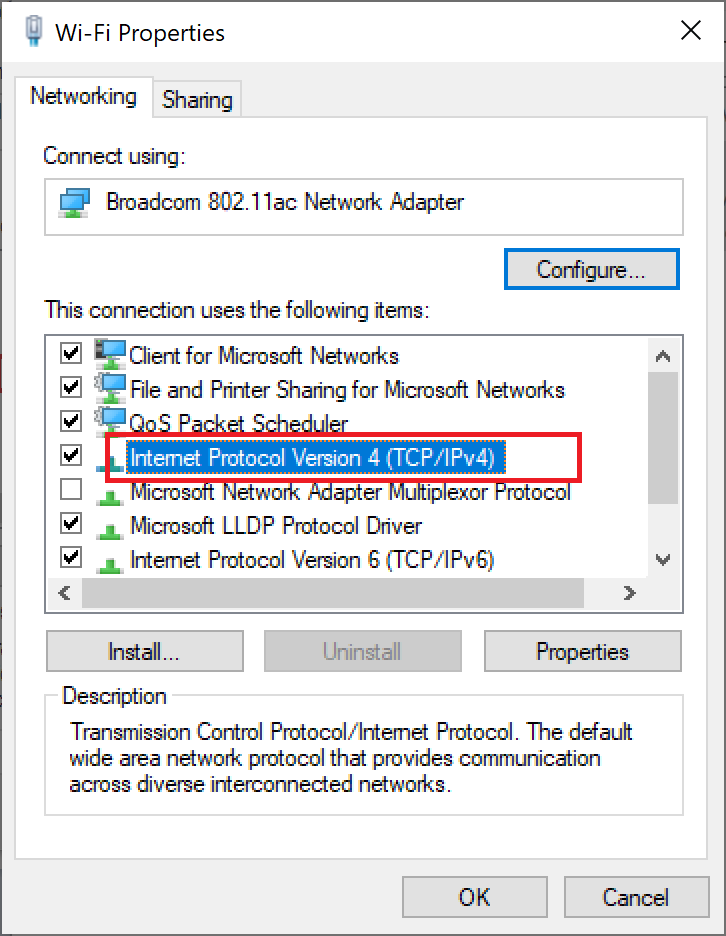
4. Next, right-click on your currently active internet connection and select Guryaha, sida la iftiimiyay.
5. In the Properties window, double-click on Xeerka Internet Protocol 4 (TCP / IPv4).
6. Next, check the options titled Si toos ah u hel cinwaanka IP iyo Isticmaal cinwaanada DNS server ee soo socda, sida la iftiimiyay.
6a. For the Preferred DNS server, enter the Google Public DNS address as: 8.8.8.8
6b. And, In the Nidaam kale oo DNS ah, enter the other Google Public DNS as: 8.8.4.4
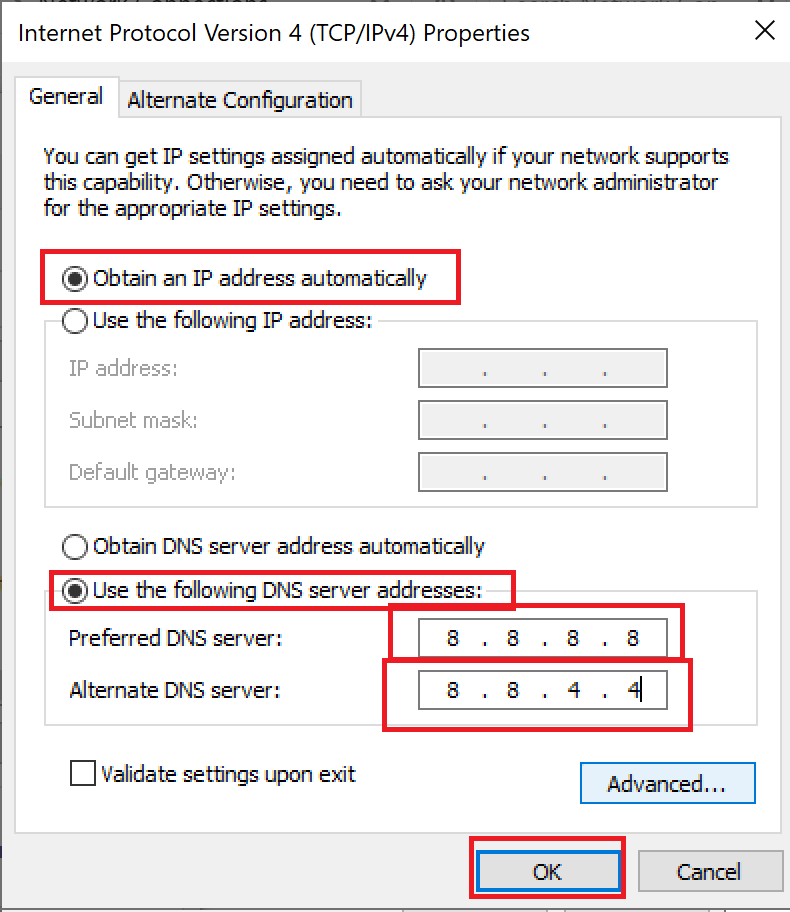
7. Ugu dambayn, guji OK si loo badbaadiyo isbedelada iyo dib u kici PC-ga.
Method 6: Restart DNS Cache
You can follow these steps to restart DNS cache.
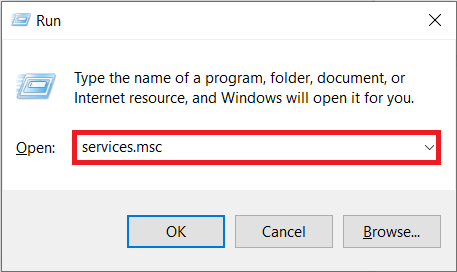
1. Taabo riix Furayaasha Windows + R si wadajir ah loo furo Run sanduuqa wada-hadalka.
2. Then type services.msc oo riix Gali furaha in lafuro adeegyada furmo suuqa.
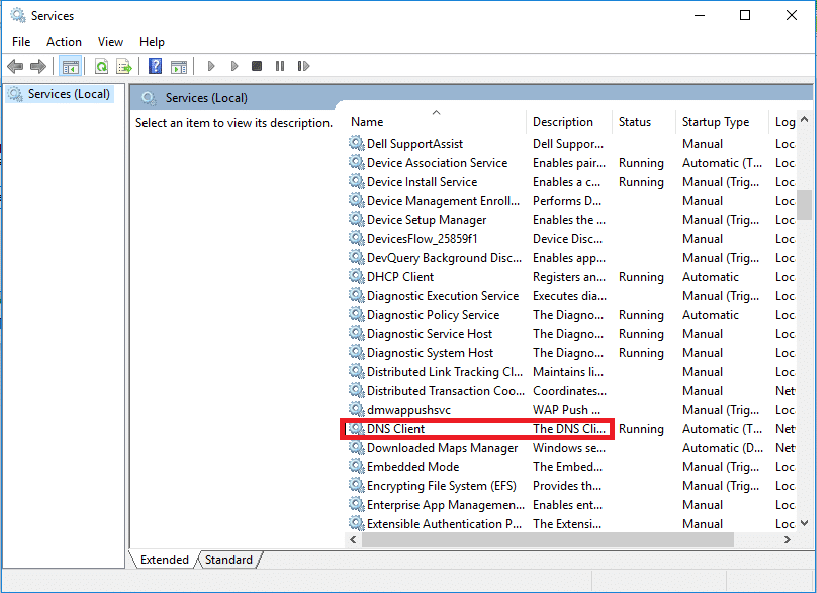
3. Right-click on Macmiilka DNS dooro Dib u bilow.
Fiiro gaar ah: If you find no restart option and unable to restart it from this method, you do not need to worry. You just need to open an elevated Command Prompt on your system.
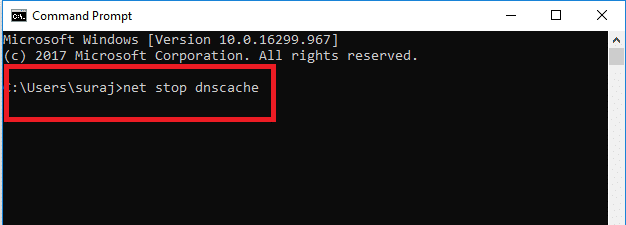
4. Ku qor kuwan soo socda amarka oo riix Gali furaha.
net stop dnscache
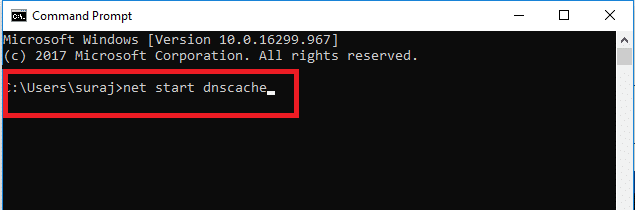
5. To start it again, type the given amarka iyo garaacaan Gali furaha.
net bilowga dnscache
Sidoo kale Akhri: Sida dib loogu habeeyo Settings Network on Windows 10
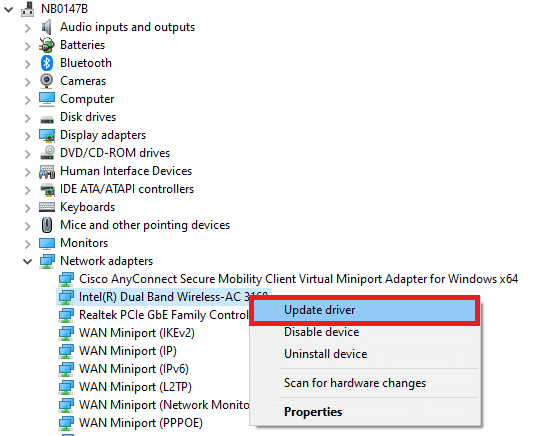
Method 7: Update Network Driver
Outdated network drive also can cause server IP address could not be found error. If you do not have the latest driver versions installed, then this may create bugs and can result in the unstable network connection. So, updating your network driver is necessary for a good network connection. Read our guide to update network drivers on Windows 10.
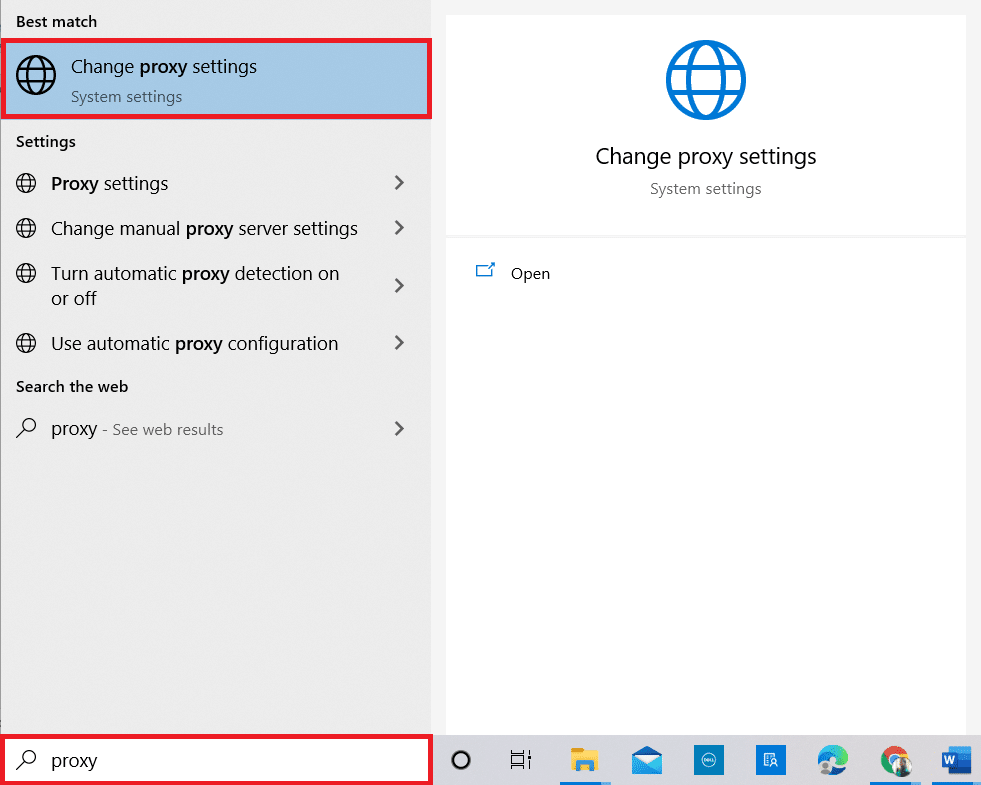
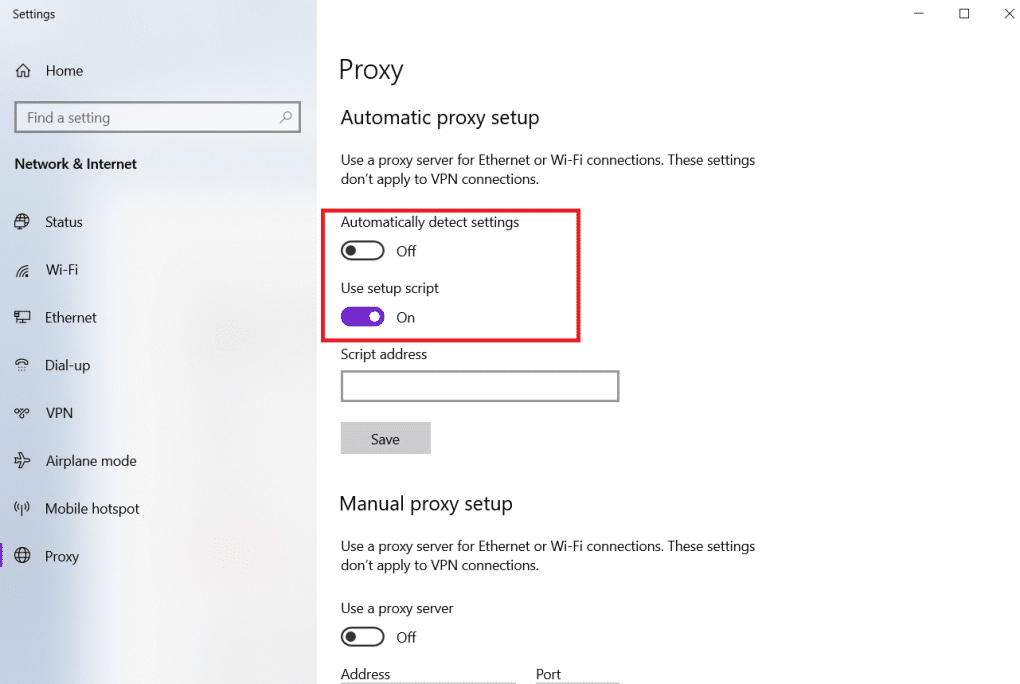
Method 8: Verify Proxy Settings
If you are using a proxy server, then using a particular proxy can create issues with your internet. You can change your proxy server to solve this problem. Follow the steps listed below to verify proxy settings.
1. Ku dhufo Furaha daaqadaha iyo nooca Wakiil iyo guji Beddel dejinta wakiillada laga bilaabo natiijooyinka raadinta.
2. Here, switch on the toggle for Si dhakhso ah u ogaato goobaha.
lagu talinayo:
We hope that you learned how to fix server IP address could not be found on Windows 10. Feel free to reach out to us with your queries and suggestions via the comments section below. Let us know what you want to learn about next.

