How to Fix Automatic Repair couldn’t repair your PC: Windows 10 is the latest operating system offered by Microsoft and with each Windows upgrade Microsoft is trying their best to overcome the limitation and shortcomings of various issues found in earlier versions of Windows. But there are some errors that are common to all versions of Windows including boot failure being the major one. Boot failure can happen with any version of Windows including Windows 10.
Automatic repair is generally able to fix the boot failure error, this is a built-in option that comes along with Windows itself. When Windows 10 running system fails to boot, the Automatic Repair option tries to repair Windows automatically. In most cases, automatic repair fixes various issues related to boot failures but like any other program, it also has its limitations, and sometimes Automatic Repair fails to work.
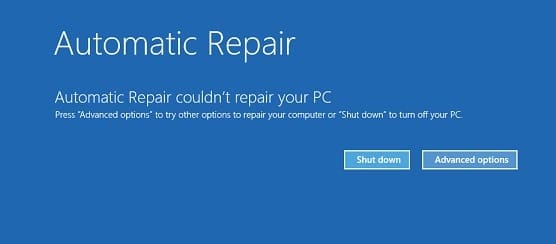
Automatic Repair fails because there are some errors or corrupted or missing files in your operating system installation that prevent Windows from starting correctly and if Automatic Repair fails then you won’t be able to get into Safe Mode. Often a failed automatic repair option will show you some kind of error message like this one:
Automatic Repair couldn't repair your PC.
Press "Advanced options" to try other options to repair your PC or "Shut down" to turn off your PC.
Log file: C:WINDOWSSystem32LogfilesSrtSrtTrail.txt
In a situation when Automatic Repair couldn’t repair your PC, Bootable installation media or Recovery Drive/System Repair Disc are helpful in such cases. Let’s get started and see step by step how you can fix Automatic Repair couldn’t repair your PC error.
Fiiro gaar ah: For each and every step below you need to have Bootable installation media or Recovery Drive/System Repair Disc and if you don’t have one then create one. If you don’t want to download the entire OS from the website then you use your friend’s PC to create the disc using this link or you need to download official Windows 10 ISO but for that, you need to have a working internet connection and PC.
IMPORTANT: Never convert a Basic disk that contains your operating system to a Dynamic disk, as it could make your system unbootable.
How to open Command Prompt at Boot in Windows 10
FIIRO GAAR AH: You need to open Command Prompt at Boot a lot in order to fix various issues.
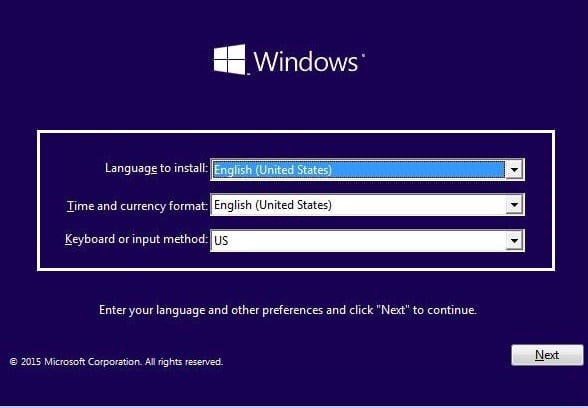
a) Put in the Windows installation media or Recovery Drive/System Repair Disc and select your dookhyada luqadda, oo guji Next.
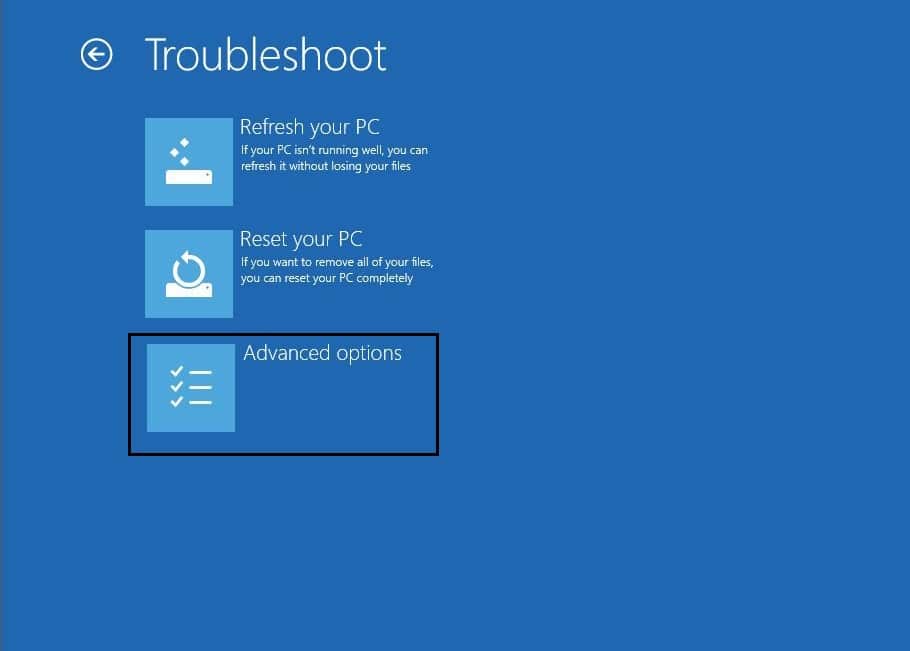
b) Guji Repair kombuyuutarkaaga xagga hoose.

c) Now choose Xallinta Dhibaatada ka dibna Fursadaha Horukacsan.
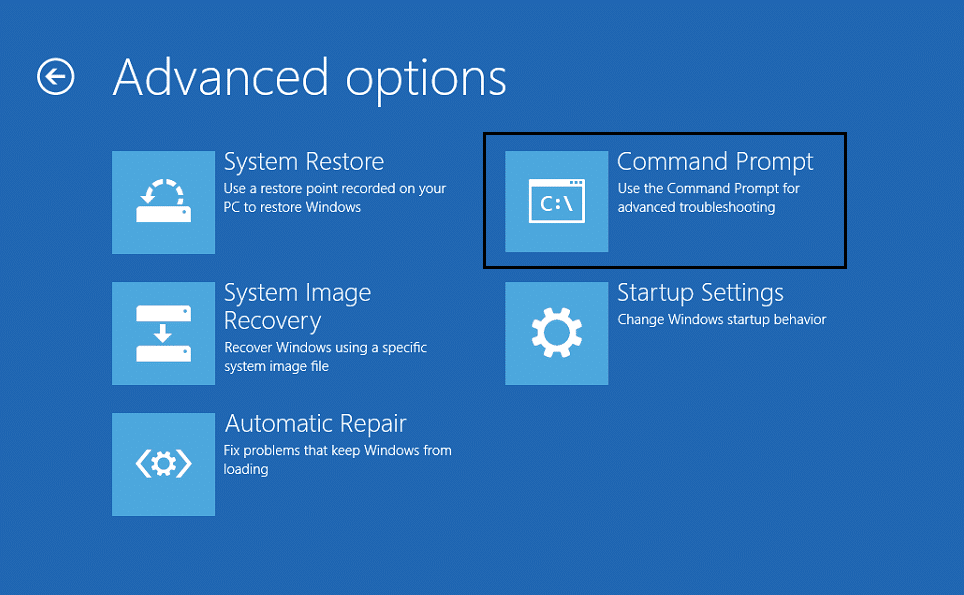
d) Select Amar Amar (Iyadoo la isku xidho) liiska xulashooyinka.
Fix Automatic Repair couldn’t repair your PC
Afeef Muhiim ah:
Kuwani waa casharro aad u horumarsan, haddii aanad garanayn waxaad samaynayso markaa waxaad si lama filaan ah u dhaawacaysaa kombuyutarkaaga ama waxaad samayn kartaa tillaabooyin khalad ah kuwaas oo ugu dambeyntii ka dhigi doona PC-gaaga inuu awoodi waayo inuu ku rakibo Windows. Markaa haddii aanad garanayn waxaad samaynayso, fadlan caawimo ka qaado farsamayaqaan kasta ama kormeer khabiir ah ayaa lagula talinayaa.
Method 1: Fix boot and rebuild BCD
1. Open the Command prompt and type the following commands one by one & hit enter:
bootrec.exe / dib-u-dhiska
bootrec.exe / fixmbr
bootrec.exe / fixboot
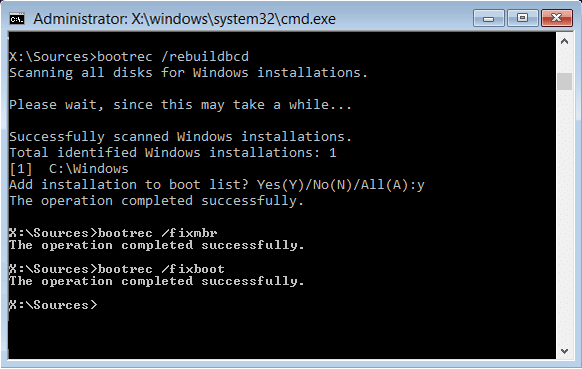
2. After completing each command successfully type bixitaan.
3. Restart your PC to see if you boot to windows.
4. If you get an error in the above method then try this:
bootsect /ntfs60 C: (replace the drive letter with your boot drive letter)
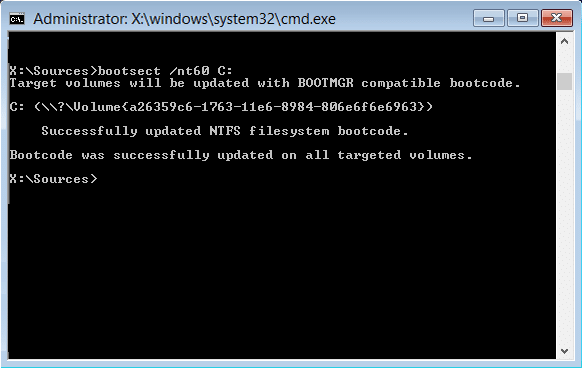
5. And again try the above commands which failed earlier.
Method 2: Use Diskpart to fix corrupted file system
1. Again go to Amar Amar iyo nooca: sawirka
2. Now type these commands in Diskpart: (don’t type DISKPART)
DISKPART> select disk 1
DISKPART> xulo qaybta 1
DISKPART> firfircoon
DISKPART> kordhin nidaamka faylasha
DISKPART> bixitaanka
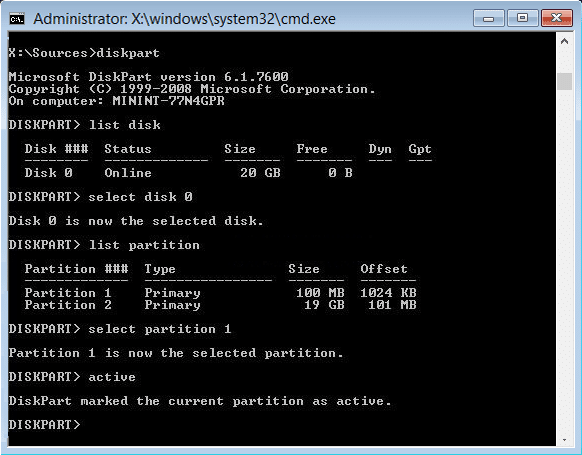
3. Now type the following command:
 bootrec.exe / dib-u-dhiska
 bootrec.exe / fixmbr
 bootrec.exe / fixboot
4. Restart to apply changes and see if you’re able to fix Automatic Repair couldn’t repair your PC error.
Method 3: Use Check Disk Utility
1. Go to command prompt and type the following: chkdsk /f/r C:
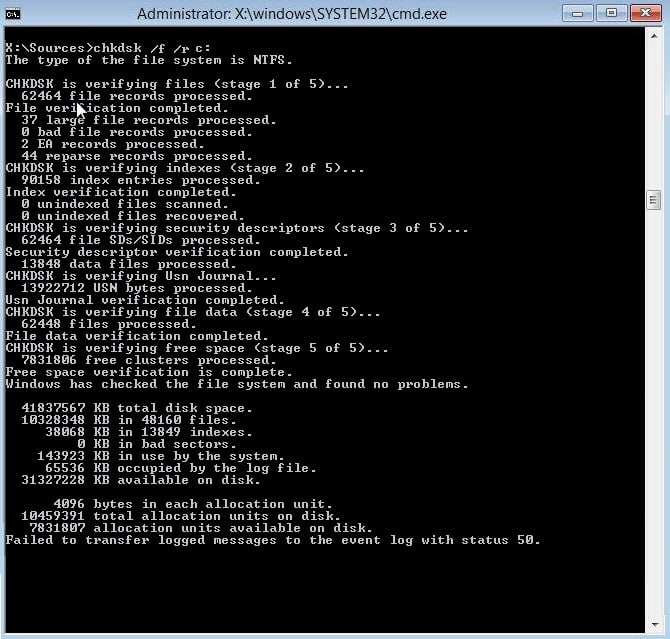
2. Hada inaad dib u bilowdo PC-gaaga to see if the problem is fixed or not.
Method 4: Recover Windows registry
1. Gali rakibaadda ama warbaahinta soo kabashada oo ka bootin.
2. Xulo adiga doorbidida luqadda oo guji xiga.
3. After selecting language press Wareejinta + F10 si degdeg ah loo amro.
4. Type the following command in the Command Prompt:
cd C:windowssystem32logfilessrt (ka beddel warqaddaada si habboon)

5. Now type this to open the file in notepad: SrtTrail.txt
6. Saxiix CTRL + O ka dibna nooca faylka ka dooro"Dhamaan faylasha” oo u gudub C:windowssystem32 then right-click CMD oo dooro Orod sida maamulaha.
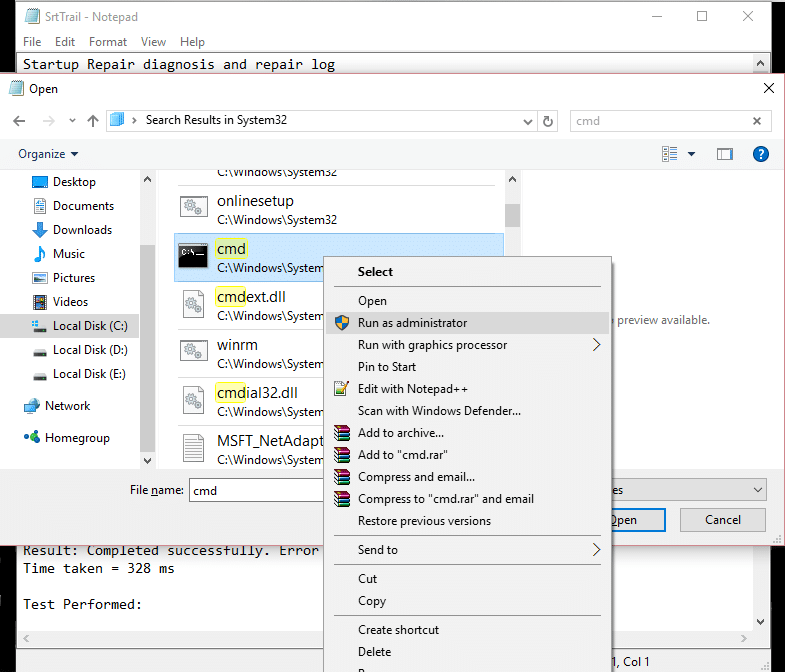
7. Type the following command in cmd: cd C:windowssystem32config
8. Rename Default, Software, SAM, System, and Security files to .bak to back up those files.
9. To do so type the following command:
rename DEFAULT DEFAULT.bak
rename SAM SAM.bak
rename SECURITY SECURITY.bak
rename SOFTWARE SOFTWARE.bak
rename SYSTEM SYSTEM.bak
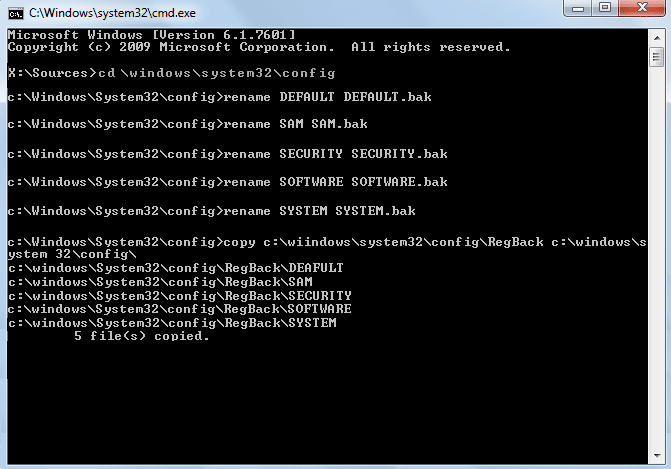
10. Now type the following command in cmd:
koobbi c:windowssystem32configRegBack c:windowssystem32config
11. Restart your PC to see if you can boot to Windows.
Method 5: Repair Windows Image
1. Open Command Prompt and enter the following command:
DISM / khadka internetka / Nadiifinta-Sawirka / Soo-celinta Caafimaadka

2. Press enter to run the above command and wait for the process to complete, usually, it takes 15-20 minutes.
FIIRO GAAR AH: If the above command doesn’t work then try this: Dism /Sawirka:C:offline /Sawirka Nadiifinta /Soo celintaHealth /Isha:c: testmountwindows or Dism / Online / Nadiifinta-Sawirka / Soo CelintaCaafimaadka / Source: c: testmountwindows /LimitAccess
3. After the process is completed restart your PC.
4. Reinstall all the windows drivers and fix Automatic Repair couldn’t repair your PC error.
Habka 6: Tirtir faylka dhibaatada leh
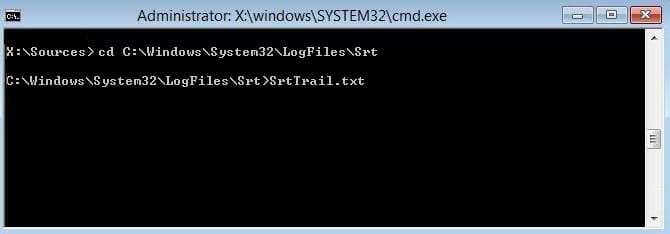
1. Access Command Prompt again and enter the following command:
cd C:WindowsSystem32LogFilesSrt
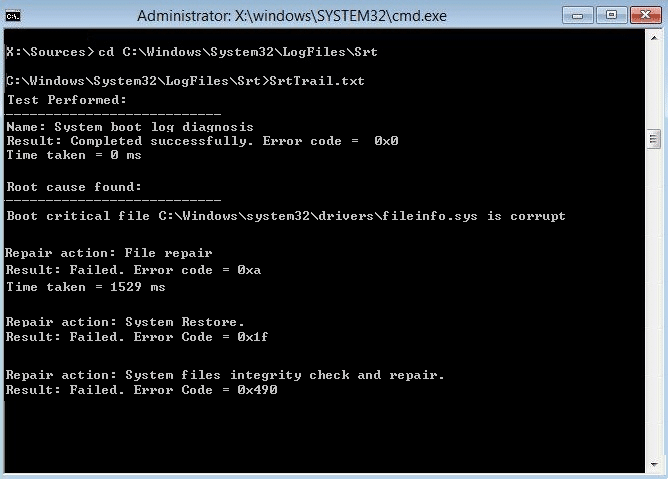
SrtTrail.txt
2. When the file opens you should see something like this:
Boot faylka muhiimka ah c:windowssystem32driverstmel.sys waa musuqmaasuq.
3. Delete the problematic file by entering the following command in cmd:
cd c:windowssystem32drivers
del tmel.sys
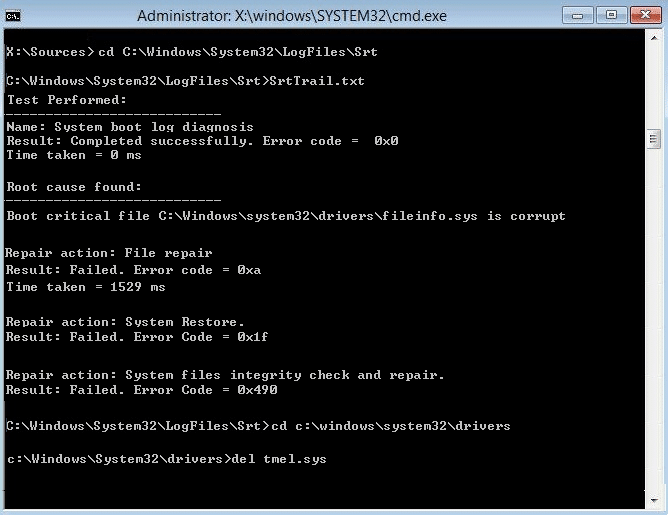
FIIRO GAAR AH: Ha tirtirin darawalada muhiimka u ah daaqadaha si ay ugu shubaan nidaamka hawlgalka
4. Restart to see if the issue is fixed if not continue to the next method.
Method 7: Disable Automatic Startup Repair Loop
1. Open Command Prompt and enter the following command:
FIIRO GAAR AH: Only disable if you are in Automatic Startup Repair Loop
bcdedit / dhigay {default} dib u soo kabashada waa la dajiyay
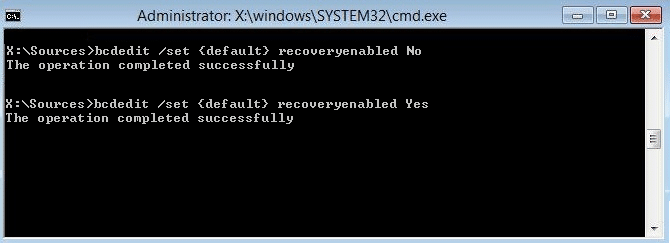
2. Restart and Automatic Startup Repair should be disabled.
3. If you need to again enable it, enter the following command in cmd:
bcdedit /set {default} dib u soo kabashada haa
4. Reboot si aad u codsato isbeddelada.
Habka 8: Deji qiimaha saxda ah ee qaybinta qalabka iyo qaybta osdevice
1. In Command Prompt type the following and press enter: bcdedit
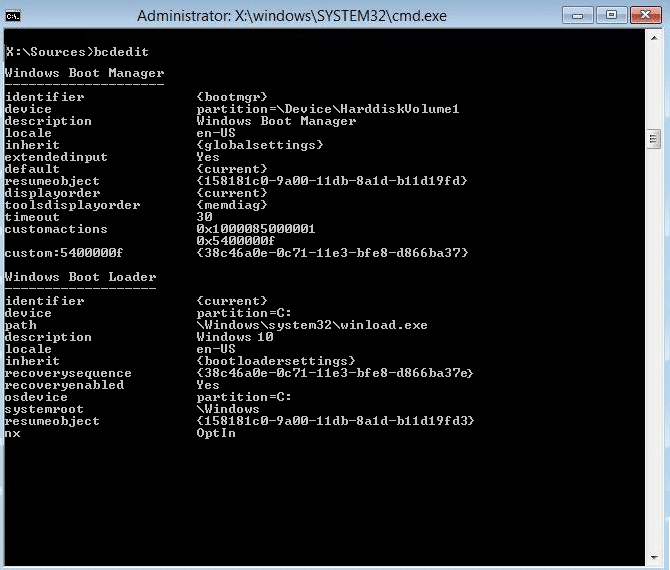
2. Now find the values of Qaybta qalabka iyo qaybta osdevice oo hubi in qiimahoodu sax yahay ama loo dhigay qaybinta saxda ah.
3. By default value is C: because Windows comes pre-installed on this partition only.
4. If by any reason it is changed to any other drive then enter the following commands and press Enter after each one:
bcdedit / dhig {default} qaybta qalabka=c:
bcdedit / dhig {default} osdevice partition=c:
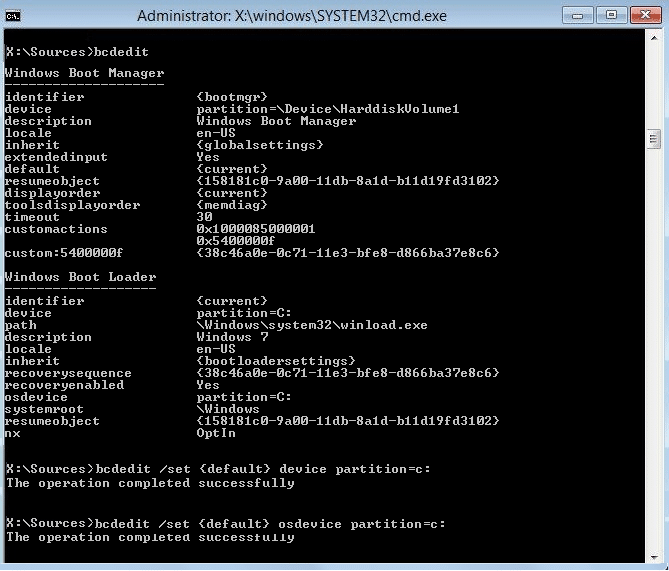
Fiiro gaar ah: Haddii aad ku rakibtay daaqadahaaga darawal kasta oo kale hubi inaad isticmaasho midkaas halkii aad ka isticmaali lahayd C:
5. Reboot your PC to save changes and fix Automatic Repair couldn’t repair your PC error.
Method 9: Disable driver signature enforcement
1. Put in the Windows installation media or Recovery Drive/System Repair Disc and select your dookhyada luqadda, oo guji Next.
2. Guji Repair kombuyuutarkaaga xagga hoose.
3. Now choose Xallinta Dhibaatada ka dibna Fursadaha Horukacsan.
4. Dooro Dejinta Bilaabashada.
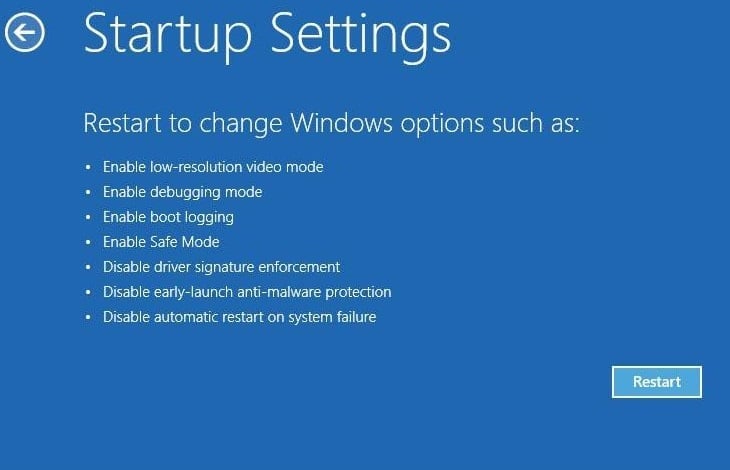
5. Restart your PC and riix lambarka 7 (If 7 isn’t working then relaunch the process and try different numbers).

Method 10: Last option is to perform Refresh or Reset
Again insert Windows 10 ISO then select your language preferences and click Dayactir kombuyuutarkaaga hoose.
1. Dooro Dhibaatooyinka marka Calaamadda kabaha muuqdaa.

2. Now choose between the option Refresh or Reset.
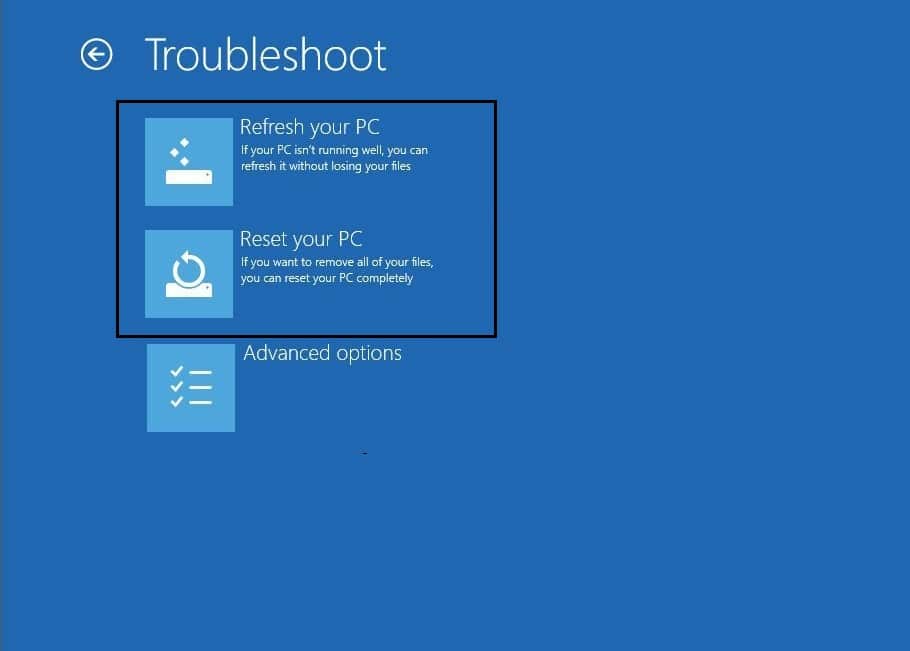
3. Follow the on-screen instructions to complete the Reset or Refresh.
4. Make sure you have the latest OS disc (doorbidayaa Windows 10) in order to complete this process.
Laguugu taliyey adiga:
By now you must have successfully hagaajin Automatic Repair couldn’t repair your PC but if you still have any questions regarding this guide please feel free to ask them in the comment section.

