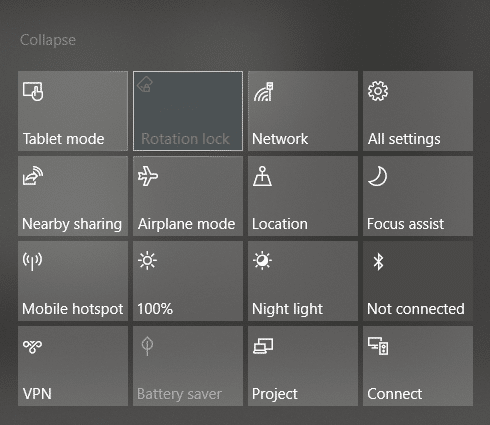
If you have 2 in 1 Windows device such as Tablets, you would be familiar with the importance of the screen rotation feature. Users report that the screen rotation feature has stopped working & the Screen Rotation Lock option is greyed out. If you’re facing this issue, then don’t worry as this is just a setting issue which means it can be easily fixed. This guide will walk you through the steps to fix rotation lock greyed out in Windows 10.
Here are issues which can be resolved using this guide:
- Rotation lock missing
- Auto Rotate not working
- Rotation lock greyed out.
- Screen rotation not working
Fix Rotation Lock greyed out in Windows 10
Se till att skapa en återställningspunkt ifall något går fel.
Method – 1: Enable Portrait Mode
One of the methods to fix this problem is to rotate your screen in portrait mode. Once you rotate it to portrait mode, most probably your rotation lock would start working, i.e. clickable again. In case your device is not rotating into portrait mode automatically, try to do it manually.
1. Tryck Windows-tangent + I to open Settings then click on the Systemkrav ikonen.

2. Make sure to select Visa från menyn till vänster.
3. Leta reda på Orientation section where you need to choose Porträtt från rullgardinsmenyn.
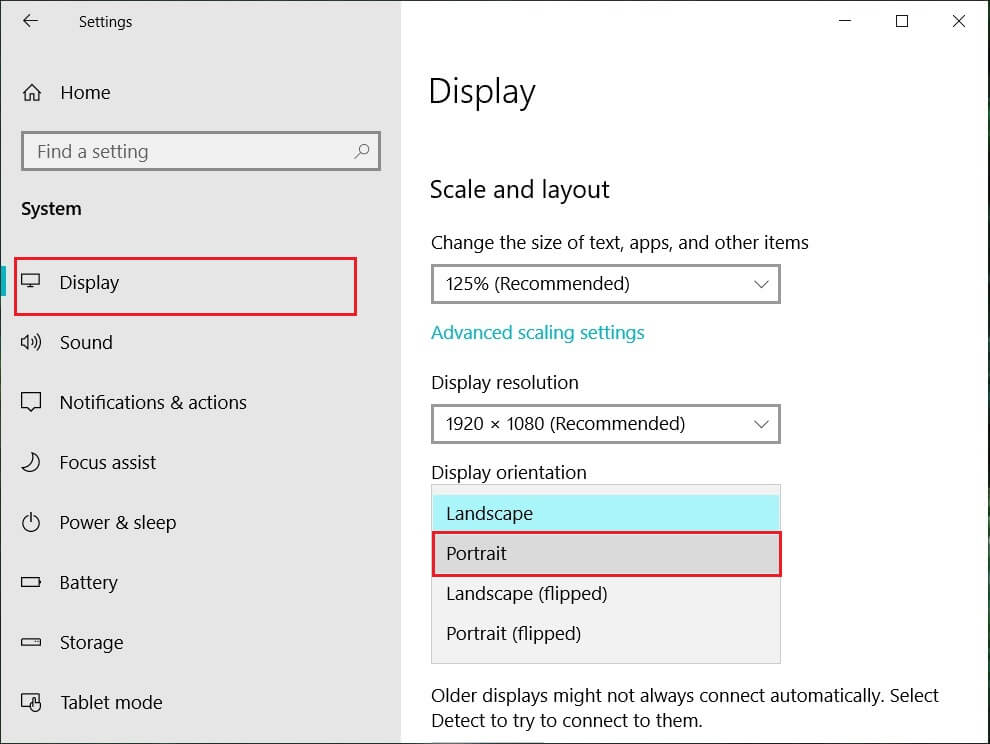
4. Your device will automatically turn into portrait mode.
Method – 2: Use your device in tent mode
Some users, particularly Dell Inspiron, experienced that when their rotation lock is greyed out, the only way to solve this problem is to put your device in Tent Mode.
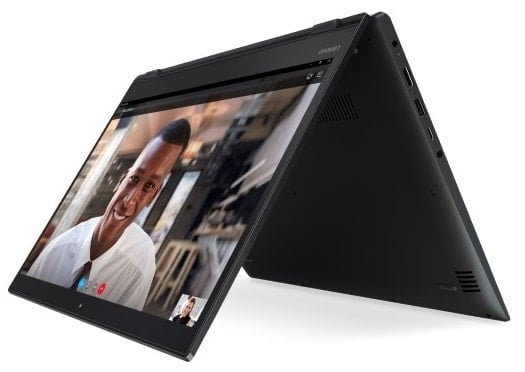
Image Credit: Microsoft
1. You need to put your device in Tent Mode. If your display is upside down, you need not worry.
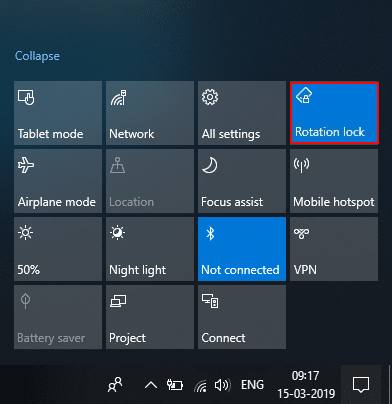
2. Klicka nu på Windows Action Center, Rotationslås will be working. Here you need to turn it off if you want so that your device rotate properly.
Method – 3: Disconnect your keyboard
If rotation lock is greyed in your Dell XPS and Surface Pro 3 (2-in-1 device), you need to disconnect your keyboard, and many users reported that disconnecting the keyboard solves the rotation lock problem. If you own different devices, you can still use this method to fix rotation lock greyed out in Windows 10 issue.
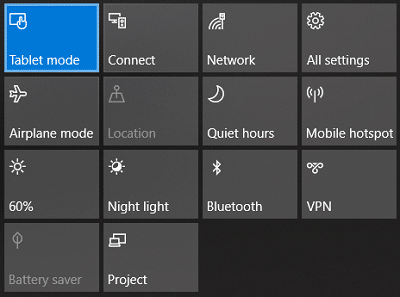
Method – 4: Switch to Tablet Mode
Many users experienced that this rotation greyed out the problem by switching their device into Tablet Mode. If it is switched automatically, it is good; otherwise, you can do it manually.
1. Klicka på Windows Action Center.
2. Här hittar du Tablet-läge option, Click on It.
OR
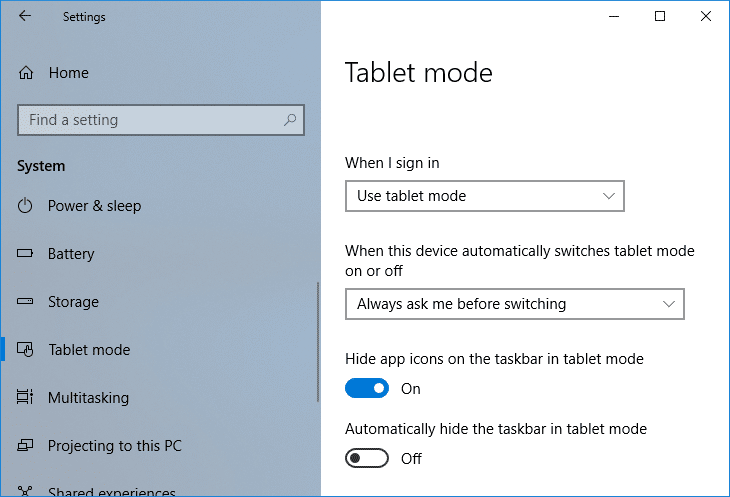
1. Tryck på Windows-tangent + I för att öppna Inställningar klicka sedan på Systemkrav ikonen.
2. Here it would help if you located Tablet-läge option under the left window pane.
3. Now from the “When I sign in” drop-down, select “Använd tablettläge".
Method – 5: Change LastOrientation Registry Value
If you still experience a problem, you can solve it by changing some registry values.
1. Press Windows +R and enter regedit tryck sedan på Enter.

2. Once registry editor opens, you need to navigate to the below path:
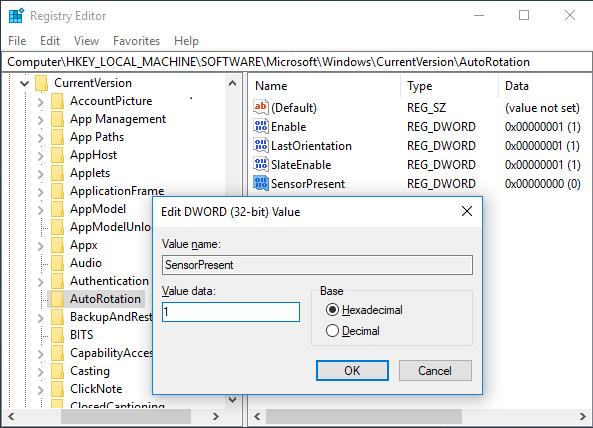
HKEY_LOCAL_MACHINESOFTWAREMicrosoftWindowsCurrentVersionAutoRotation
Notera: Follow the above folders one by one to locate Auto Rotation.
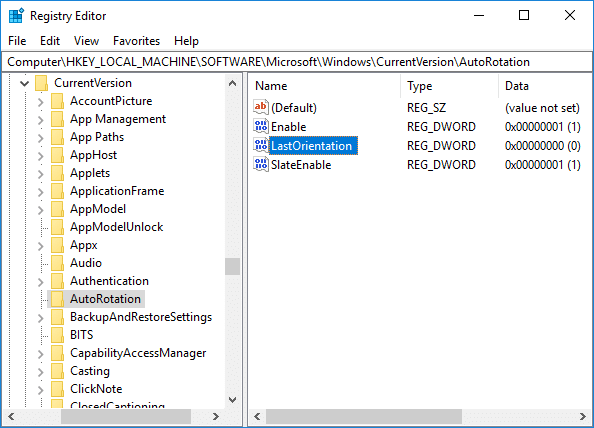
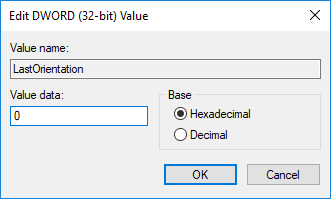
3. Se till att select AutoRotation dubbelklicka sedan på i den högra fönsterrutan Last Orientation DWORD.
4. Ange nu 0 under Value data field och klicka på OK.
5. Om det finns SensorPresent DWORD, double-click on it and set its värde till 1.
Method – 6: Check Sensor Monitoring Service
Sometimes services of your device can cause a rotation lock problem. Therefore, we can get it sorted with Windows Monitoring services feature.
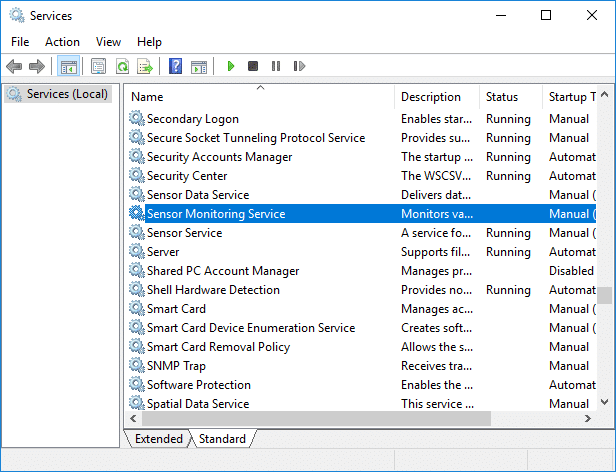
1. Tryck på Windows + R och skriv services.msc och tryck på Enter.

2. Once the services window opens, find the Sensor Monitoring services option och dubbelklicka på den.
3. Now, from the Startup type drop-down select Automat och sedan klicka på Startknapp att starta tjänsten.
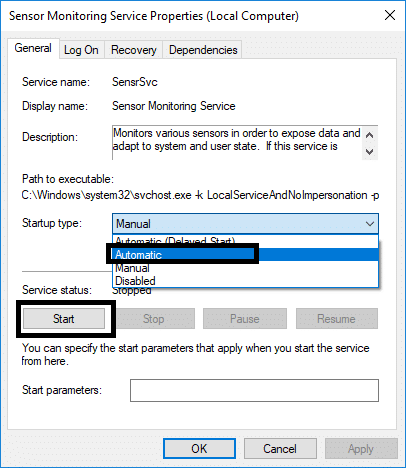
4. Finally, click Apply followed by OK to save the settings, and you can reboot the system to apply the changes.
Method – 7: Disable YMC service
If you are using a Lenovo Yoga device and experiencing this problem, you can fix rotation lock grayed out in the Windows 10 issue by disabling YMC service.
1. Windows + R type services.msc och tryck på Enter.
2. Hitta YMC services och dubbelklicka på den.
3. Ställ in starttyp till Disabled and click Apply, followed by OK.
Method – 8: Update Display Drivers
One reason for this problem could be the driver update. If your respective driver for the monitor is not updated, it can cause the Rotation Lock greyed out in Windows 10 Issue.
Manually Update Graphics Drivers using Device Manager
1. Tryck på Windows-tangent + R och skriv sedan devmgmt.msc och tryck på enter för att öppna Enhetshanteraren.

2. Expandera sedan Grafikkort och högerklicka på ditt grafikkort och välj Gör det möjligt.

3. När du har gjort detta igen högerklickar du på ditt grafikkort och väljer "Uppdatera drivrutin".

4. Välj "Sök automatiskt efter uppdaterad drivrutinsprogram” och låt det avsluta processen.

5. If the above steps helped fix the issue then very good, if not then continue.
6. Högerklicka igen på ditt grafikkort och välj "Uppdatera drivrutin" men den här gången på nästa skärm välj "Bläddra i min dator för drivrutinsprogram."

7. Välj nu “Låt mig välja från en lista med tillgängliga drivrutiner på min dator. "

8. Slutligen, välj den senaste drivrutinen från listan och klicka på Nästa.
9. Låt processen ovan avslutas och starta om datorn för att spara ändringarna.
Följ samma steg för det integrerade grafikkortet (Intel i det här fallet) för att uppdatera dess drivrutiner. Se om du kan Fix Rotation Lock greyed out Issue, om inte, fortsätt sedan med nästa steg.
Uppdatera automatiskt grafikdrivrutiner från tillverkarens webbplats
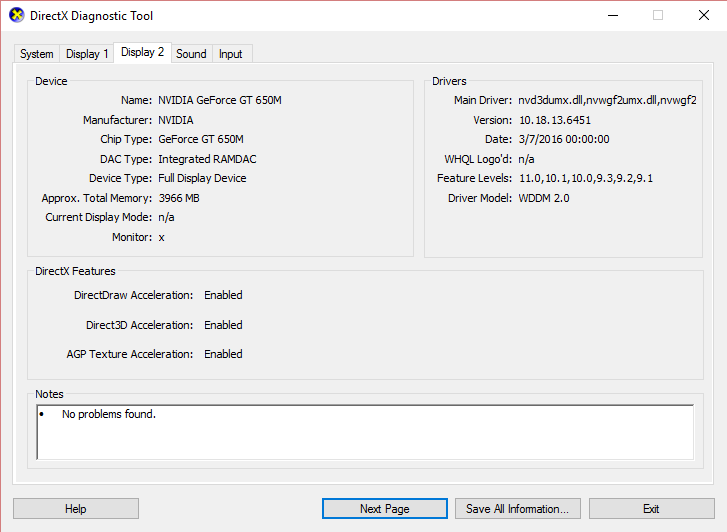
1. Tryck på Windows-tangent + R och i dialogrutan skriv "dxdiag” och tryck enter.

2. Efter den sökningen efter visningsfliken (det kommer att finnas två visningsflikar, en för det integrerade grafikkortet och en annan kommer att vara från Nvidia) klicka på fliken Display och ta reda på ditt grafikkort.
3. Gå nu till Nvidia-drivrutinen ladda ner hemsida och ange produktinformationen som vi får reda på.
4. Sök i dina drivrutiner efter att ha angett informationen, klicka på Godkänn och ladda ner drivrutinerna.

5. Efter en lyckad nedladdning, installera drivrutinen och du har framgångsrikt uppdaterat dina Nvidia-drivrutiner manuellt.
Method – 9: Remove Intel Virtual Buttons Driver
Some users reported that Intel Virtual button drivers cause rotation lock problem on your device. To solve this problem, you can uninstall the driver.
1. Open Device manager on your device by pressing Windows + R and type devmgmt.msc and hit Enter or press Windows X and choose Enhetshanteraren från alternativlistan.
2. Once Device manager box is opened locate Intel virtual buttons driver.
3. Högerklicka på den och välj Avinstallera.
Rekommenderas:
Jag hoppas att den här artikeln var till hjälp och nu kan du enkelt Fix Rotation Lock greyed out in Windows 10, but if you still have any questions regarding this tutorial then feel free to ask them in the comment’s section.
")
