Fix The Service Couldn’t Be Started Windows Defender Error 0x80070422: Windows Defender is a malware protection software which is inbuilt into Windows 10. Now it is used widely by Windows users because it’s reliable, but in some cases, users also installed 3rd party Antivirus software such as Norton, Quick Heal etc which is not recommend because they corrupt the files of Windows Defender. Once you completely uninstall 3rd party antivirus you won’t be able to use Windows Defender properly because files required by it have already been corrupted and can no longer be used.
“The service couldn’t be started.
The service cannot be started, either because it is disabled or because it has no enabled devices associated with it.”
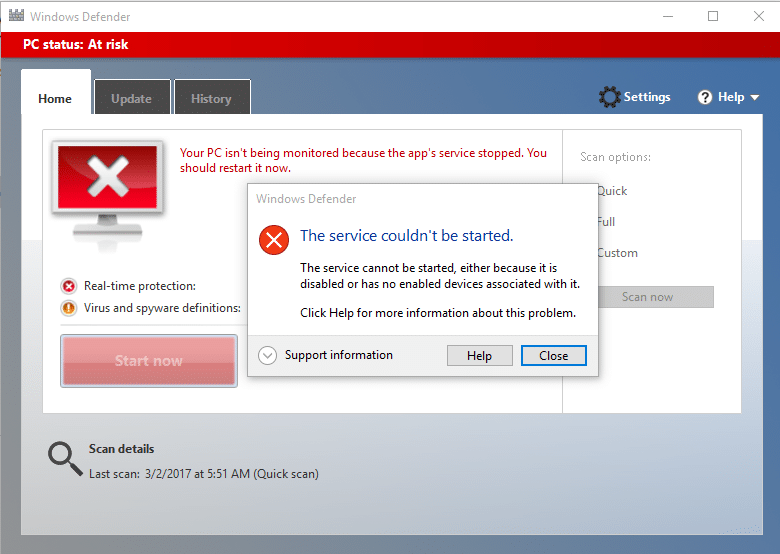
Windows Defender is turned off when you use a 3rd party Antivirus and once you uninstall the Antivirus software you won’t be able to turn ON Windows Defender. If you try to enable Windows Defender you will face the error “The Service Couldn’t Be Started” with error code 0x80070422. So without wasting any time let’s see how to actually Fix The Service Couldn’t Be Started Windows Defender Error 0x80070422 with the help of below-listed troubleshooting guide.
Fix The Service Couldn’t Be Started Windows Defender Error 0x80070422
ఏదైనా తప్పు జరిగితే పునరుద్ధరణ పాయింట్ను సృష్టించినట్లు నిర్ధారించుకోండి.
విధానం 1: SFC మరియు CHKDSKని అమలు చేయండి
1.Windows కీ + X నొక్కి ఆపై క్లిక్ చేయండి కమాండ్ ప్రాంప్ట్ (అడ్మిన్).

2.ఇప్పుడు cmdలో కింది వాటిని టైప్ చేసి ఎంటర్ నొక్కండి:
Sfc / scannow sfc / scannow /offbootdir = c: /offwindir = c:windows (పైన విఫలమైతే దీన్ని ప్రయత్నించండి)

3.పై ప్రక్రియ పూర్తయ్యే వరకు వేచి ఉండండి మరియు పూర్తయిన తర్వాత మీ PCని పునఃప్రారంభించండి.
4.తర్వాత, ఇక్కడ నుండి CHKDSKని అమలు చేయండి చెక్ డిస్క్ యుటిలిటీ (CHKDSK)తో ఫైల్ సిస్టమ్ లోపాలను పరిష్కరించండి.
5.పై ప్రక్రియను పూర్తి చేసి, మార్పులను సేవ్ చేయడానికి మీ PCని మళ్లీ రీబూట్ చేయండి.
Method 2: Temporarily Disable 3rd party Antivirus
1.పై కుడి-క్లిక్ చేయండి యాంటీవైరస్ ప్రోగ్రామ్ చిహ్నం సిస్టమ్ ట్రే నుండి మరియు ఎంచుకోండి డిసేబుల్.

2.తర్వాత, దీని కోసం టైమ్ ఫ్రేమ్ని ఎంచుకోండి యాంటీవైరస్ నిలిపివేయబడి ఉంటుంది.

గమనిక: సాధ్యమైనంత తక్కువ సమయాన్ని ఎంచుకోండి ఉదాహరణకు 15 నిమిషాలు లేదా 30 నిమిషాలు.
3.Once done, again try to run Windows Defender and check if the error resolves or not.
4.Windows కీ + X నొక్కి ఆపై ఎంచుకోండి నియంత్రణ ప్యానెల్.

5.తర్వాత, క్లిక్ చేయండి వ్యవస్థ మరియు భద్రత.
6.తర్వాత క్లిక్ చేయండి విండోస్ ఫైర్వాల్.

7.ఇప్పుడు ఎడమ విండో పేన్ నుండి టర్న్ విండోస్ ఫైర్వాల్ ఆన్ లేదా ఆఫ్ పై క్లిక్ చేయండి.

8.విండోస్ ఫైర్వాల్ను ఆఫ్ చేయి ఎంచుకోండి మరియు మీ PCని పునఃప్రారంభించండి. Again try to open Windows Defender and see if you’re able to Fix The Service Couldn’t Be Started Windows Defender Error 0x80070422.
పై పద్ధతి పని చేయకపోతే, మీ ఫైర్వాల్ని మళ్లీ ఆన్ చేయడానికి ఖచ్చితమైన దశలను అనుసరించండి.
విధానం 3: Windows తాజాగా ఉందని నిర్ధారించుకోండి
1.Windows కీ + I నొక్కండి, ఆపై ఎంచుకోండి నవీకరణ & భద్రత.

2.తదుపరి, మళ్లీ క్లిక్ చేయండి తాజాకరణలకోసం ప్రయత్నించండి మరియు ఏవైనా పెండింగ్లో ఉన్న నవీకరణలను ఇన్స్టాల్ చేసినట్లు నిర్ధారించుకోండి.

3. అప్డేట్లు ఇన్స్టాల్ చేయబడిన తర్వాత మీ PCని రీబూట్ చేయండి మరియు మీరు చేయగలరో లేదో చూడండి Fix The Service Couldn’t Be Started Windows Defender Error 0x80070422.
Method 4: Make sure Windows Defender service is set to Automatic
గమనిక: If Windows Defender service is grayed out in Services Manager then follow this post.
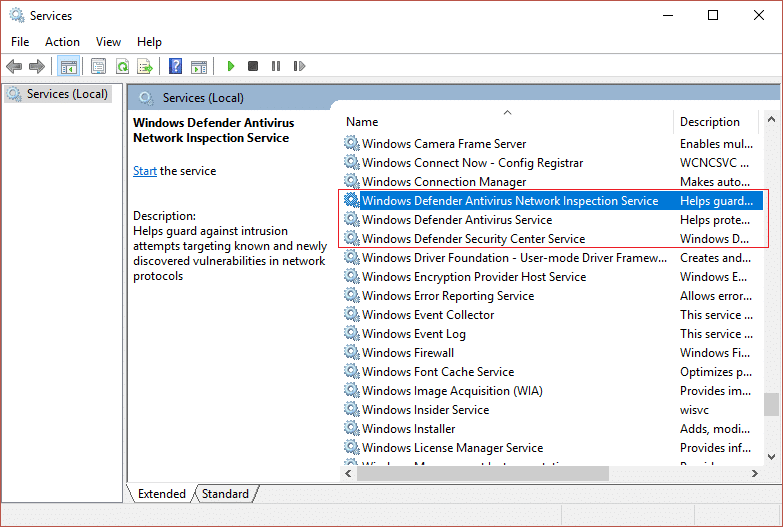
1.Windows కీ + R నొక్కండి, ఆపై టైప్ చేయండి services.msc మరియు ఎంటర్ నొక్కండి.

2.Find the following services in the Services window:
Windows Defender Antivirus Network Inspection Service
Windows Defender Antivirus Service
Windows Defender Security Center Service
3.Double-click on each of them and make sure their Startup type is set to ఆటోమేటిక్ and click Start if the services are not already running.
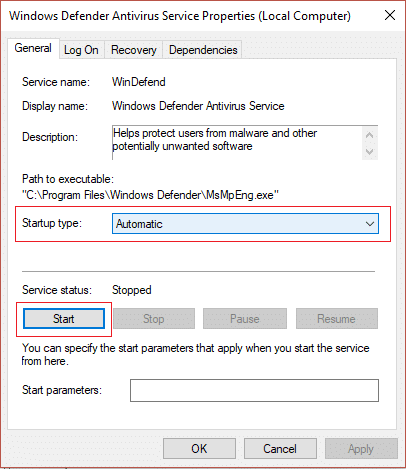
4. OK తర్వాత వర్తించు క్లిక్ చేయండి.
5. మార్పులను సేవ్ చేయడానికి మీ PCని రీబూట్ చేయండి మరియు మీరు చేయగలరో లేదో చూడండి Fix The Service Couldn’t Be Started Windows Defender Error 0x80070422.
Method 5: Enable Windows Defender through Registry Editor
1.Windows కీ + R నొక్కండి, ఆపై టైప్ చేయండి Regedit మరియు ఎంటర్ నొక్కండి.

2.క్రింది రిజిస్ట్రీ కీకి నావిగేట్ చేయండి:
HKEY_LOCAL_MACHINESYSTEMContrentControlSetServicesWinDefend
3.ఇప్పుడు రైట్ క్లిక్ చేయండి WinDefend మరియు ఎంచుకోండి అనుమతులు.
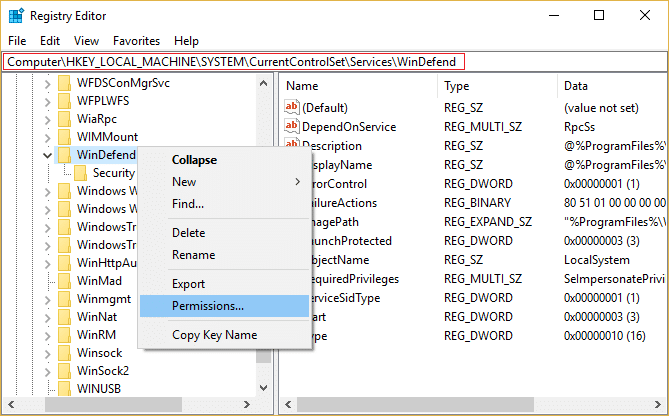
4.Follow this guide in order to take full control or ownership of the above registry key.
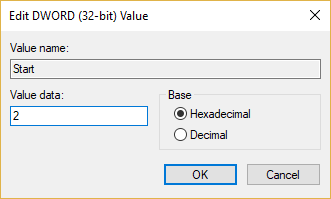
5.After that make sure you have selected WinDefend then in the right window double-click on Start DWORD.
6.Change the value to 2 in the value data field and click OK.
7.Close Registry Editor and reboot your PC.
8.Again try to enable Windows Defender and this time it should work.
విధానం 6: CCleaner మరియు Malwarebytesని అమలు చేయండి
1.డౌన్లోడ్ చేసి ఇన్స్టాల్ చేయండి CCleaner & మాల్వేర్బైట్స్.
2.మాల్వేర్బైట్లను అమలు చేయండి మరియు హానికరమైన ఫైల్ల కోసం మీ సిస్టమ్ని స్కాన్ చేయనివ్వండి.
3.మాల్వేర్ కనుగొనబడితే అది వాటిని స్వయంచాలకంగా తీసివేస్తుంది.
4.ఇప్పుడు రన్ చేయండి CCleaner మరియు "క్లీనర్" విభాగంలో, విండోస్ ట్యాబ్ క్రింద, శుభ్రం చేయడానికి క్రింది ఎంపికలను తనిఖీ చేయమని మేము సూచిస్తున్నాము:

5.ఒకసారి మీరు సరైన పాయింట్లను తనిఖీ చేశారని నిర్ధారించుకున్న తర్వాత, క్లిక్ చేయండి క్లీనర్ ని రన్ చేయండి, మరియు CCleaner దాని కోర్సును అమలు చేయనివ్వండి.
6.మీ సిస్టమ్ను మరింత శుభ్రం చేయడానికి రిజిస్ట్రీ ట్యాబ్ని ఎంచుకుని, కింది వాటిని తనిఖీ చేసినట్లు నిర్ధారించుకోండి:

7. సమస్య కోసం స్కాన్ని ఎంచుకుని, స్కాన్ చేయడానికి CCleanerని అనుమతించి, ఆపై క్లిక్ చేయండి ఎంచుకున్న సమస్యలను పరిష్కరించండి.
8. CCleaner అడిగినప్పుడు "మీరు రిజిస్ట్రీకి బ్యాకప్ మార్పులు చేయాలనుకుంటున్నారా?”అవును ఎంచుకోండి.
9.మీ బ్యాకప్ పూర్తయిన తర్వాత, ఎంచుకున్న అన్ని సమస్యలను పరిష్కరించండి ఎంచుకోండి.
10.మార్పులను సేవ్ చేయడానికి మీ PCని పునఃప్రారంభించండి మరియు మీరు చేయగలరో లేదో చూడండి Fix The Service Couldn’t Be Started Windows Defender Error 0x80070422.
Method 7: Refresh or Reset your PC
1. సెట్టింగ్లను తెరవడానికి విండోస్ కీ + I నొక్కండి, ఆపై ఎంచుకోండి నవీకరణ & భద్రత.
2.From left-hand menu select రికవరీ మరియు "ప్రారంభించడానికి” under Reset this PC.

3. ఎంపికను ఎంచుకోండి నా ఫైళ్ళను ఉంచండి.

4.Follow the instructions on the screen to complete the process.
5.This will take some time and your computer will restart.
విధానం 8: విండోస్ 10 ఇన్స్టాల్ రిపేర్ చేయండి
ఈ పద్ధతి చివరి ప్రయత్నం ఎందుకంటే ఏమీ పని చేయకపోతే, ఈ పద్ధతి ఖచ్చితంగా మీ PCతో అన్ని సమస్యలను రిపేర్ చేస్తుంది. సిస్టమ్లో ఉన్న వినియోగదారు డేటాను తొలగించకుండా సిస్టమ్తో సమస్యలను సరిచేయడానికి ఇన్ప్లేస్ అప్గ్రేడ్ని ఉపయోగించి ఇన్స్టాల్ రిపేర్ చేయండి. కాబట్టి విండోస్ 10ని సులభంగా రిపేర్ చేయడం ఎలాగో చూడటానికి ఈ కథనాన్ని అనుసరించండి.
మీకు సిఫార్సు చేయబడినది:
అంతే, మీరు విజయవంతంగా చేసారు Fix The Service Couldn’t Be Started Windows Defender Error 0x80070422 అయితే ఈ గైడ్కు సంబంధించి మీకు ఇంకా ఏవైనా ప్రశ్నలు ఉంటే, వాటిని వ్యాఖ్య విభాగంలో అడగడానికి సంకోచించకండి.

