When you try to install apps on Windows Store, you may face Error Code 0x80073cf9, which can be very frustrating as Windows Store is a reliable source to install apps. If you try to install 3rd party apps from any other source, you risk your machine to malware or infections but what other option you have if you cannot install apps from Windows Store. Well, that’s where you’re wrong this error can be fixed, and that’s what exactly we are going to teach you in this article.
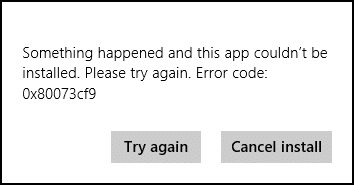
Something happened, and this app couldn’t be installed. Please try again. Error code: 0x80073cf9
There is no single cause as to why this error occurs so that various methods can fix this error. Most of the times it completely depends on the user machine configuration as to which method might work for them, so without wasting any time, let’s see how to fix this error.

Fix Windows 10 Store Error 0x80073cf9
Боварӣ ҳосил кунед, ки нуқтаи барқарорсозӣ эҷод кунед, агар чизе хато кунад.
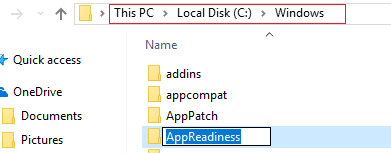
Method 1: Create A Folder AppReadiness
1. Тугмаи Windows + R -ро пахш кунед ва баъд нависед C: Windows ва пахш кунед.
2. Find the folder AppReadniess in the Windows folder, if you can’t follow the next step.
3. Right-click in an empty area and select Нав > Папка.
4. Name the newly created folder as Омодагӣ ва пахш кунед.
5. Reboot your PC to save changes. Again try to access the Store, and this time it might work perfectly.
Method 2: Reinstall Windows Store
1. Open Command Prompt as an Маъмур.

2. Run below PowerShell command
Get-AppxPackage -AllUsers | Foreach {Add-AppxPackage -DisableDevelopmentMode -Register “$ ($ _. InstallLocation) AppXManifest.xml”}

3. Once done, close command prompt and Restart your PC.
This step re-register Windows Store apps which should automatically Fix Windows 10 Store Error 0x80073cf9.
Method 3: Create a folder AUInstallAgent
1. Тугмаи Windows + R -ро пахш кунед ва баъд нависед C: Windows ва пахш кунед.
2. Find the folder AUInstallAgent in the Windows folder, if you can’t then follow the next step.
3. Right-click in an empty area and select Нав > Папка.
4. Name the newly created folder as AAUInstallAgent ва пахш кунед.
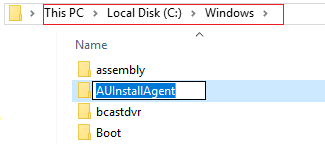
5. Reboot your PC to save changes. This step may fix Windows 10 Store Error 0x80D05001 or 0x80073cf9 but if it didn’t then continue.
Method 4: Allow Full System Access to Packages in AppRepository
1. Тугмаи Windows + R -ро пахш кунед ва баъд нависед C: ProgramDataMicrosoftWindows ва пахш кунед.
2. Now double click on AppRepository folder to open it, but you will receive an error:
You have been denied permission to access this folder.
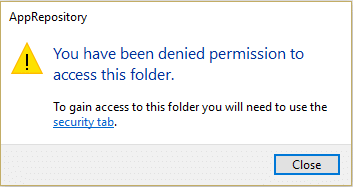
3. This means you need to take ownership of this folder before you can access it.
4. You can take ownership of the folder via the following method: How To Fix Destination Folder Access Denied Error.
5. Now you need to give the SYSTEM account, and the APPLICATION PACKAGES account full control on the folder C:ProgramDataMicrosoftWindowsAppRepositoryPackages. To this follow the next step.
6. Ангушт занед Packages folder ва интихоб кунед Хусусиятҳо.
7. Интихоб кунед Ҷадвали амният ва баъд пахш кунед Пешрафти.
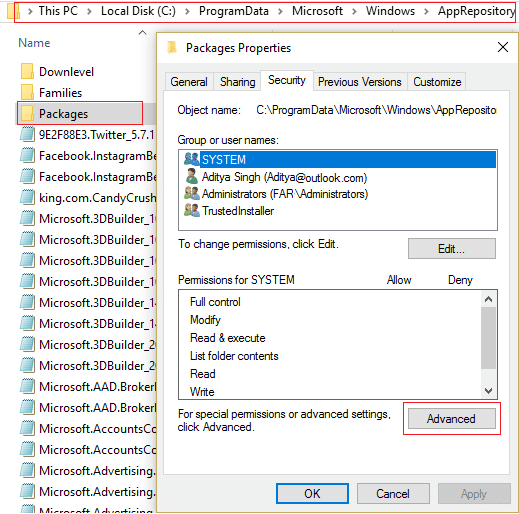
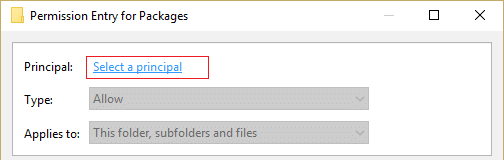
8. In Advanced Security Settings, click илова кардан and click on Select a асосӣ.
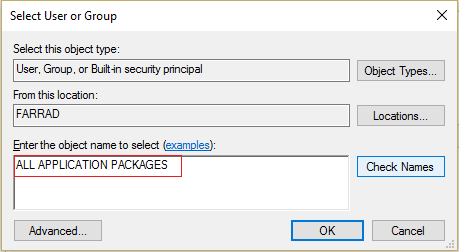
9. Баъдан, нависед "ҲАМАИ МАСЪАЛҲОИ ЗАМИНАҲО” (without quote) in the field Enter the object name to select and click OK.
10. Now, on the next window check mark Full control and then click OK.
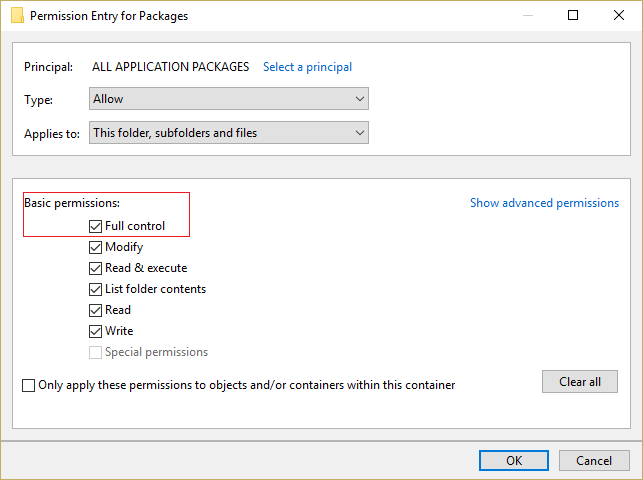
11. Do the same with the SYSTEM account. Reboot your PC to save changes.
Method 5: Rename Software Distribution Folder
1. Press Windows Key + Q to open Charms Bar and type смд.
2. Right-click on cmd and select Ҳамчун Administrator иҷро кунед.
3. Type these commands and hit enter:
net stop wuauserv
ren c:windowsSoftwareDistribution softwaredistribution.old
net start wuauserv
exit
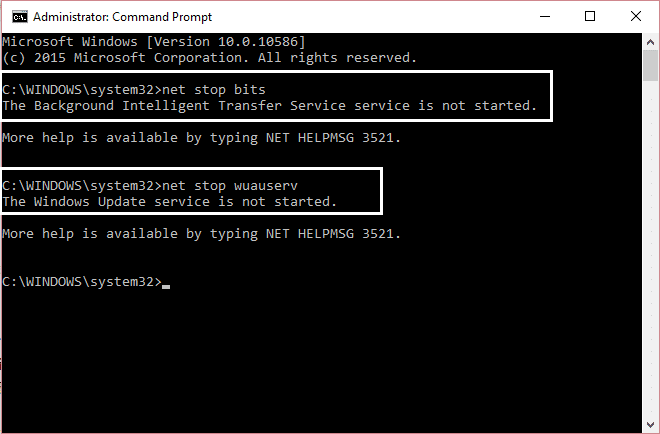
4. Reboot your PC to saves changes and again try to download updates.
Усули 6: DISM-ро иҷро кунед (Хизматрасонӣ ва идоракунии тасвири ҷойгиркунӣ)
1. Тугмаи Windows + X -ро пахш кунед ва баъд интихоб кунед Сатри фармон (Админ).

2. Enter the following command in cmd and hit enter:
Муҳим: Вақте ки шумо DISM-ро мекунед, ба шумо лозим аст, ки Windows Installation Media омода бошед.
DISM.exe /Online /Cleanup-Image /RestoreHealth /Манбаъ:C:RepairSourceWindows /LimitAccess
Шарҳ: C:RepairSourceWindows-ро бо макони манбаи таъмири худ иваз кунед

3. Press enter to run the above command and wait for the process to complete; usually, it takes 15-20 minutes.
ШАРҲ: Агар фармони дар боло зикршуда кор накунад, дар зер кӯшиш кунед: Dism /Image:C:offline /Cleanup-Image /RestoreHealth /Source:c:testmountwindows Dism /Online /Cleanup-Image /RestoreHealth /Source:c:testmountwindows /LimitAccess
4. After the DISM process is complete, type the following in the cmd and hit Enter: sfc / scannow
5. Let System File Checker run and once it’s complete, restart your PC.
Усули 7: CCleaner ва Malwarebytes -ро иҷро кунед
1. Бор кунед ва насб кунед CCleaner & Malwarebytes.
2. Malwarebytes -ро иҷро кунед ва бигзор он системаи шуморо барои файлҳои зараровар скан кунад. Агар нармафзори зараровар пайдо шавад, он ба таври худкор онҳоро нест мекунад.

3. Акнун CCleaner-ро иҷро кунед ва интихоб кунед Фармоишгари тоза.
4. Дар зери Тозакунии фармоишӣ, -ро интихоб кунед Ҷадвали Windows ва пешфарзҳоро қайд кунед ва клик кунед Таҳлил.

5. Пас аз анҷоми таҳлил, боварӣ ҳосил кунед, ки шумо файлҳои ҳазфшавандаро нест мекунед.

6. Дар охир, пахш кунед Тозакунандаро иҷро кунед тугмаро пахш кунед ва бигзоред, ки CCleaner курси худро иҷро кунад.
7. Барои тоза кардани системаи шумо, ҷадвали Реестрро интихоб кунед, ва боварӣ ҳосил кунед, ки инҳо тафтиш карда мешаванд:

8. Тафтиш кунед Мушкилотро скан кунед тугмаро пахш кунед ва ба CCleaner иҷозат диҳед, ки скан кунад, пас тугмаро клик кунед Масъалаҳои интихобшударо ислоҳ кунед тугмача.

9. Вақте ки CCleaner мепурсад "Оё шумо мехоҳед, ки тағиротро дар феҳрист нусхабардорӣ кунед?" Ҳа ро интихоб кунед.
10. Пас аз он ки нусхаи эҳтиётии шумо ба анҷом расид, тугмаро пахш кунед Ҳама масъалаҳои интихобшударо ислоҳ кунед тугмача.
11. Барои захира кардани тағйирот компютери худро бозоғоз намоед.
Method 8: Clear Windows Store cache
1. Тугмаи Windows + R -ро пахш кунед ва баъд нависед Wsreset.exe ва ворид кунед.
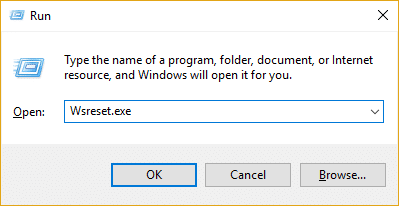
2. Яке аз раванд ба анҷом расид компютери худро бозоғоз намоед.
Method 9: Run Windows Update and Windows Store Apps troubleshooter
1. Намуди носозиҳо дар сатри Ҷустуҷӯи Windows ва клик кунед Troubleshooter.
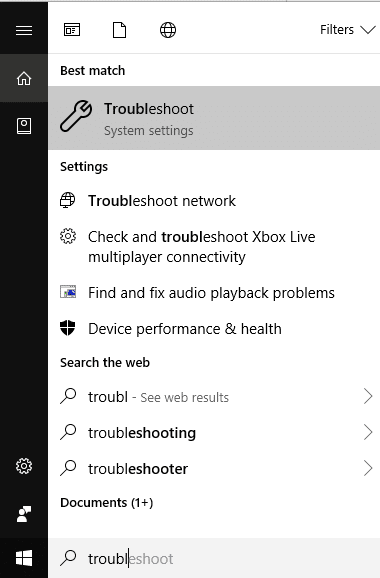
2. Баъдан, аз равзанаи чап, панелро интихоб кунед Ҳамаро бинед.
3. Сипас, аз рӯйхати Мушкилоти компютерро бартараф кардан -ро интихоб кунед Навсозии Windows.

4. Follow on-screen instruction and let the Windows Update Troubleshoot run.

5. Now again go back to the View all window but this time select Барномаҳои Дӯкони Windows. Run the troubleshooter and follow on-screen instructions.
6. Компютери худро бозоғоз намоед ва бори дигар кӯшиш кунед, ки барномаҳоро аз Дӯкони Windows насб кунед.
тавсия мешавад:
Ин аст, ки шумо муваффақ ҳастед Fix Windows 10 Store Error 0x80073cf9 аммо агар шумо то ҳол ягон саволе дар бораи ин паём дошта бошед, аз онҳо дар қисмати шарҳҳо пурсед.

