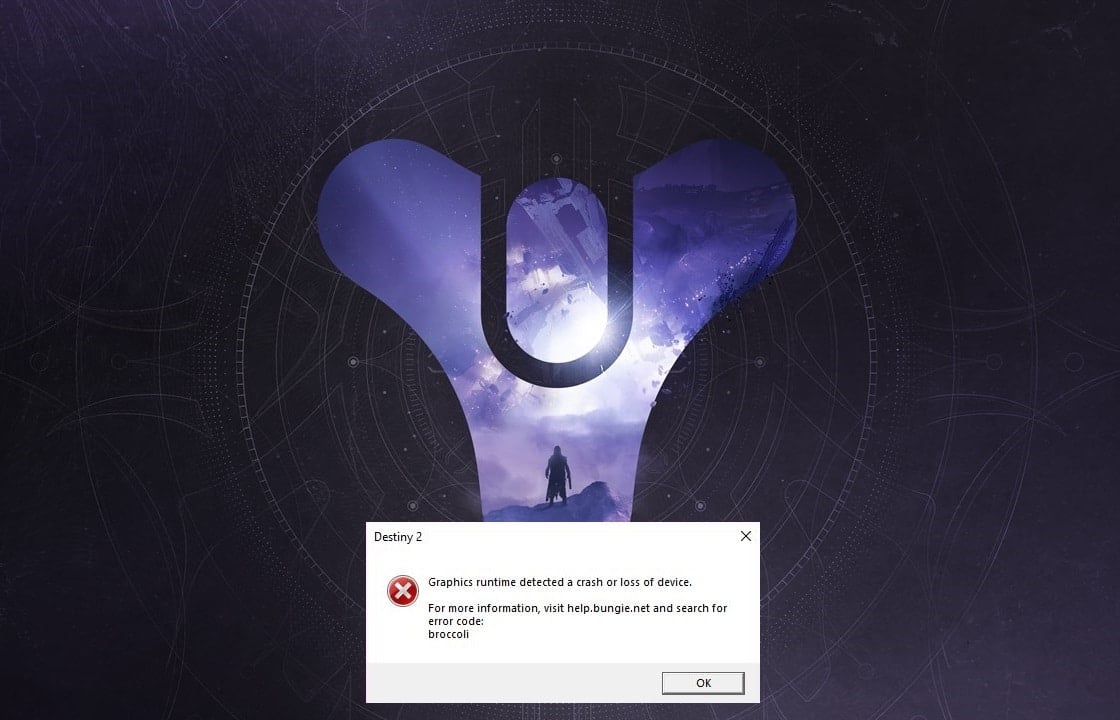
Destiny 2 is a multiplayer shooting game that is hugely popular amongst gamers today. Bungie Inc developed this game and released it in 2017. It is now available on Windows computers along with PlayStation 4/5 and Xbox models – One/X/S. Since it is an online-only game, you would require a stable and high-speed internet connection on your device to play it. Many users reported some issues while playing this game on their Windows systems, majorly: error code ผักชนิดหนึ่ง and error code Marionberry. Keep reading to learn more about Destiny 2 Error Code Broccoli และวิธีการแก้ไข
วิธีการแก้ไข 2 ชะตา Error Code Broccoli on Windows 10
Here are the general reasons why this error occurs while playing Destiny 2:
- Overclocked GPU: All Graphics Processing Units are set to run at a particular speed called the ความเร็วพื้นฐาน which is set by the device manufacturer. On some GPUs, users can boost their performance by increasing the GPU speed to a level higher than the base speed. However, overclocking the GPU may cause the Broccoli error.
- Full-screen glitch: You are more likely to face Destiny 2 error code Broccoli if you are using NVIDIA GeForce GPU.
- Outdated Windows version: If the Windows operating system is working on an outdated version, then the system will not update the GPU drivers on the PC. You need to ensure that you have the latest version of Windows installed.
- Corrupted/Outdated Graphics card drivers: The Destiny 2 error code Broccoli can occur if the graphic drivers on your PC are outdated or corrupt. Destiny 2 requires compatible graphics card and updated graphics card drivers so that your gaming experience is smooth and error-free.
To fix Destiny 2 error code Broccoli, try the methods written below, one-by-one, to find a possible solution for your Windows 10 system.
Method 1: Run Game in Windowed Mode (NVIDIA)
This method is applicable only if you use ประสบการณ์ NVIDIA GeForce to play Destiny 2. Since GeForce Experience might force the game into Full-screen mode, leading to error code Broccoli learn How to Manually Add Game to GeForce Experience learn How to Manually Add Game to GeForce Experience. Follow the steps below to force the game to run in Windowed Mode instead:
1 เปิดตัว NVIDIA ประสบการณ์ GeForce แอพลิเคชัน
2 ไปที่ หน้าแรก และเลือก 2 ชะตา from the list of games displayed on the screen.
3. เลื่อนลงและคลิกที่ไฟล์ ไอคอนเครื่องมือ เพื่อเปิดการตั้งค่า
4 คลิกที่ โหมดการแสดงผล ภายใต้ การตั้งค่าที่กำหนดเอง และเลือก หน้าต่าง จากเมนูแบบเลื่อนลง
5. สุดท้าย คลิกที่ ใช้ เพื่อบันทึกการเปลี่ยนแปลง
6 เปิด 2 ชะตา และเปิดใช้งาน โหมดเต็มหน้าจอ from here instead. Refer highlighted section in the pic below.
วิธีที่ 2: อัปเดต Windows
The developers named the error code Broccoli to indicate the inconsistencies with the Graphics card drivers and Windows OS. If the graphics card driver updates are handled by the Windows Update service on your PC, it is necessary to ensure that no Windows updates are pending. Follow the given steps to update Windows:
1 ประเภท การปรับปรุง in ค้นหา Windows box. Launch the การตั้งค่า Windows Update from the search result, as shown.
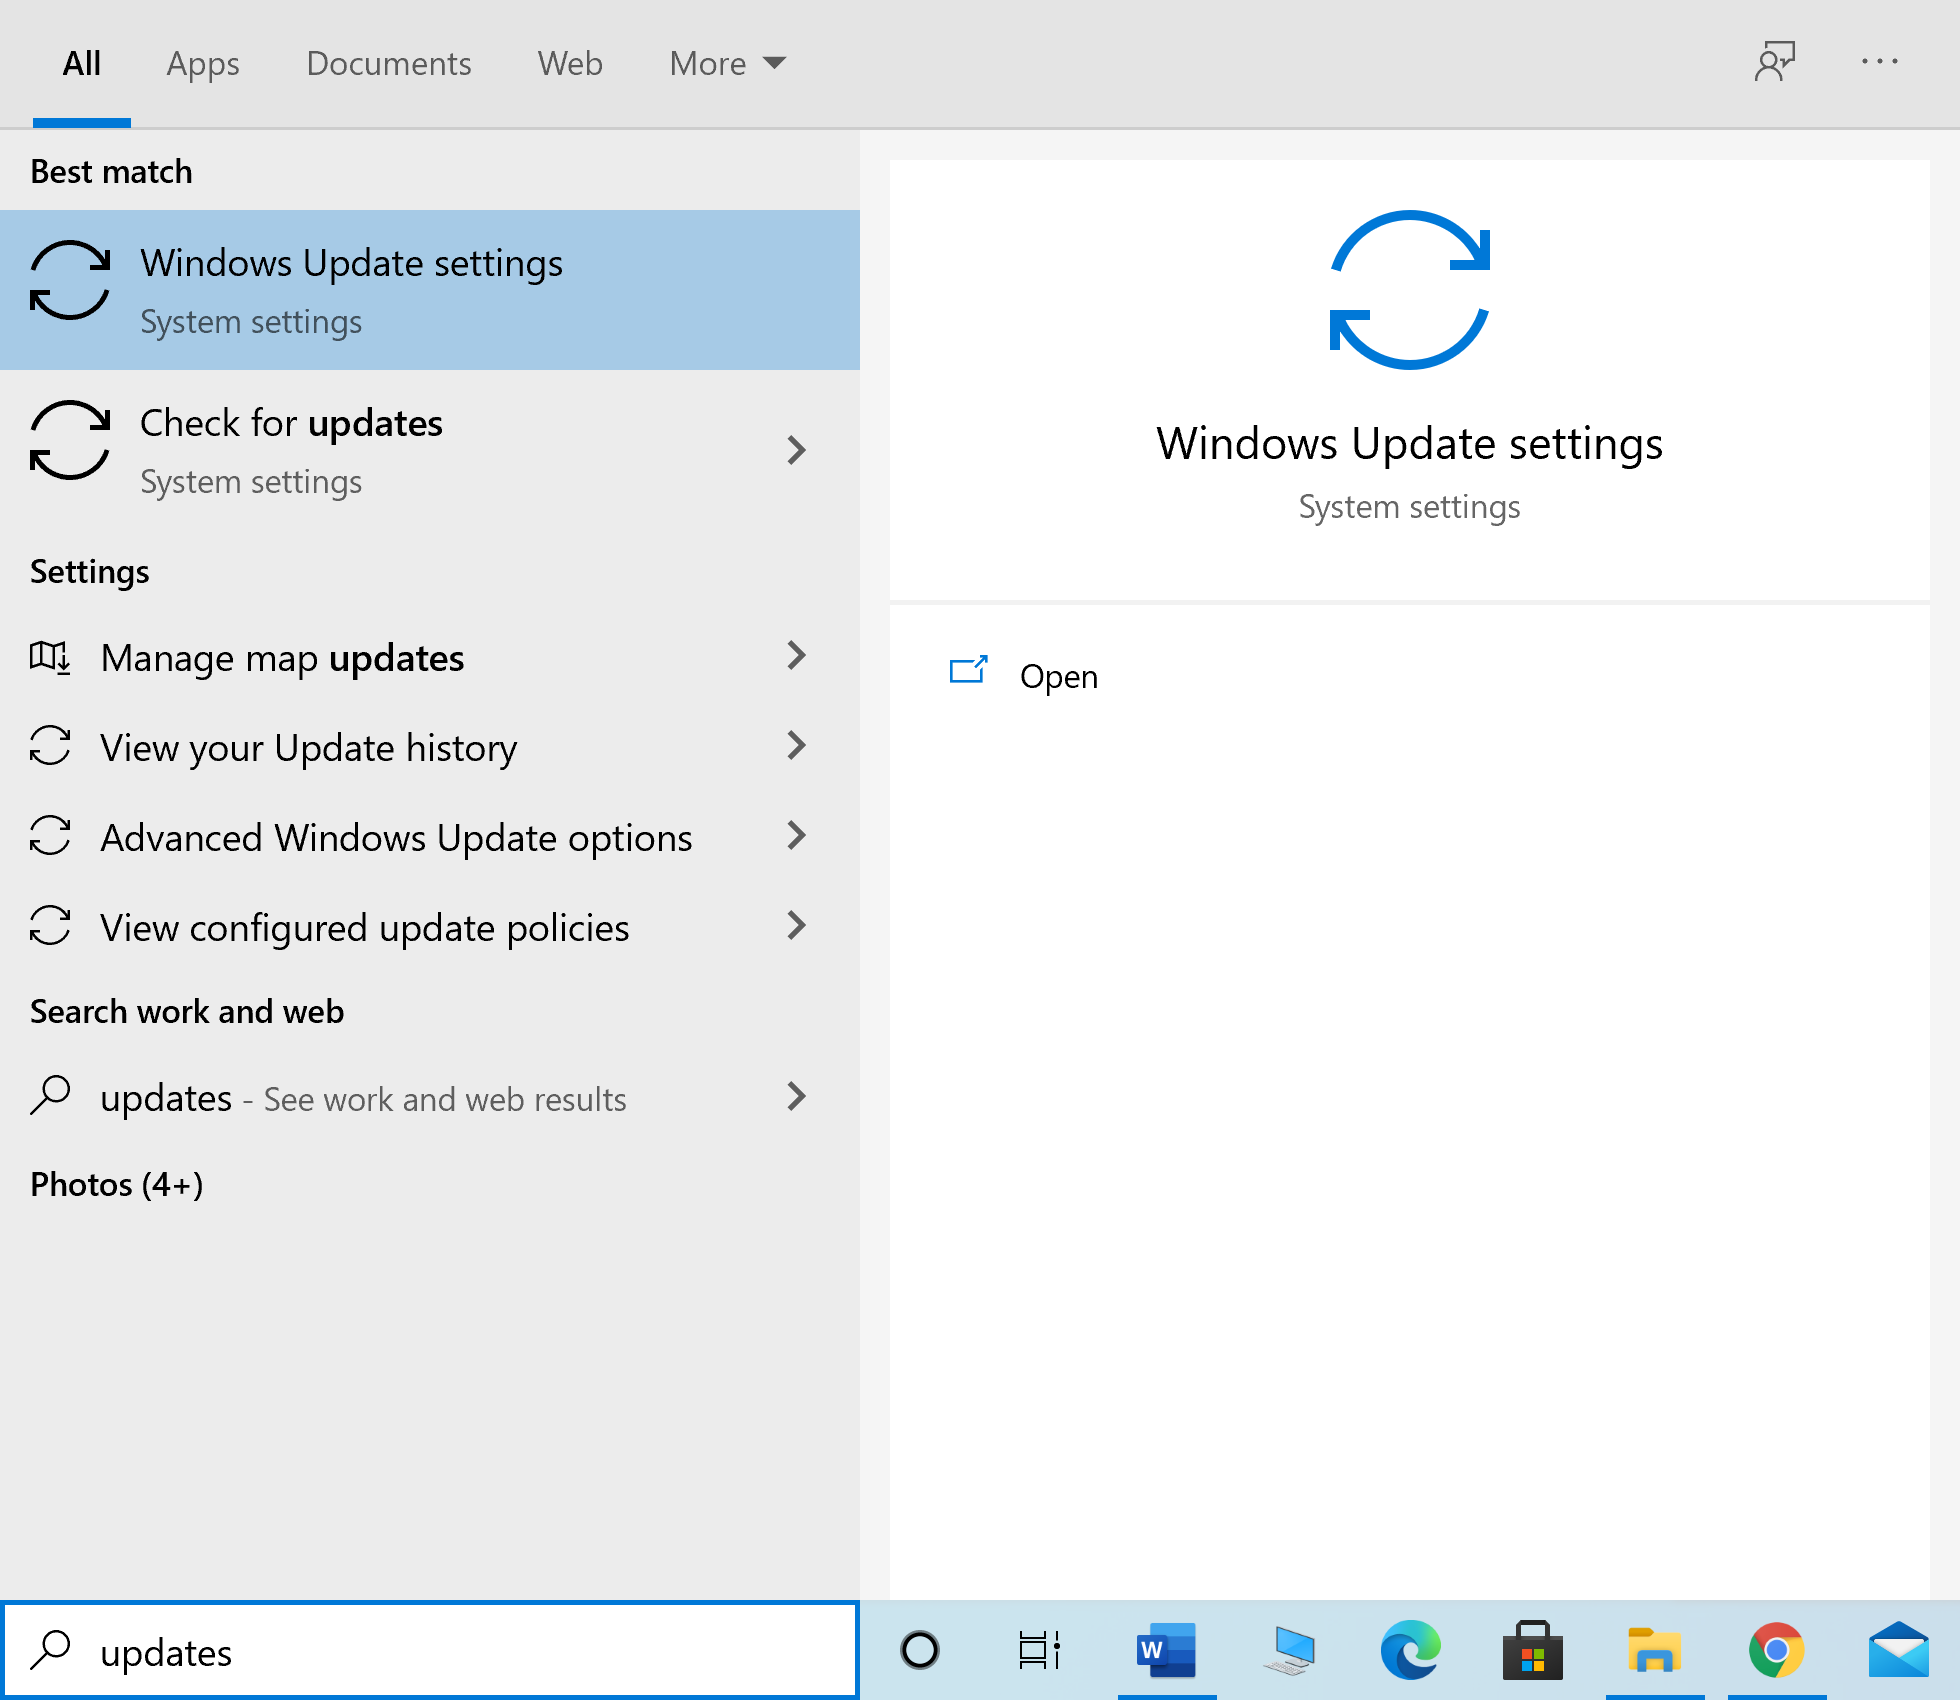
2 คลิกที่ ตรวจหาการปรับปรุง from the right pane, as depicted.
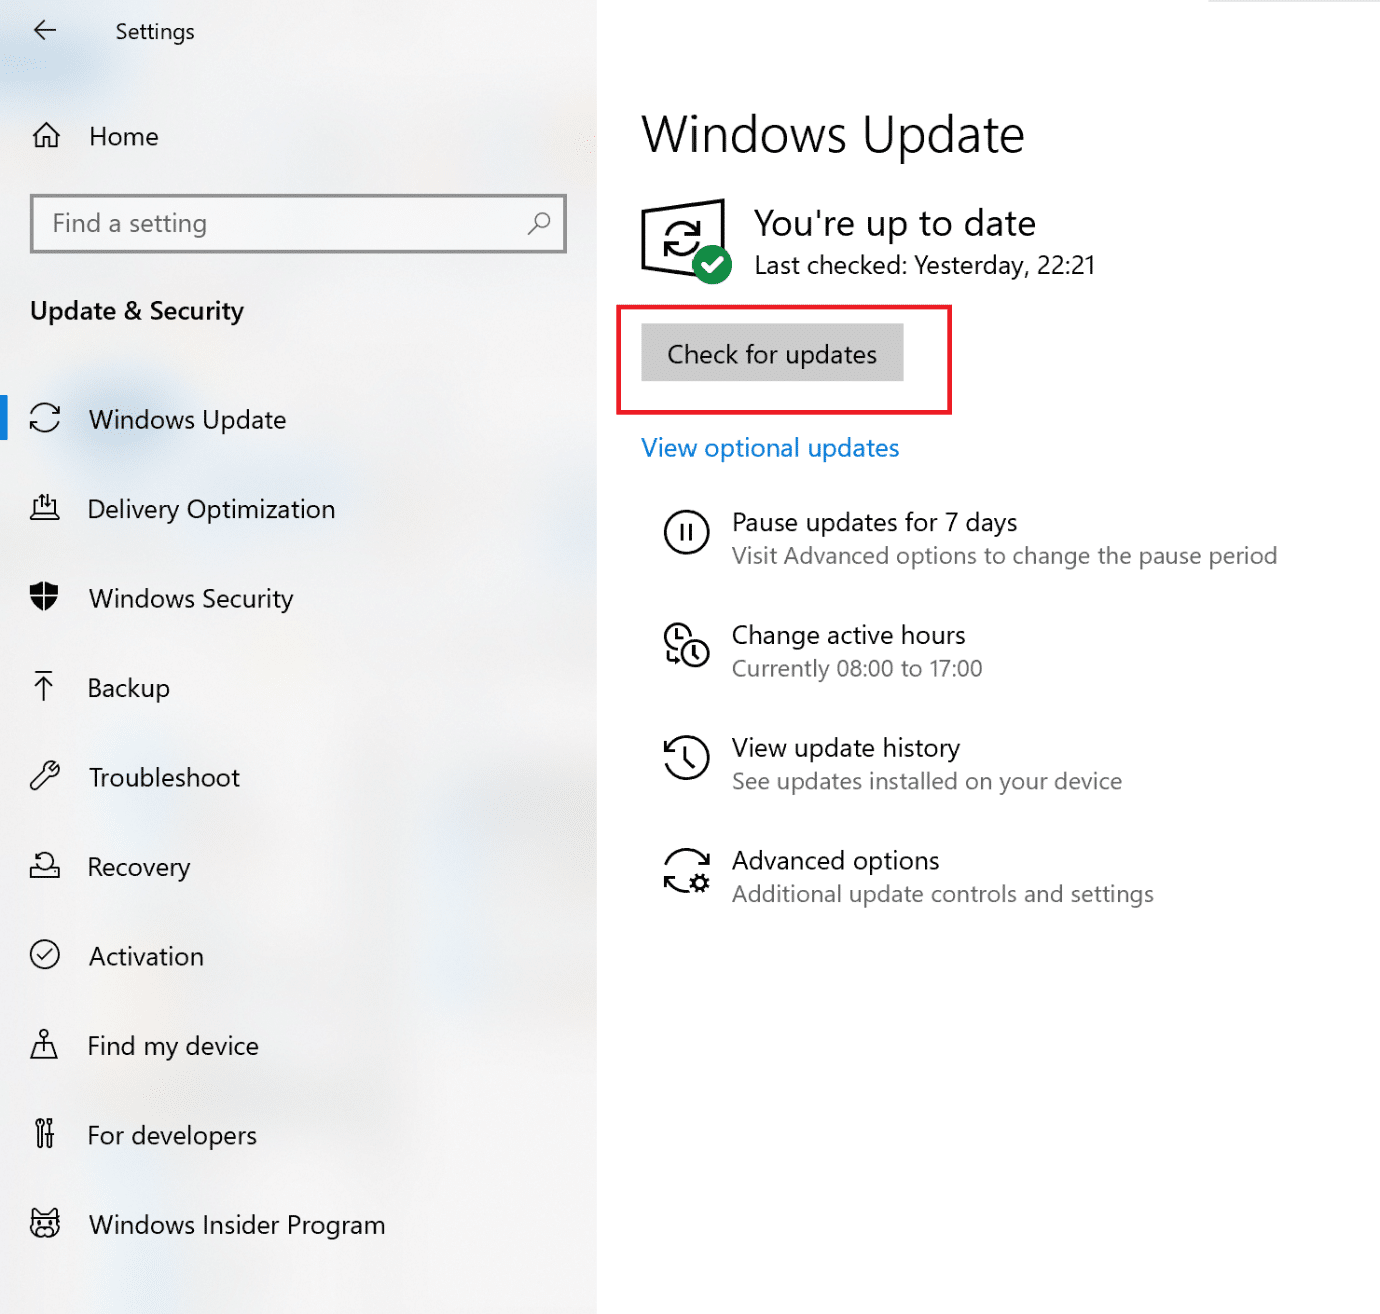
3 รอ for Windows to search for and install any pending updates.
หมายเหตุ Your PC may need to restart several times during the update process. Return to Windows Update settings to install all available updates, after every restart.
After the process is complete, launch Destiny 2 and see if the game launches without Broccoli error. If not, there may be issues with Graphics card drivers which will be dealt with in succeeding methods.
ยังอ่าน: Windows Updates Stuck? Here are a few things you could try!
Method 3: Reinstall Graphics Card Drivers
If the above methods did not work for you, you need to update Graphics card drivers on your PC to eliminate the issue of corrupt and/or outdated drivers. This can possibly resolve Destiny 2 error code Broccoli.
Given below are two options:
- update graphics card drivers using Device Manager.
- update the drivers by reinstalling them manually.
Option 1: Automatically Update Graphics Card Drivers
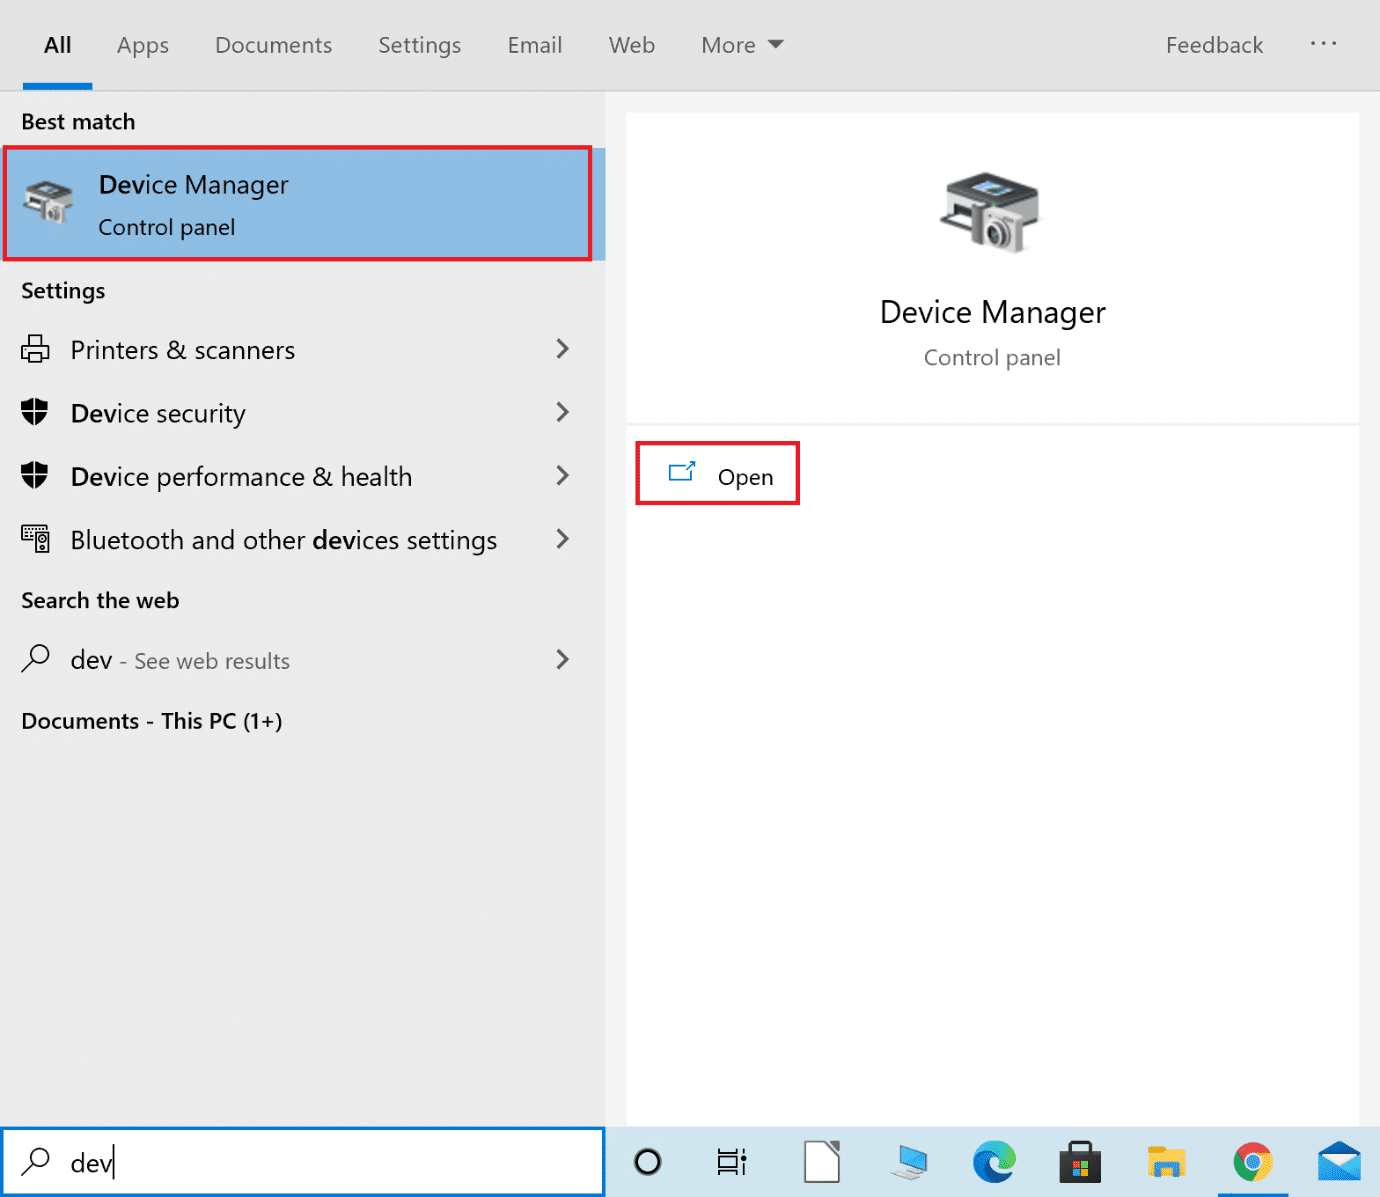
1 ประเภท ตัวจัดการอุปกรณ์ ใน ค้นหา Windows box and launch the app from there.
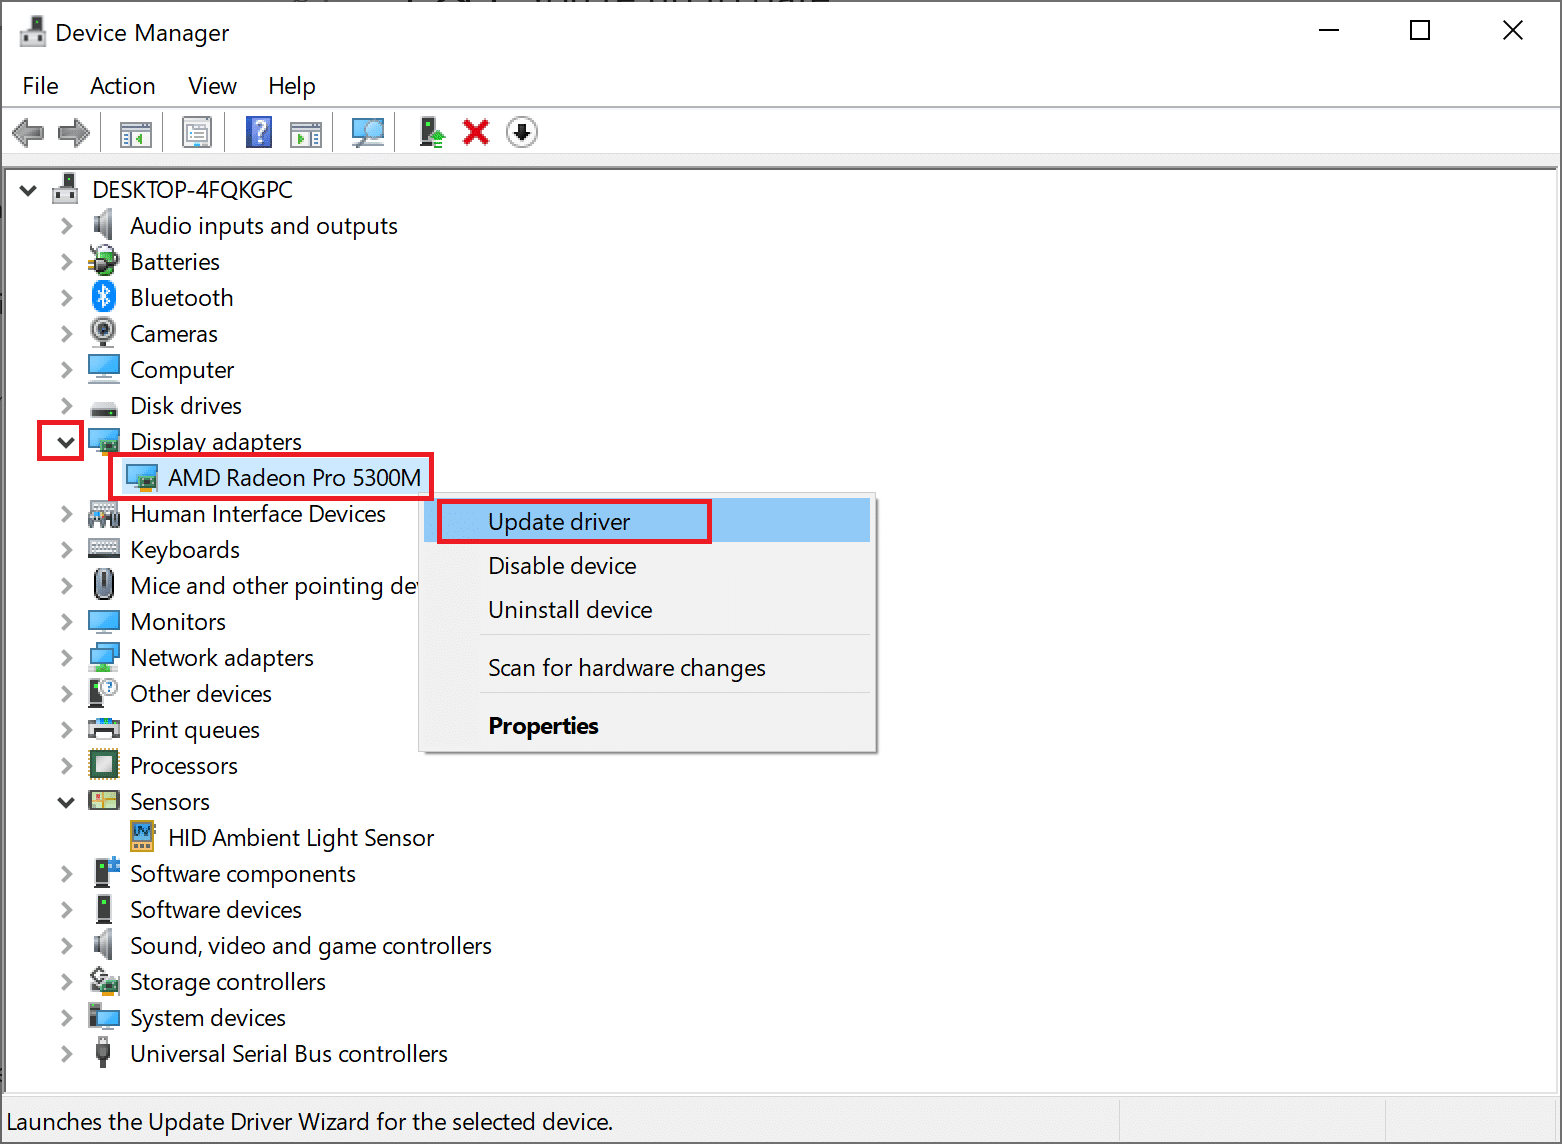
ฮิต คลิกที่ ลูกศรชี้ลง ติด การ์ดแสดงผล เพื่อขยาย
3. Right-click on your Graphics card driver and select อัพเดตไดรเวอร์ จากเมนูแบบเลื่อนลงดังภาพด้านล่าง
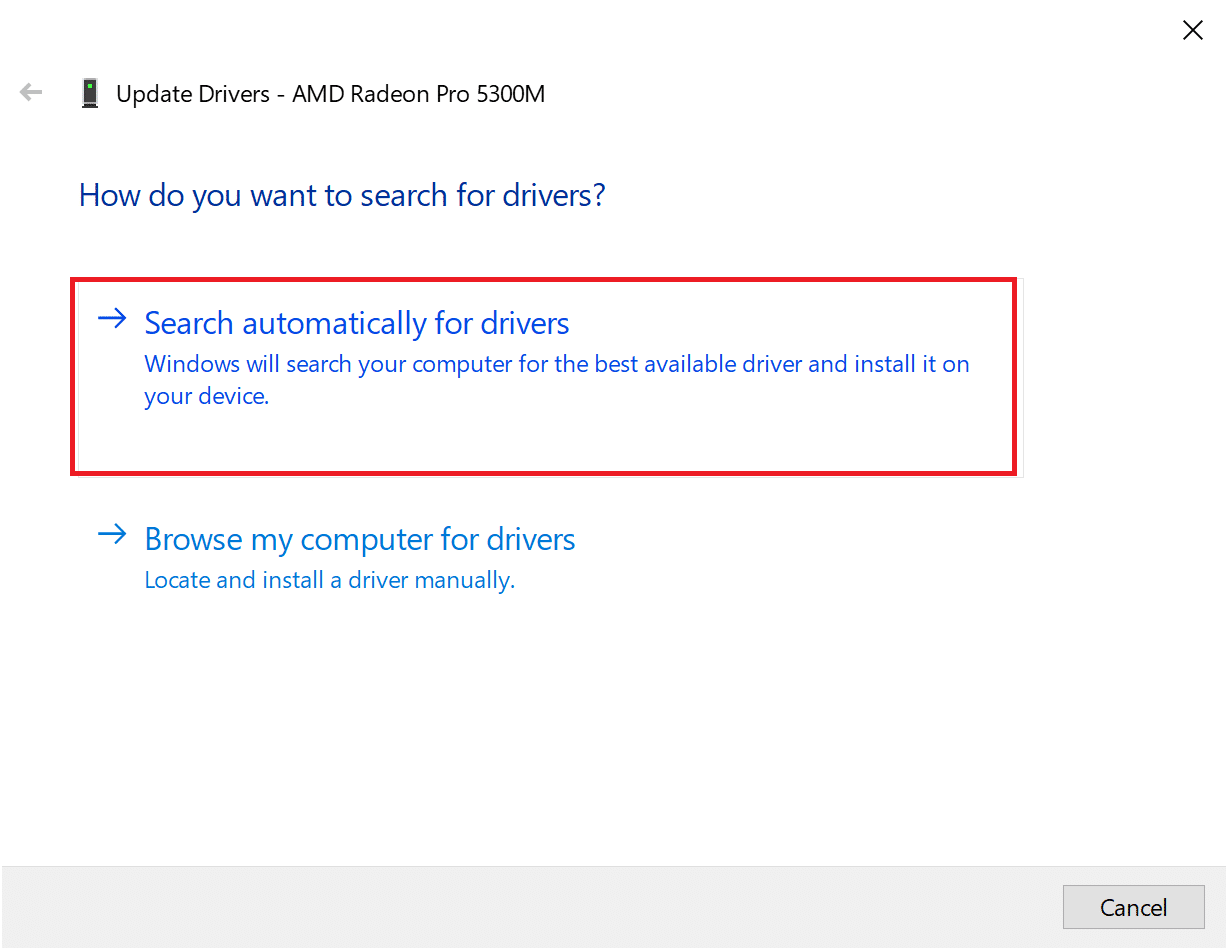
4. In the pop-up box that follows, click on the option titled ค้นหาไดรเวอร์โดยอัตโนมัติตามที่ไฮไลต์ด้านล่าง
5. รอ for your PC to install updated drivers if any are found.
6. Restart the computer and launch the game.
If the above option did not work, you need to manually update the graphics card drivers by reinstalling them on your computer. Read below to do so.
Option 2: Manually Update Drivers by Reinstallation
This process has been explained for users of AMD graphic cards and NVIDIA graphics cards. If you use any other graphics card, ensure to follow the correct steps to reinstall those.
Reinstall AMD Graphic Drivers
1. Download AMD Cleanup Utility จากที่นี่.
2. Once the file is downloaded, right-click on it and select เรียกใช้ในฐานะผู้ดูแลระบบ
3 คลิกที่ ใช่ บน ยูทิลิตี้การล้างข้อมูลของ AMD pop-up box to enter Windows Recovery สิ่งแวดล้อม.
4. Once in Safe Mode, follow the instructions on the screen to complete the uninstallation process.
5. The AMD Cleanup Utility will completely remove AMD drivers without leaving leftover files on your system. Of course, if there are any corrupt AMD files, those will be removed too. After the process is complete, your machine will การเริ่มต้นใหม่ อัตโนมัติ คลิกที่นี่ อ่านเพิ่มเติม
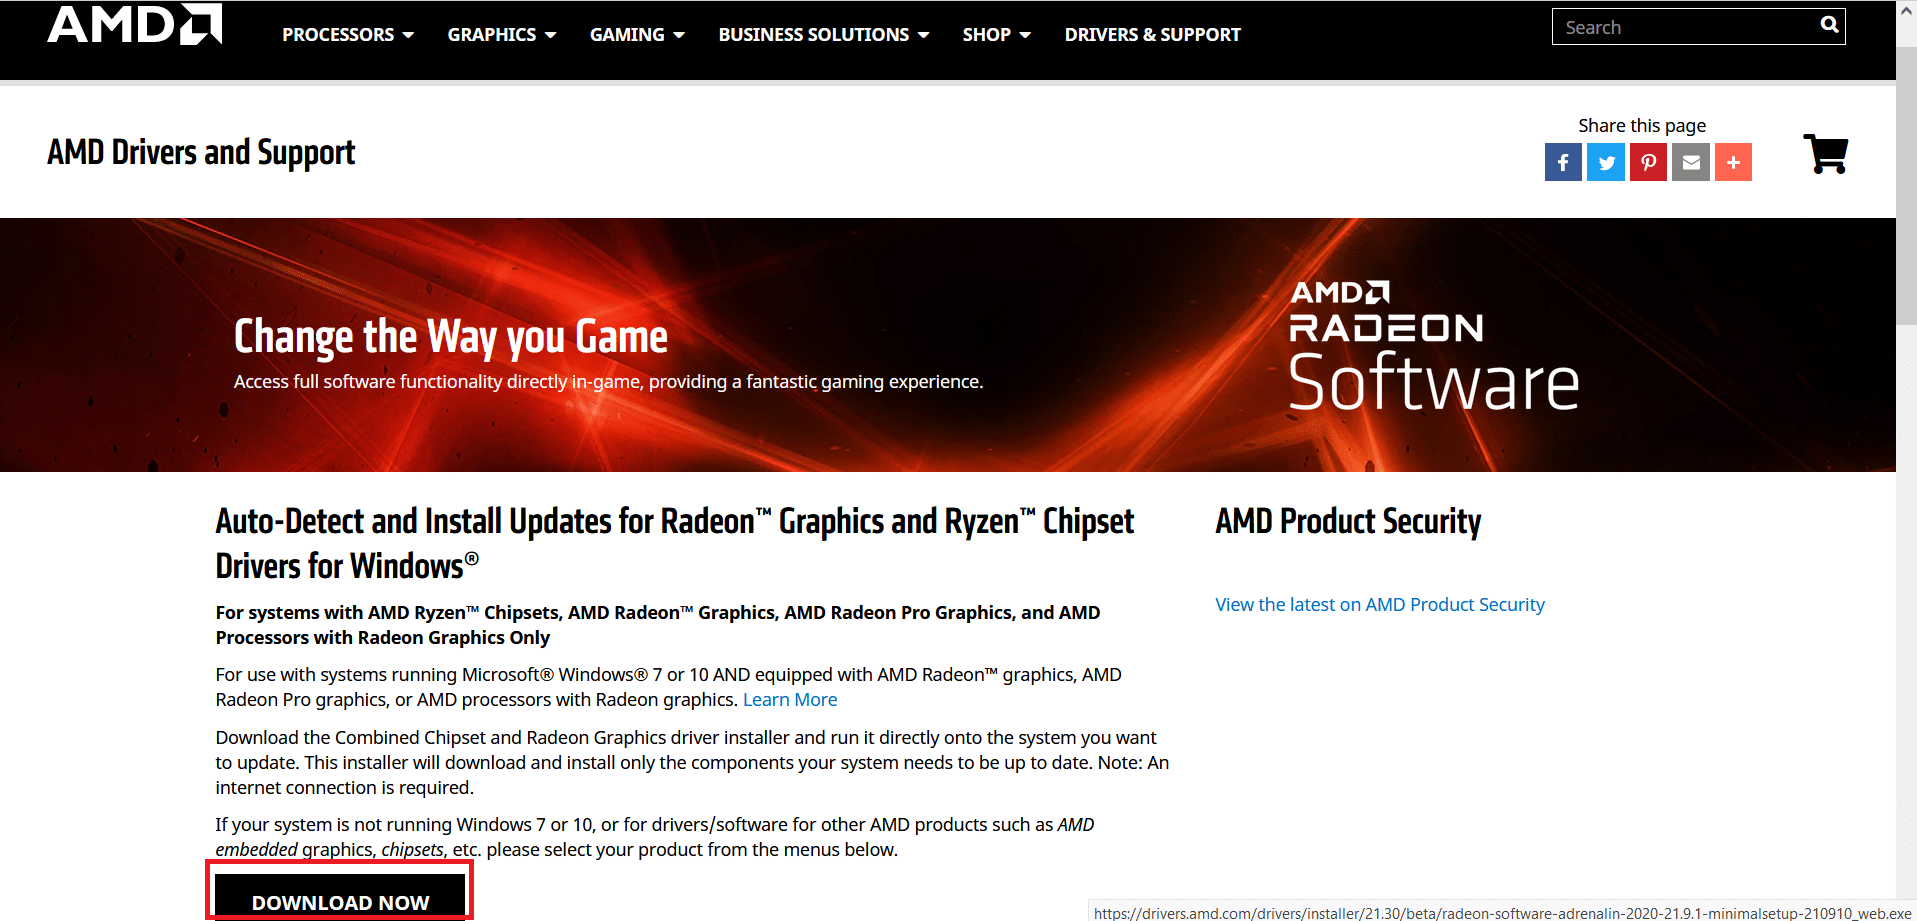
6. เยี่ยมชม เว็บไซต์ AMD อย่างเป็นทางการ และคลิกที่ ดาวน์โหลดเดี๋ยวนี้ option displayed at the bottom of the screen, to download the latest drivers for your PC.
7. On the AMD Radeon Software Installer, click on รุ่นที่แนะนำ to determine the most suitable drivers for the AMD hardware on your PC. การติดตั้ง พวกเขา
8. Follow the instruction on-screen to finish the installation. Once done, รีสตาร์ทคอมพิวเตอร์ and enjoy playing Destiny 2.
Reinstall NVIDIA Graphics Cards
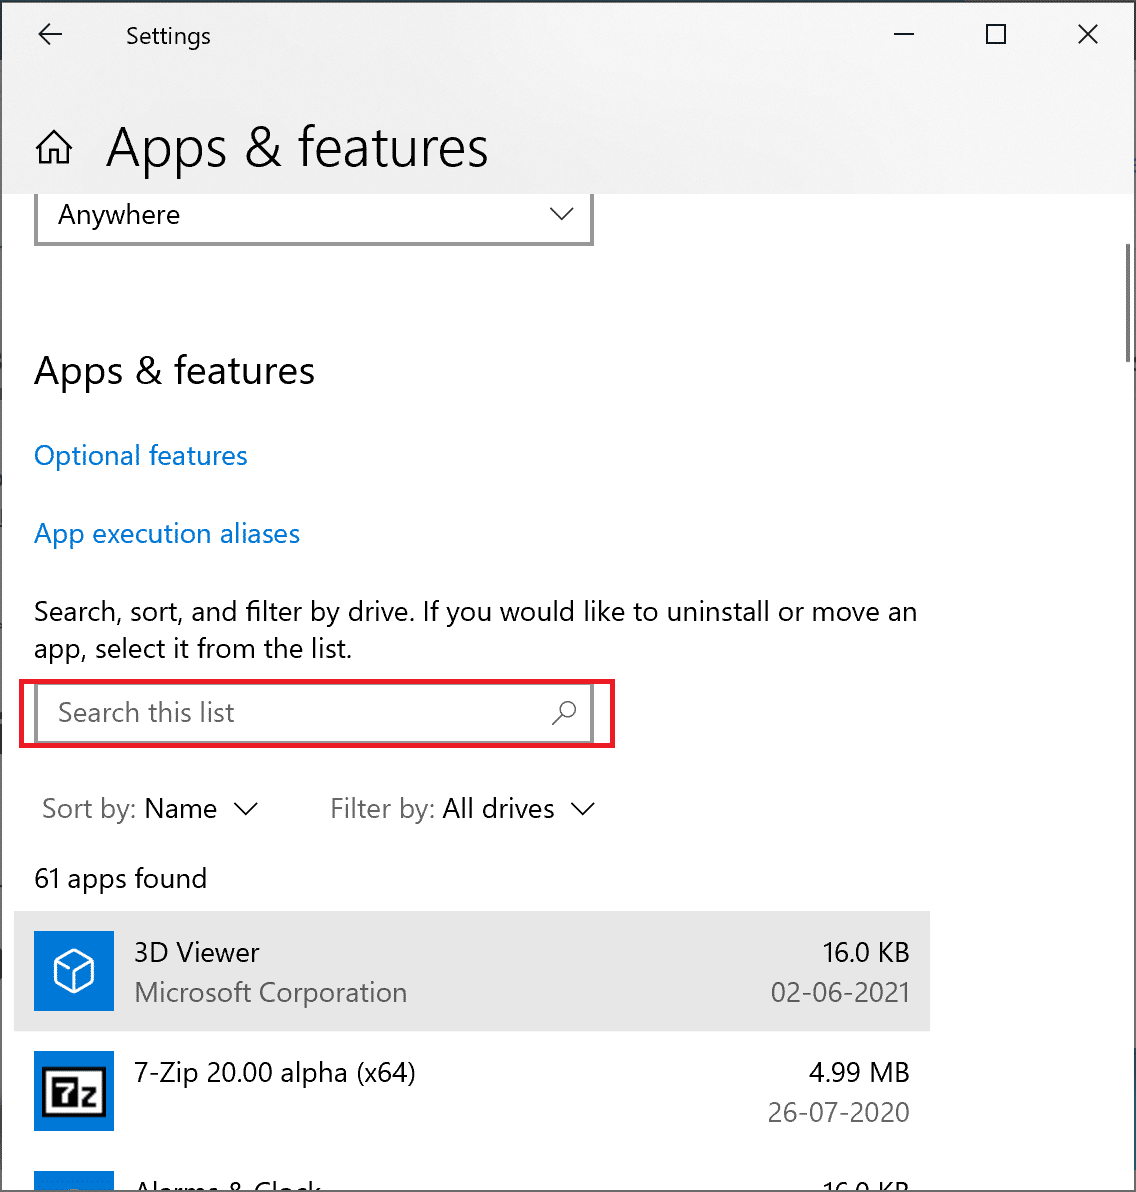
1 ประเภท เพิ่มหรือลบโปรแกรม ใน ค้นหา Windows box and launch it from the search result, as shown.
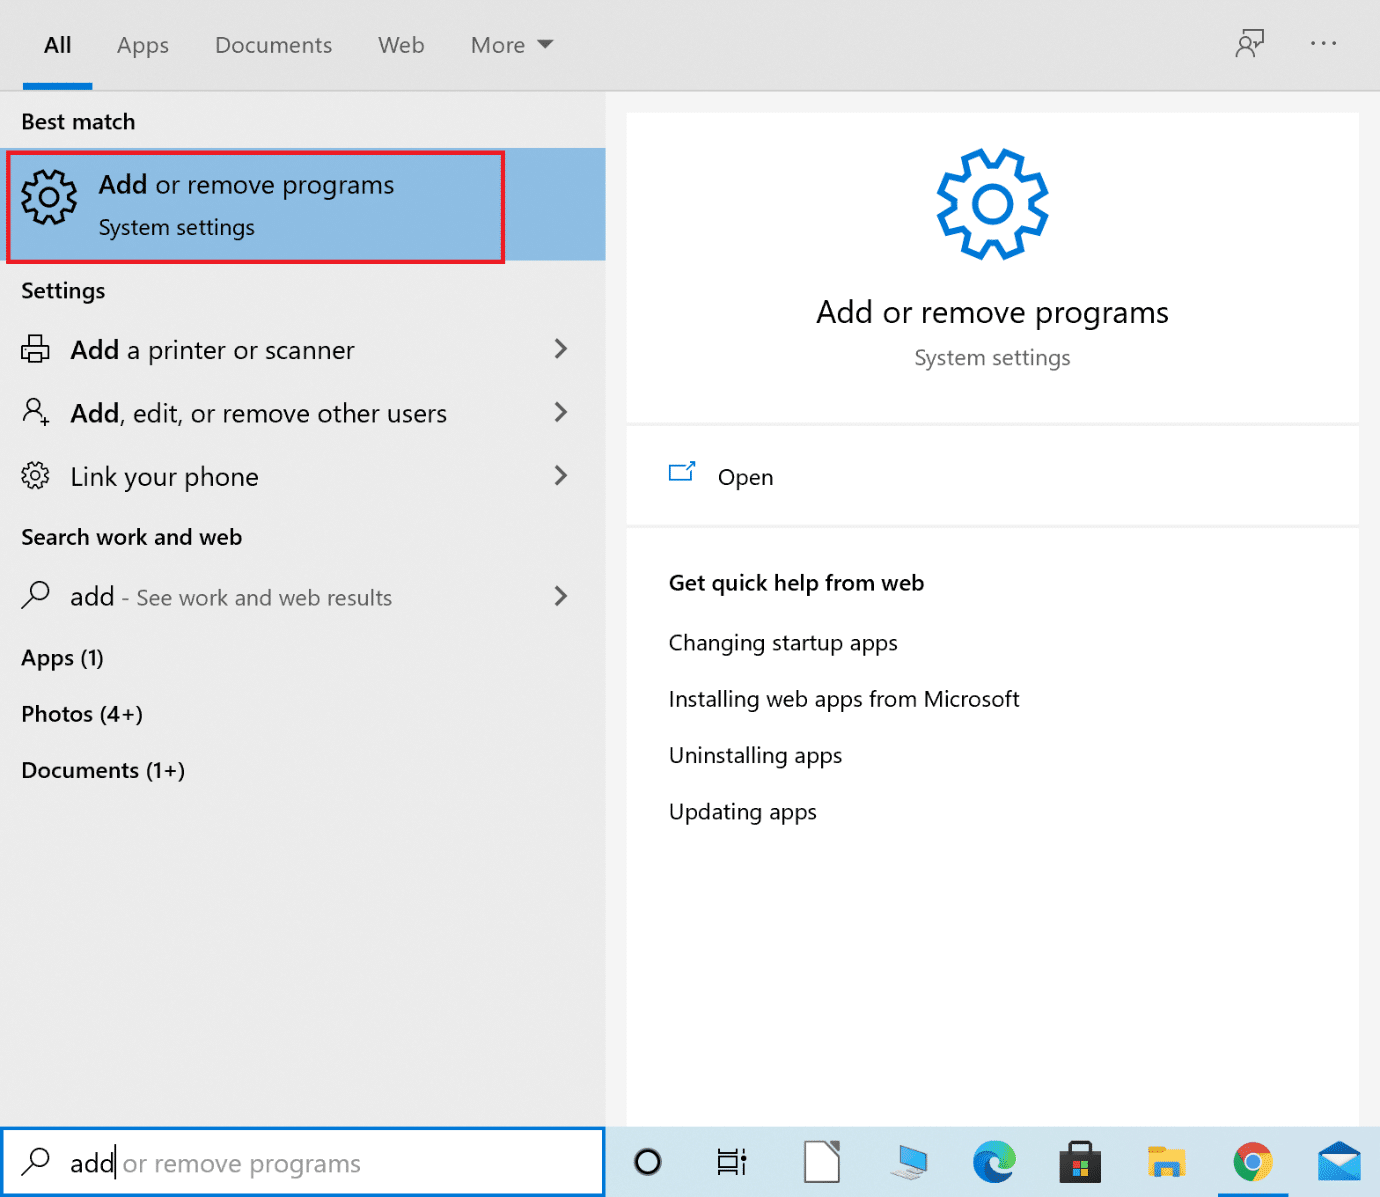
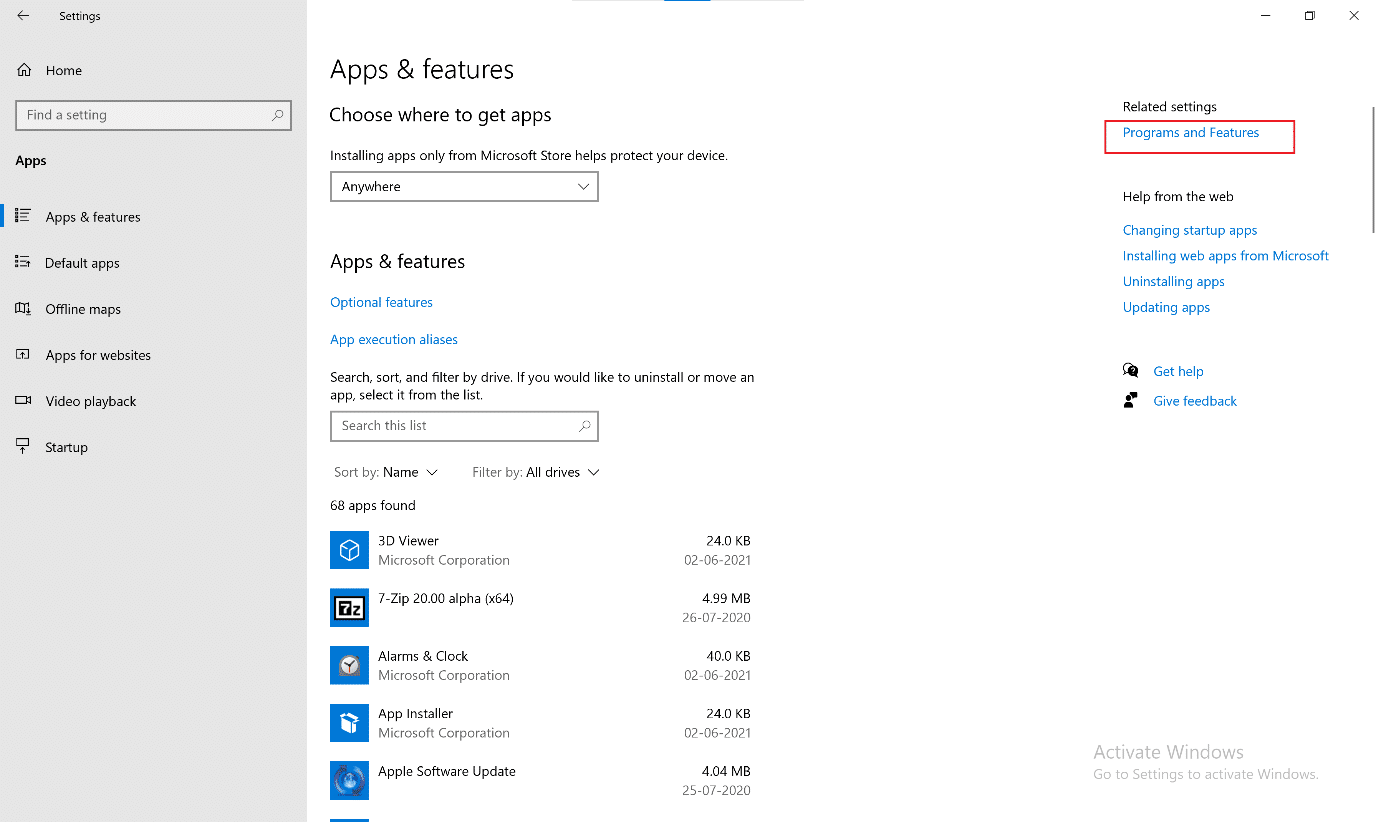
2 คลิกที่ โปรแกรมและคุณลักษณะ ภายใต้ การตั้งค่าที่เกี่ยวข้อง จากด้านขวาของหน้าจอ
ฮิต คลิกที่ ลูกศรชี้ลง ติด Change your view ไอคอนตามที่แสดง
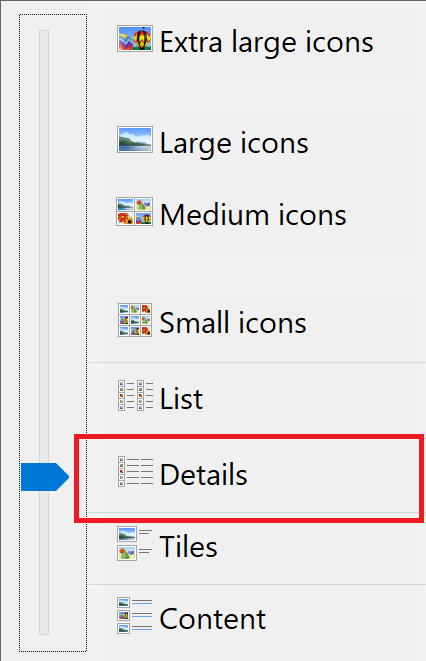
4 เลือก รายละเอียด from the list to view apps along with the name of the publisher, date of installation, and the version installed.
![]()
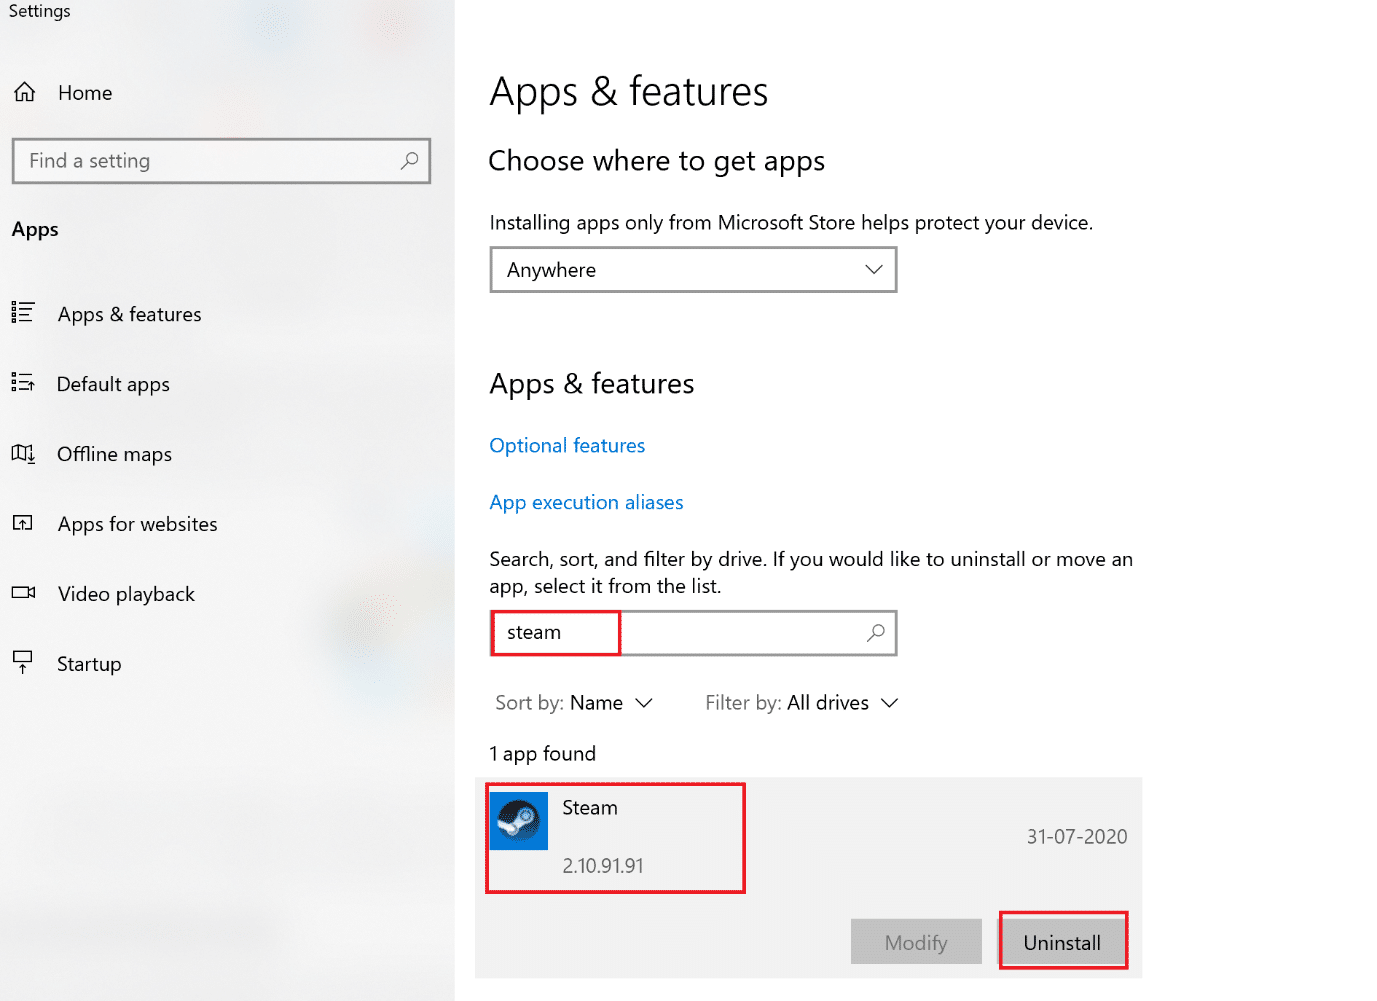
5. Select all instances of apps and programs published by NVIDIA. Right-click on each and select ถอนการติดตั้ง.
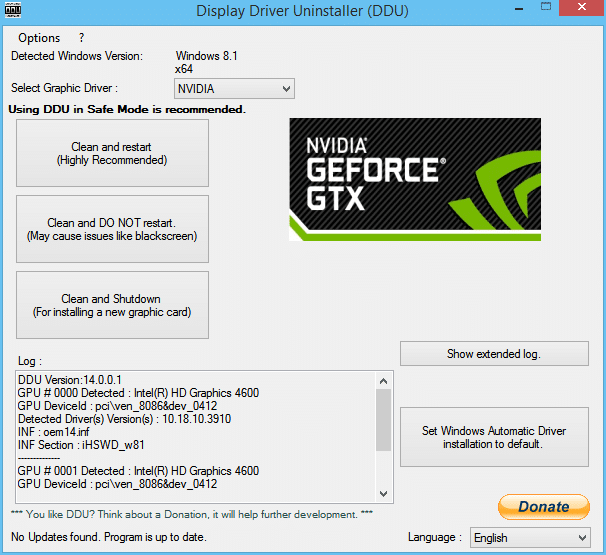
หมายเหตุ หรือคุณสามารถใช้ Display Driver Uninstaller to uninstall NVIDIA GeForce as well.
6. เริ่มต้นใหม่ คอมพิวเตอร์ ทำครั้งเดียว
7. จากนั้น เยี่ยมชม Nvidia official website และคลิกที่ ดาวน์โหลด to download the latest GeForce Experience.

8. Click on the downloaded file to วิ่ง the set-up utility.
9 ต่อไป, เข้าสู่ระบบ to your Nvidia account and click on the ไดร์เวอร์ tab. Install all the recommended drivers.
ยังอ่าน: แก้ไขการ์ดแสดงผลที่ตรวจไม่พบใน Windows 10
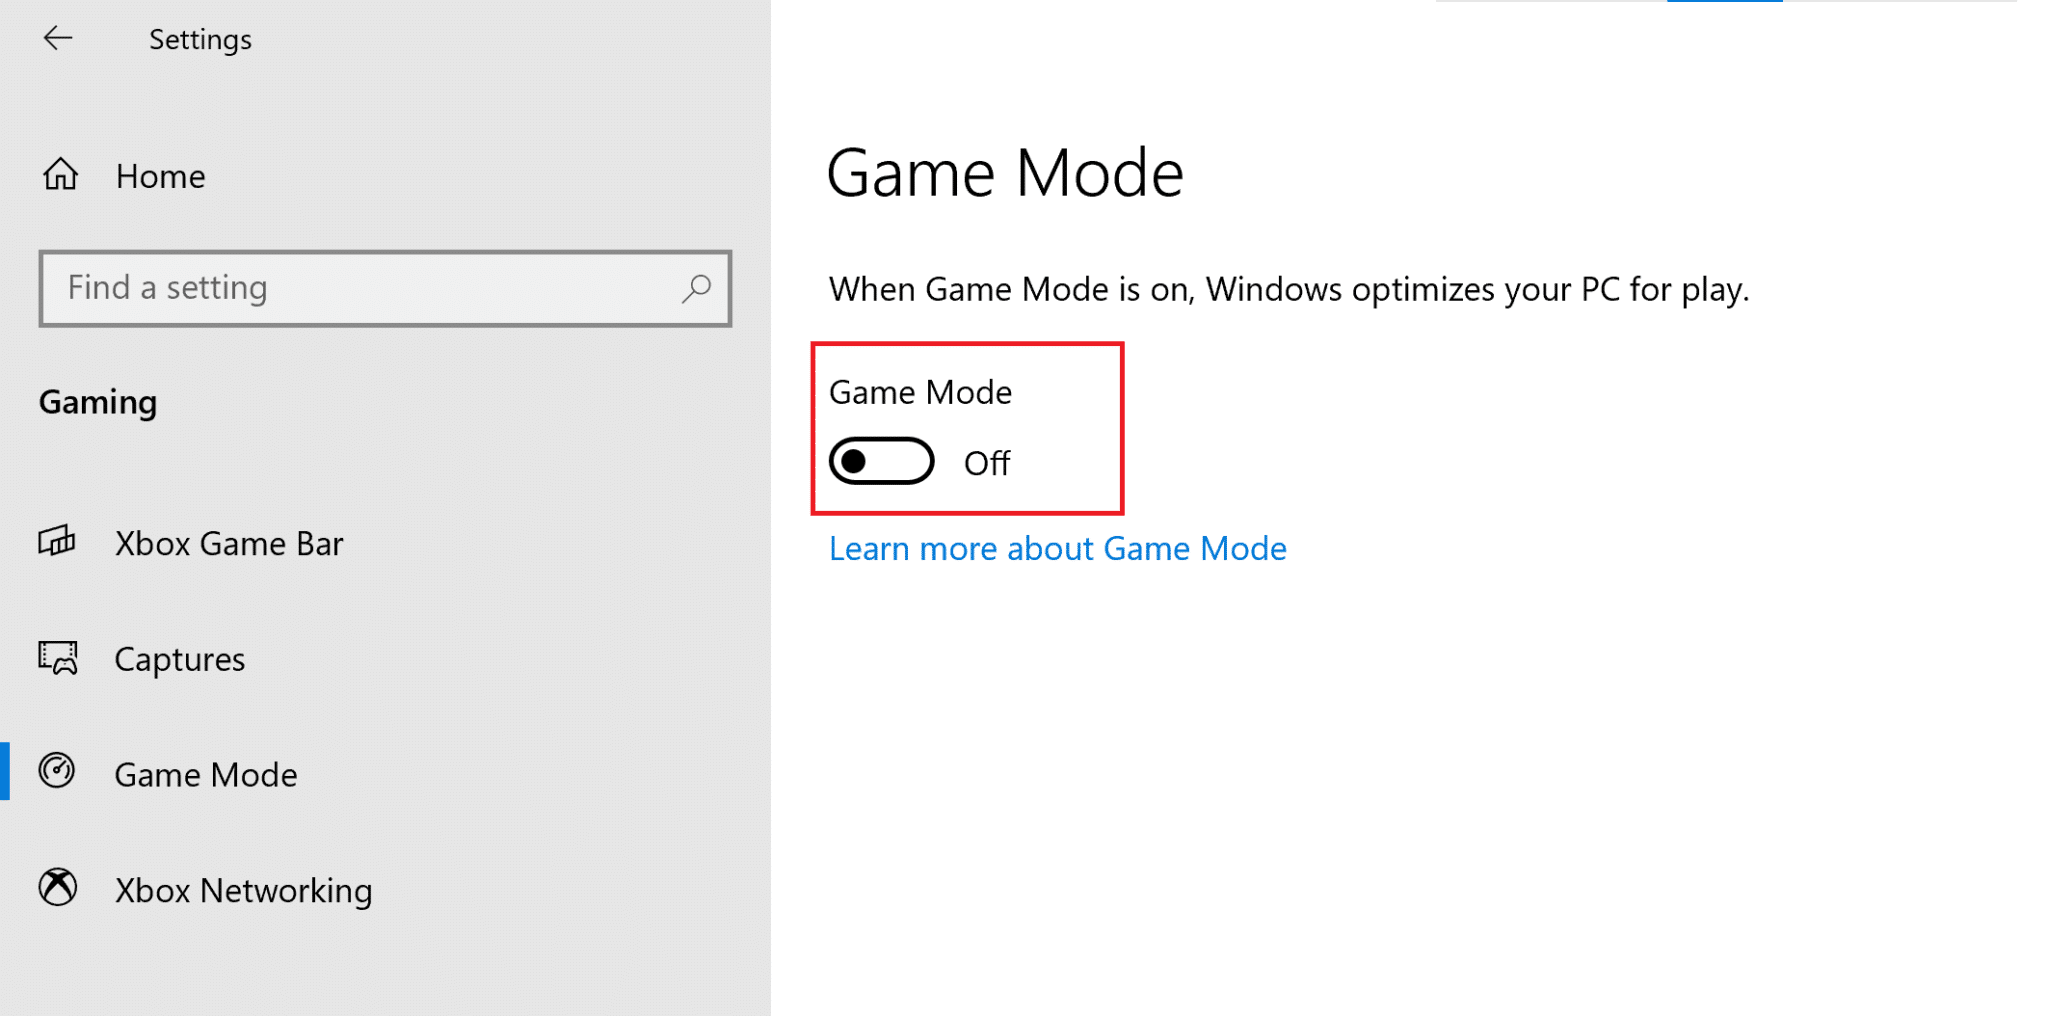
Method 4: Toggle off Game Mode
The Windows 10 feature of Game Mode can boost the gaming experience and performance of your PC. Nevertheless, many users have reported that disabling this feature is a potential Destiny 2 error code Broccoli fix. Here’s how you can turn off Game Mode in Windows 10 systems:
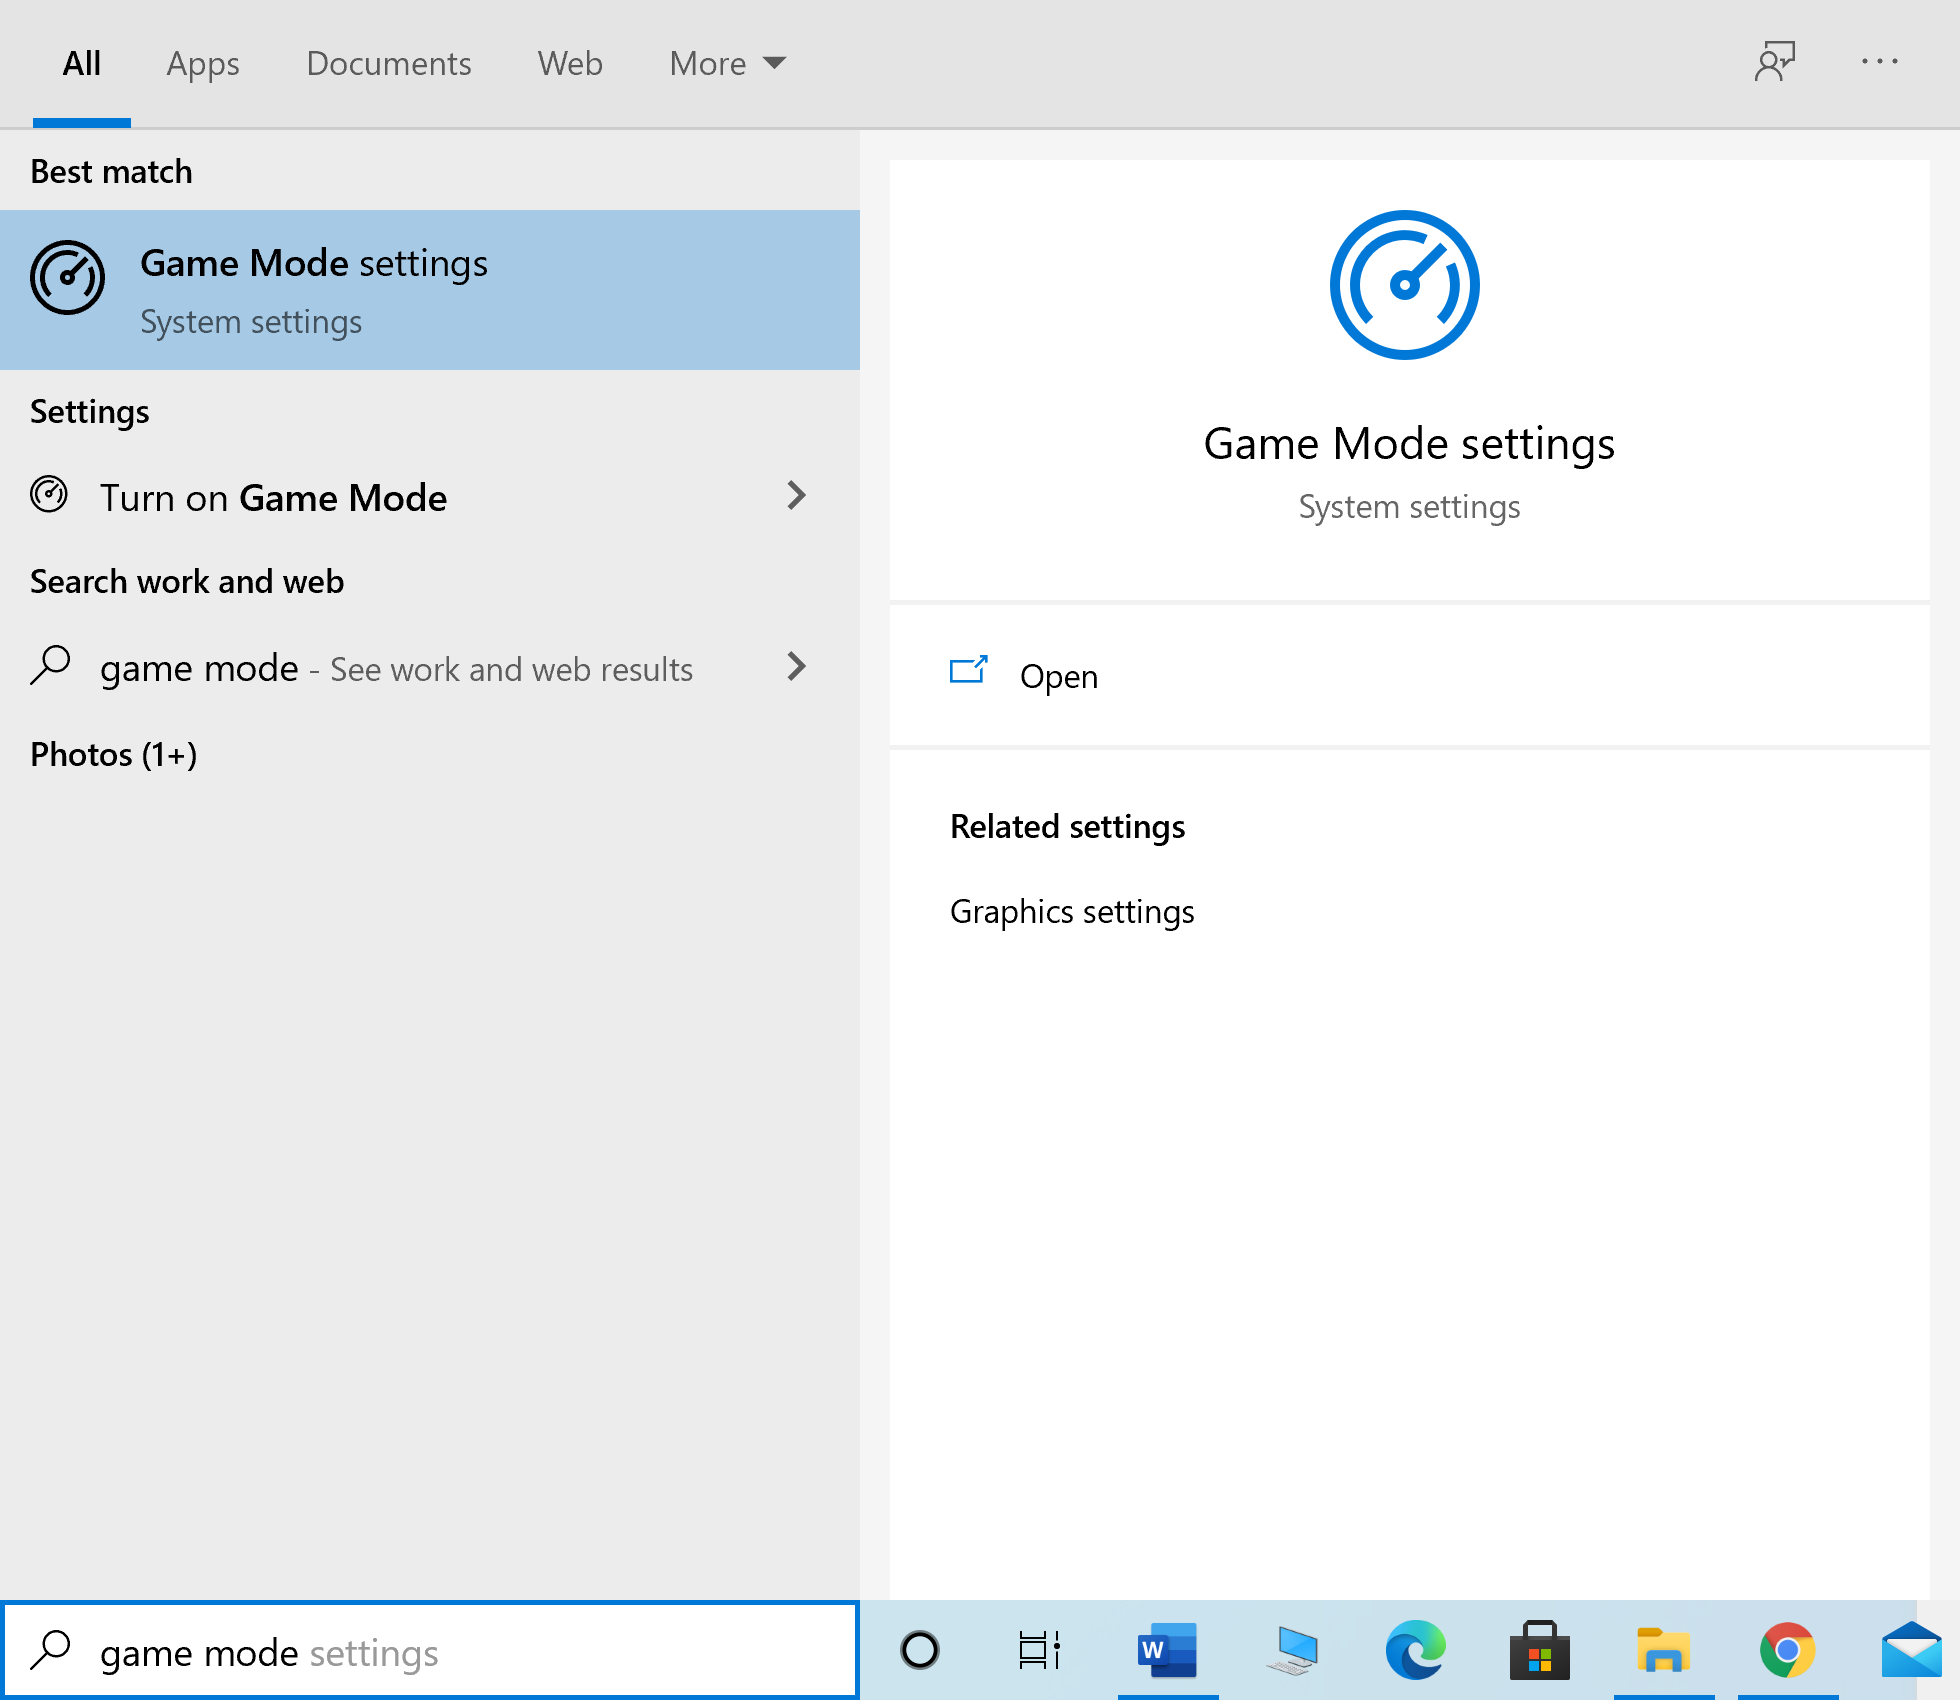
1 ประเภท การตั้งค่าโหมดเกม ใน ค้นหา Windows box. Click on Open from the right window.
2. สลับไฟล์ โหมดเกมปิด ที่แสดงด้านล่าง
Method 5: Check Integrity of Destiny 2 Files (For Steam)
If you use Steam to play Destiny 2, you need to verify the integrity of game files so that the installed version of the game matches the latest version available on Steam servers. Read our guide on How to Verify the Integrity of Game Files on Steam here.
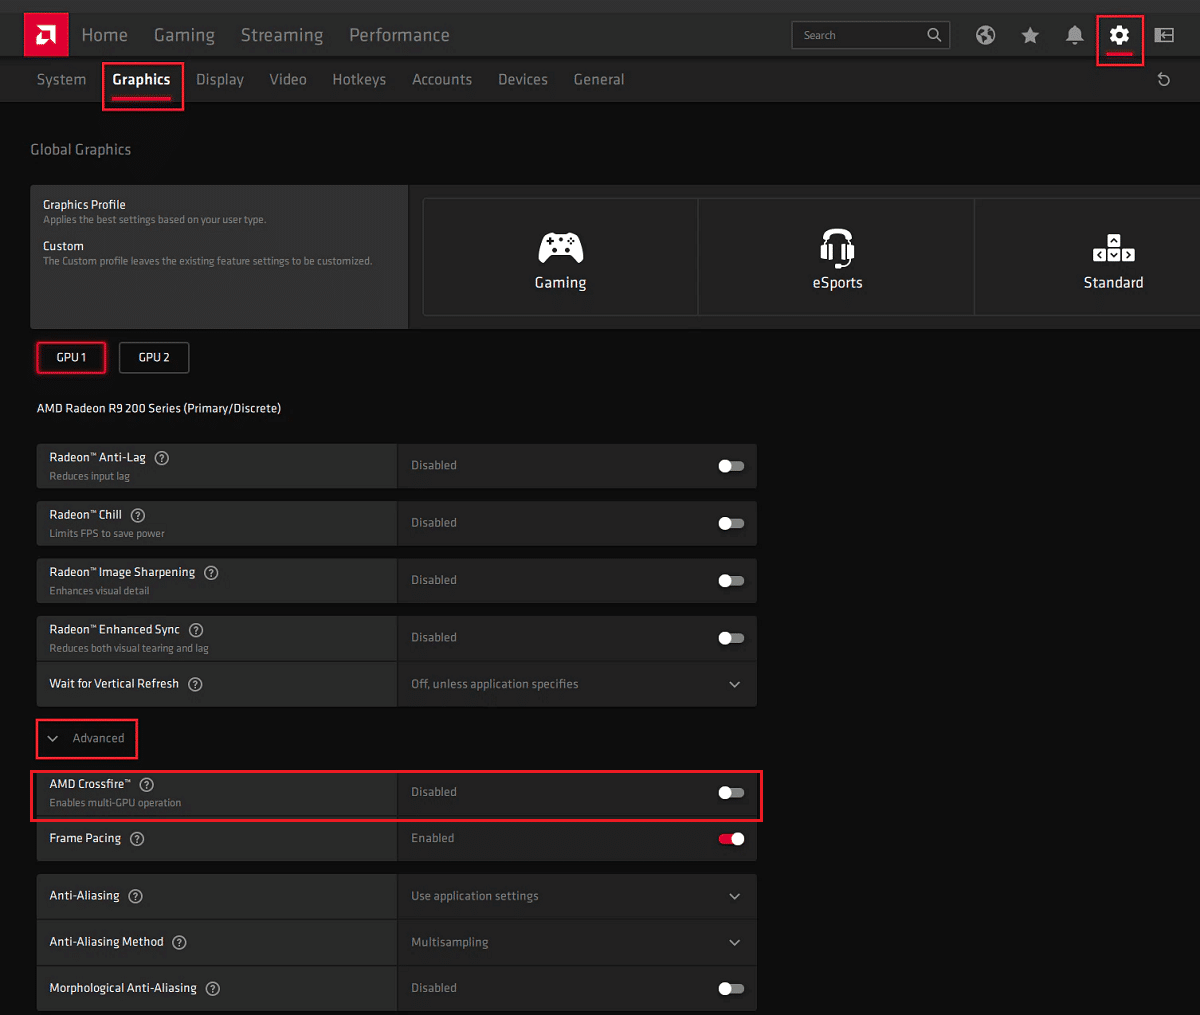
Method 6: Enable Multi-GPU settings (If applicable)
This method is applicable if you use two graphic cards and are facing the Destiny 2 Broccoli error. These settings allow the PC to combine multiple graphic cards and use combined graphics processing power. Follow the listed steps to enable the said settings for NVIDIA and AMD, as the case may be.
สำหรับ NVIDIA
1. คลิกขวาที่ เดสก์ทอป และเลือก แผงควบคุม NVIDIA.
2 คลิกที่ Configure SLI, Surround, PhysX, from the left pane of the NVIDIA Control Panel.
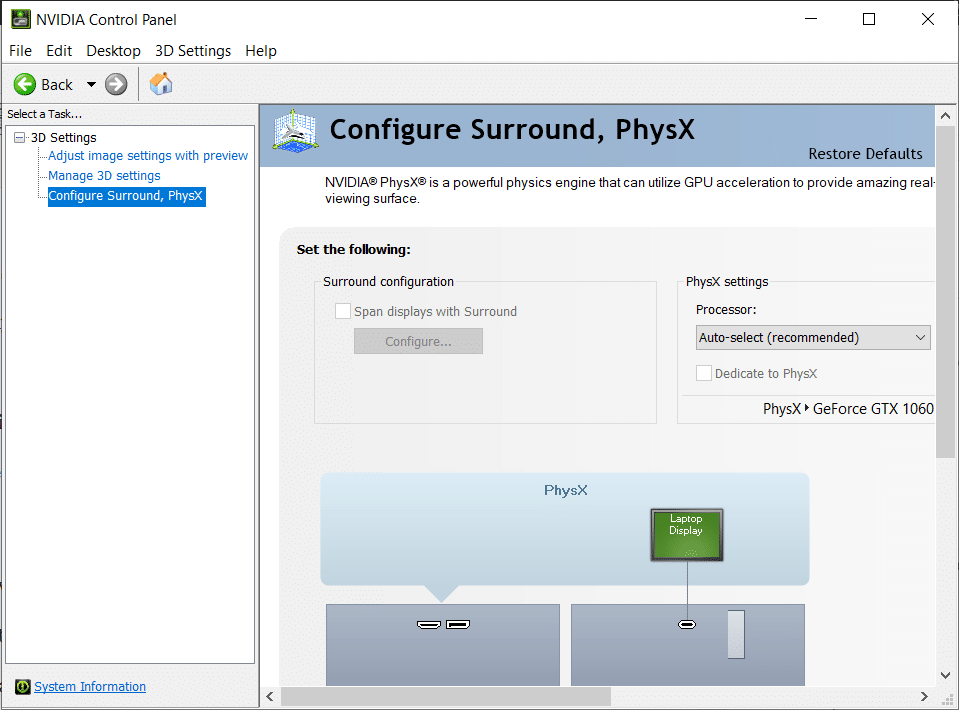
3 คลิกที่ เพิ่มประสิทธิภาพ 3D สูงสุด ภายใต้ SLI configuration. ลด การเปลี่ยนแปลง.
หมายเหตุ The Scalable Link Interface (SLI) is the brand name for the NVIDIA multi-GPU setting.
4. เริ่มต้นใหม่ ระบบของคุณ and launch the game to check if the issue is resolved.
สำหรับ AMD
1. คลิกขวาที่ของคุณ เดสก์ทอป และคลิกที่ ซอฟต์แวร์ AMD Radeon
ฮิต คลิกที่ ไอคอนการตั้งค่า from the top right corner of the AMD Software window.
3. จากนั้นไปที่ กราฟิก แถบ
4 เลื่อนลงไปที่ ระดับสูง ส่วนและเปิดสวิตช์ AMD Crossfire to enable multi-GPU settings.
หมายเหตุ CrossFire is the brand name for the AMD multi-GPU setting.
5. เริ่มต้นใหม่ the PC, and launch Destiny 2. Check if you’re able to fix Destiny 2 Error Code Broccoli.
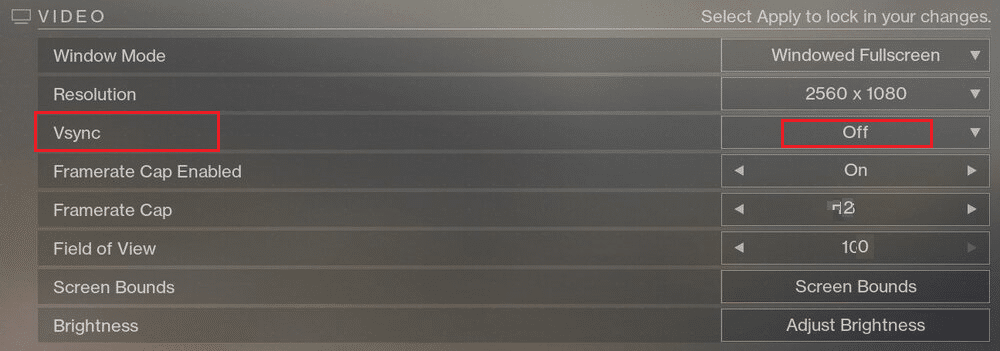
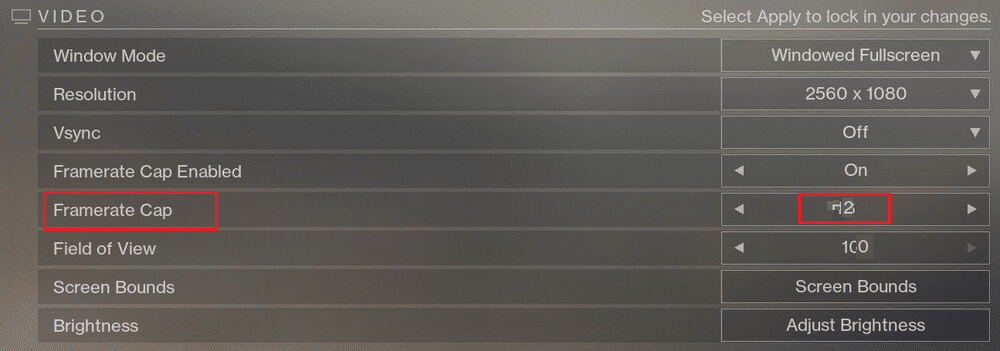
Method 7: Change Graphic Settings on Destiny 2
In addition to modifying graphics settings associated with GPU, you can do similar modifications in the game itself. This will help avoid issues arising out of graphics inconsistency like Destiny 2 error code Broccoli. Here’s how to alter graphics settings in Destiny 2:
1 เปิด 2 ชะตา บนพีซีของคุณ
2 คลิกที่ เปิดการตั้งค่า to view the available settings.
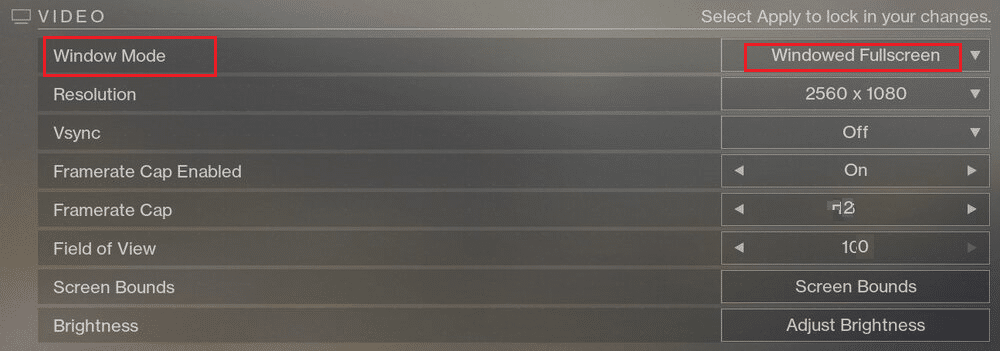
3. ถัดไป คลิกที่ วีดีโอ แท็บจากบานหน้าต่างด้านซ้าย
4 จากนั้นเลือก v-ซิงค์ from Off to บน.
5. จากนั้น Enable Framerate Cap และตั้งเป็น 72 from the drop-down, as illustrated below.
6. ลด the settings and launch the game.
ยังอ่าน: Fix Unreal Engine Exiting Due To D3D Device Being Lost
Method 8: Change Game Properties
You can change settings for the executable file of the game to potentially fix the Broccoli error code. Follow the given steps to do the same.
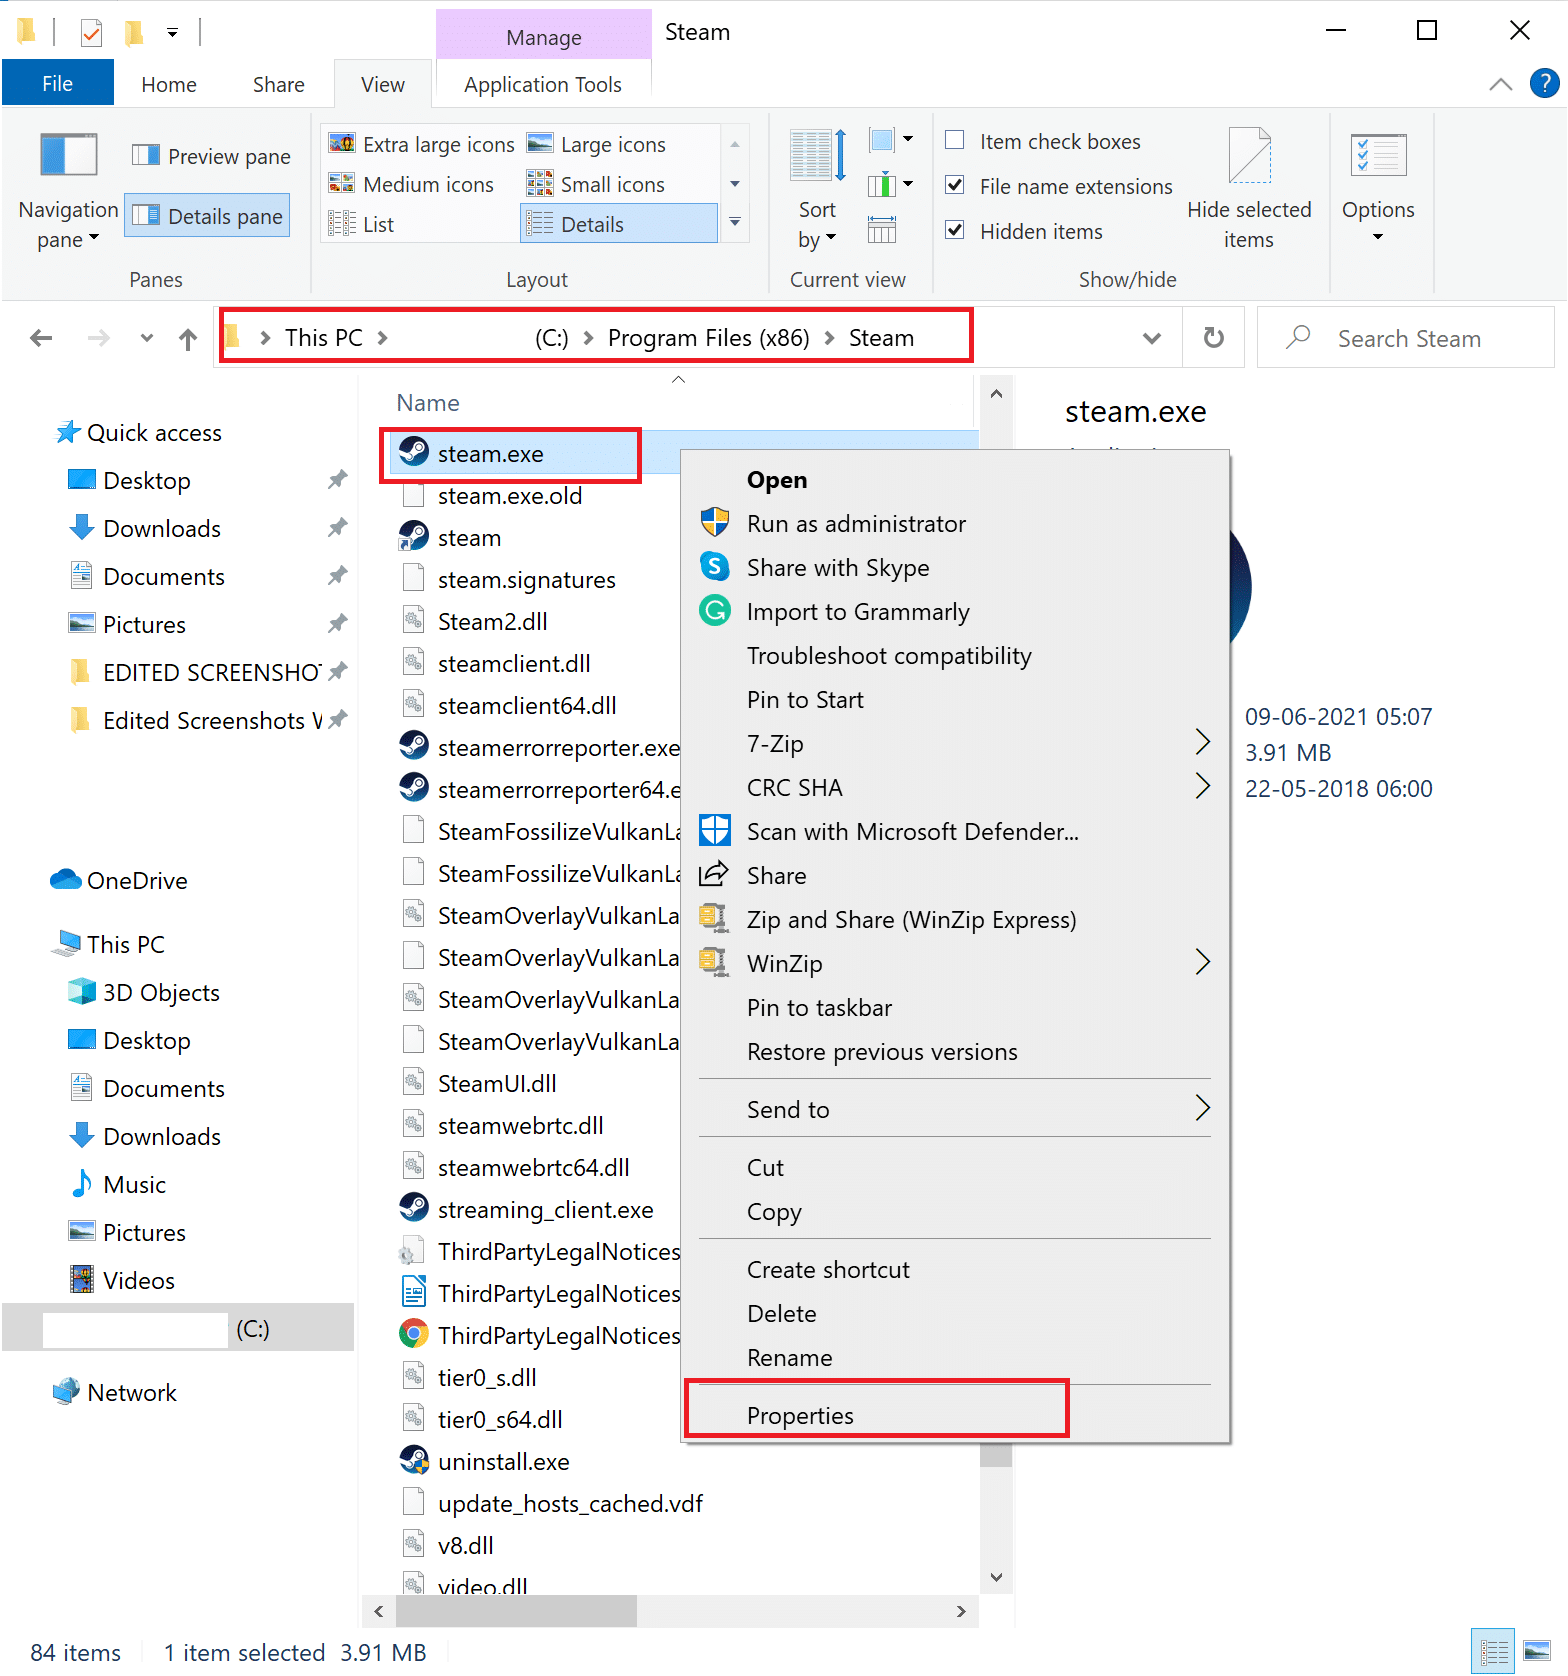
1. Launch File Explorer and go to C: > Program files (x86).
หมายเหตุ If you have installed the game elsewhere, navigate to the appropriate directory.
2 เปิด Destiny 2 folder. คลิกขวาที่ไฟล์ ไฟล์. exe of the game and select อสังหาริมทรัพย์ .
หมายเหตุ Below is an example shown using อบไอน้ำ.
3. จากนั้นไปที่ Security แท็บในนั้น อสังหาริมทรัพย์ window. Click on the option titled Edit.
4. รับรองว่า การควบคุม is enabled for all users, as depicted below.
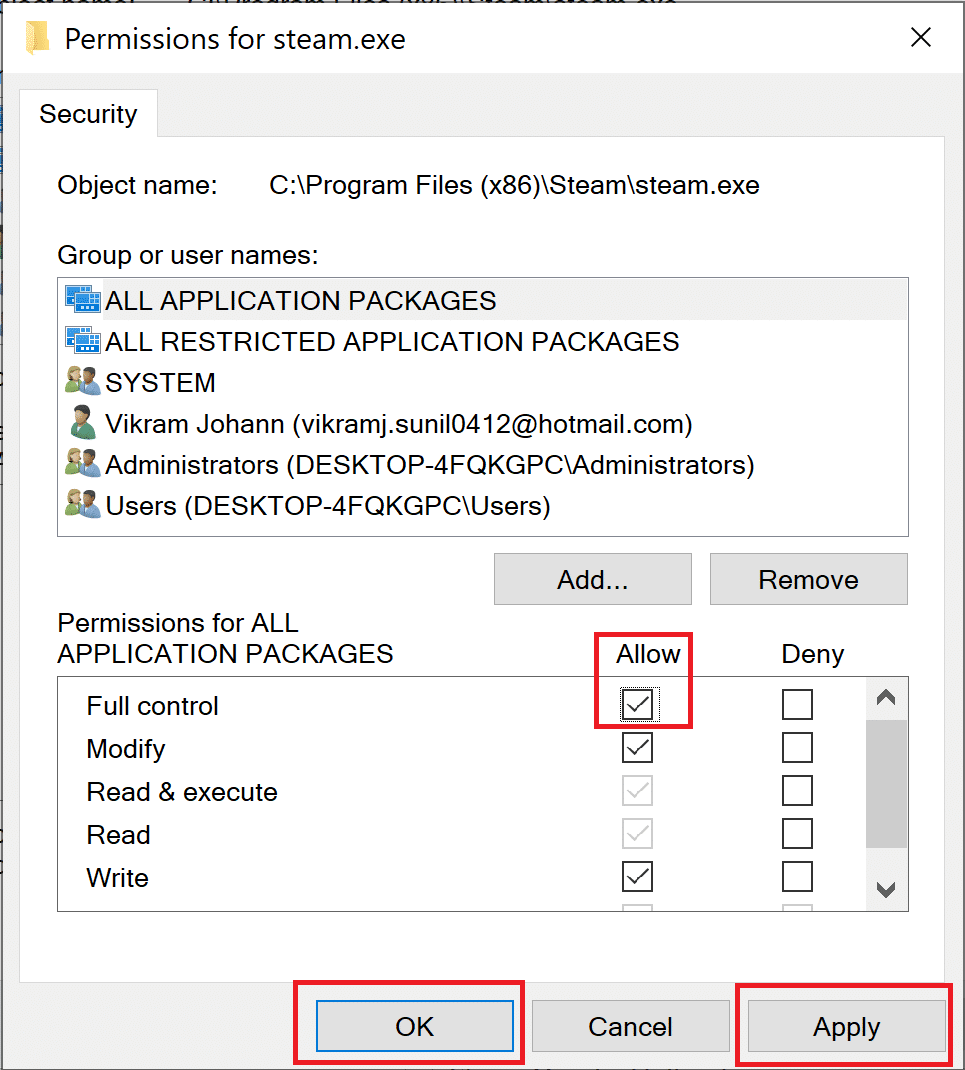
5 คลิกที่ ใช้> ตกลง to save changes as highlighted above.
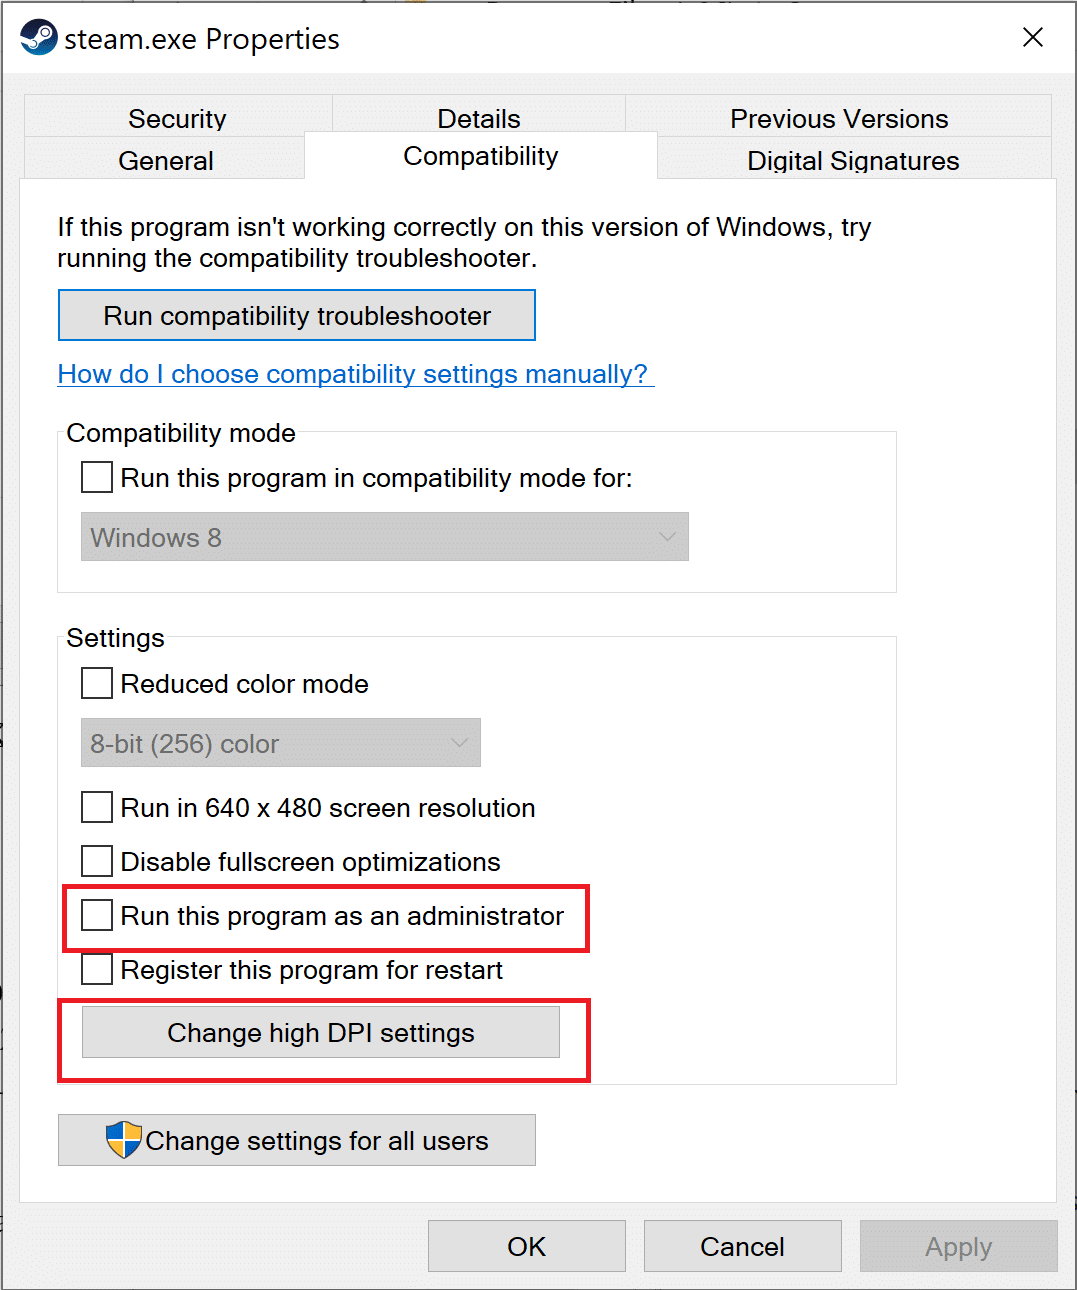
6. ถัดไป สลับไปที่ ความเข้ากันได้ tab and check the box next to the option titled รันโปรแกรมนี้เป็นผู้ดูแลระบบ.
7. จากนั้นคลิกที่ เปลี่ยนการตั้งค่า DPI สูง ตามที่แสดงไว้
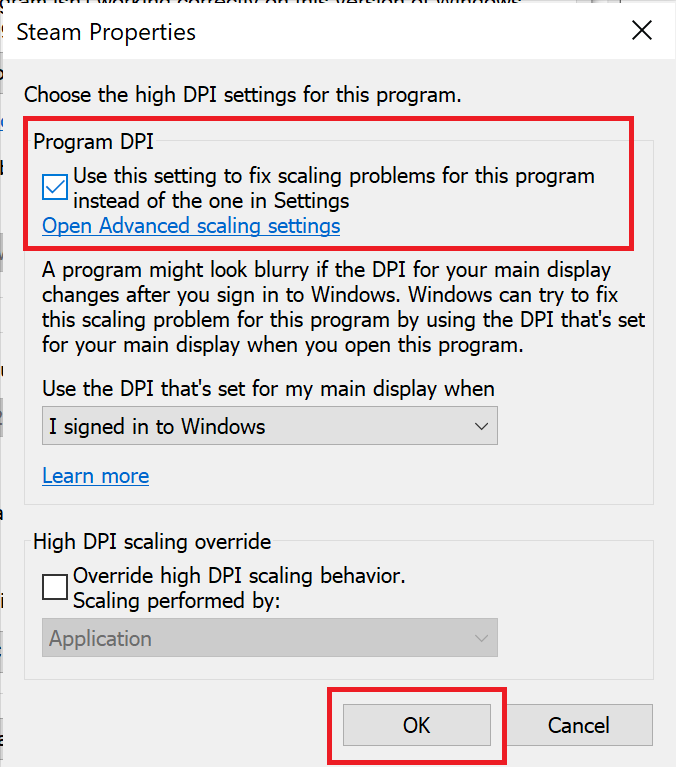
8. Here check the box under Program DPI. คลิกที่ OK เพื่อบันทึกการตั้งค่า
Method 9: Set Destiny 2 as High Priority
To ensure that the CPU resources are reserved for Destiny 2 gameplay, you need to set it as a high-priority task in Task Manager. When your PC prefers to utilize the CPU for Destiny 2, there are lesser chances that the game will crash. Follow these steps to prioritize Destiny 2 and in turn, fix Destiny 2 Error Code Broccoli on Windows 10:
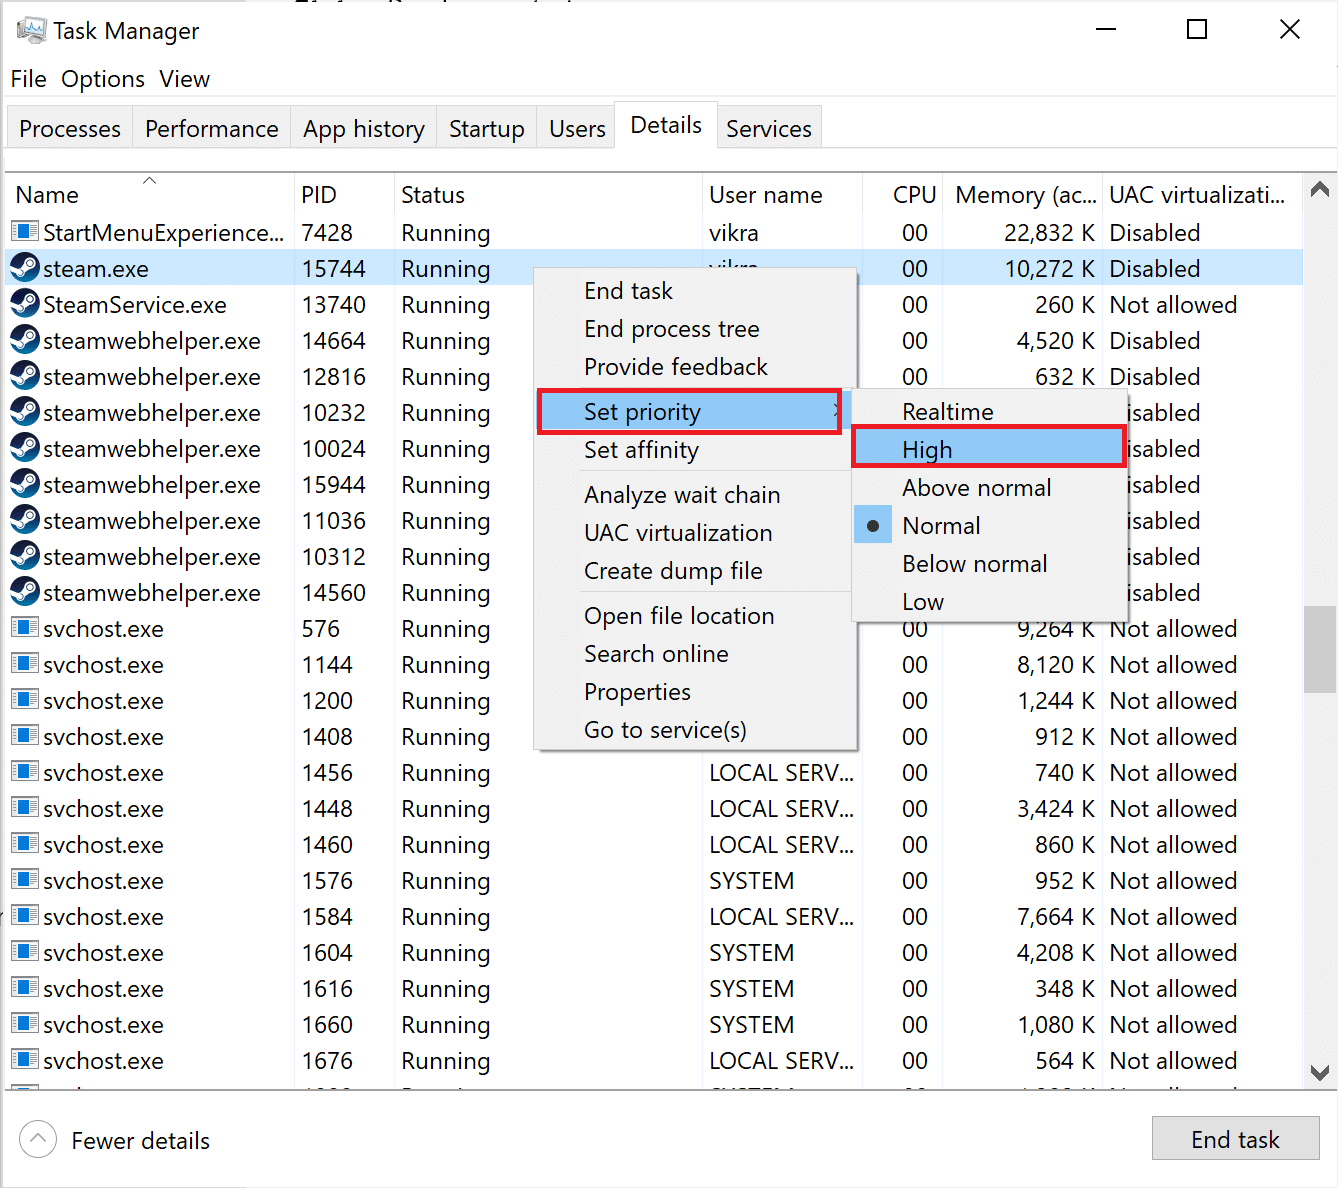
1 ประเภท ที่ Task Manager in ค้นหา Windows box. Launch it from the search result by clicking จุดเปิด.

2 ไปที่ รายละเอียด แท็บในนั้น ที่ Task Manager หน้าต่าง
3 คลิกขวาที่ 2 ชะตา และคลิกที่ Set priority > High, as explained in the given pic.
4. Repeat the same process for Battle.net, อบไอน้ำ, or any application that you use to launch Destiny 2.
ยังอ่าน: วิธีเปลี่ยนลำดับความสำคัญของกระบวนการ CPU ใน Windows 10
Method 10: Reinstall Destiny 2
There might be corrupt installation files or game files. To clean your system of corrupt game files, you need to reinstall the game, as follows:
1 เปิด เพิ่มหรือลบโปรแกรม window as explained in 3 วิธี during Reinstallation of Graphics drivers.
2 ประเภท 2 ชะตา ใน ค้นหารายการนี้ text box, as shown.
3 คลิกที่ 2 ชะตา in the search result and select ถอนการติดตั้ง.
หมายเหตุ Below is an example is given using อบไอน้ำ.
4. รอ for the game to be uninstalled.
5. เปิดตัว Steam or the application that you use to play games and reinstall Destiny 2.
Corrupt game files on your PC, if any, are now deleted and the Destiny 2 Broccoli error code rectified.
วิธีที่ 11: เรียกใช้ Windows Memory Diagnostic
In case, the said error still persists, there is a probability of hardware problems with your computer. To diagnose these problems, implement this method. The Windows Memory Diagnostic app will scan the hardware components of your computer to search for problems. For example, if the RAM on your PC is malfunctioning, the diagnostic app will give information about it so that you can get the RAM checked or replaced. Similarly, we shall run this tool to have problems diagnosed with system hardware that is affecting gameplay.
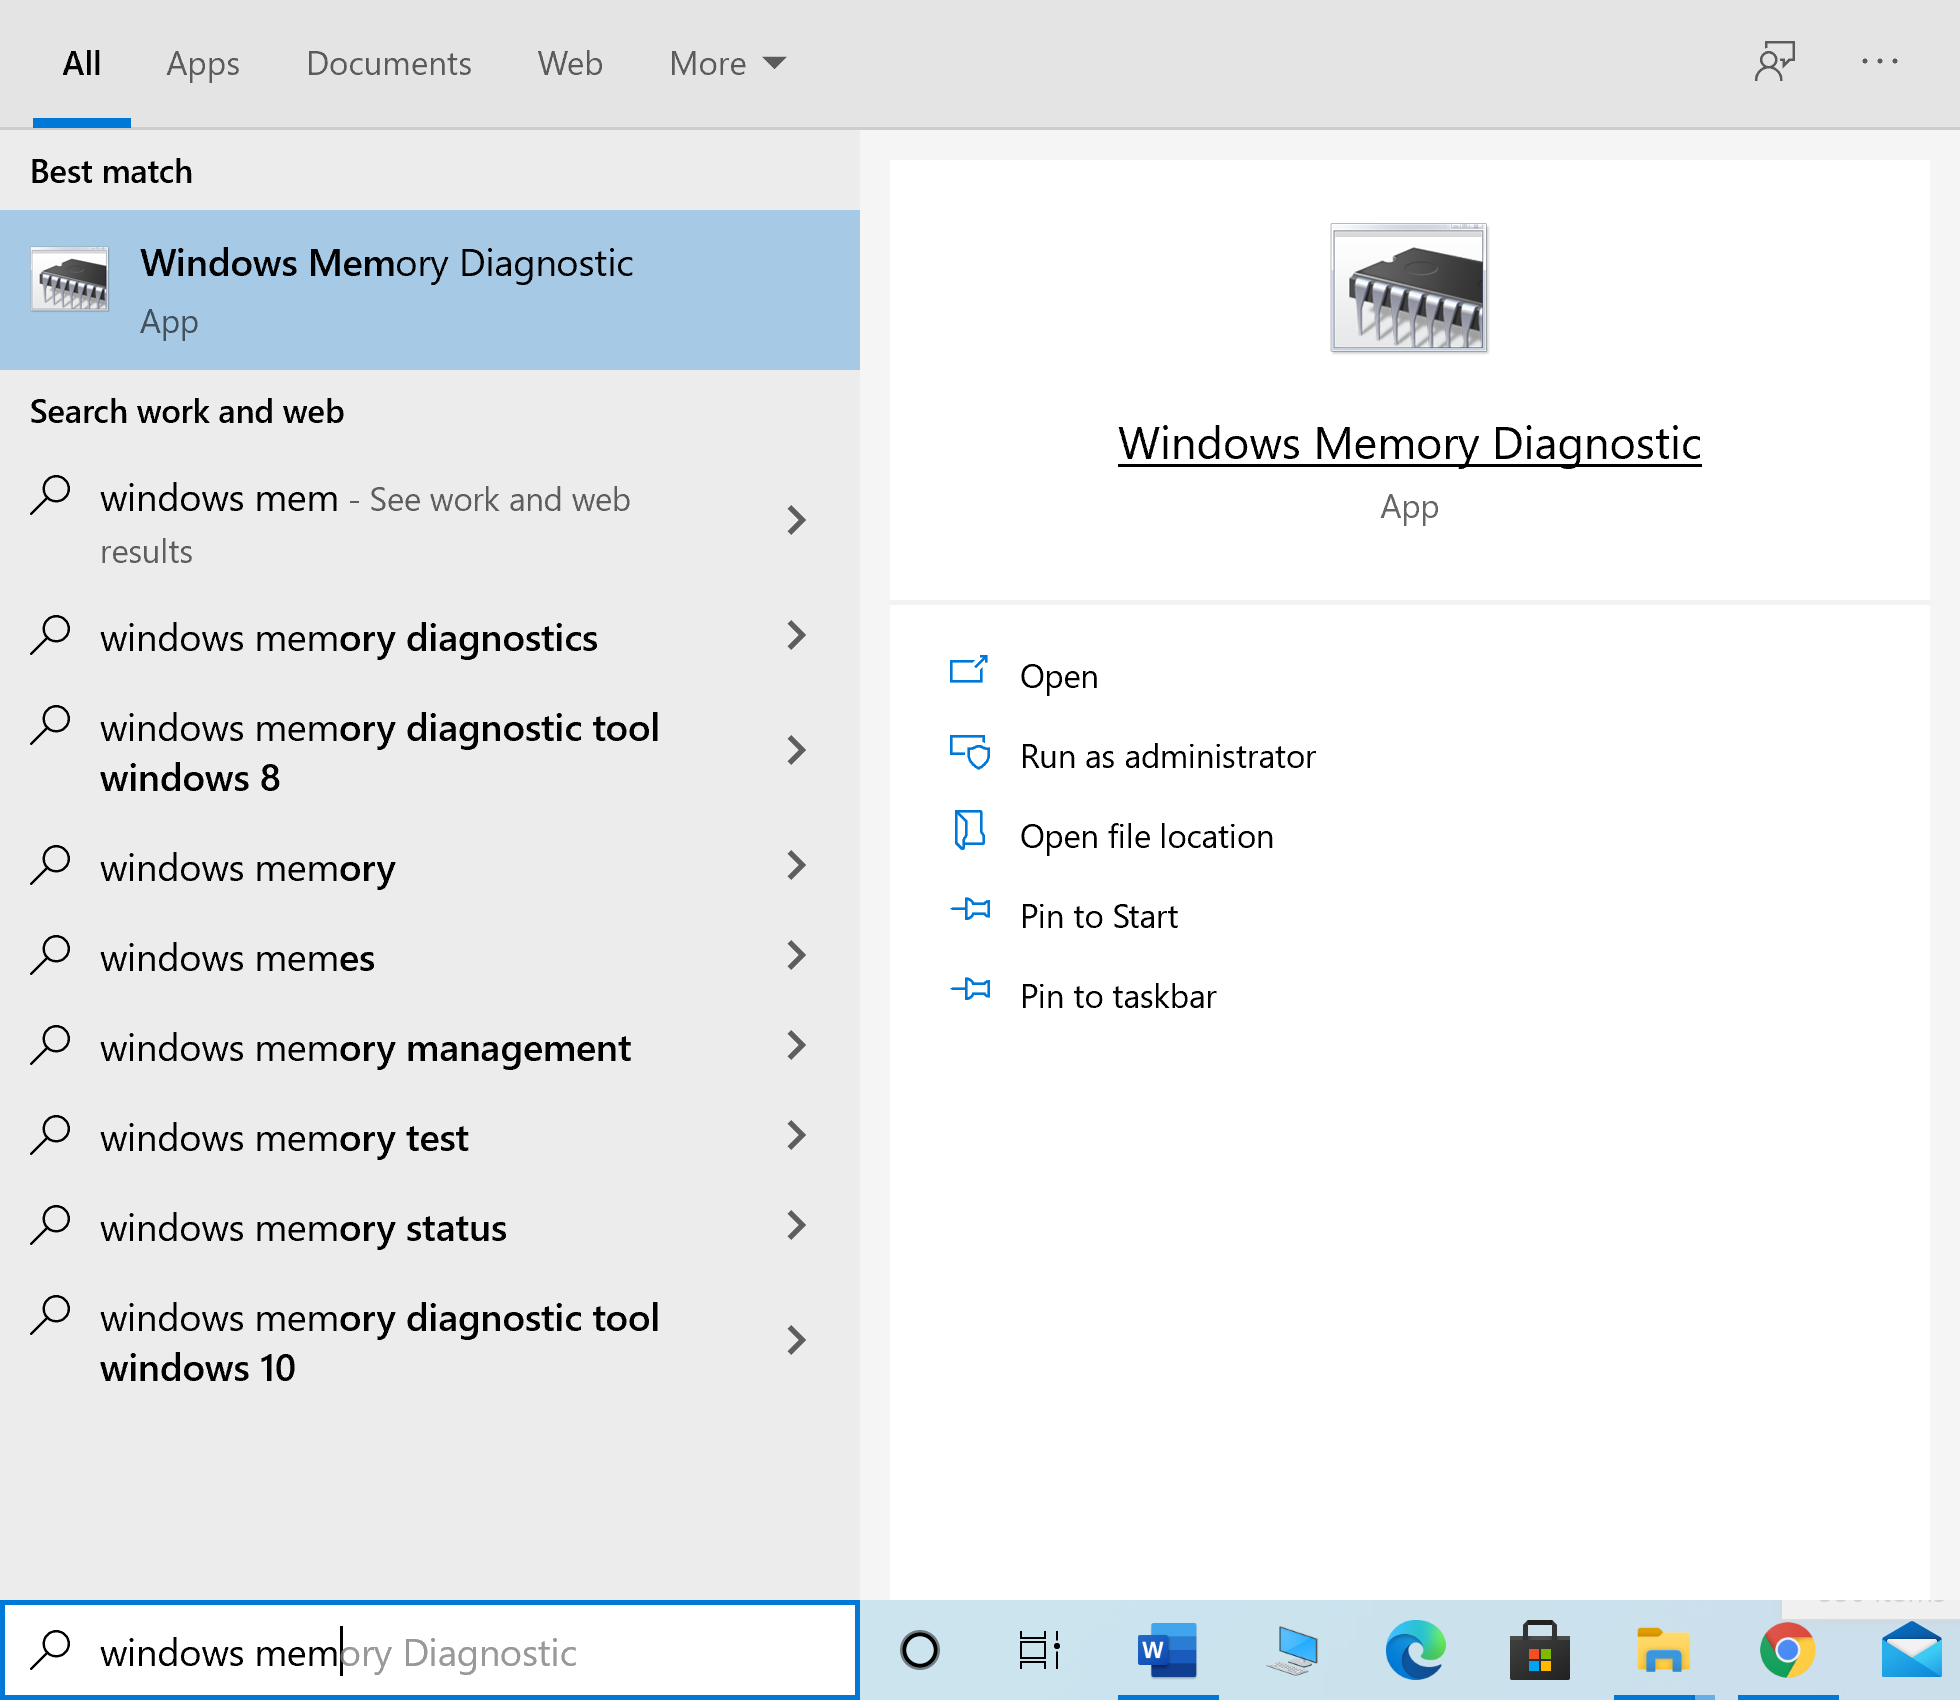
1 ประเภท หน้าต่างวินิจฉัยหน่วยความจำ ใน ค้นหา Windows box. Open it from here.
2 คลิกที่ รีสตาร์ททันทีและตรวจสอบปัญหา (แนะนำ) ในหน้าต่างป๊อปอัป
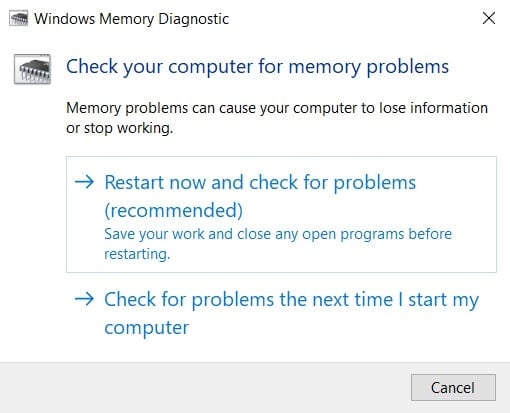
3. The computer will การเริ่มต้นใหม่ and begin the diagnostics.
หมายเหตุ The process may take a while. Do not switch off the machine during the process.
4. The computer will รีบูต เมื่อกระบวนการเสร็จสมบูรณ์
5. To view the diagnostic information, go to แสดงเหตุการณ์, ตามที่ปรากฏ.
6 นำทางไปยัง บันทึกของ Windows > ระบบ from the left pane of the Event Viewer window.
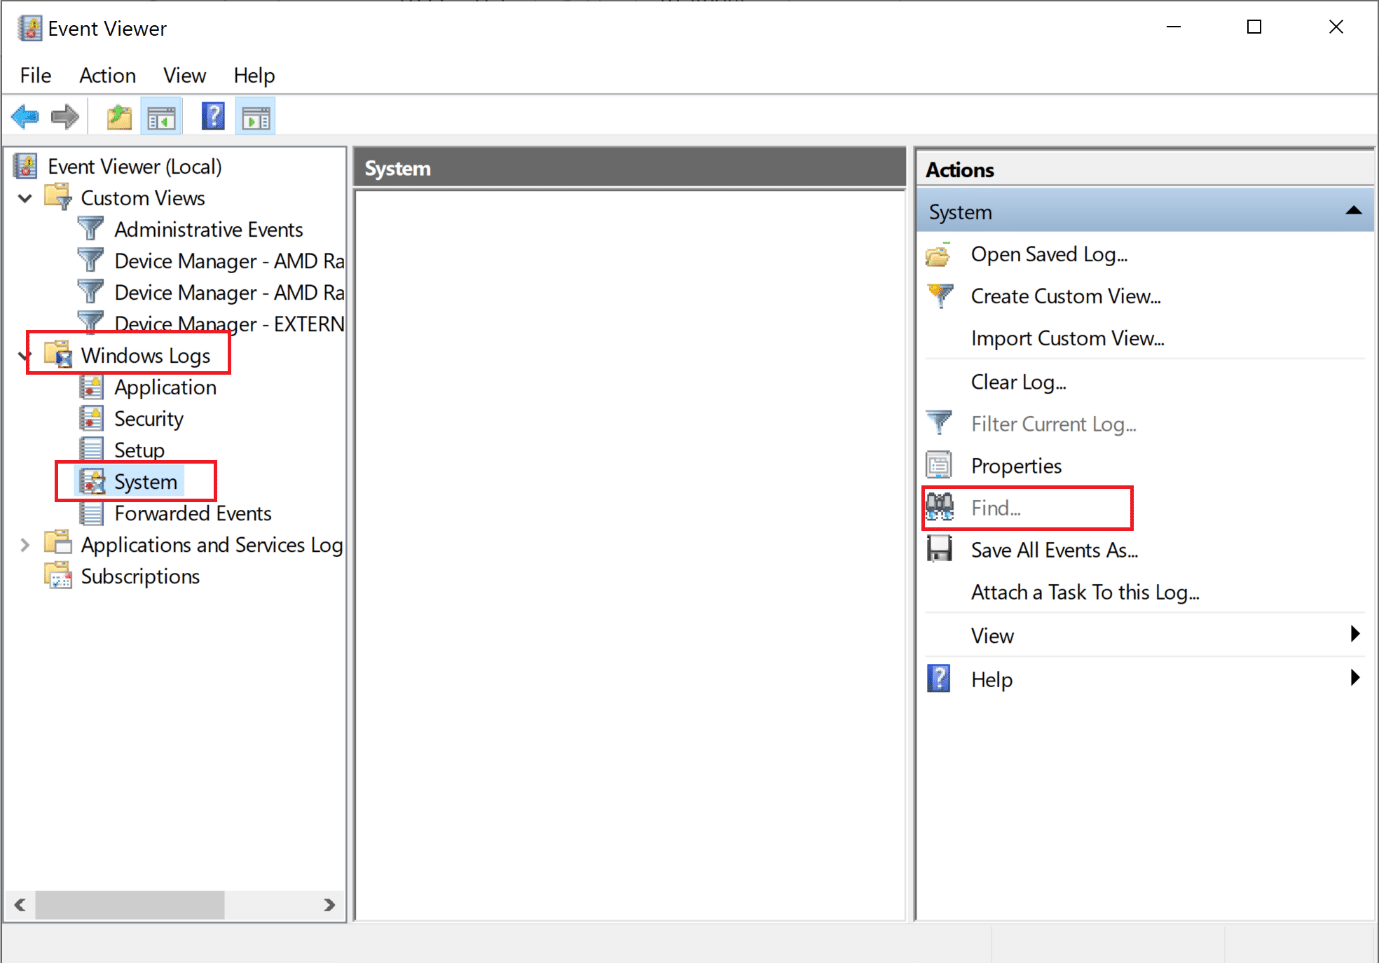
7 คลิกที่ หา จาก สถานะ pane on the right-hand side.
8 ประเภท หน่วยความจำการวินิจฉัย และเลือก ค้นหาถัดไป.
9. Check the Event Viewer window for information displayed about ฮาร์ดแวร์ผิดพลาด, ถ้ามี.
10. If the hardware is found to be defective, get it checked or replaced by a technician.
ที่แนะนำ:
เราหวังว่าคู่มือนี้จะเป็นประโยชน์และคุณก็สามารถทำได้ fix Destiny 2 error code Broccoli on your Windows 10 laptop/desktop. Do let us know which method worked the best for you. Also, if you have any questions or suggestions regarding this article, feel free to drop them in the comments section below.

