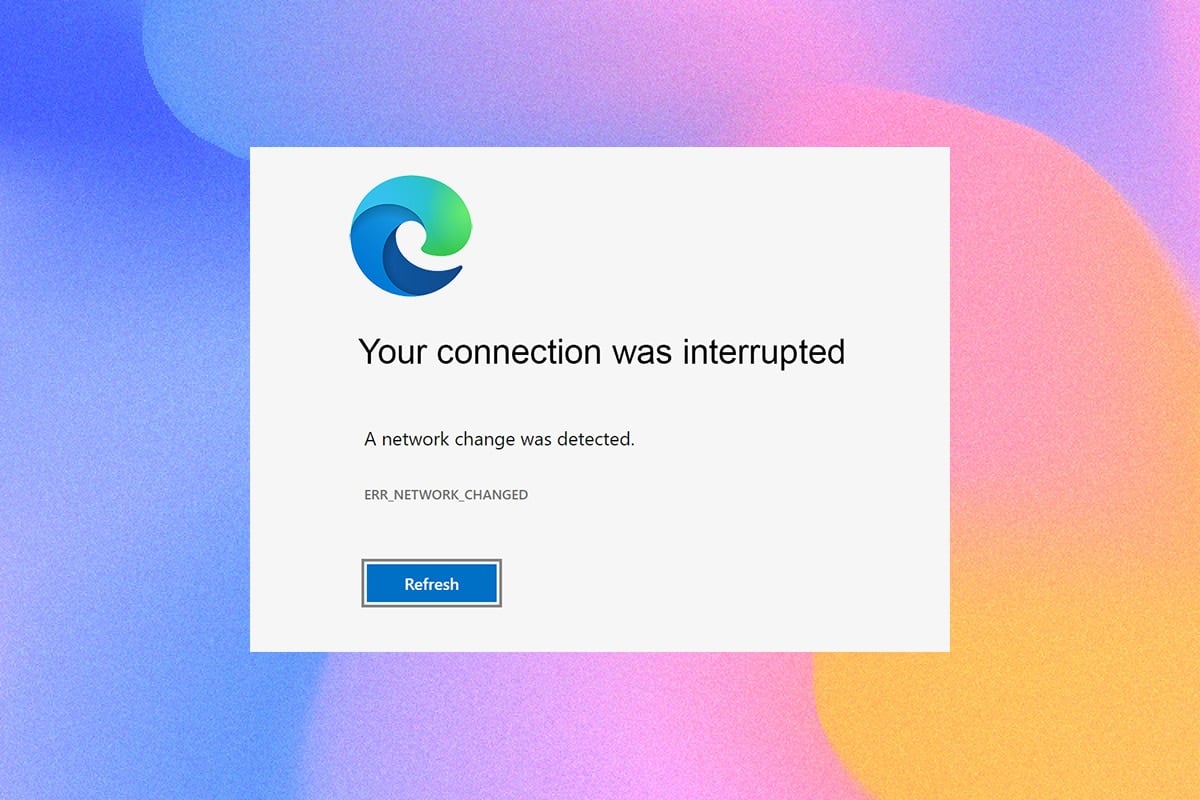
Accessing a few web pages in your favorite browser might seem difficult due to some errors. If you are using the Microsoft Edge browser, you might have faced Microsoft Edge ERR NETWORK CHANGED error while surfing through any web pages. Nevertheless, this guide will help you fix a network change was detected Windows 10 error with effective troubleshooting steps. The methods in this article also apply to your Android device and other browsers too. So, what are you waiting for? Continue reading the article.
How to Fix Microsoft Edge ERR NETWORK CHANGED in Windows 10
Apart from network conflicts in your Windows 10 PC, a few other reasons cause a network change was detected Windows 10 error. They are listed below.
- Change in IP address.
- Router conflicts.
- Corrupt cache in browser.
- Conflicts from third-party extensions.
- Outdated Operating System.
- การตั้งค่าเบราว์เซอร์ที่เข้ากันไม่ได้
- Malware/virus attack.
- Interference from VPN/proxy servers.
- เบราว์เซอร์ที่ล้าสมัย
- Incompatible Network Adapters.
- Corrupt data in WLAN profiles.
- Restrictions from VPN, ISP, website owners, and proxy servers.
Although there is a huge list of reasons that cause your connection was interrupted a network change was detected an error in Microsoft Edge, you can easily resolve them all by following the below-discussed methods.
We have compiled a list of methods that will help you fix this error in the Edge in this article. Follow the below-mentioned methods in the same order to attain perfect results.
วิธีการแก้ไขปัญหาเบื้องต้น
Before trying any advanced troubleshooting methods, try the following basic troubleshooting methods. A basic and easy troubleshooting method may help in resolving the issue quickly.
- โหลด the page by pressing the ปุ่ม F5 or ปุ่ม Fn + F5 ร่วมกัน
- รีสตาร์ทเบราว์เซอร์ by closing all the browser windows and opening them.
- เริ่มต้นใหม่ ระบบ because a simple restarting might help in fixing the issue.
- ลองใช้ different Internet browsers such as Google Chrome, Opera, and Firefox.
วิธีที่ 1: เรียกใช้ Network Troubleshooter
To analyze and fix all the connection problems, the in-built network troubleshooter will help you. All the network problems will be fixed, and the network operations will be improvised by running a network troubleshooter. Here are a few instructions to run the network troubleshooter on Windows 10 PC.
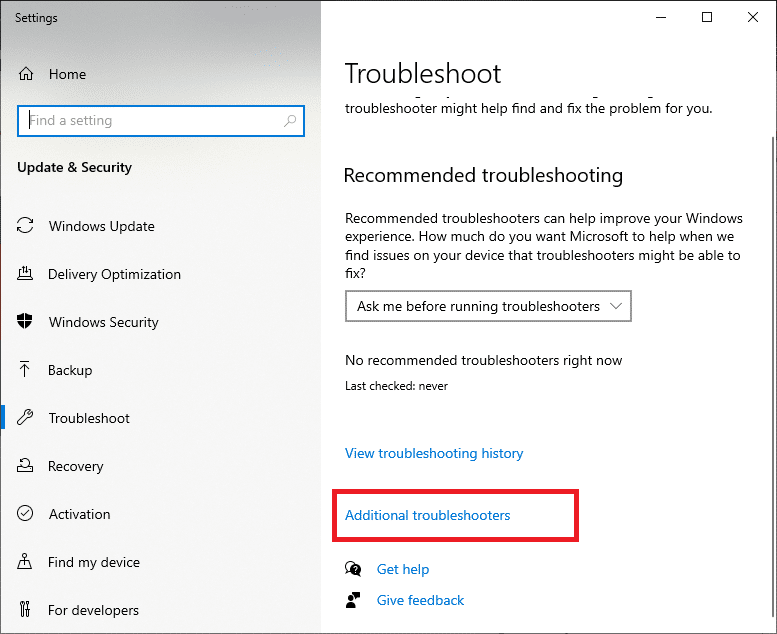
1. กดปุ่ม ปุ่ม windows. ชนิด แก้ไขปัญหาการตั้งค่า ในแถบค้นหาแล้วเปิด

2. ตอนนี้ click on Additional troubleshooters as depicted below.
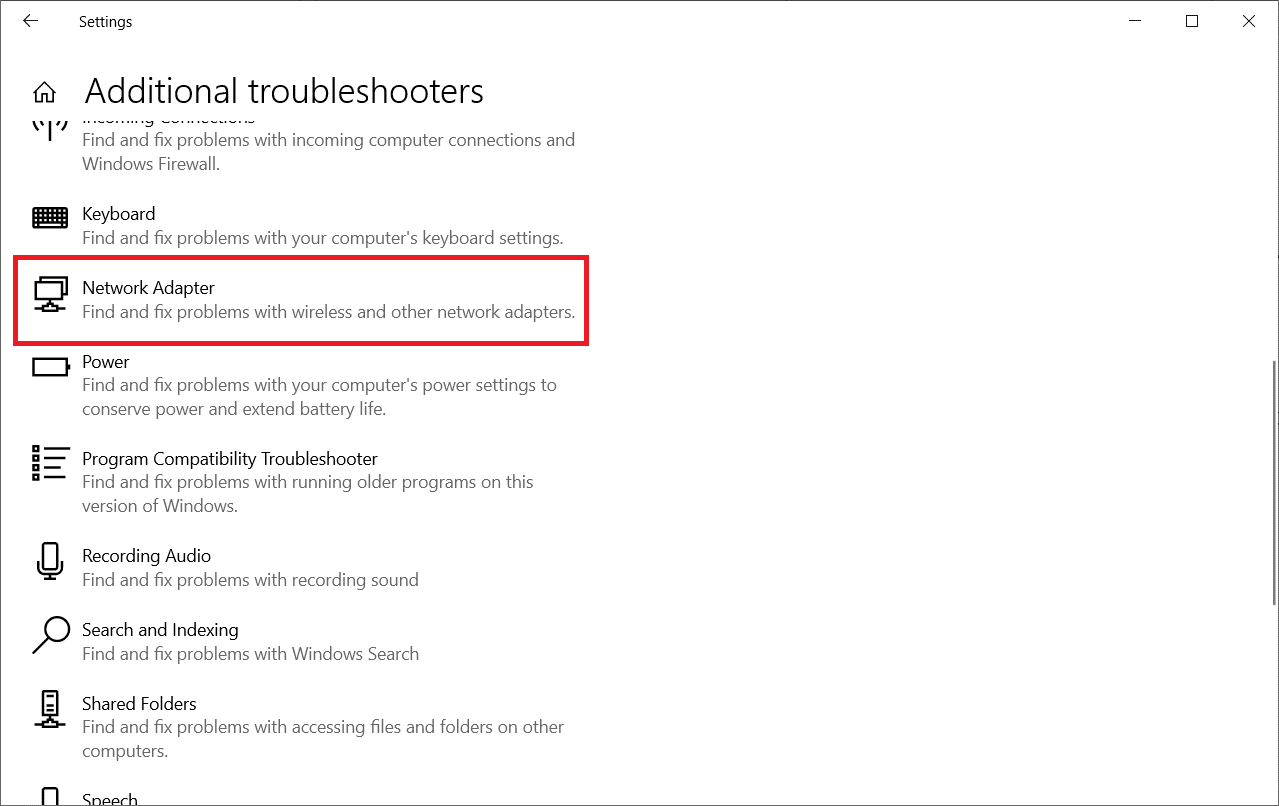
3. ตอนนี้เลือก Network Adapter, which is displayed under Find, and fix other problems.
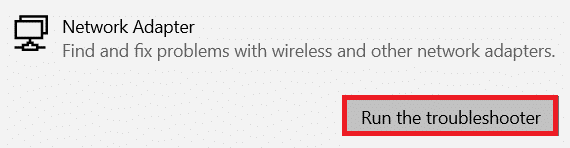
4 เลือก Run the troubleshooter, and the Network Adapter troubleshooter will be launched now.
5 เลือก All network adapters และคลิก ถัดไป.
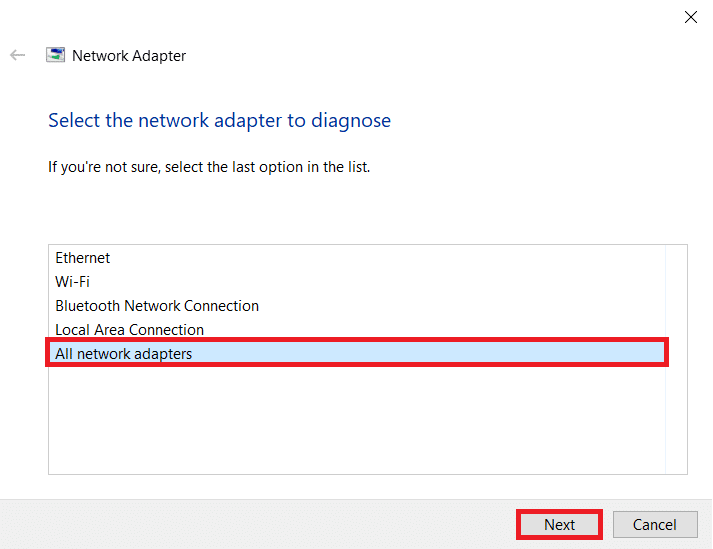
6. If there is an issue, click on ใช้การแก้ไขนี้ and follow the instructions given in the successive prompts.
Method 2: Disable Proxy
Using proxy servers will divert the internet connection to a different tunnel. This will trigger ERR NETWORK CHANGED Windows 10 error message. There are so many error messages to disable proxy servers on your computer. Yet, the simplest method is explained below.
หมายเหตุ ออกจาก Microsoft Edge and make sure you close all the applications related to Edge from Task Manager.
1. ตอนนี้กด Windows ปุ่ม. ชนิด หนังสือมอบฉันทะ and open as highlighted below.
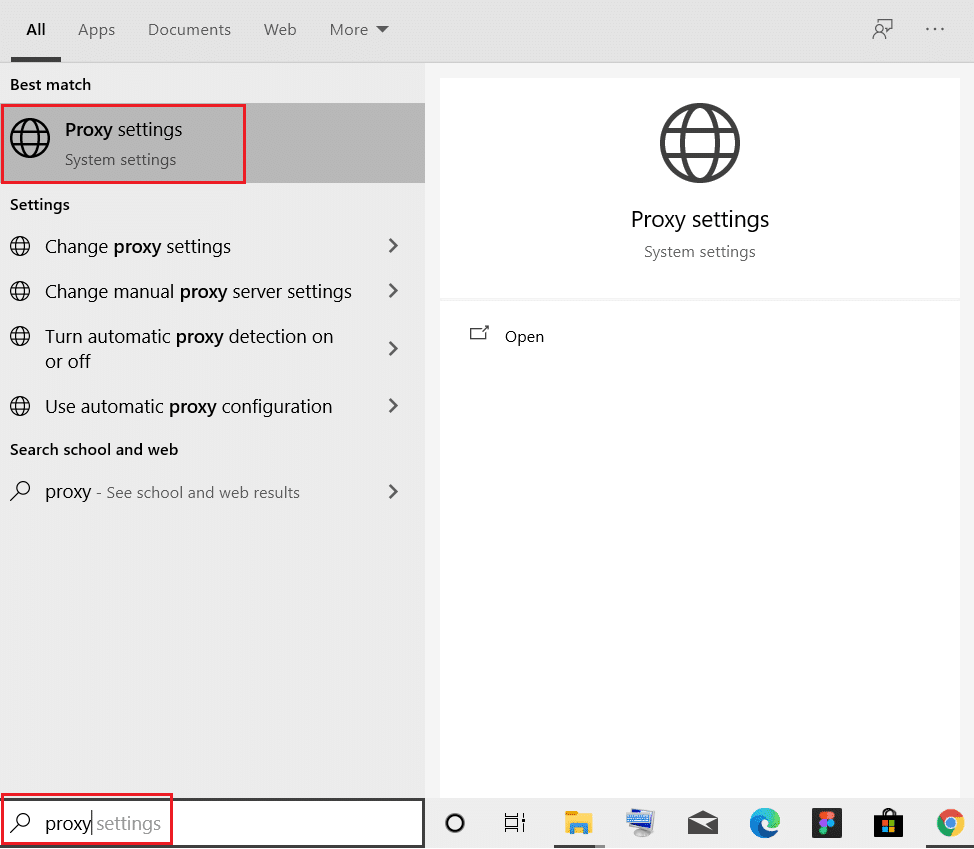
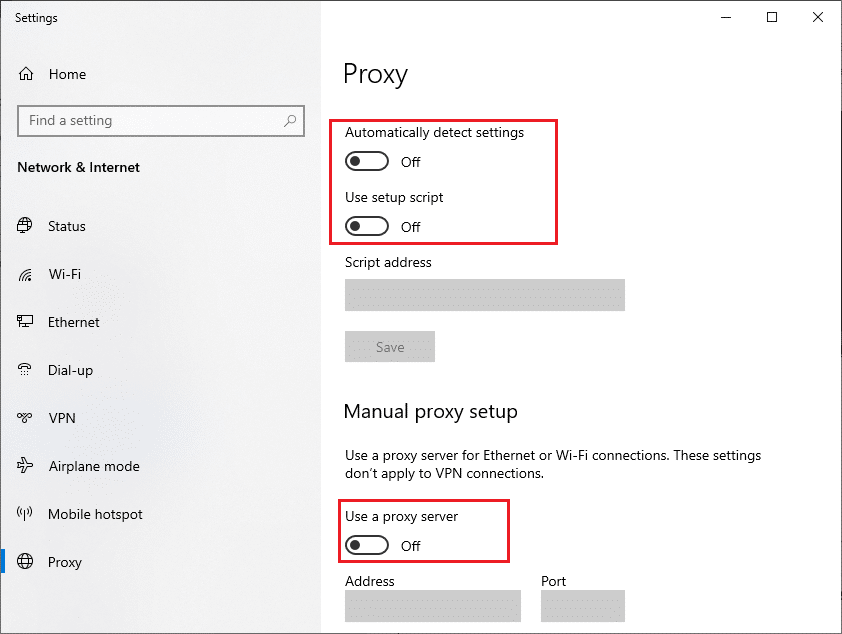
2. Here, toggle ปิด the following settings.
- ตรวจหาการตั้งค่าโดยอัตโนมัติ
- ใช้สคริปต์การตั้งค่า
- ใช้พร็อกซีเซิร์ฟเวอร์
3. Now, relaunch the เบราเซอร์ Edge and try if you can visit web pages.
4. If not, use a VPN client and check if your problem is fixed. If not, try connecting your PC to another network like Wi-Fi หรือ ฮอตสปอตมือถือ.
ยังอ่าน: How to set up a VPN on Windows 10
วิธีที่ 3: ปิดใช้งาน VPN
When your PC is disconnected from VPN, the original location of your computer will be mapped with the browser, leading to a network change was detected Windows 10 error. Hence, in this case, you are advised to disable your VPN client as instructed below.
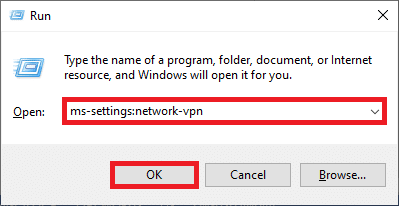
1. To use the วิ่ง ให้กดปุ่ม Windows +R keys.
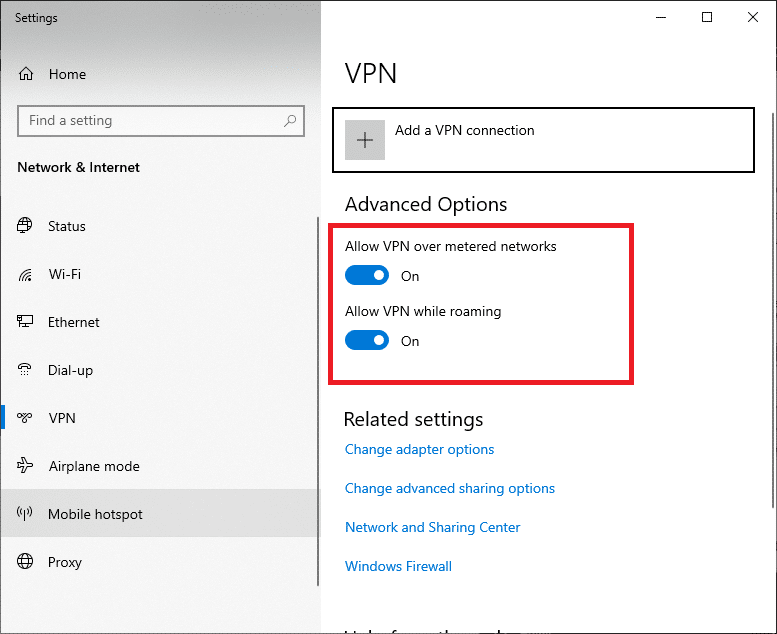
2 ประเภท MS-การตั้งค่า: เครือข่าย VPN แล้วคลิกไฟล์ OK ปุ่ม
3 ใน การตั้งค่า window, disconnect the active VPN service and toggle off the ตัวเลือก VPN ภายใต้ตัวเลือกขั้นสูง
Method 4: Clear Edge Browser History
More often, corrupt browser cache leads to several browser errors rather than ERR NETWORK CHANGED Windows 10. A bulk of cookies and cache will slow down your internet experience and affects the loading responses. You can clear them all in a single shot by following the below-mentioned steps.
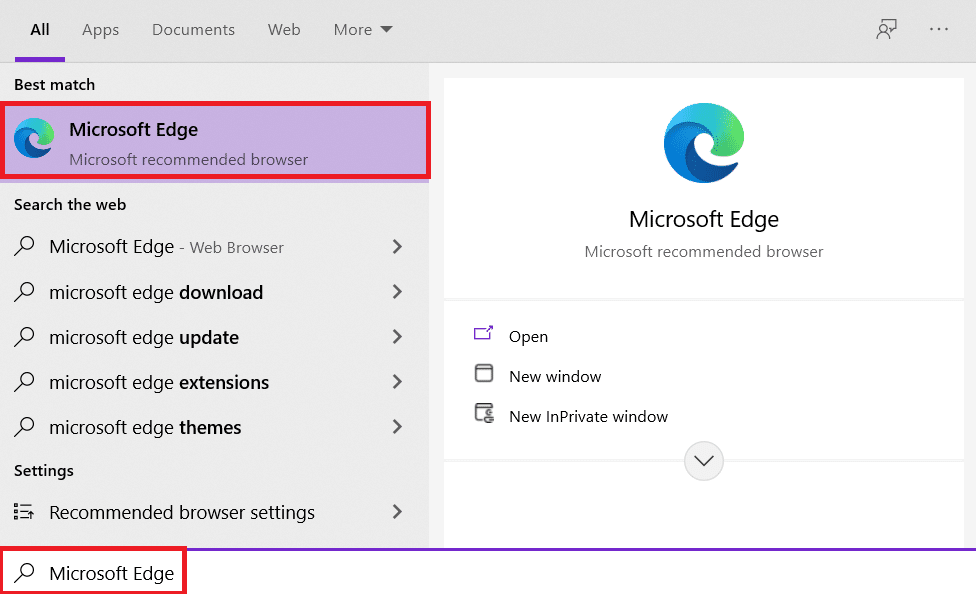
1 กด Windows สำคัญ. พิมพ์ ขอบ และเปิดมัน
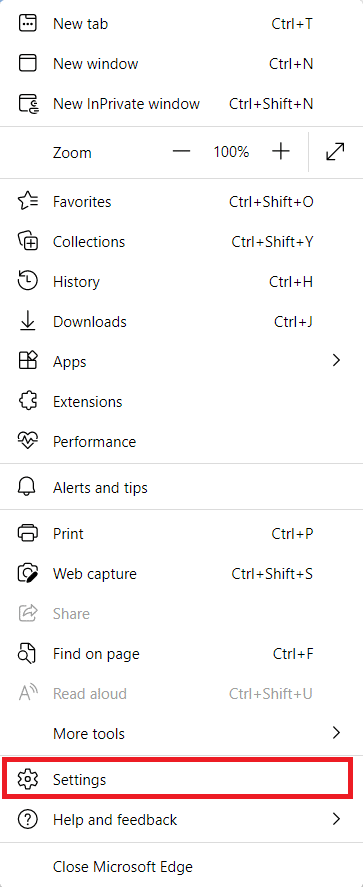
ฮิต คลิกที่ ไอคอนสามจุด near your profile image as you did earlier.
![]()
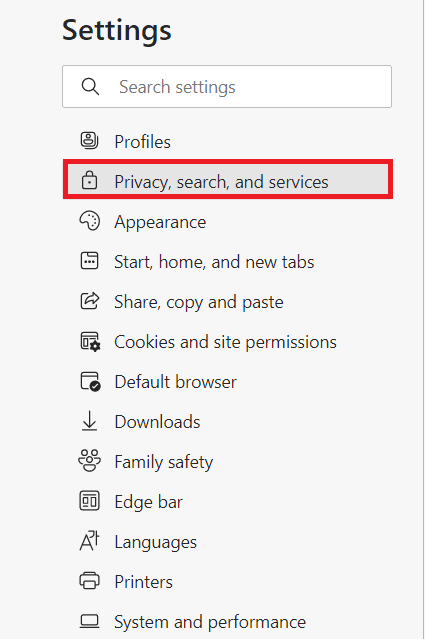
3 คลิก การตั้งค่า.
4. ตอนนี้นำทางไปยัง ความเป็นส่วนตัวการค้นหาและบริการ option in the left pane as shown.
5. Then, scroll down the right screen and click on เลือกสิ่งที่ชัดเจน ภายใต้ ล้างข้อมูลการท่องเว็บ ตามที่ปรากฏ.
หมายเหตุ You can directly navigate the page to delete browsing history in the Edge by typing ขอบ: // การตั้งค่า / clearBrowserData ในแถบค้นหา
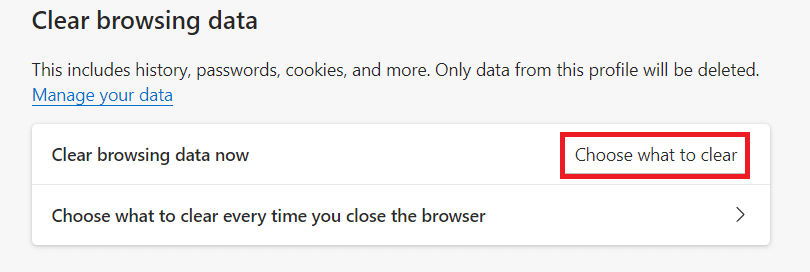
6. In the next window, select the boxes according to your preferences like Browsing history, Cookies, and other site dataและ รูปภาพและไฟล์ที่แคชและคลิกที่ เคลียร์เดี๋ยวนี้ ตามที่ไฮไลต์ด้านล่าง
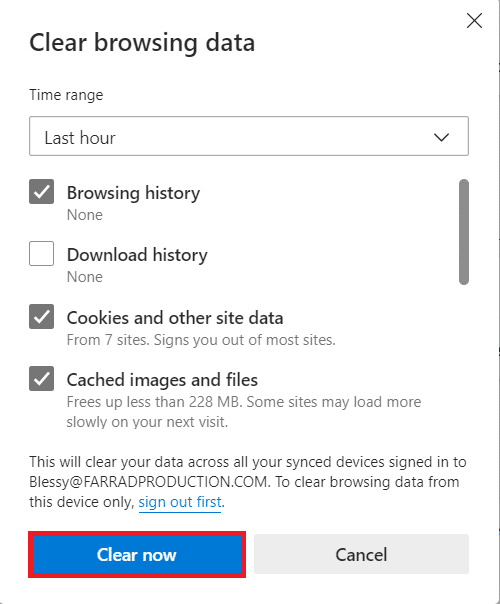
Finally, all your browsing data will be cleared now.
ยังอ่าน: How to Fix Firefox Not Loading Pages
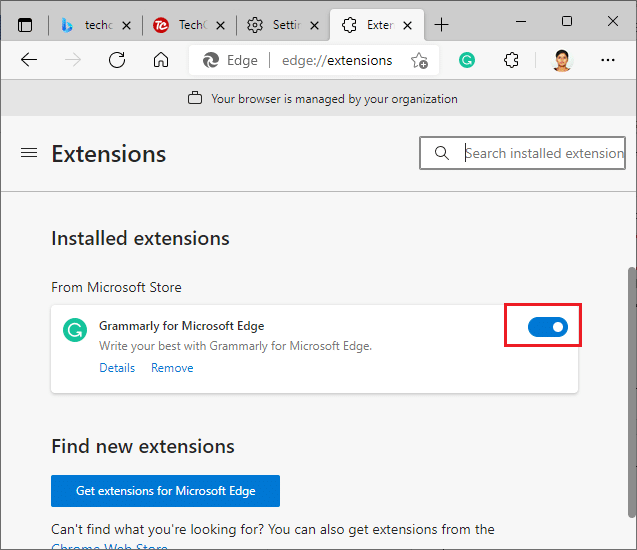
วิธีที่ 5: ปิดใช้งานส่วนขยาย (ถ้ามี)
If you have installed any third-party extensions in your browser, you may face a network change was detected Windows 10 error. You can try closing all the unnecessary tabs and restarting your system. If you have closed all the tabs and still face the issue, try to disable all the extensions.
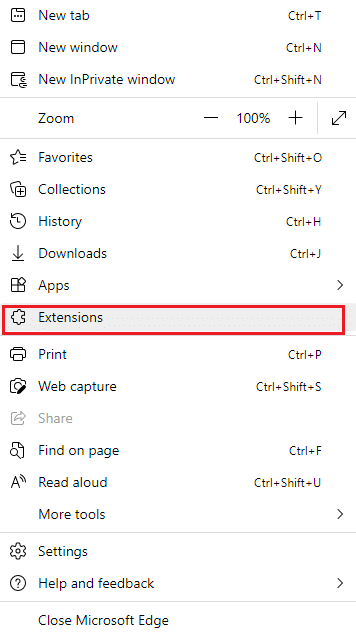
1 เปิด เบราเซอร์ Edge และคลิกที่ ไอคอนสามจุด ที่มุมขวาบน
![]()
2 ตอนนี้ให้คลิกที่ ส่วนขยาย ตามที่ไฮไลต์ด้านล่าง
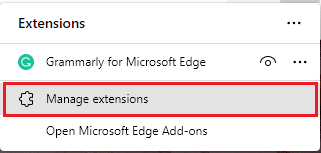
3. Now, all of your added extensions will pop up on the screen. Click on จัดการส่วนขยาย ตามที่ปรากฏ.
4. Now, toggle off the extension and check if you face the error again.
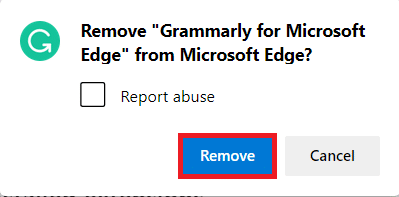
5. If you find the error does not pop up after removing any particular extension, then uninstall it completely from your browser. Then, select ลบรายการออกจากรถเข็น.
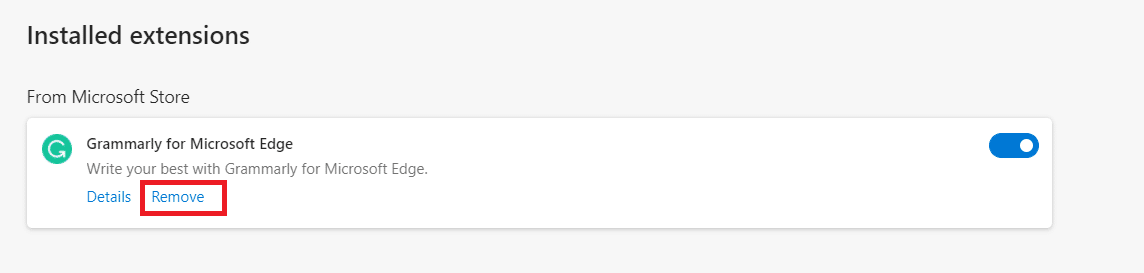
6. Now, confirm the prompt by clicking on ลบรายการออกจากรถเข็น ตามที่ปรากฏ.
หมายเหตุ If you face the again, hit F12 หรือกด . ค้างไว้ Ctrl + Shift + I keys together on your webpage. This will open เครื่องมือสำหรับนักพัฒนา on the right side. Now, reload the page.
Method 6: Update Microsoft Edge
Outdated browser is always a problem. Updates are released to fix the bugs and errors, and if you fail to update them, you may face several errors. Follow the below instructions to update the Microsoft Edge browser.
1. As you did earlier, launch the ขอบ เบราว์เซอร์และคลิกที่ ไอคอนสามจุด.
![]()
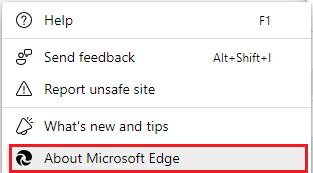
2. ตอนนี้คลิกที่ ความช่วยเหลือและข้อเสนอแนะ ตัวเลือกตามที่ไฮไลต์ไว้
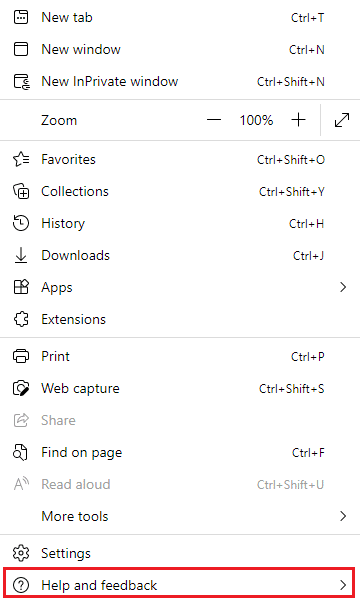
3. จากนั้นคลิกที่ เกี่ยวกับ Microsoft Edge ตามที่ปรากฏ.
หมายเหตุ คุณยังสามารถพิมพ์ edge: // settings / help เปิดตัว About Microsoft Edge page โดยตรง.
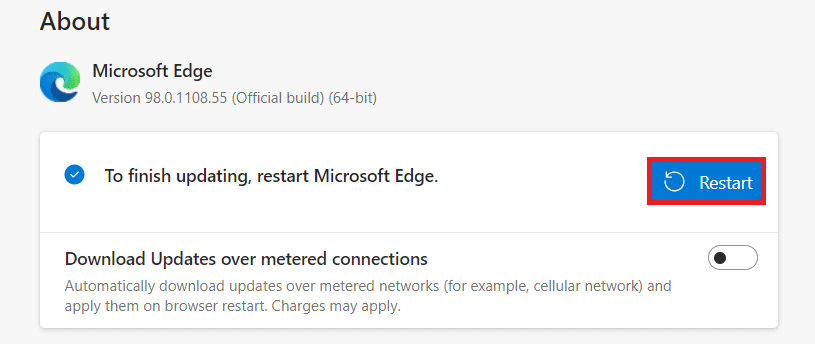
4A. If a new update is available, the browser will automatically update the browser to the latest version. Click เริ่มต้นใหม่ to update and restart the browser.
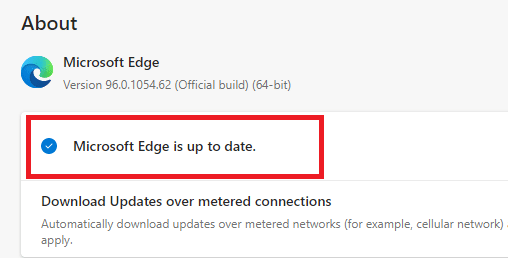
4B. If the browser is up-to-date, it will show that Microsoft Edge is up to date.
5. Finally, launch your webpage in the latest version of your browser and check if Microsoft Edge ERR NETWORK CHANGED Windows 10 issue recurs.
ยังอ่าน: Fix Google Chrome Not Updating
Method 7: Update or Reinstall Drivers
You cannot access your web pages properly if you have incompatible or outdated USB drivers on your PC. Follow the instructions to update your drivers and check if a network change was detected Windows 10 problem is resolved. If not, you can try reinstalling them.
Option I: Update Network Drivers
Installing the latest version of drivers helps your computer to fix the driver conflicts, thereby improving the stability of the PC. By following the below-mentioned steps, you can solve all network-related issues concerning ERR NETWORK CHANGED error.
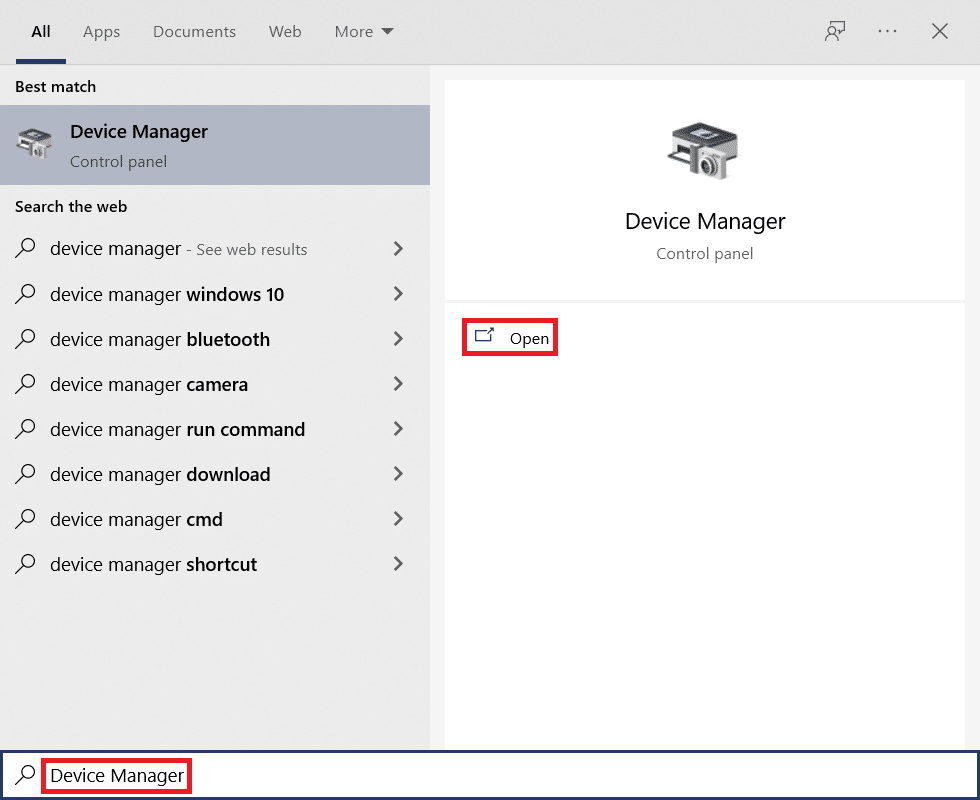
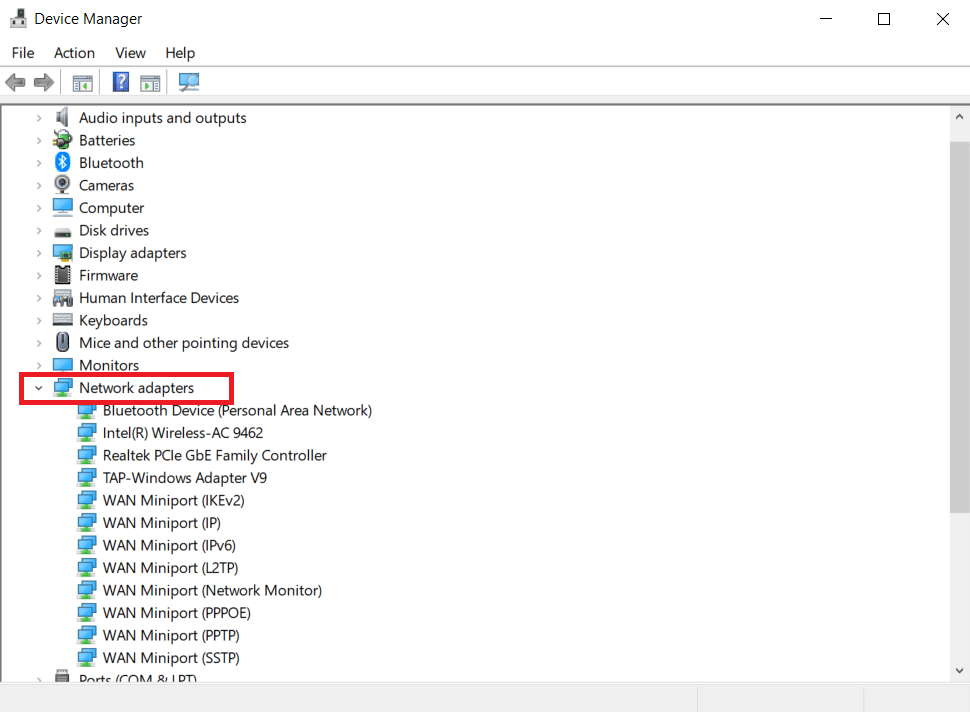
1. กดปุ่ม ปุ่ม windows และประเภท จัดการอุปกรณ์, คลิกที่ จุดเปิด.
2 คุณจะเห็น อะแดปเตอร์เครือข่าย on the main panel; double-click on it to expand it.
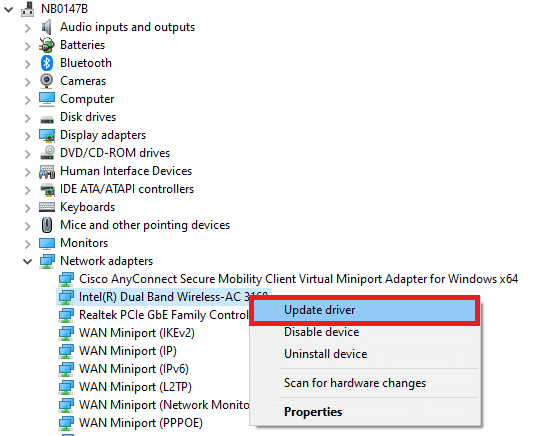
3. ตอนนี้ให้คลิกขวาที่ไฟล์ ไดรเวอร์เครือข่าย (เช่น Intel (R) Dual Band Wireless-AC 3168) และคลิก อัพเดตไดรเวอร์.
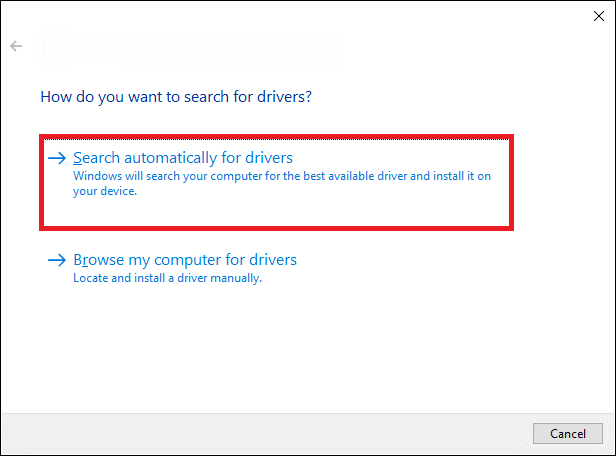
4 ตอนนี้ให้คลิกที่ ค้นหาไดรเวอร์โดยอัตโนมัติ options to locate and install a driver automatically.
5A. Now, the drivers will be updated to the latest version if they are not updated.
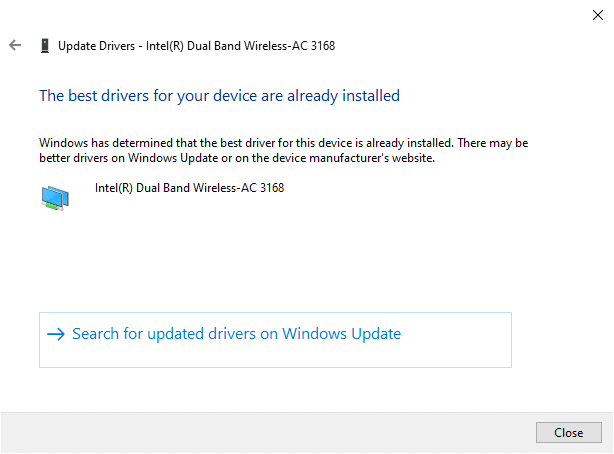
5B. If they are already in an updated stage, the screen displays the following message, ติดตั้งไดรเวอร์ที่ดีที่สุดสำหรับอุปกรณ์ของคุณแล้ว.
6 คลิกที่ ปิดหน้านี้ เพื่อออกจากหน้าต่าง
Option II: Reinstall Drivers
If you did not attain any fix to a network change was detected Windows 10 error by updating the drivers, then you can try reinstalling them as instructed below.
1 เปิดตัว จัดการอุปกรณ์ using the steps mentioned above.
2. ขยาย อะแดปเตอร์เครือข่าย โดยดับเบิลคลิกที่พวกมัน
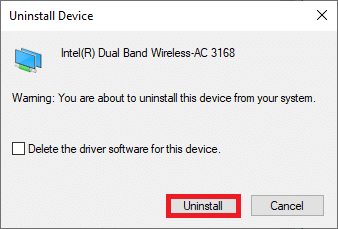
3. ตอนนี้ให้คลิกขวาที่ไฟล์ คนขับรถ และเลือก ถอนการติดตั้งอุปกรณ์.
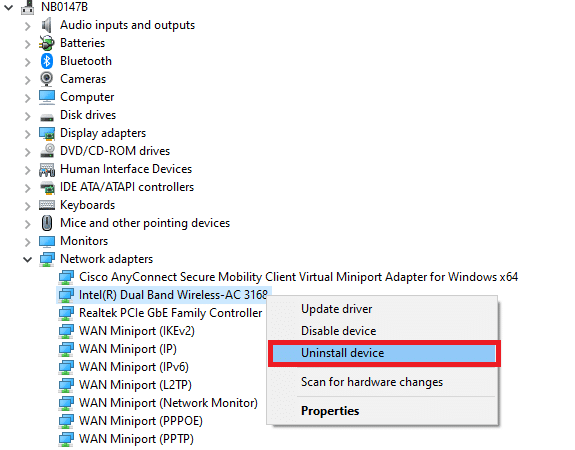
4. Now, a warning prompt will be displayed on the screen. Check the box ลบซอฟต์แวร์โปรแกรมควบคุมสำหรับอุปกรณ์นี้ and confirm the prompt by clicking ถอนการติดตั้ง.
5. Visit the manufacturer’s website (e.g. อินเทล) to download the driver manually.
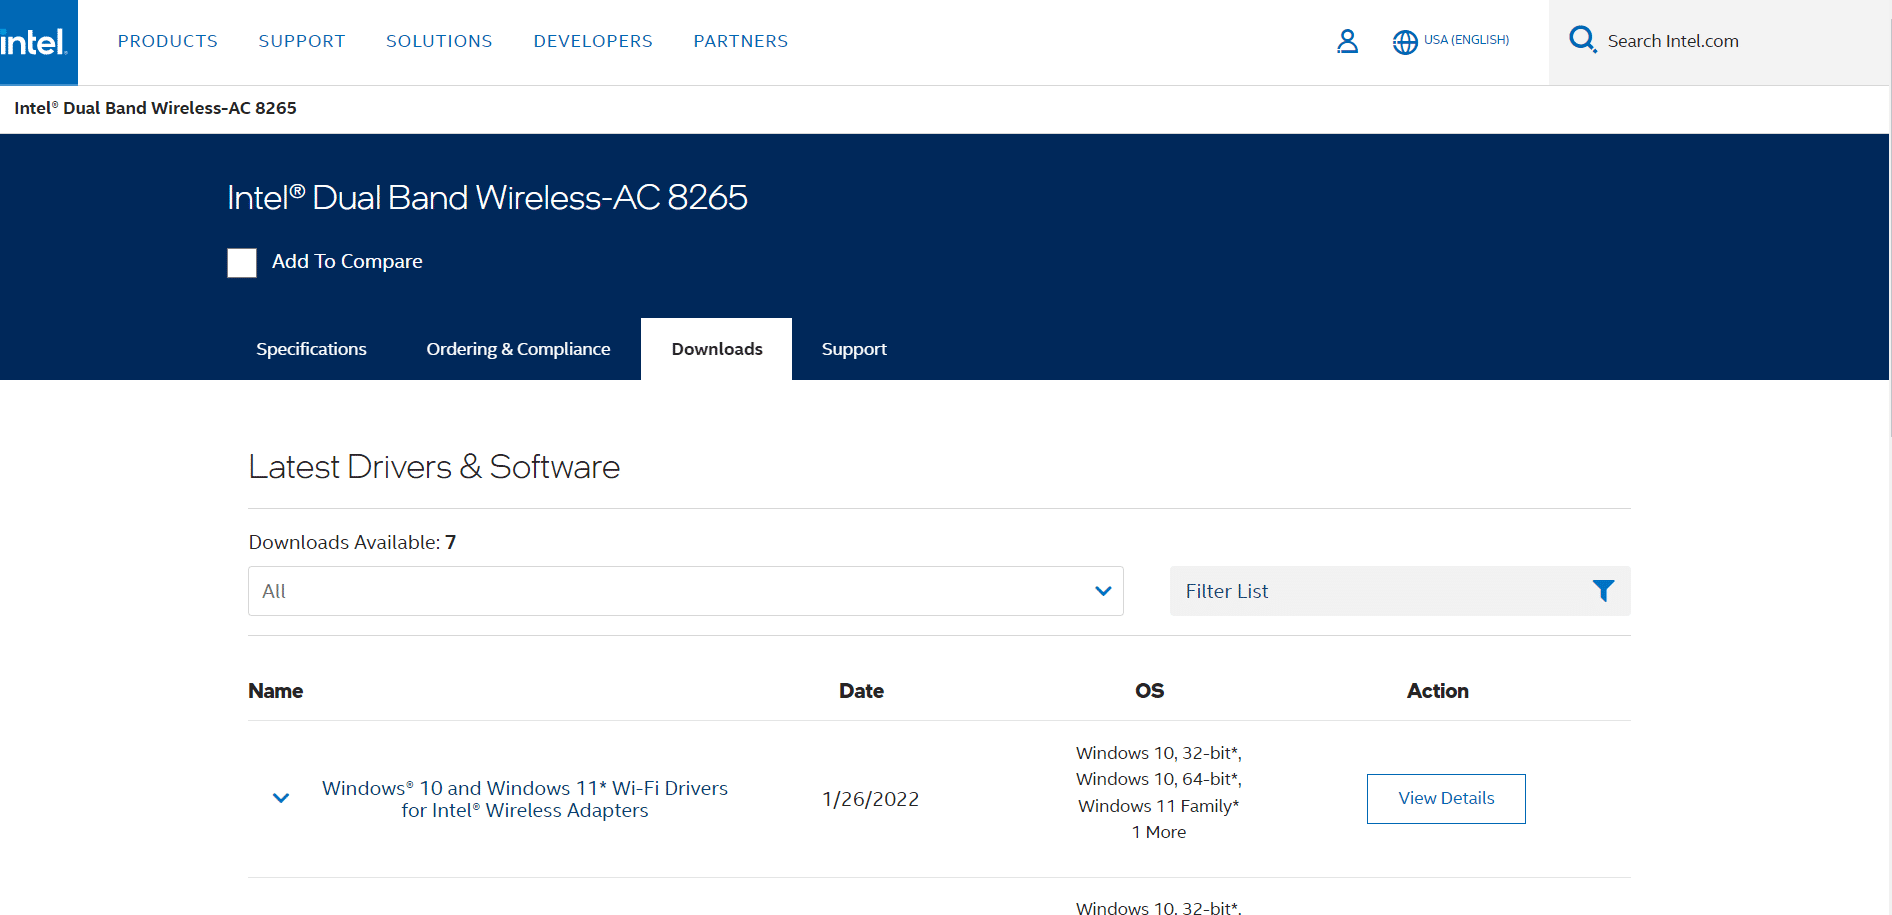
6. Once downloaded, double-click on the ไฟล์ที่ดาวน์โหลด และทำตามคำแนะนำที่ให้มาเพื่อติดตั้ง
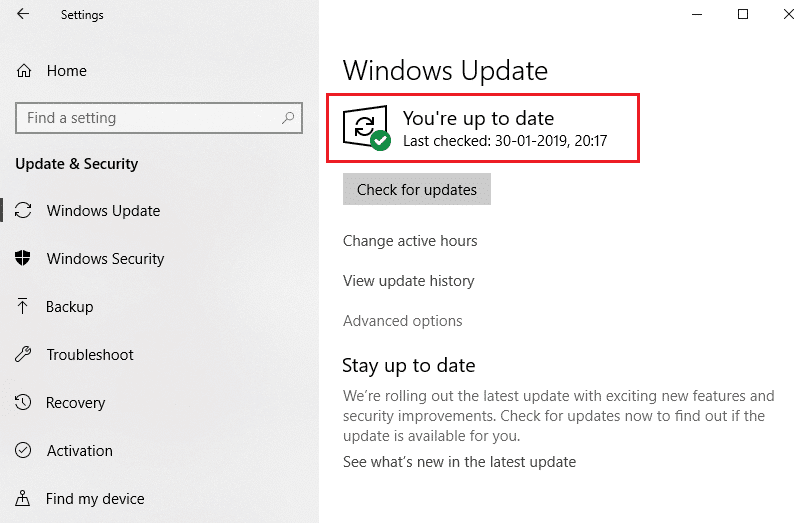
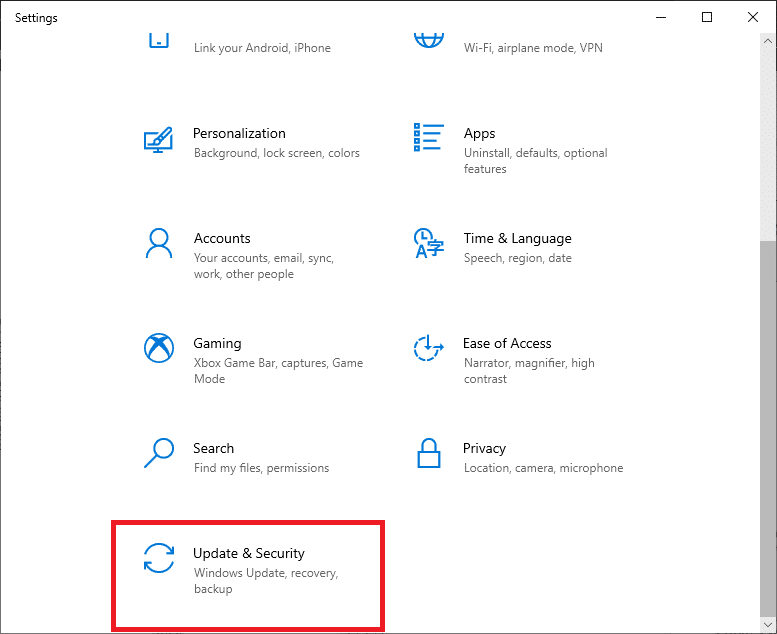
วิธีที่ 8: อัปเดต Windows
Regular updates are not only necessary for your browsers but also for your operating systems too. You can fix the bugs and update problems in your Windows 10 computer by updating it periodically. Follow the below-mentioned steps to update your Windows PC.
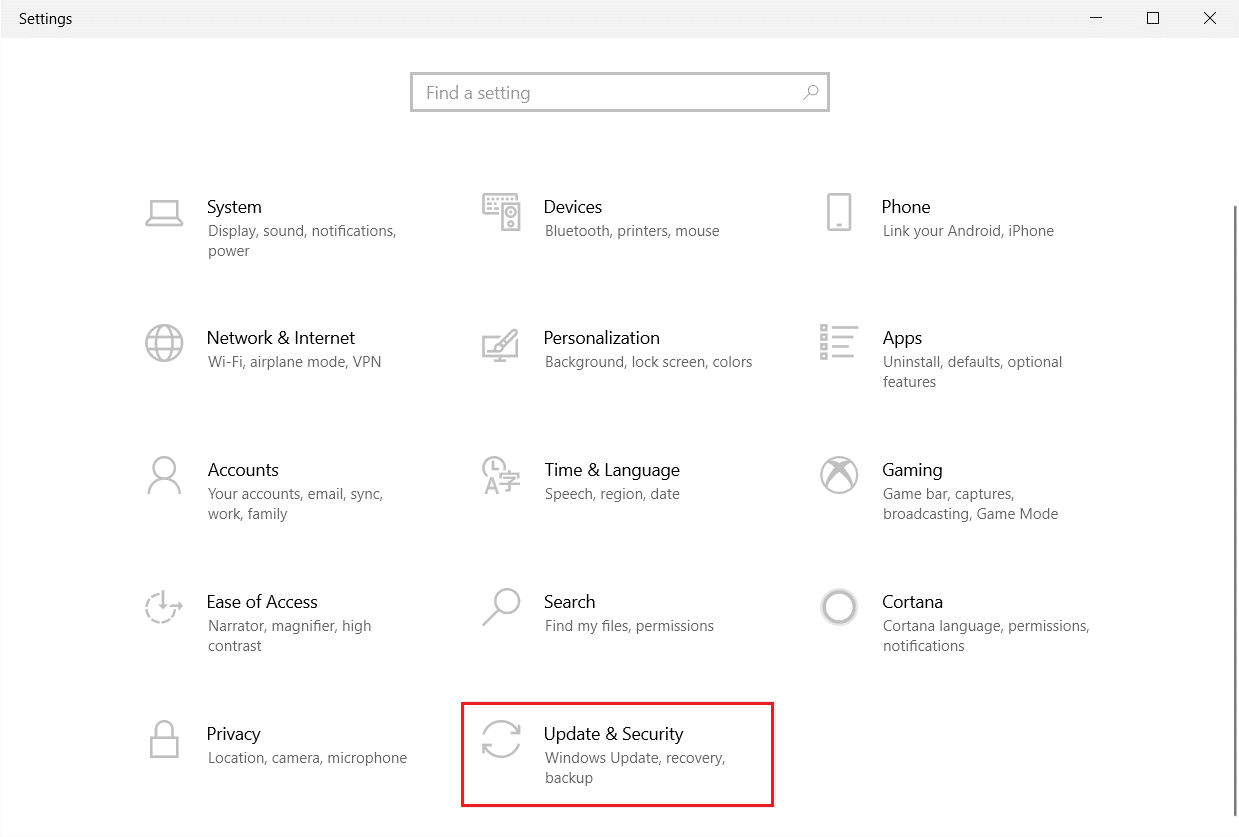
1 กด ปุ่ม Windows + I พร้อมกันเพื่อเปิดตัว การตั้งค่า.
ฮิต คลิกที่ อัปเดตและความปลอดภัย กระเบื้องตามที่แสดง
3 ใน windows Update คลิกที่ ตรวจหาการปรับปรุง ปุ่ม
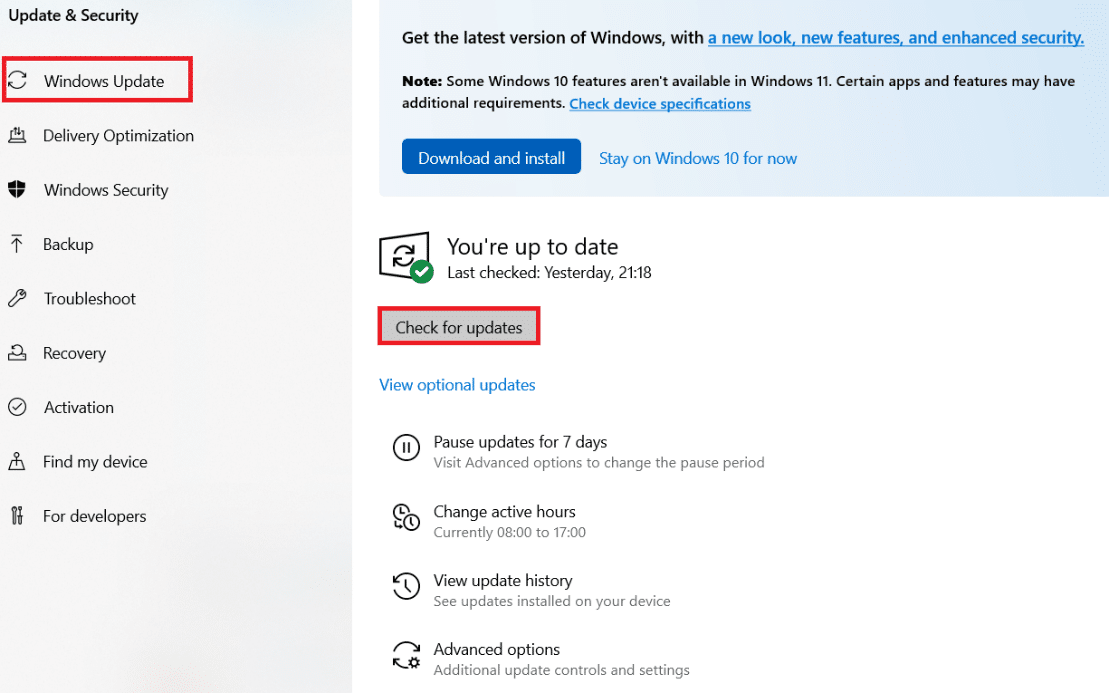
4เอ หากมีการอัพเดตใหม่ให้คลิก ติดตั้งเดี๋ยวนี้ and follow the on-screen instructions. Restart your PC when done.
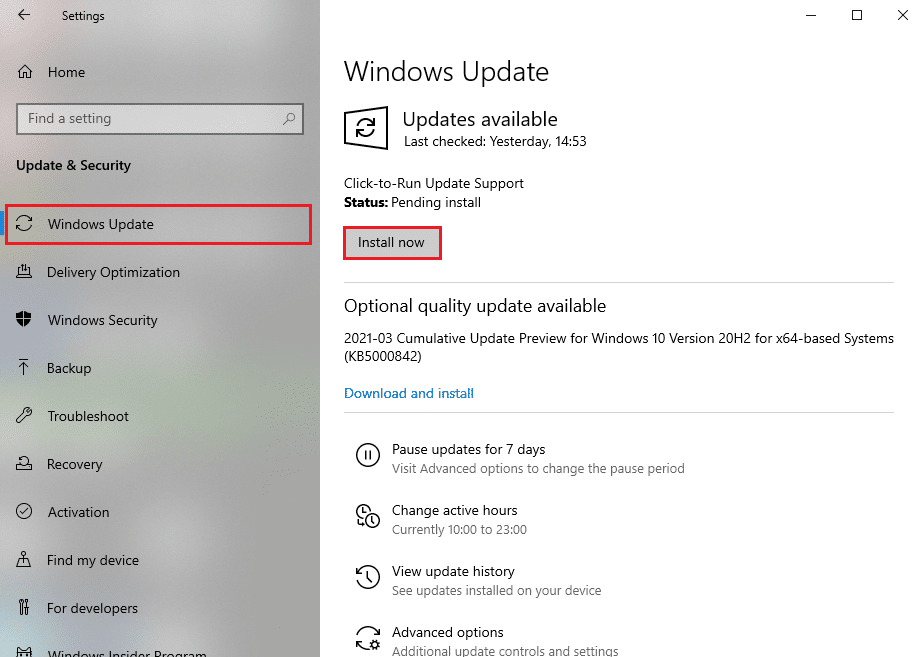
4B. Otherwise, it will show คุณทันสมัย message as shown.
ยังอ่าน: 14 Ways to Fix Chrome Profile Error
วิธีที่ 9: เรียกใช้การสแกนไวรัส
If you are getting your connection was interrupted a network change was detected an error, there may be some chances that your PC has a malware infection. Follow the below-mentioned steps to run a full system scan that offers incredible protection to fix all of your problems.
1. กดค้างไว้ ปุ่ม Windows + I ร่วมกันเปิด การตั้งค่า.
2. ที่นี่ คลิกที่ อัปเดตและความปลอดภัย, ตามที่ปรากฏ.
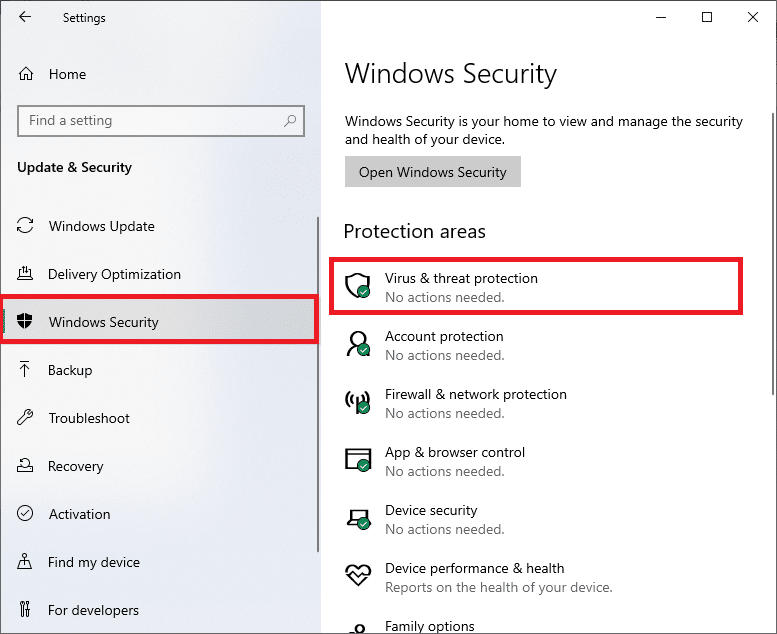
3 จากนั้นเลือก ความปลอดภัยของ windows ตัวเลือกในบานหน้าต่างด้านซ้าย
4. ถัดไป เลือก การป้องกันไวรัสและภัยคุกคาม ภายใต้ พื้นที่คุ้มครอง.
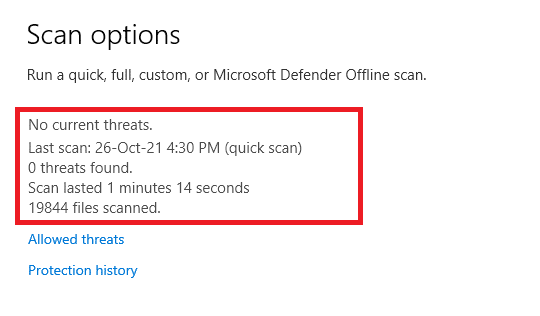
5 คลิกที่ สแกนตัวเลือก, ตามที่ปรากฏ.
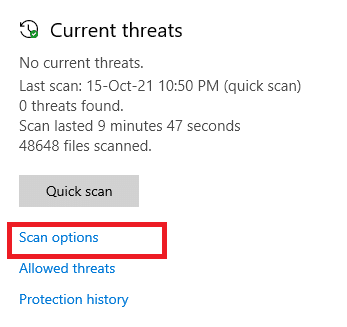
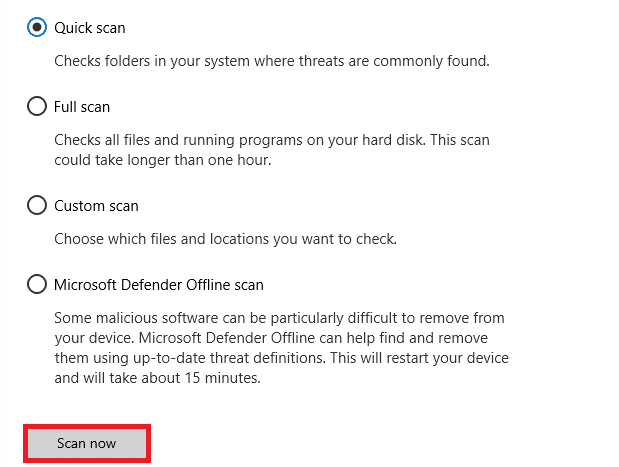
6. Choose a scan option as per your preference and click on ตรวจเดี๋ยวนี้.
7A. If there are threats, have a glance at all the threats listed in the window. Here, click on เริ่มการดำเนินการ ภายใต้ ภัยคุกคามในปัจจุบัน.
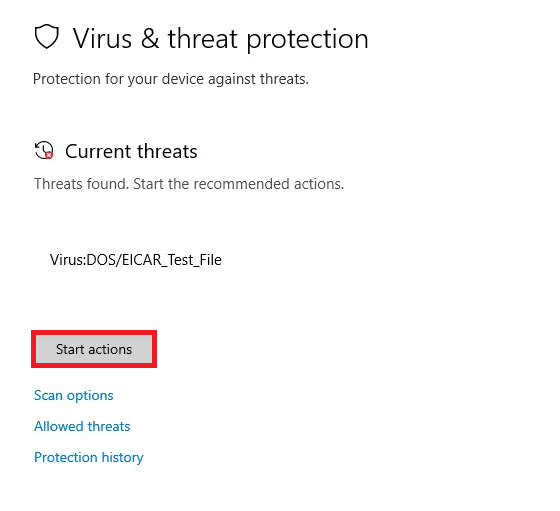
7B. If you do not have any threats in your system, the system will show the No actions needed alert as highlighted below.
Method 10: Whitelist URL or Disable Antivirus Temporarily
If you face this error in Edge even after your computer is malware-free and Windows is up to date, then there are some chances that the super-security suite might prevent you from accessing any content-specific URL. Here are some instructions to whitelist URLs in the antivirus program.
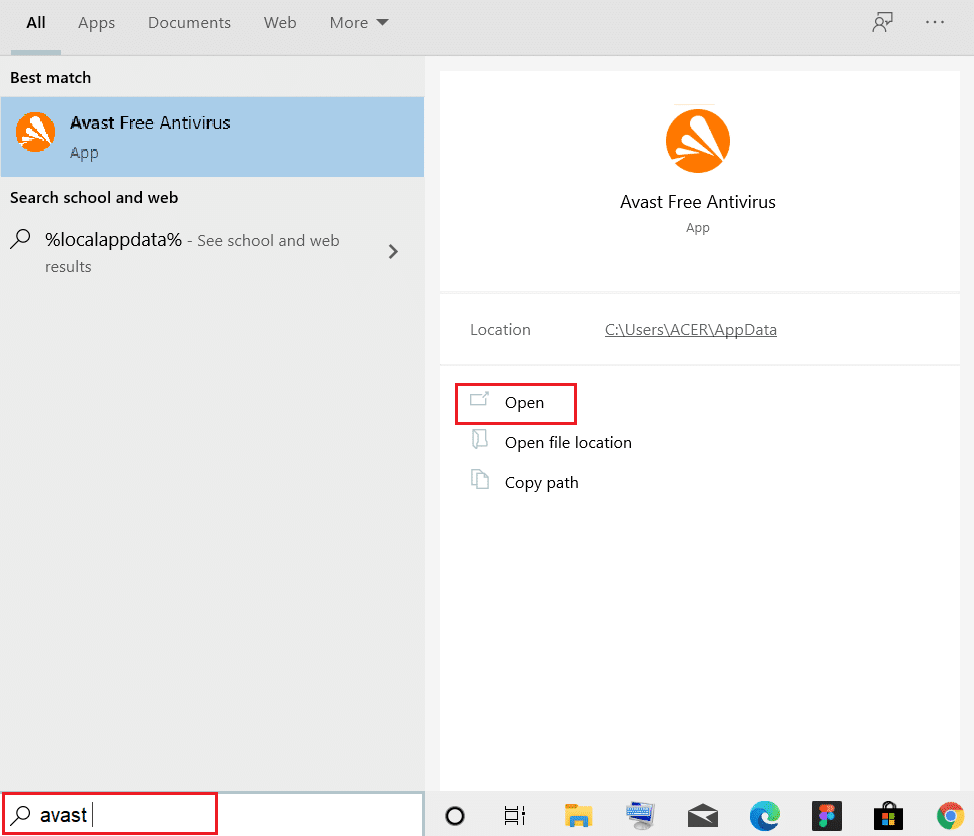
หมายเหตุ ที่นี่ Avast โปรแกรมป้องกันไวรัสฟรี is taken as an example. Do follow the steps according to your Antivirus program.
Option I: Whitelist the URL
If you do not want Avast to block any particular website, you can also whitelist the URL by following the below-mentioned steps and fix A network change was detected Windows 10 error.
1. Navigate to the search menu, type Avast และคลิกที่ จุดเปิด.
2. ตอนนี้คลิกที่ เมนู option at the top right corner, as shown below.

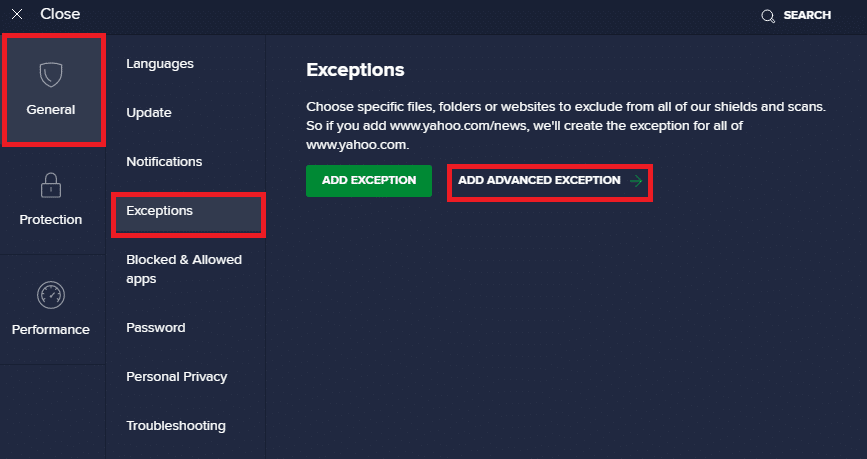
3 ตอนนี้ให้คลิกที่ การตั้งค่า จากรายการแบบหล่นลง

4 ใน แท็บทั่วไป เปลี่ยนเป็น ข้อยกเว้น และคลิกที่ เพิ่มข้อยกเว้นขั้นสูง ภายใต้ ข้อยกเว้น สนาม
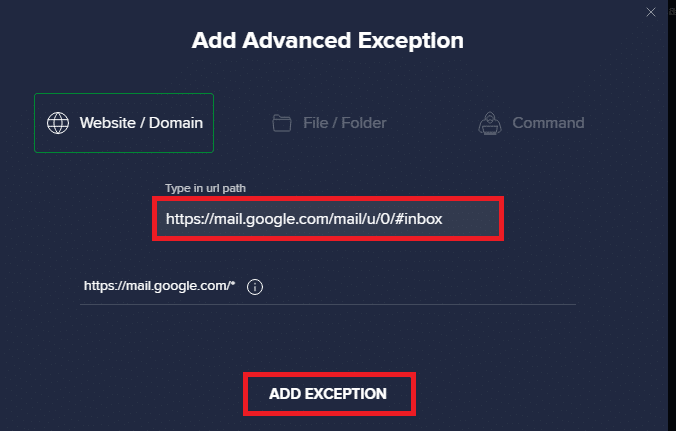
5 ตอนนี้ให้คลิกที่ Website/Domain ในหน้าต่างใหม่
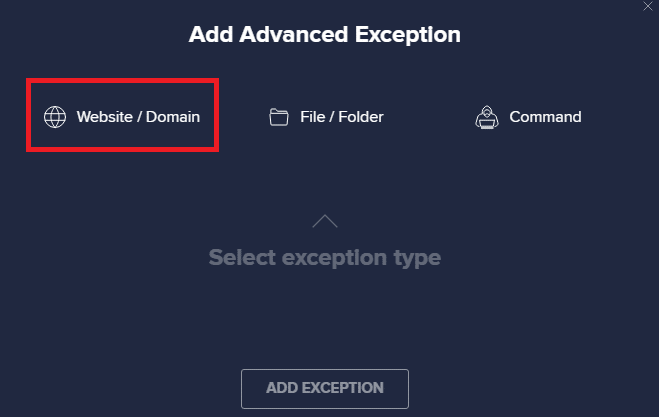
6. Now, paste the URL in the พิมพ์ URL เส้นทาง. จากนั้นคลิกที่ เพิ่มข้อยกเว้น ตัวเลือก
หมายเหตุ If you want to remove the URL from the Avast whitelist, hover over your URL in the main Settings window and click on the Trash icon as depicted below.
![]()
Option II: Disable Antivirus Temporarily
If you did not fix it by adding an exception to the URL in your antivirus program, you could disable them by implementing the steps as instructed below.
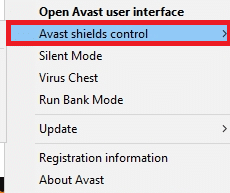
1 ไปที่ ไอคอนแอนตี้ไวรัส in the Taskbar and คลิกขวาที่ เกี่ยวกับมัน
![]()
2. ตอนนี้ เลือก การควบคุม Avast shields ตัวเลือก
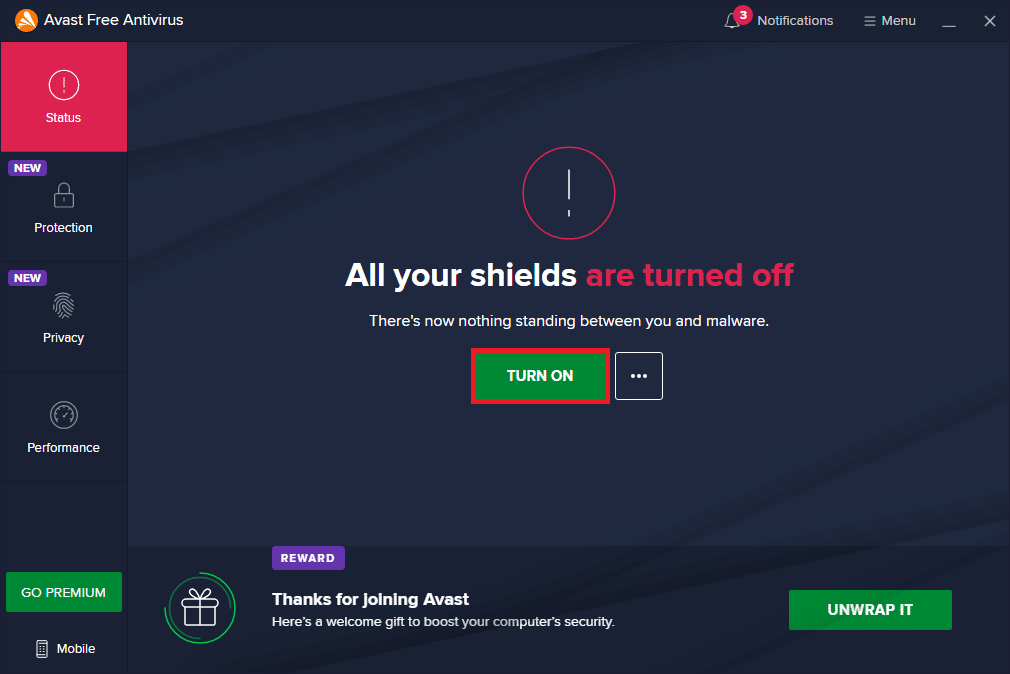
3. Choose the option according to your convenience and confirm the prompt displayed on the screen.
- Disable for 10 minutes
- Disable for 1 hour
- Disable until computer is restarted
- Disable permanently

หมายเหตุ Now, go back to the main window. Here, you have turned off all shields from Avast. To activate the settings, click on เปิด.
ยังอ่าน: แก้ไขปัญหาการดาวน์โหลดการบล็อก Chrome
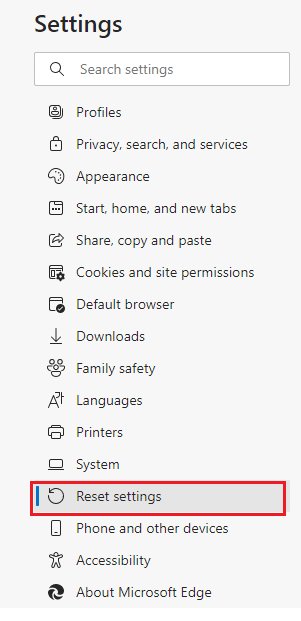
วิธีที่ 11: รีเซ็ตการตั้งค่าเบราว์เซอร์
If you are not satisfied with the above fixes, then try resetting your browser to its default settings. First, follow the below-mentioned steps to reset Microsoft Edge, then check if a network change was detected Windows 10 problem is resolved.
1 เปิด เบราเซอร์ Edge และไปที่ การตั้งค่า.
2. Now, in the left pane, click on คืนค่าการตั้งค่า ตามที่ปรากฏ.
หมายเหตุ คุณยังสามารถพิมพ์ ขอบ: // การตั้งค่า / รีเซ็ต เพื่อเริ่มต้น Reset Edge page โดยตรง.
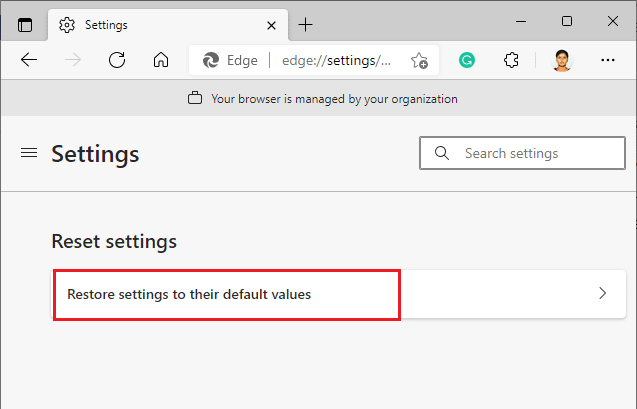
3 ตอนนี้ให้คลิกที่ คืนค่าการตั้งค่าเป็นค่าเริ่มต้น ตัวเลือกตามที่แสดง
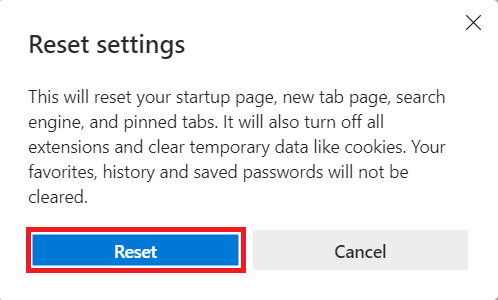
4. Now, confirm the prompt by clicking on รีเซ็ต ตามที่ปรากฏ.
ยังอ่าน: วิธีเปิดใช้งาน DNS ผ่าน HTTPS ใน Chrome
Method 12: Repair Microsoft Edge
If none of those mentioned above methods has helped you fix a network change was detected Windows 10 error, try repairing Microsoft Edge. Doing this will fix all the relevant issues with the search engine, updates, or other related problems triggering this ERR NETWORK CHANGED Windows 10 error.
หมายเหตุ Close Microsoft Edge browser if it is opened.
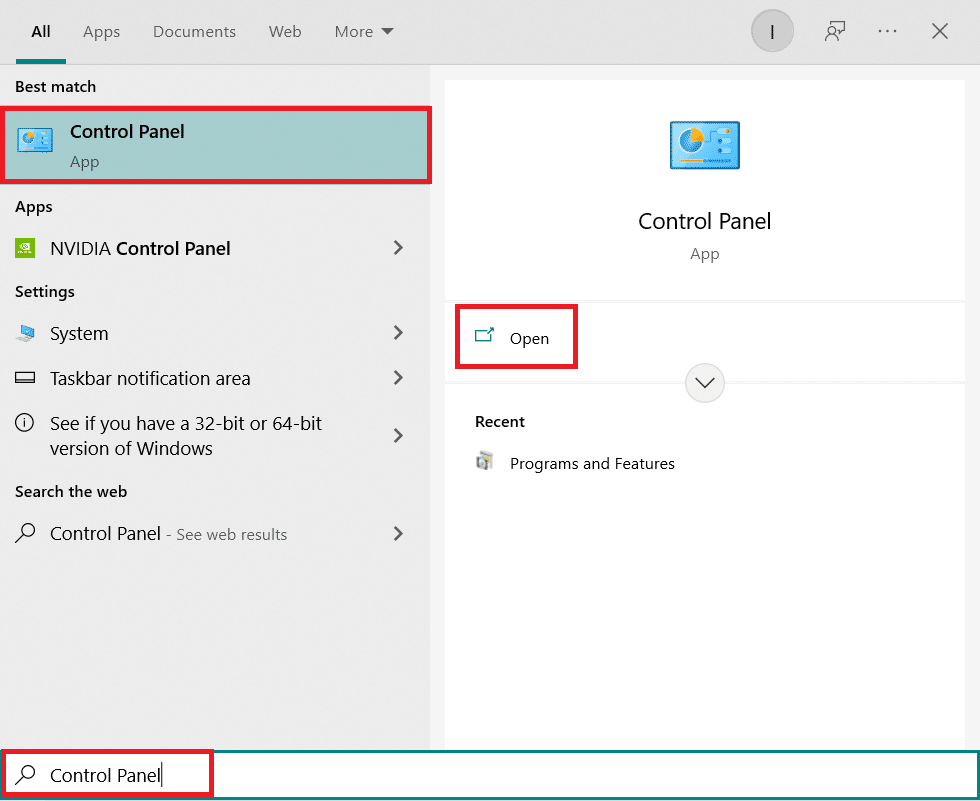
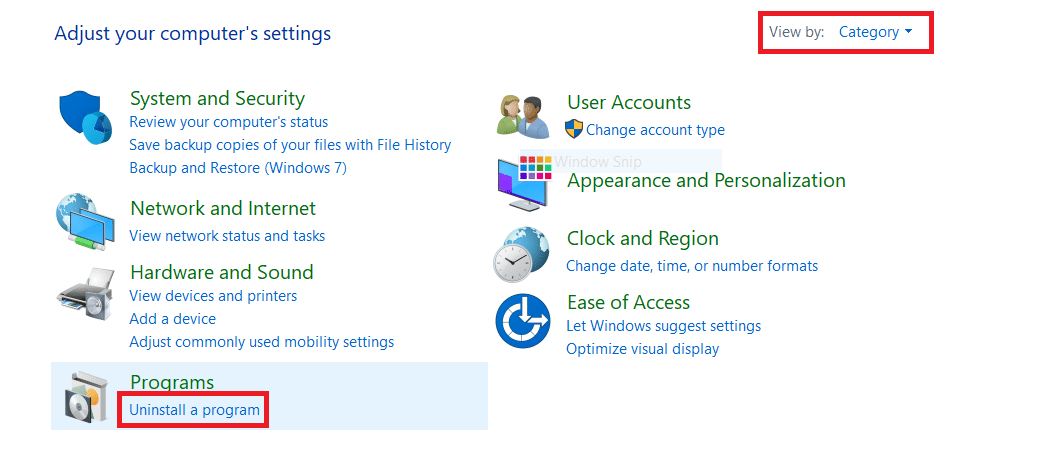
1 กด Windows สำคัญพิมพ์ แผงควบคุม และคลิกที่ จุดเปิด.
2 ตั้งค่า ดูตาม as หมวดหมู่ และคลิก ถอนการติดตั้งโปรแกรม.
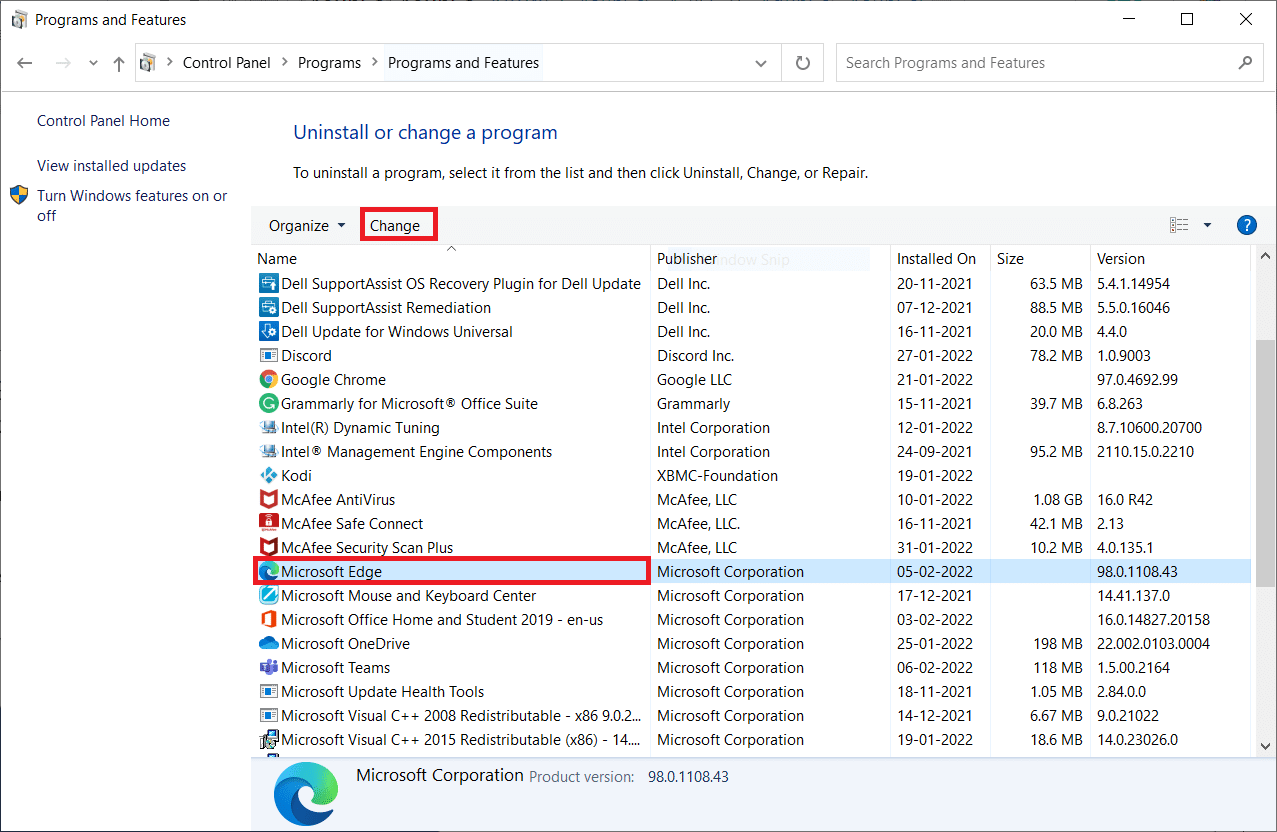
3. Search and click on Microsoft Edge และเลือก เปลี่ยนแปลง option as depicted in the below picture.
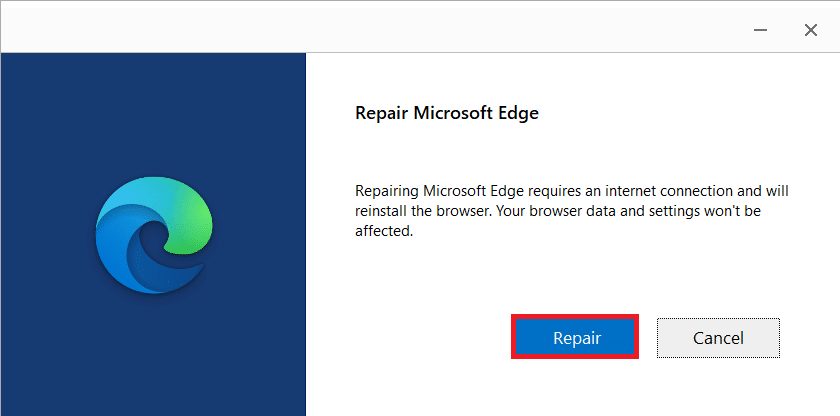
4 คลิก ใช่ ในข้อความแจ้ง
5. Now, confirm the prompt by clicking on ซ่อมแซม.
6. เริ่มต้นใหม่ the computer once you complete all the steps mentioned above.
7. Now, the new version of Microsoft Edge will be installed on your PC. Launch a site and check if Your connection was interrupted error is fixed now.
ยังอ่าน: Fix Microsoft Edge Not Working in Windows 10
วิธีที่ 13: ดำเนินการคลีนบูต
If all of these methods fail to give you a fix to a network change was detected Windows 10 error, then you can try resetting your PC or restoring it to the previous version. This helps you resolve any software incompatibility issues, thereby fixing your connection was interrupted a network change was detected an error in the Edge browser. Here are a few steps to clean boot your Windows 10 PC to fix Microsoft Edge ERR NETWORK CHANGED Windows 10 issue.
หมายเหตุ Make sure you log in as an administrator to clean boot your PC.
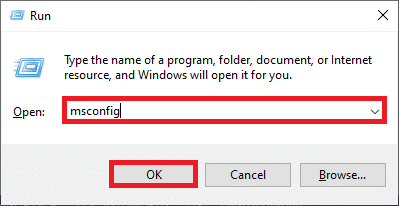
1. เพื่อเปิดตัว เรียกใช้กล่องโต้ตอบ, กด ปุ่ม Windows + R ร่วมกัน
2 ประเภท msconfig และคลิกที่ OK button to open System Configuration.
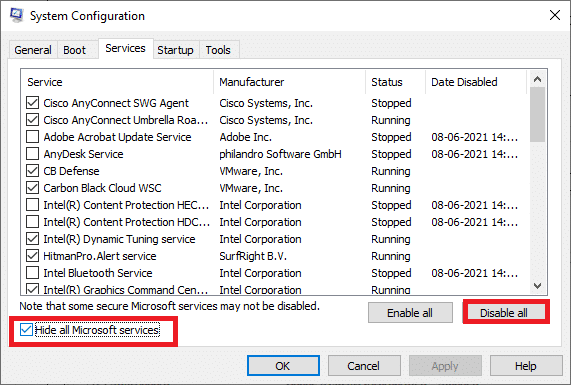
3. ตอนนี้เปลี่ยนเป็น บริการ แท็บในนั้น การกำหนดค่าระบบ หน้าต่าง
4. ทำเครื่องหมายที่ช่องถัดจาก ซ่อนบริการทั้งหมดไมโครซอฟท์และคลิกที่ ปิดการใช้งานทั้งหมด button as shown highlighted.
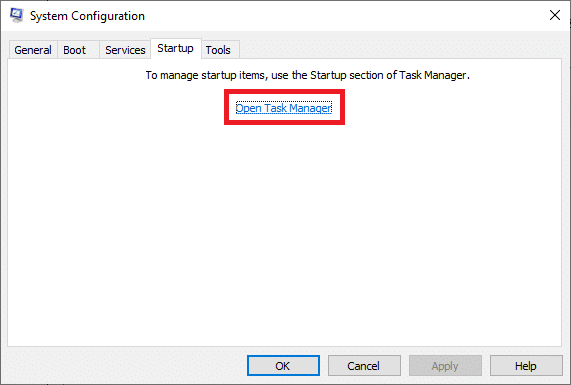
5. ตอนนี้เปลี่ยนเป็น แท็บเริ่มต้น and click the link to เปิดตัวจัดการงาน ตามที่แสดงด้านล่าง
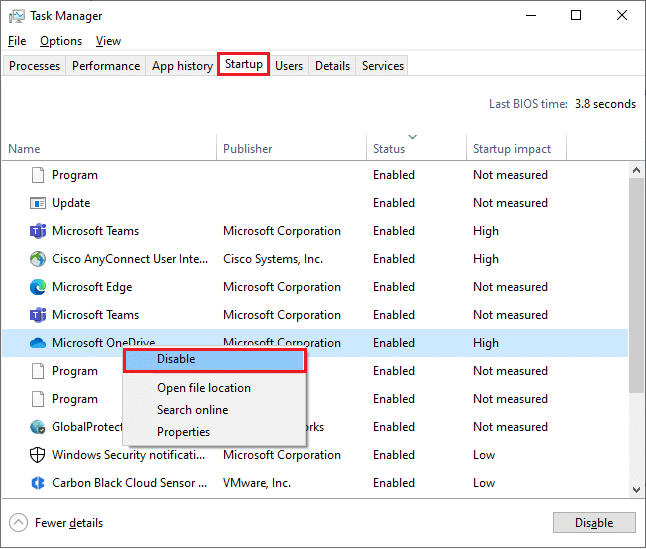
6. Next, right-click on the startup tasks which are not required and click on ปิดการใช้งาน ตัวเลือกตามที่แสดง
7 ปิด ที่ Task Manager และ การกำหนดค่าระบบ หน้าต่าง
8. สุดท้าย รีสตาร์ทเครื่องคอมพิวเตอร์ของคุณ.
ที่แนะนำ:
เราหวังว่าคู่มือนี้จะเป็นประโยชน์และคุณสามารถแก้ไขได้ ERR NETWORK CHANGED error in your device. Let us know which method worked for you the best. Also, if you have any queries or suggestions regarding this article, then feel free to drop them in the comments section.

