Fix The Service Couldn’t Be Started Windows Defender Error 0x80070422: Windows Defender is a malware protection software which is inbuilt into Windows 10. Now it is used widely by Windows users because it’s reliable, but in some cases, users also installed 3rd party Antivirus software such as Norton, Quick Heal etc which is not recommend because they corrupt the files of Windows Defender. Once you completely uninstall 3rd party antivirus you won’t be able to use Windows Defender properly because files required by it have already been corrupted and can no longer be used.
“The service couldn’t be started.
The service cannot be started, either because it is disabled or because it has no enabled devices associated with it.”
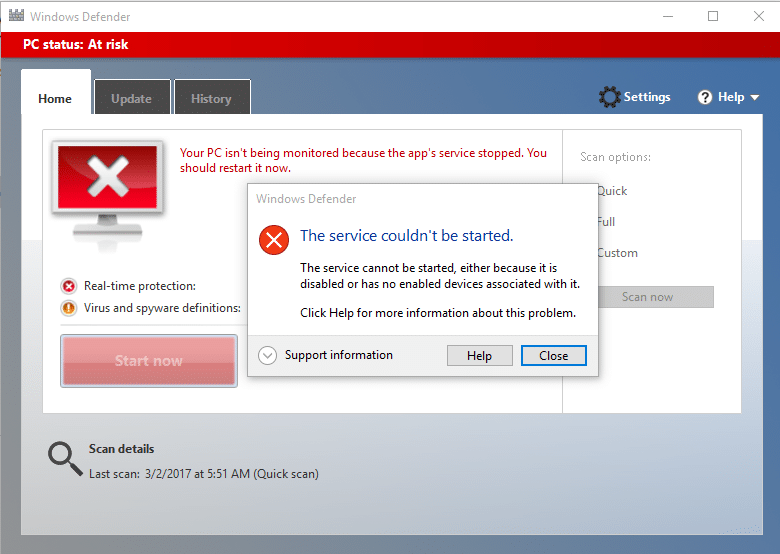
Windows Defender is turned off when you use a 3rd party Antivirus and once you uninstall the Antivirus software you won’t be able to turn ON Windows Defender. If you try to enable Windows Defender you will face the error “The Service Couldn’t Be Started” with error code 0x80070422. So without wasting any time let’s see how to actually Fix The Service Couldn’t Be Started Windows Defender Error 0x80070422 with the help of below-listed troubleshooting guide.
Fix The Service Couldn’t Be Started Windows Defender Error 0x80070422
ตรวจสอบให้แน่ใจว่าได้สร้างจุดคืนค่าในกรณีที่มีสิ่งผิดปกติเกิดขึ้น
วิธีที่ 1: เรียกใช้ SFC และ CHKDSK
1.กด Windows Key + X จากนั้นคลิกที่ Command Prompt (Admin)

2. พิมพ์คำสั่งต่อไปนี้ใน cmd แล้วกด Enter:
Sfc /scannow sfc /scannow /offbootdir=c: /offwindir=c:windows (หากด้านบนล้มเหลว ให้ลองใช้วิธีนี้)

3. รอให้กระบวนการข้างต้นเสร็จสิ้นและเมื่อเสร็จแล้วให้รีสตาร์ทพีซีของคุณ
4.ถัดไป ให้รัน CHKDSK จากที่นี่ แก้ไขข้อผิดพลาดของระบบไฟล์ด้วย Check Disk Utility (CHKDSK)
5.ปล่อยให้กระบวนการข้างต้นเสร็จสมบูรณ์และรีบูตเครื่องพีซีของคุณอีกครั้งเพื่อบันทึกการเปลี่ยนแปลง
Method 2: Temporarily Disable 3rd party Antivirus
1.คลิกขวาที่ ไอคอนโปรแกรมป้องกันไวรัส จากถาดระบบแล้วเลือก ปิดการใช้งาน

2.จากนั้น เลือกกรอบเวลาที่ต้องการ โปรแกรมป้องกันไวรัสจะยังคงปิดใช้งานอยู่

หมายเหตุ: เลือกระยะเวลาที่น้อยที่สุดที่เป็นไปได้ เช่น 15 นาที หรือ 30 นาที
3.Once done, again try to run Windows Defender and check if the error resolves or not.
4.กด Windows Key + X จากนั้นเลือก แผงควบคุม

5.ถัดไป คลิกที่ ระบบและความปลอดภัย.
6.จากนั้นคลิกที่ ไฟร์วอลล์หน้าต่าง.

7. จากบานหน้าต่างด้านซ้ายให้คลิกที่ เปิดหรือปิดไฟร์วอลล์ Windows

8.เลือกปิดไฟร์วอลล์ Windows แล้วรีสตาร์ทพีซีของคุณ Again try to open Windows Defender and see if you’re able to Fix The Service Couldn’t Be Started Windows Defender Error 0x80070422.
หากวิธีการข้างต้นไม่ได้ผล โปรดทำตามขั้นตอนเดียวกันนี้เพื่อเปิดไฟร์วอลล์อีกครั้ง
วิธีที่ 3: ตรวจสอบให้แน่ใจว่า Windows เป็นเวอร์ชันล่าสุด
1.กด Windows Key + I จากนั้นเลือก อัปเดตและความปลอดภัย

2.ถัดไป คลิกอีกครั้ง ตรวจหาการปรับปรุง และตรวจสอบให้แน่ใจว่าได้ติดตั้งการอัปเดตที่ค้างอยู่

3. หลังจากติดตั้งการอัปเดตแล้ว ให้รีบูทพีซีของคุณและดูว่าคุณสามารถทำได้หรือไม่ Fix The Service Couldn’t Be Started Windows Defender Error 0x80070422.
Method 4: Make sure Windows Defender service is set to Automatic
หมายเหตุ หากบริการ Windows Defender กลายเป็นสีเทาในตัวจัดการบริการ ติดตามโพสต์นี้.
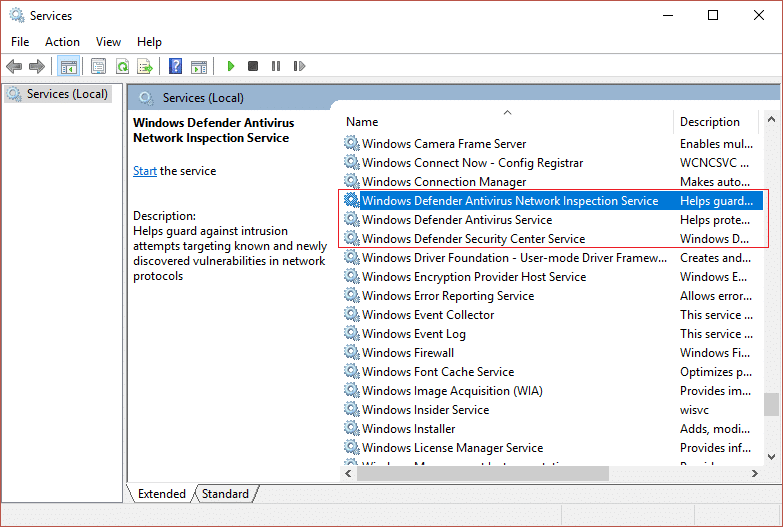
1.กดแป้น Windows + R แล้วพิมพ์ services.msc และกด Enter

2. ค้นหาบริการต่อไปนี้ในหน้าต่างบริการ:
บริการตรวจสอบเครือข่ายของ Windows Defender Antivirus
บริการ Windows Defender Antivirus
บริการศูนย์การรักษาความปลอดภัยของ Windows Defender
3. ดับเบิลคลิกที่แต่ละอันและตรวจสอบให้แน่ใจว่าได้ตั้งค่าประเภทการเริ่มต้นไว้แล้ว อัตโนมัติ และคลิกเริ่มหากบริการยังไม่ได้ทำงานอยู่
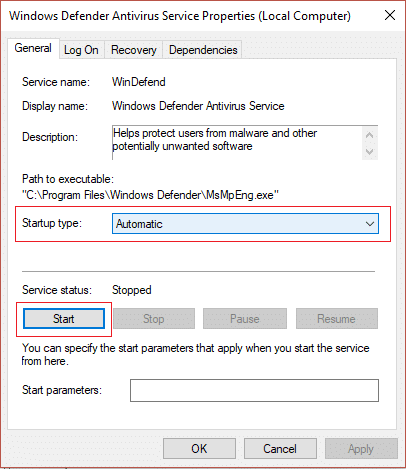
4.คลิก Apply ตามด้วย OK
5.รีบูตเครื่องพีซีของคุณเพื่อบันทึกการเปลี่ยนแปลงและดูว่าคุณสามารถ Fix The Service Couldn’t Be Started Windows Defender Error 0x80070422.
Method 5: Enable Windows Defender through Registry Editor
1.กดแป้น Windows + R แล้วพิมพ์ regedit และกด Enter

2. ไปที่คีย์รีจิสทรีต่อไปนี้:
HKEY_LOCAL_MACHINESYSTEMCurrentControlSetServicesWinDefend
3.ตอนนี้ให้คลิกขวาที่ WinDefend และเลือก สิทธิ์
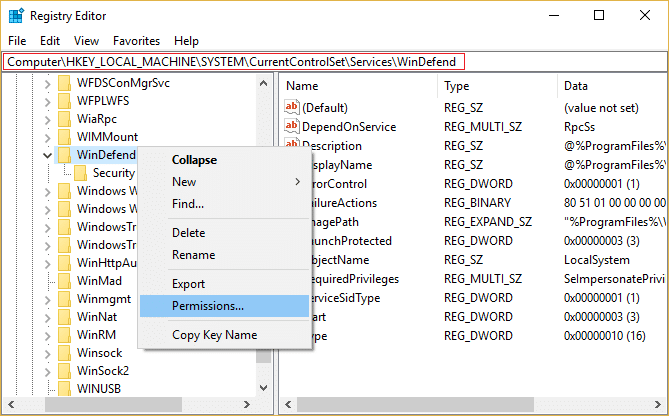
4.Follow this guide in order to take full control or ownership of the above registry key.
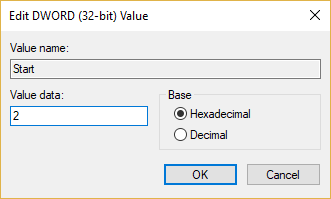
5.After that make sure you have selected WinDefend then in the right window double-click on Start DWORD.
6.Change the value to 2 in the value data field and click OK.
7.Close Registry Editor and reboot your PC.
8.Again try to enable Windows Defender and this time it should work.
วิธีที่ 6: เรียกใช้ CCleaner และ Malwarebytes
1.ดาวน์โหลดและติดตั้ง CCleaner & Malwarebytes
2.เรียกใช้ Malwarebytes และปล่อยให้มันสแกนระบบของคุณเพื่อหาไฟล์ที่เป็นอันตราย
3.หากพบมัลแวร์ มันจะลบออกโดยอัตโนมัติ
4.ตอนนี้วิ่ง CCleaner และในส่วน "ตัวทำความสะอาด" ใต้แท็บ Windows เราขอแนะนำให้ตรวจสอบตัวเลือกต่อไปนี้เพื่อทำความสะอาด:

5.เมื่อคุณได้ตรวจสอบจุดที่ถูกต้องแล้ว เพียงคลิก เรียกใช้โปรแกรมทำความสะอาด และปล่อยให้ CCleaner ดำเนินการต่อไป
6.หากต้องการทำความสะอาดระบบของคุณเพิ่มเติม ให้เลือกแท็บ Registry และตรวจสอบให้แน่ใจว่าได้ตรวจสอบสิ่งต่อไปนี้แล้ว:

7.เลือก Scan for Issue และอนุญาตให้ CCleaner สแกน จากนั้นคลิก แก้ไขปัญหาที่เลือก.
8.เมื่อ CCleaner ถาม “คุณต้องการเปลี่ยนแปลงการสำรองข้อมูลรีจิสทรีหรือไม่?” เลือกใช่
9.เมื่อการสำรองข้อมูลของคุณเสร็จสิ้น ให้เลือก แก้ไขปัญหาที่เลือกทั้งหมด
10.รีสตาร์ทพีซีของคุณเพื่อบันทึกการเปลี่ยนแปลงและดูว่าคุณสามารถทำได้หรือไม่ Fix The Service Couldn’t Be Started Windows Defender Error 0x80070422.
Method 7: Refresh or Reset your PC
1.Press Windows Key + I to open Settings then select อัปเดตและความปลอดภัย
2.From left-hand menu select การฟื้นตัว และคลิกที่ "สมัครที่นี่” under Reset this PC.

3.เลือกตัวเลือกเพื่อ เก็บไฟล์ของฉัน.

4.Follow the instructions on the screen to complete the process.
5.This will take some time and your computer will restart.
วิธีที่ 8: ซ่อมแซมติดตั้ง Windows 10
This method is the last resort because if nothing works out then this method will surely repair all problems with your PC. Repair Install just using an in-place upgrade to repair issues with the system without deleting user data present on the system. So follow this article to see How to Repair Install Windows 10 Easily.
แนะนำสำหรับคุณ:
เพียงเท่านี้คุณก็ประสบความสำเร็จแล้ว Fix The Service Couldn’t Be Started Windows Defender Error 0x80070422 หากคุณยังคงมีคำถามเกี่ยวกับคู่มือนี้ อย่าลังเลที่จะถามพวกเขาในส่วนความคิดเห็น

